


This guide shows how to integrate your Quickchat AI Agent with WhatsApp. The process is divided into 2 simple steps:
- Step 0 - Prerequisites
- Step 1 - Connect WhatsApp
If you have problems with integration or need help, go to Troubleshooting & FAQs section or contact us.
Watch the Video
Step 0 - Prerequisites
A. Business Phone Number
Decide which phone number you’ll use for WhatsApp. You can read more in WhatsApp documentation or follow the FAQs below:
Which number can be used in WhatsApp Cloud API?
- You need to use a dedicated business phone number that can receive SMS or voice calls for verification.
- The number must be valid, owned by you, and have a country and area code.
Can I use a number that is already used in WhatsApp Messenger?
- No. You can continue using this number for calls and texts, but not in WhatsApp Messenger.
- If the number is already used in WhatsApp Messenger, delete it first. Don’t forget to back up your WhatsApp chat history.
- Banned numbers must be unbanned before registering.
Can I use a number that is already used by WhatsApp Business App?
- Yes. If your number is currently used in the WhatsApp Business App, you may be able to onboard it to the Cloud API without deleting the app account. Read more about Coexistence onboarding in Meta documentation.
Can I use a new phone number?
- Yes, if you prefer not to use your current number, get a new number (physical SIM or virtual number). You can buy a virtual phone number from services such as Hushed.
B. Business Information
Have these details ready (you’ll enter them during the Meta integration flow):
- Business name
- Business website
- Business category
- Business description
Even if some fields seem optional, fill them accurately. Missing or inaccurate info can delay approval or cause account restrictions.
Step 1 - Connect WhatsApp
Since our latest update, connecting takes a single click. There is no separate second step anymore: Meta’s own Embedded Signup wizard walks you through creating a new WhatsApp Business Account and number, or picking one you already have, and Quickchat AI finishes the rest.
Open the Quickchat AI App → External Apps → WhatsApp → click the Connect WhatsApp button and follow the Meta pop-up:
- Log in to your Meta (Facebook) account.
- Review the permissions you’ll share with Quickchat AI (WhatsApp Business account access and Business portfolio access) and continue.
- Provide accurate business details (Business Portfolio, Business Name, Business Website, Country, etc.).
- Create or select your WhatsApp Business Account.
- Choose a WhatsApp Business display name and category.
- Add your business phone number and verify it via SMS/voice as prompted.
- Click Confirm to give Quickchat AI the required access.
- When Meta confirms the setup is complete, click Finish. The pop-up shows a Quickchat AI confirmation that your WhatsApp account has been connected and closes automatically.
Back in the Quickchat AI App, the WhatsApp panel shows Connecting your WhatsApp account and updates to Connected within about 30 seconds. If it doesn’t, click Refresh Status in the panel. Otherwise, please revisit Prerequisites above to make sure you correctly provided your business phone number and information.
Connected means Quickchat AI can reach your WhatsApp Business Account. Right below it, the panel shows what is still needed before customers get replies:
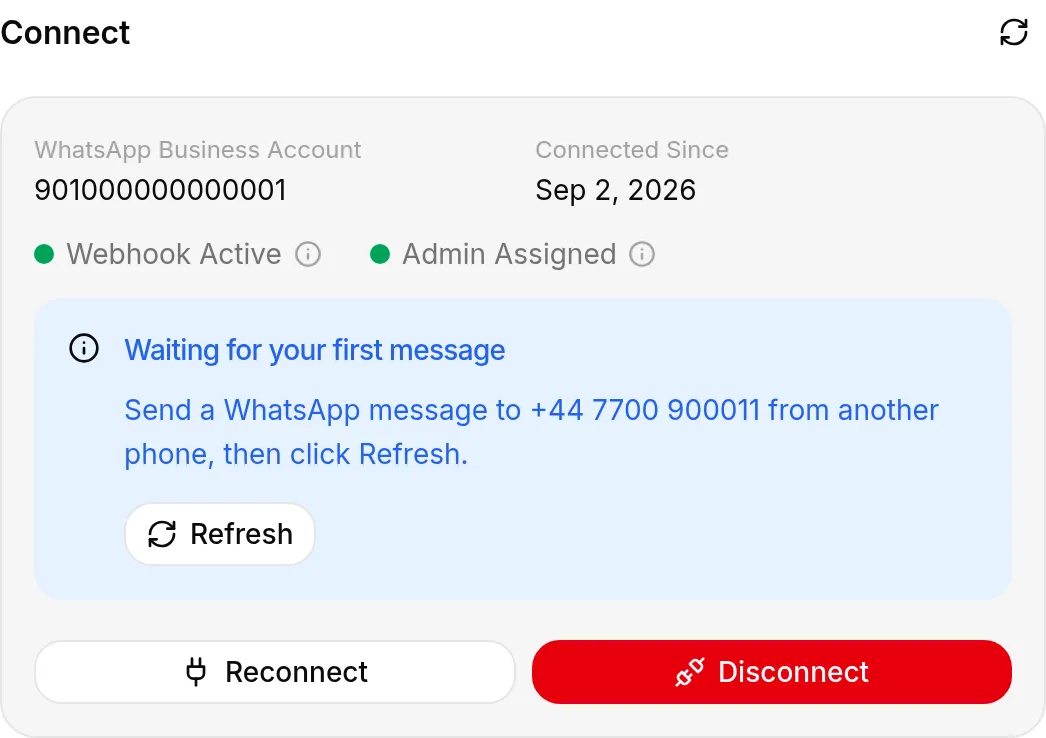 The Connected panel lists what is left: here, the first message
- Waiting for your first message: send a WhatsApp message to the number shown from another phone, then click Refresh. Once a message has arrived, the panel shows Messages Received next to Webhook Active and Admin Assigned.
- Display name: every number listed lower in the panel carries its display-name status from Meta (Approved, Pending review, Declined, Expired or No display name). A review in progress needs nothing from you and usually finishes within a few days. A declined, expired or missing display name asks you to submit one in WhatsApp Manager.
- Meta test number: if the active number is a Meta-provided +1 555 number, the panel says so. These numbers are for trying things out and cannot be moved to another account. Add your own number in WhatsApp Manager to go live.
Once the panel shows Messages Received, you’re live! 🎉 Customers can message your WhatsApp number, and your AI Agent will respond automatically.
As a final verification of your integration, send a text message to the WhatsApp number you just connected, then click Refresh in the panel. Waiting for your first message turns into Messages Received, you should get a reply from your AI Agent, and the conversation should appear in the Quickchat AI App Inbox. If you leave any of Meta’s setup steps unfinished, Quickchat AI also emails the account owner the remaining steps as a reminder.
Troubleshooting & FAQs
How WhatsApp Business API Pricing Works?
- Replies to user-initiated (inbound) customer inquiries are treated by WhatsApp as Service messages. These messages enable businesses to manage incoming customer inquiries, whether that is via a human agent or a conversational AI-powered bot.
- When users message a business, this opens a 24-hour customer service window during which businesses can respond with service messages, at no charge. This window resets with each user message.
- Outside 24 hours, you must use approved Message Templates (Marketing, Utility, Authentication, etc.) and pay per-message according to WhatsApp Business Platform Message Rates.
- Conversations are categorized and billed by Meta. Ensure your WhatsApp Business Account has a valid payment method for business-initiated/template messages.
The Connect WhatsApp button does not work. I don’t see the Meta pop-up.
- If your browser blocks the pop-up, the app shows a message asking you to allow pop-ups. Disable pop-up and tracker blockers in your browser, refresh the website and try again. If it doesn’t help, try a different browser.
Number verification failed.
- Ensure the number can receive SMS/voice calls and isn’t blocked by an active registration path that Meta doesn’t allow to coexist. If the number is used in the Business App, try onboarding via Coexistence.
Meta says my setup isn’t finished, or the panel shows a warning.
- Read the card under Connected first: it names the number your AI Agent answers on and says whether Meta is still reviewing its display name, whether it is a Meta test number, or whether the first message has not arrived yet. Each card links to the right place in WhatsApp Manager.
- If the warning is about the connection itself, click Reconnect WhatsApp in the panel. This resolves most cases.
- If it doesn’t, your number may be connected to another provider (Meta allows only one partner per WhatsApp account at a time). Follow the on-screen instructions to add Quickchat AI as a partner in Meta Business settings, then click Refresh Status.
I connected the wrong account.
- Reconnect keeps the account that is already connected. To switch, click Disconnect in the WhatsApp panel, then Connect WhatsApp again and pick the correct Meta Business account and WhatsApp Account in Meta’s window.
Messages aren’t appearing in the Quickchat AI Inbox.
- Confirm the pop-up showed the final confirmation that your WhatsApp account was connected.
- Double-check you linked the intended WhatsApp Account and the correct AI Agent is selected.
- The Waiting for your first message card names the number your AI Agent answers on. Make sure you messaged that exact number and that it is switched on in the panel, then click Refresh.
- If you’re sending messages after 24 hours without a user message, use approved templates and ensure a payment method is set in WhatsApp Manager.
My AI’s WhatsApp replies are failing to send.
- Quickchat AI shows a “WhatsApp replies are failing” alert on the WhatsApp panel and a notification on your dashboard. Common fixes: complete display-name approval in WhatsApp Manager; if the connection expired or was revoked, click Reconnect; if Meta restricted your number over quality or policy, check its status in WhatsApp Manager. The alert clears once a reply sends successfully again.
Template or business-initiated messages fail.
- Verify your Message Templates are approved and your payment method is active in WhatsApp Manager.
- New senders start with messaging limits that scale based on quality and verification. If you hit limits for business-initiated messaging, review Meta’s Messaging Limits guidance.
- Check messaging limits and quality rating in WhatsApp Manager if delivery is throttled.
How to create my own WhatsApp link and “Chat on WhatsApp” button?
- Follow this WhatsApp tutorial.
How to create my own WhatsApp QR code?
- Visit WhatsApp Manager → Phone numbers → select your business phone number → Message links → Create Message Link.
- Alternatively you can find it in your WhatsApp Business mobile app. Follow this WhatsApp tutorial.
Need Help?
Chat with Quickchat’s Support AI on WhatsApp:
📱 +1 302-405-9992: Start a chat
Or scan the QR code: