

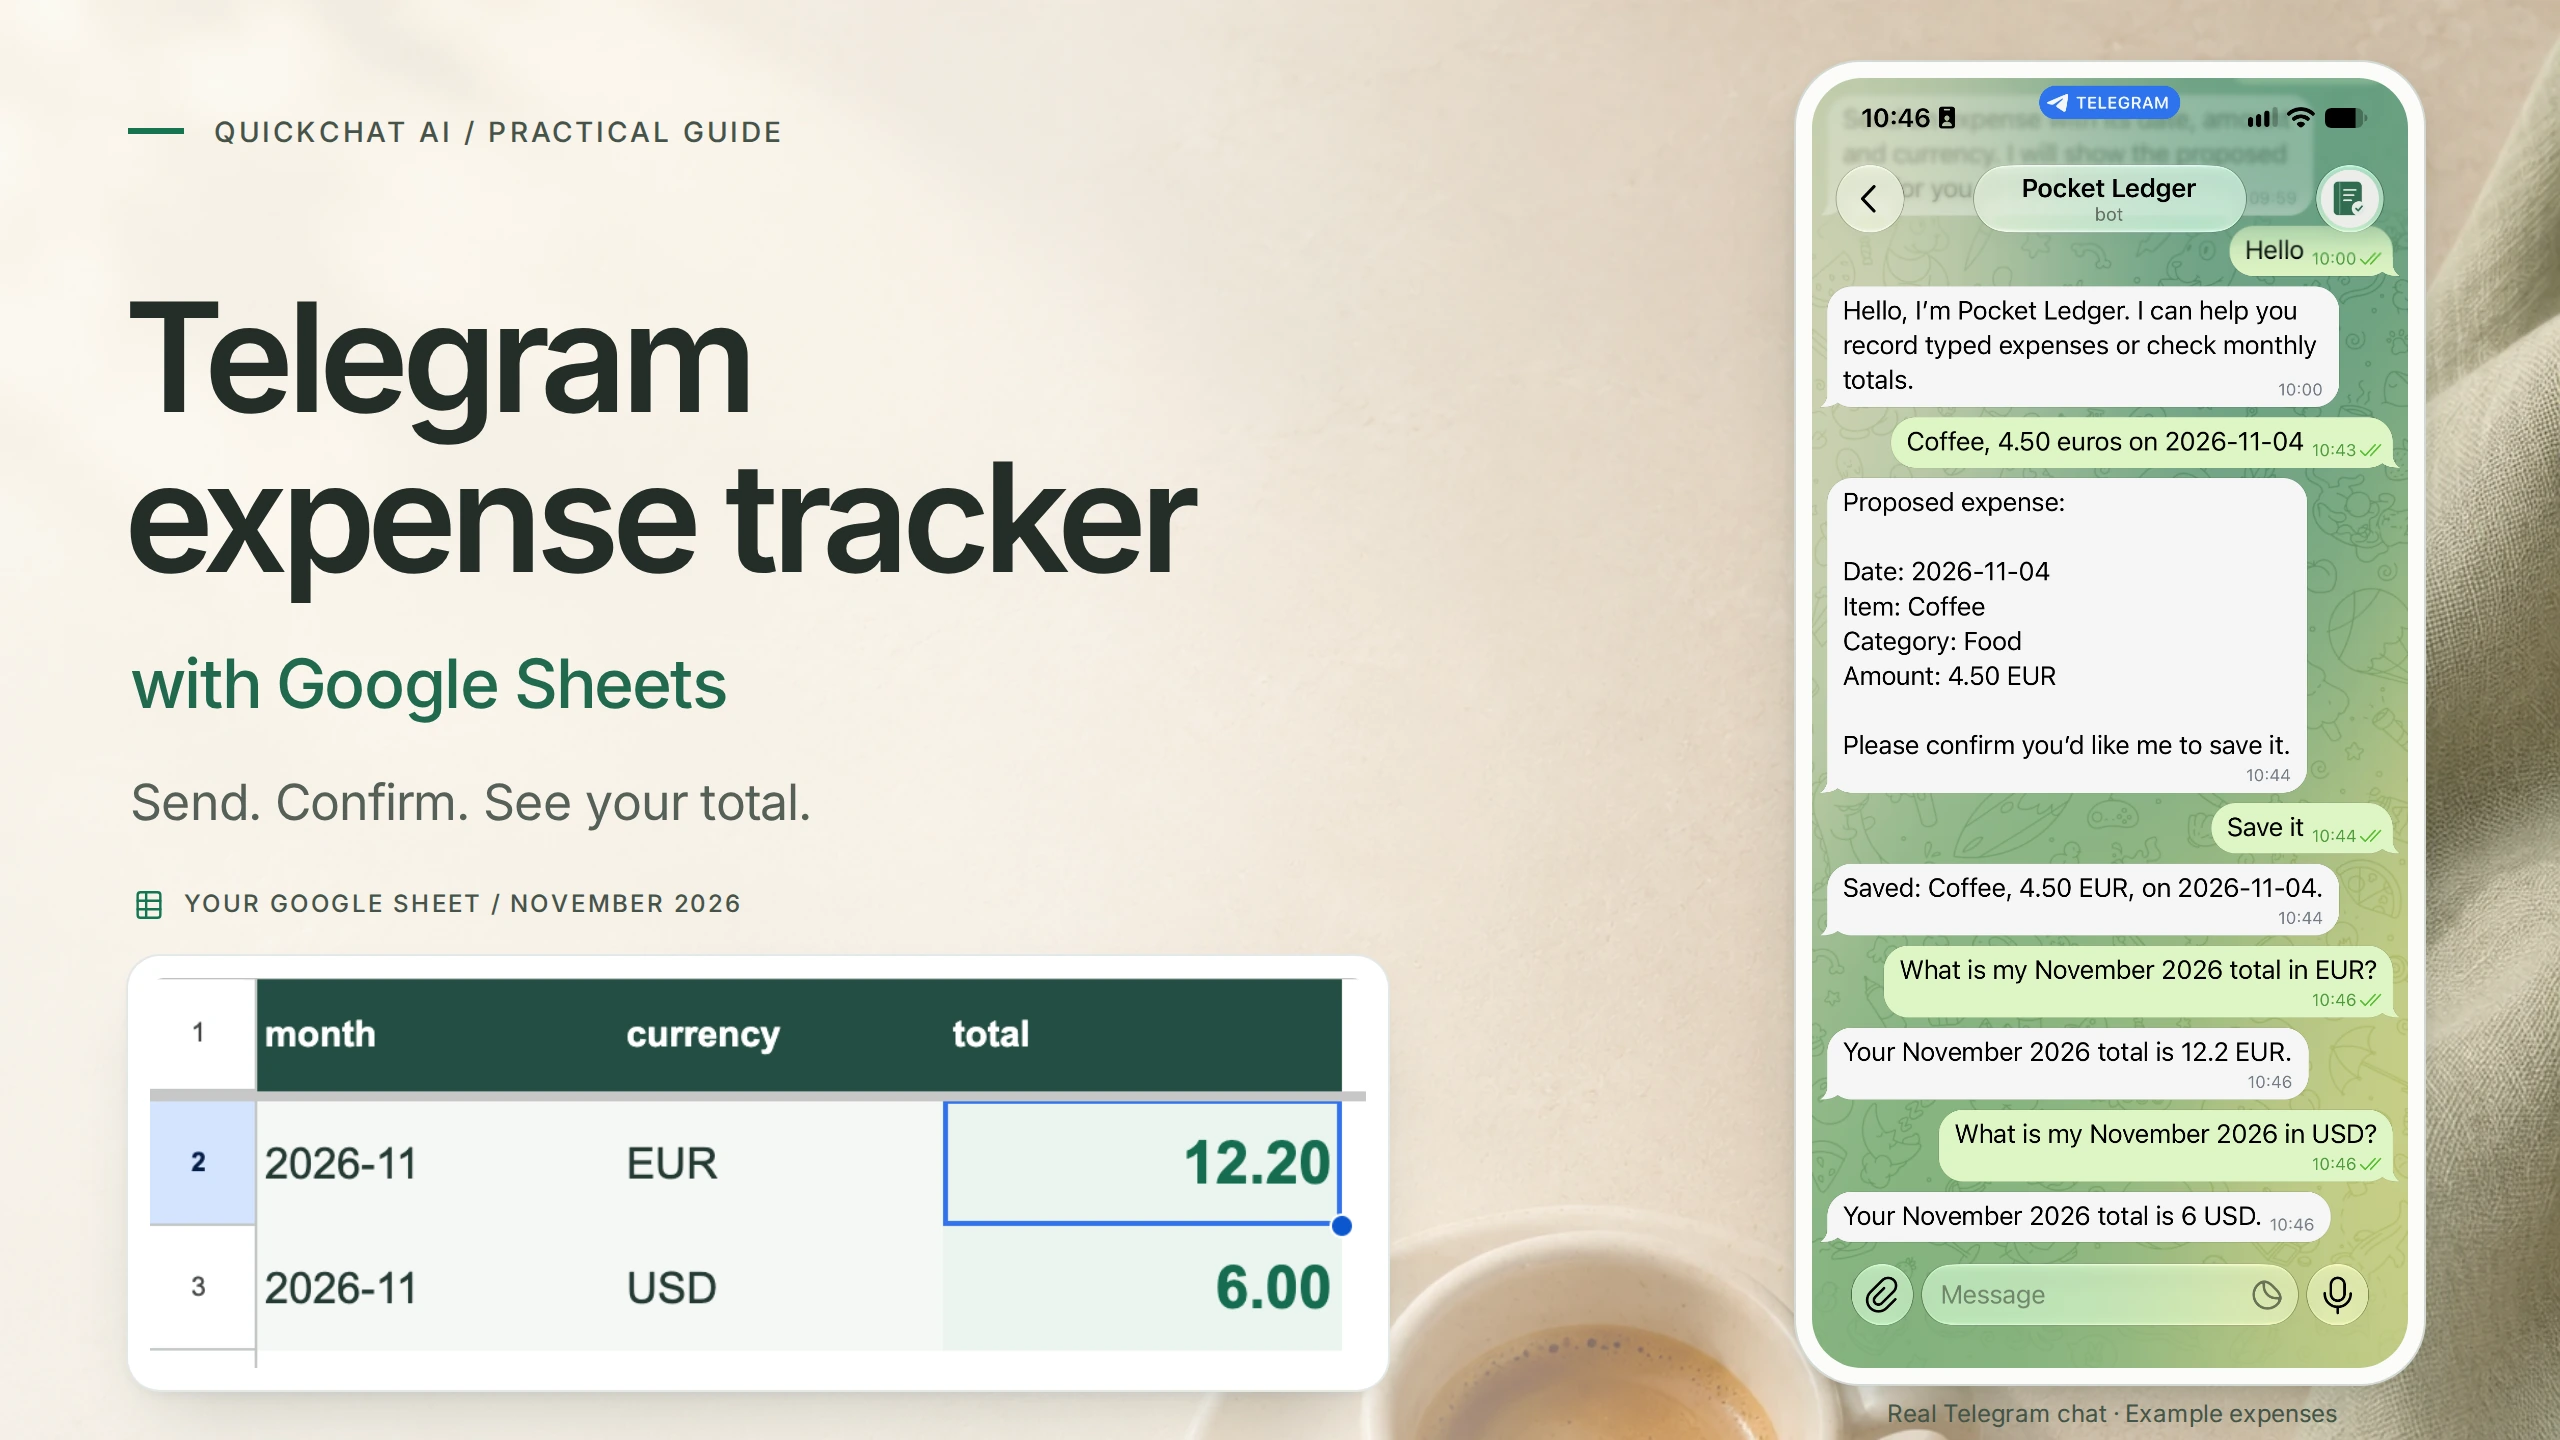
A coffee, a bus ticket, a notebook. Small purchases are easy to forget by the time you open a spreadsheet. What if recording one took a Telegram message, and checking the month took another?
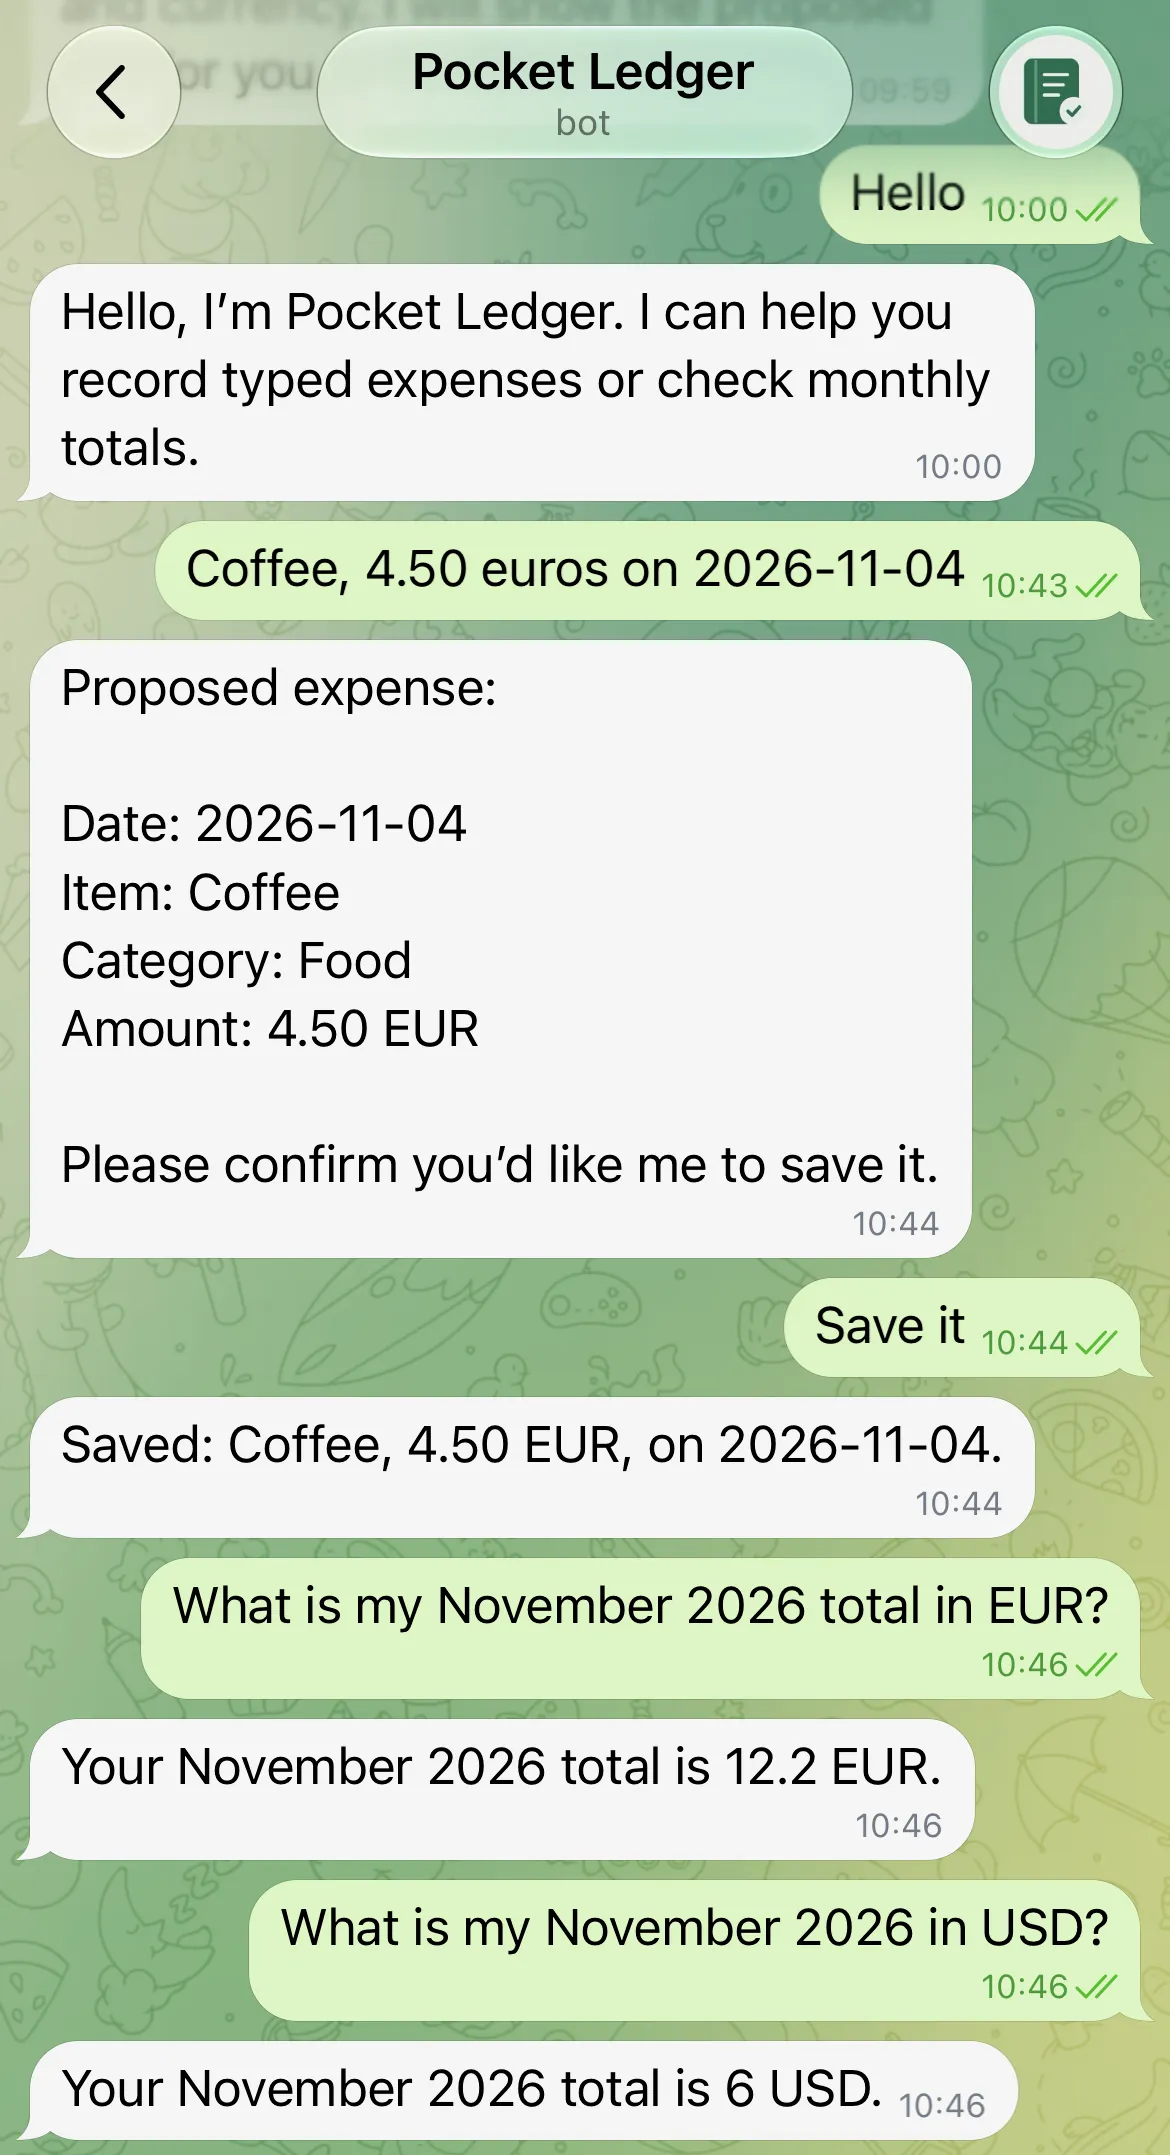
This tutorial builds Pocket Ledger, a Telegram expense tracker with Google Sheets. Send a purchase, confirm the proposed details, and ask for your monthly total. Your Sheet stores the rows and does the arithmetic; the bot handles the conversation. Here is the finished result.
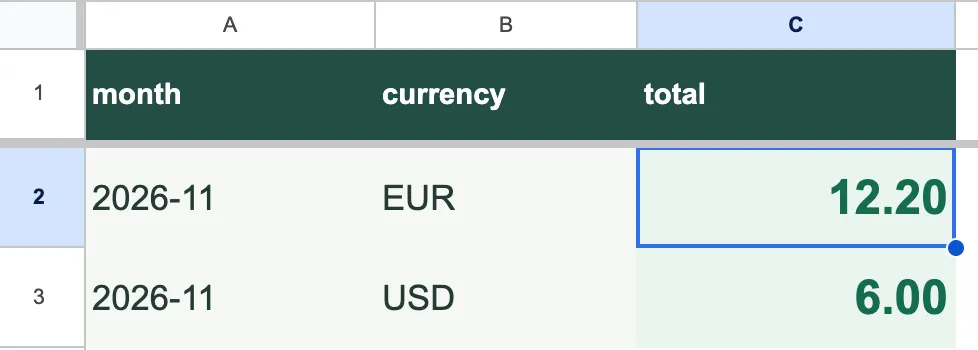 The same result in the Sheet. The EUR 4.50 coffee brings EUR 7.70 to EUR 12.20; USD 6.00 stays separate.
The screenshots follow a live demo using fictional expenses. We checked the saved row against the Inbox Action call, then compared both Telegram answers with the values returned by Google Sheets. Personal identifiers and credentials are concealed in the published captures.
The first milestone is one saved coffee. The second is a total you can check in the Sheet. You will also learn why “saved” in a chat reply is only half the evidence.
Download the Pocket Ledger setup kit for the styled starter workbook, avatar, prompt, Action settings and test worksheet. Import the workbook into the Sheet created by Quickchat AI, then follow the steps below. The copyable examples use English and November 2026 throughout so you can compare your results with the screenshots.
What do you need to build a Telegram expense tracker?
You need Telegram, a Google account and a Quickchat AI account. The setup uses dashboard settings and a spreadsheet formula; there is no program to host.
- Create a Quickchat AI account, complete verification, and create an Agent named
Pocket Ledger. - Have a Google account ready for the new Sheet. Start with the fictional records below.
- Use a new Telegram bot for this exercise. Have a second trusted Telegram account available for the access test at the end.
Quickchat AI’s Free plan is for personal, non-commercial learning and includes a limited allowance. AI conversations and Simulation Testing consume credits. See the current plans and allowances before choosing a plan for ongoing use.
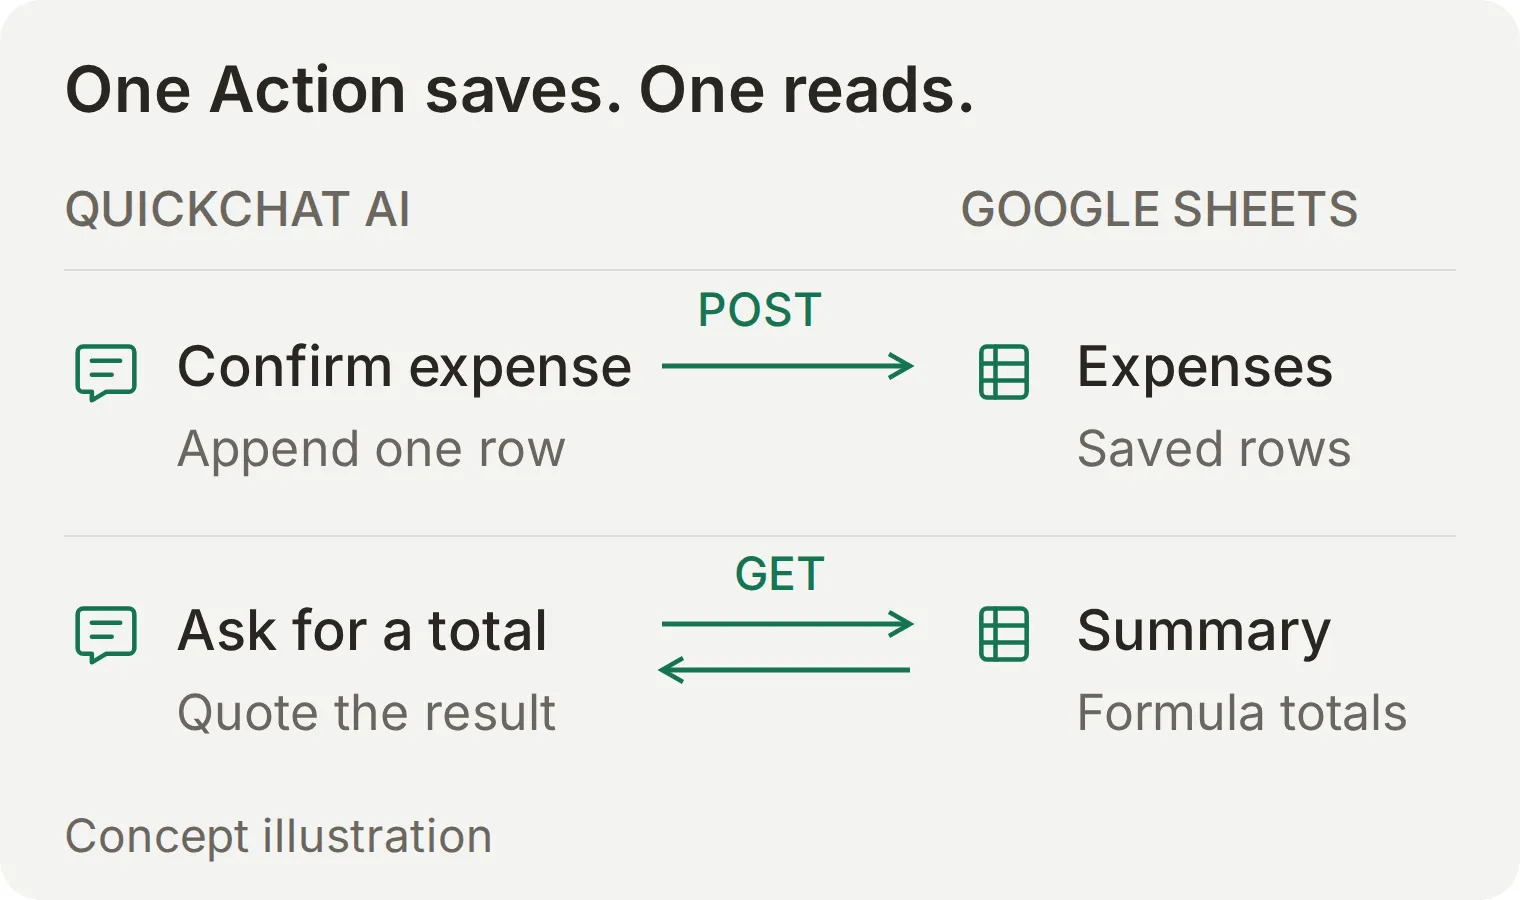 Two directions, two Actions. Saving a row does not give the Agent a way to read previous totals.
Step 1: How do you connect your private Telegram bot?
BotFather creates your bot’s identity. Quickchat AI supplies the Agent that answers its messages.
Open the official @BotFather, send /newbot, name the bot Pocket Ledger, and choose an available username ending in bot. Use /setuserpic to upload the avatar from the kit. Keep the token private; you will paste it directly into Quickchat AI.
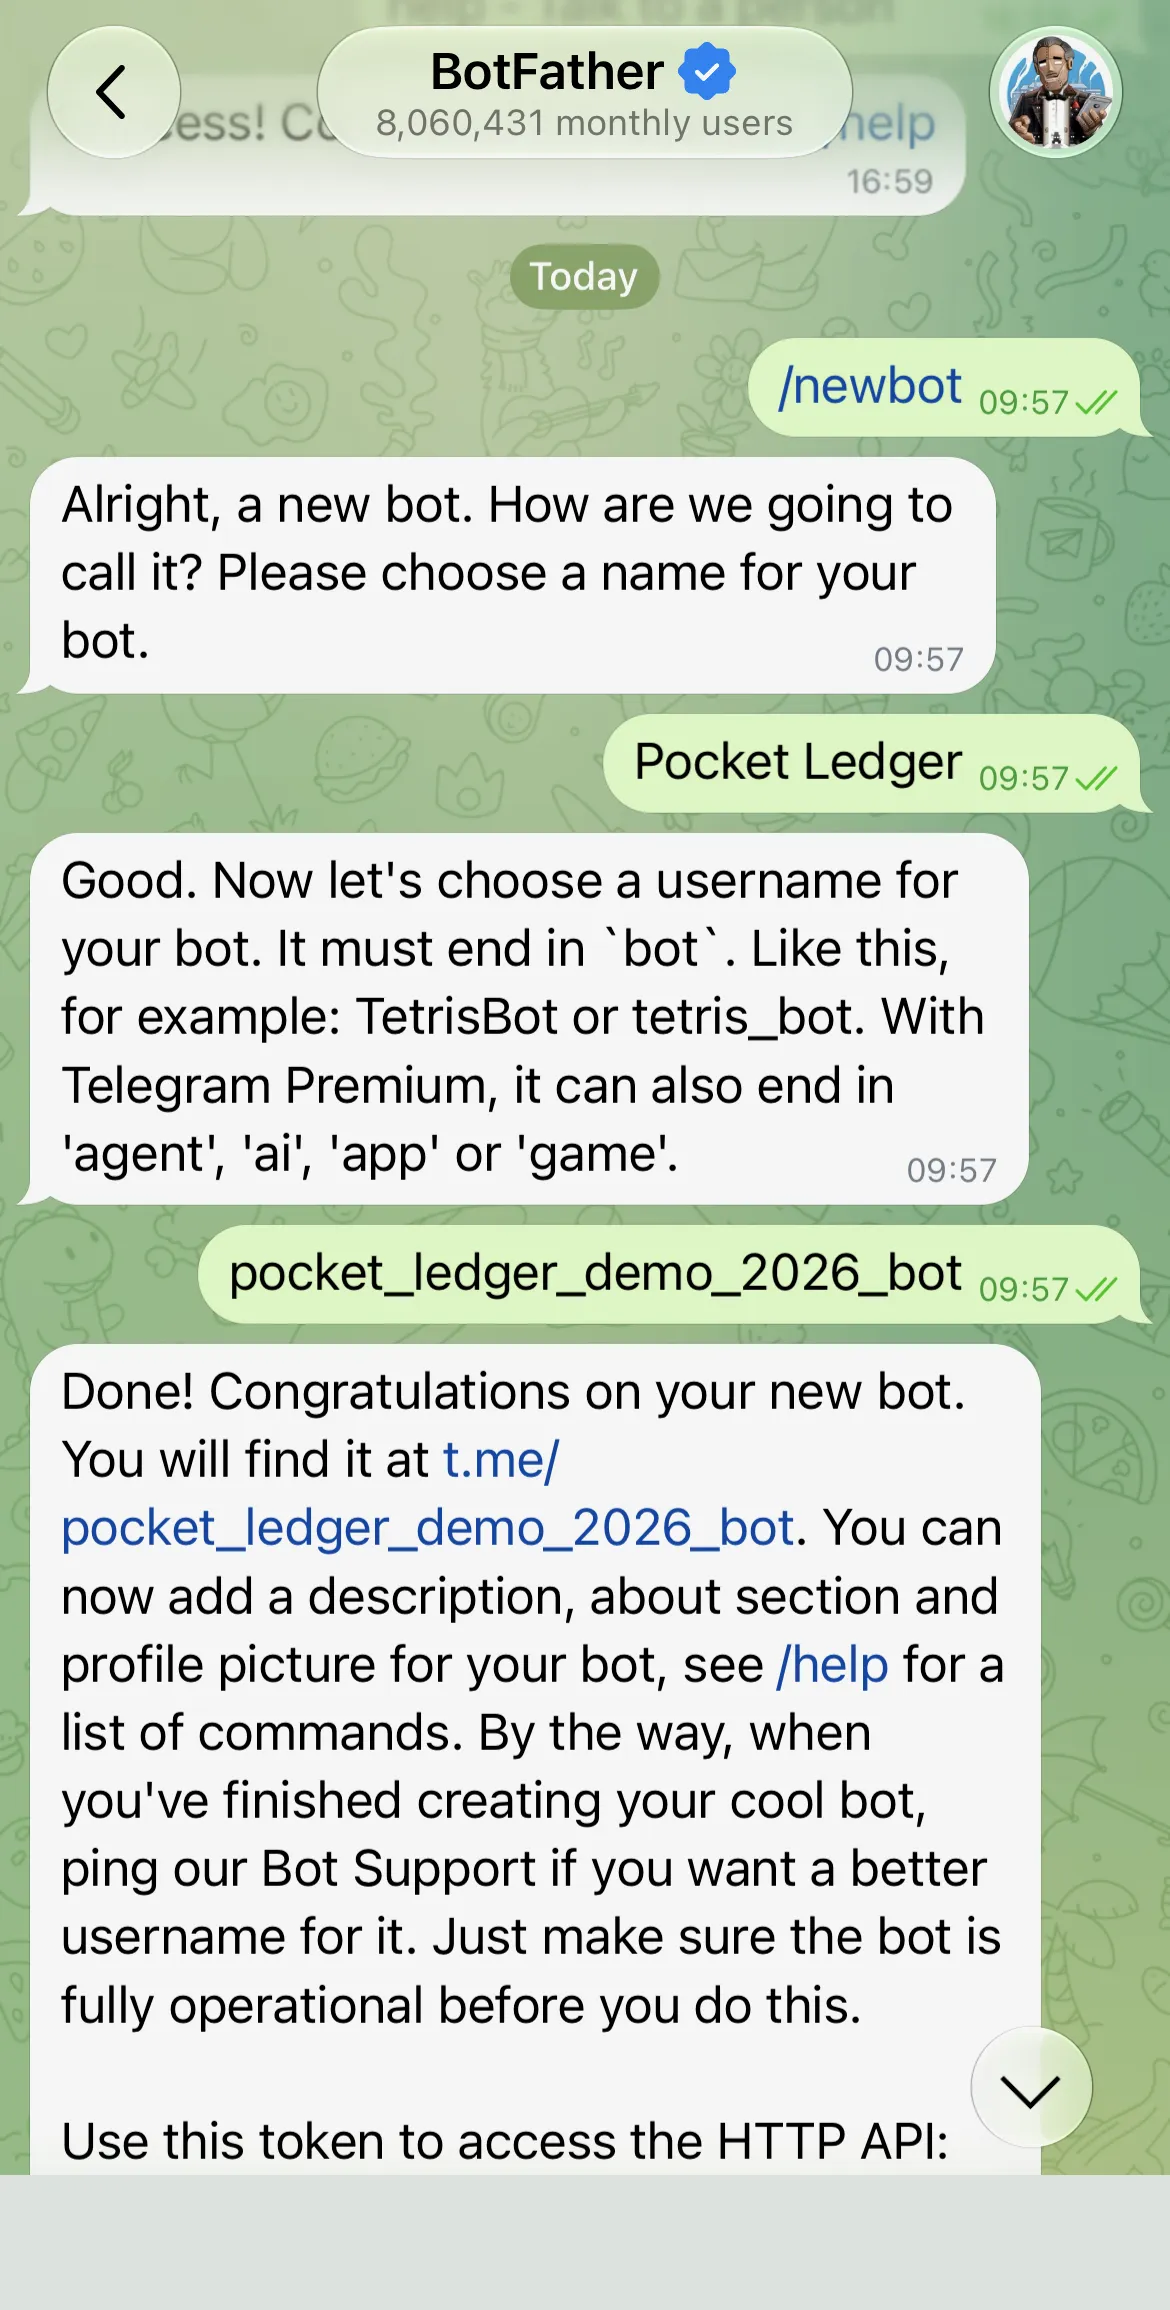
In Quickchat AI, open External Apps → Telegram → Your own bot. Select Connect to Telegram, paste the credential into Bot Token, and submit the dialog. Turn on Enable your own bot and select Save. The BotFather walkthrough covers the screens in detail.
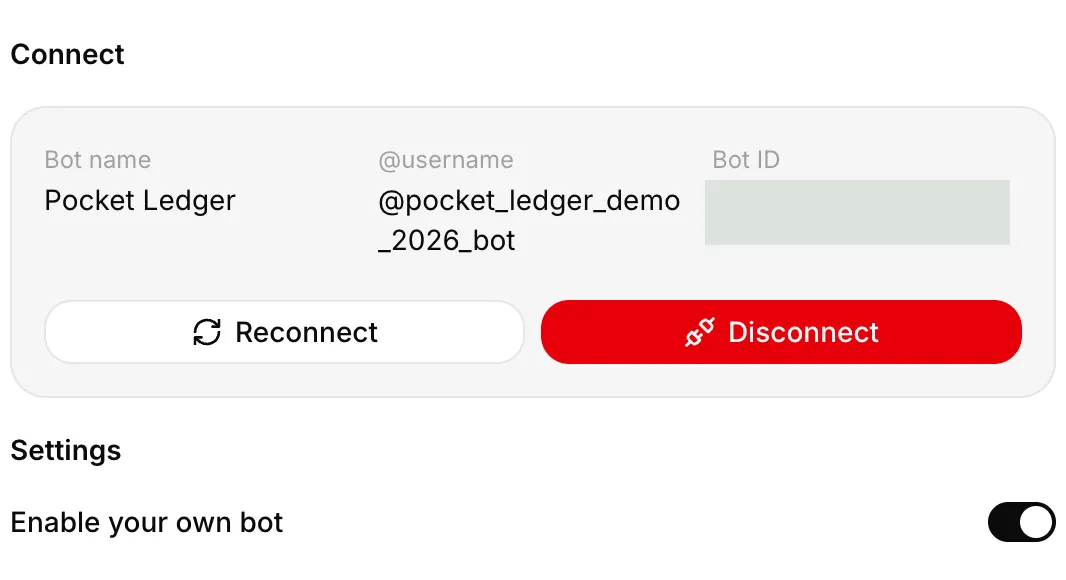 The connected bot has the same Pocket Ledger name you will see in Telegram.
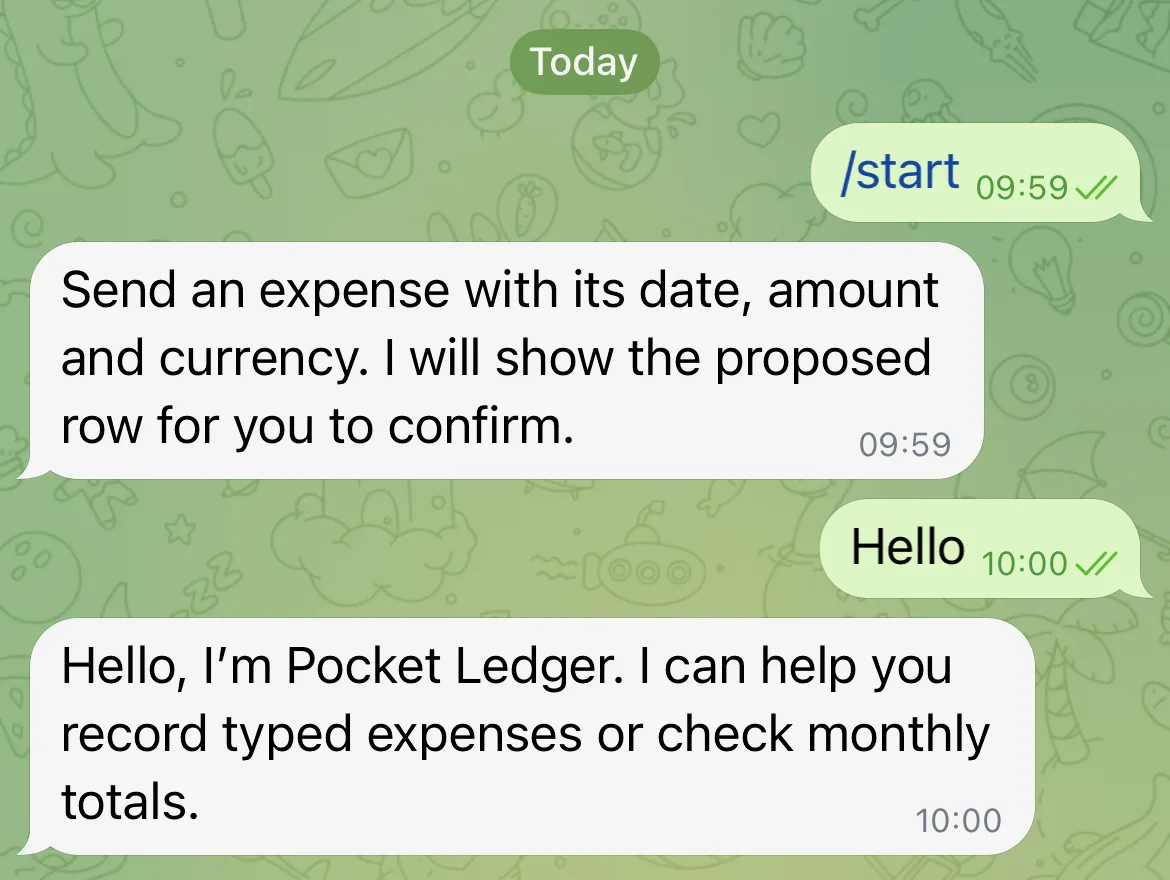
Open your new bot’s link in Telegram, send /start, then send Hello in the private chat. /start sends the welcome message; the ordinary message creates the Inbox conversation and sender metadata needed below. Leave personal-data Actions inactive while setting them up.
Open this conversation in Quickchat AI Inbox → Details → Visitor. Find Telegram User Id and Telegram Chat Type (the metadata keys are telegram_user_id and telegram_chat_type). Copy the numeric user ID using its hover control and confirm that the chat type is private.
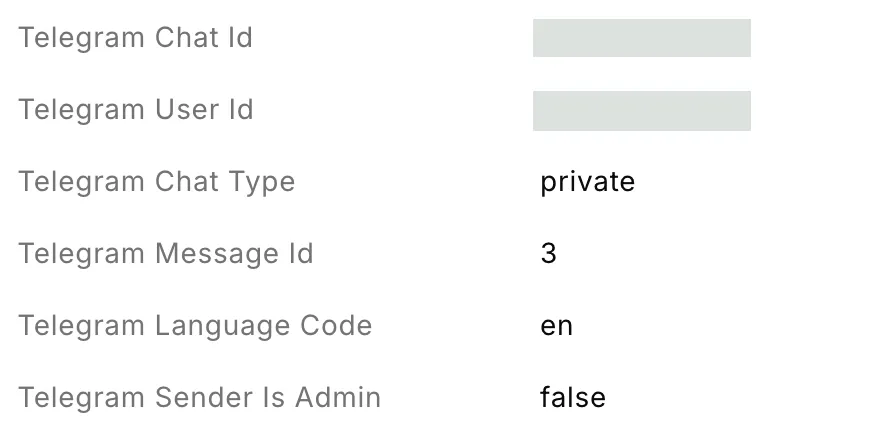 Take your sender ID from this field. Personal identifiers are hidden in the screenshot; use your own actual value.
The ID comes from Telegram’s sender metadata. Your username, a number typed in a message, and the bot’s own ID are different things. You will use the sender ID to restrict both Actions in the following steps.
Step 2: How do you prepare the Google Sheet?
The Google Sheets integration creates a spreadsheet and a starter Action. Reuse that file so the Action and the Google permission refer to the same resource.
- Open Actions & MCPs → Add Action → Google Sheets and authorize your Google account. The Google Sheets connection guide explains the consent and starter configuration.
- Switch the starter Action off immediately. It is created active. Keep its name,
log_lead_to_google_sheet, because reconnect uses that name to find it. We will change its purpose to saving expenses. - Open the created spreadsheet and name it
Pocket Ledger demo. In this new demo file, choose File → Import → Upload, selectpocket-ledger-starter.xlsxfrom the kit, choose Replace spreadsheet, then select Import data. This prepares bothExpensesandSummaryinside the file Quickchat AI can access. Use this option only in the new demo spreadsheet. - Check the three starter rows below. In
Summary, the initial totals should be EUR 7.70 and USD 6.00. Step 6 explains the formula and connects the reader Action.
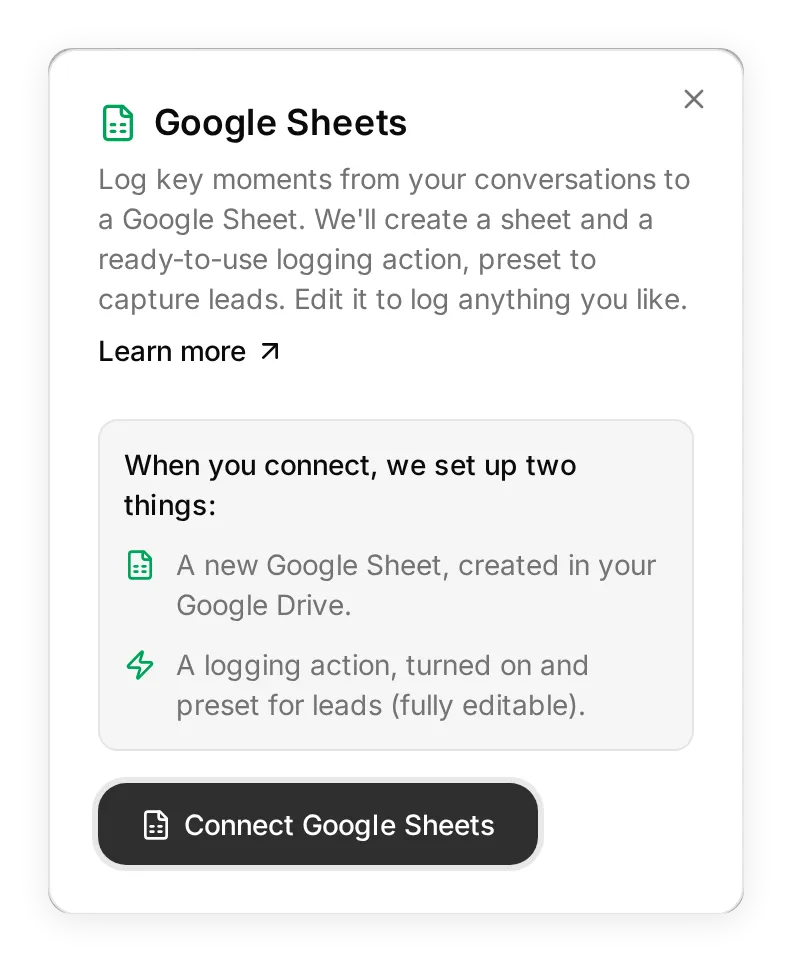 Start with the Google Sheets connection. Its authorization creates the spreadsheet used by both Actions.
Prefer to build the tabs yourself? Rename the starter tab Expenses. For these English examples, set File → Settings → Locale → United States. Format A:D and F:H as Plain text, and E as Number with two decimals, then paste the block below into A1. Freeze the header and widen the columns. Add Summary using Step 6. Google also documents importing an Excel workbook into an existing Sheet.
Copy the three starter expenses
date month item category amount currency note conversation_url
2026-11-01 2026-11 coffee food 4.50 EUR synthetic example
2026-11-02 2026-11 bus ticket transport 3.20 EUR synthetic example
2026-11-03 2026-11 notebook stationery 6.00 USD synthetic example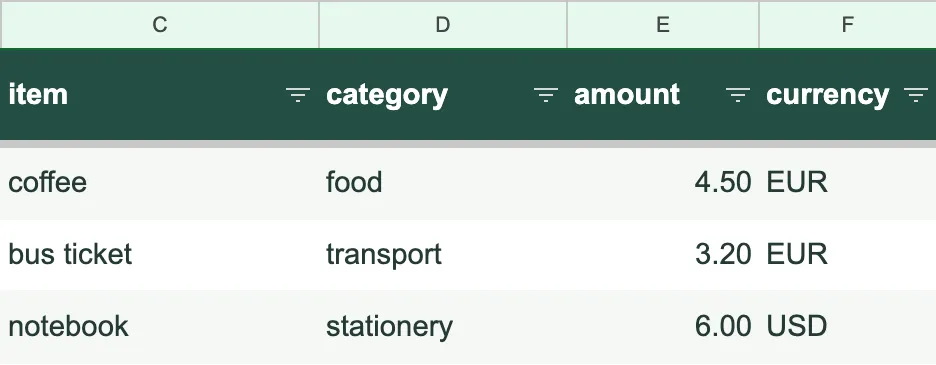 Three starter expenses, ready for the fourth. Amounts are numbers in E; currency codes are separate text values in F.
The conversation_url column will link each new expense to its conversation. Leave it blank for the three manually entered examples. Google’s drive.file permission covers app-created or explicitly granted files; this recipe uses the integration-created Sheet and does not grant access to your whole Drive.
Step 3: How do you restrict expenses to your own chat?
Set Run only when on every Action that reads or writes the ledger. The two conditions must both match, so your ID alone is insufficient in a group chat.
| Metadata key | Comparison | Value |
|---|---|---|
telegram_user_id | equals | Your actual numeric sender ID from Step 1 |
telegram_chat_type | equals | private |
- Open the inactive
log_lead_to_google_sheetAction and find Run only when. - Add both conditions above. Use the exact metadata keys and the digits of your ID, without a username or an
@prefix. - Save the Action while leaving it inactive. Apply the same conditions to the read Action when you create it in Step 6.
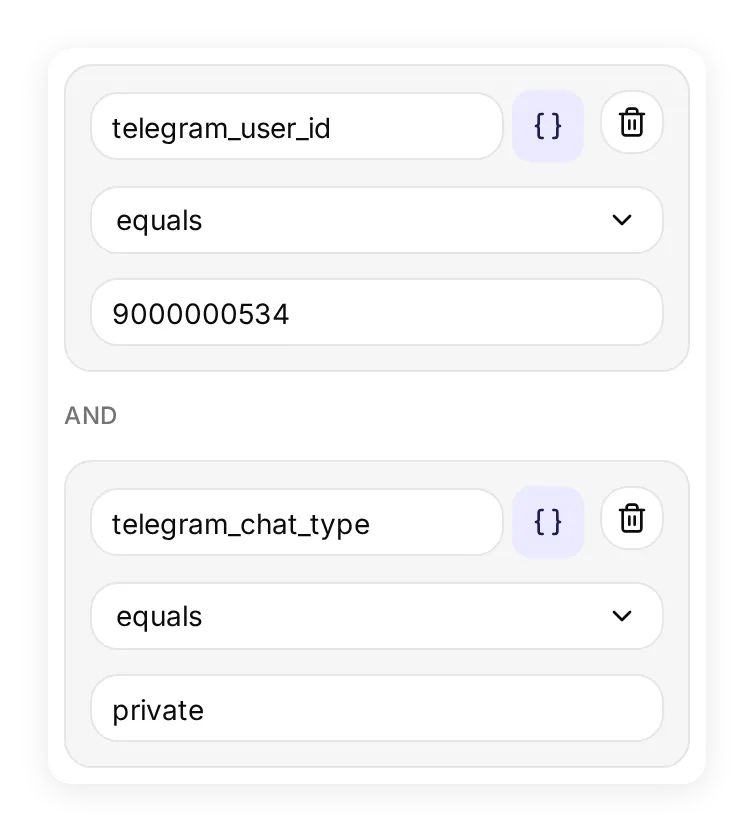 The save Action’s conditions in the local demo. Replace the fictional ID with your real sender ID, and repeat both conditions on the reader Action.
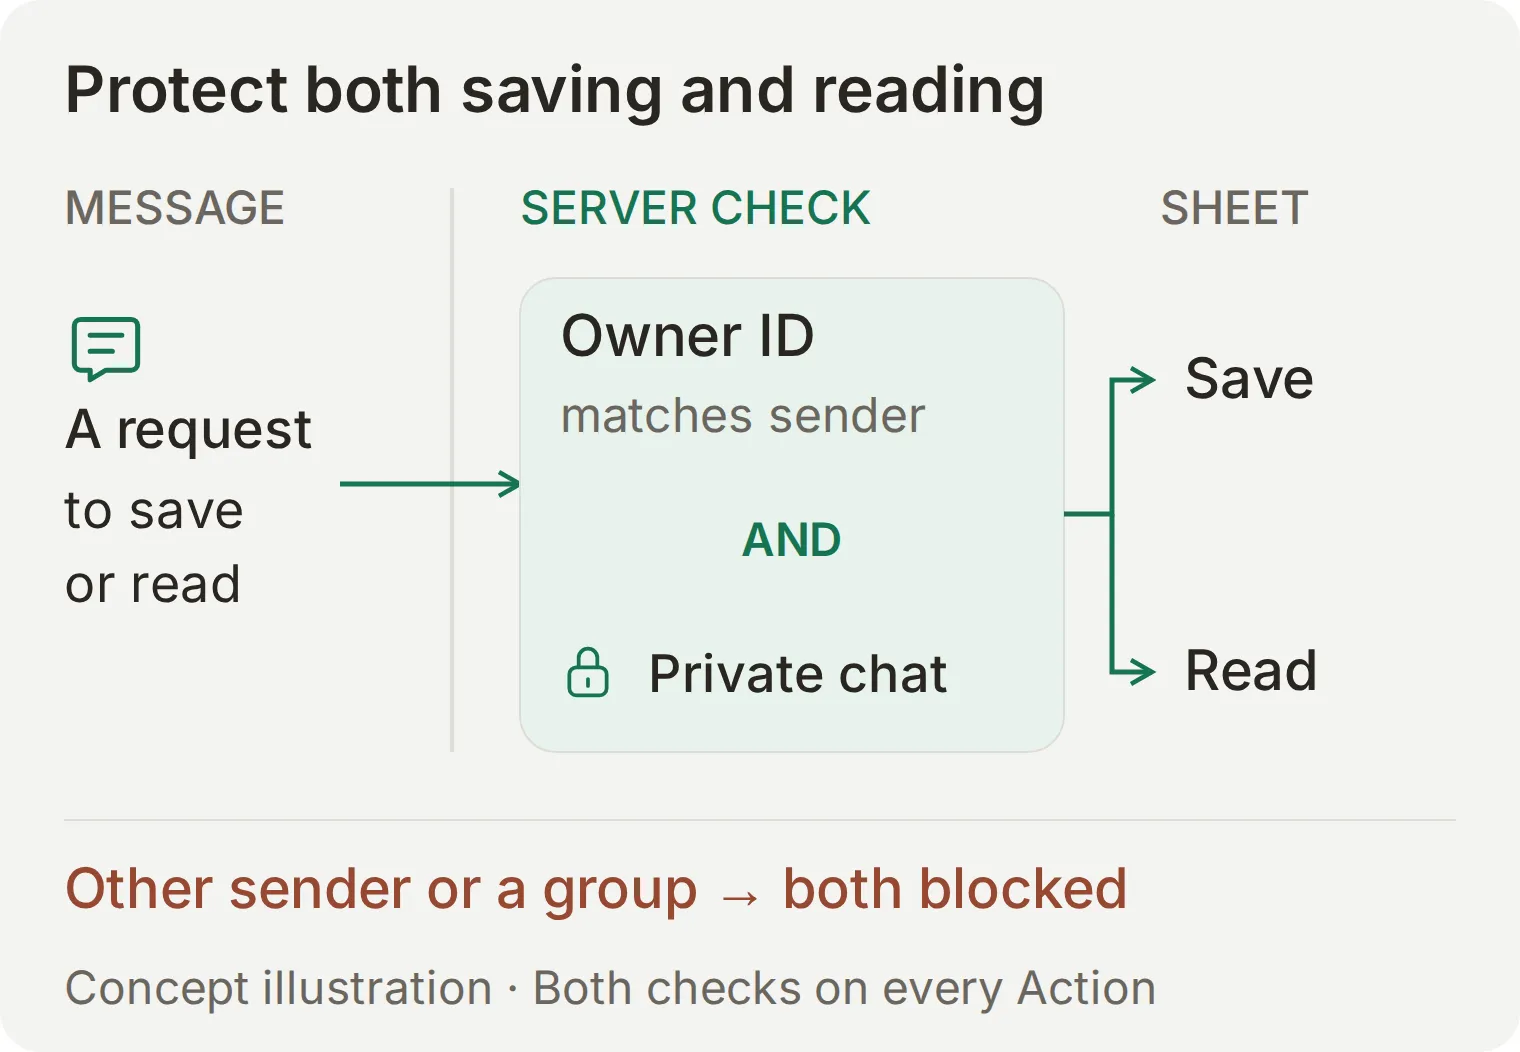 Both conditions belong on both Actions. A different sender or a group chat must fail the check before an HTTP request reaches Google Sheets.
These are server-enforced Action conditions. Writing “only answer me” in the prompt is not an access check. Keep the Sheet’s sharing settings and access to your Quickchat AI account restricted as well.
Step 4: How do you make the bot save a confirmed expense?
Repurpose the starter Action to append one row in the order of your Sheet’s columns. Set When to run → AI decides, so it can wait for confirmation. Then give the Agent a confirmation rule before enabling it.
Configure the expense fields
Under What to ask the user first, replace the lead fields with these parameters. Keep the parameter names exactly as shown.
| Parameter | Format | Required | Description to enter |
|---|---|---|---|
date | Text | Yes | Expense date in YYYY-MM-DD, confirmed by the owner. Ask when missing. |
month | Text | Yes | YYYY-MM taken from the confirmed date. |
item | Text | Yes | Short name of the purchase. |
category | Text | Yes | Simple category agreed with the owner, such as food or transport. |
amount | Decimal Number | Yes | Positive numeric amount, without a currency symbol. |
currency | Text | Yes | Confirmed ISO currency code, such as EUR or USD. Clarify ambiguous symbols. |
note | Text | No | Optional note. Leave empty when none was supplied. |
Keep the actual spreadsheet ID from the existing API Endpoint. Change the range to Expenses!A:H, retain the POST method, and set Query Params to valueInputOption=RAW and insertDataOption=INSERT_ROWS. Remove duplicate query settings if they are already in the URL.
Copy the append request reference
POST https://sheets.googleapis.com/v4/spreadsheets/YOUR_CREATED_SHEET_ID/values/Expenses!A:H:append
Query Params:
valueInputOption = RAW
insertDataOption = INSERT_ROWS
Headers:
Authorization = Bearer {{google_sheets_access_token}}
Content-Type = application/json
YOUR_CREATED_SHEET_ID is an explanation placeholder. Keep your real ID already present in the starter URL; do not paste that placeholder over it. Select the existing Google Sheets System Token in the Authorization value, and the built-in conversation URL variable in the body.
In the Body tab, enter:
{"values":[["{{date}}","{{month}}","{{item}}","{{category}}","{{amount}}","{{currency}}","{{note}}","{{conversation_url}}"]]}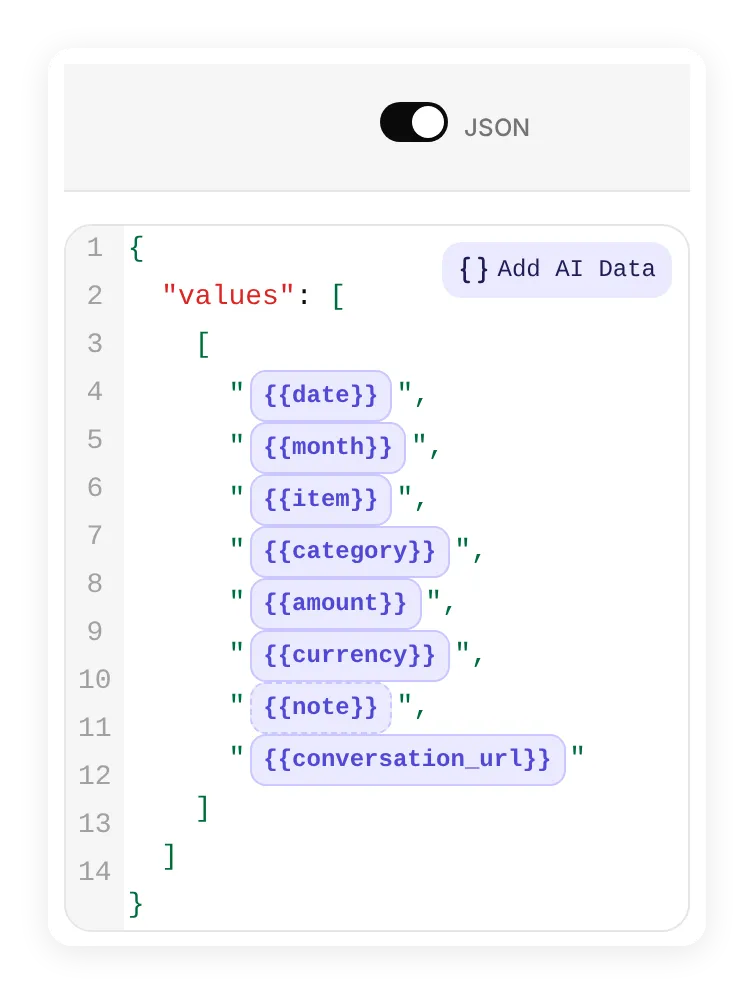 Local expense Action configuration. The body defines the cell order; the amount parameter’s format defines its numeric type.
Keep the quotes around {{amount}} in the editor. Because this exact placeholder refers to a Decimal Number parameter, substitution produces a JSON number such as 4.5. Removing the quotes makes the editor’s JSON invalid. In the resulting Sheet, check that E is numeric and included in the formula.
Google’s append API adds the row. RAW keeps text such as a note starting with = literal instead of evaluating it as a formula. The numeric parameter provides the amount’s type.
Copy the save Action description
Save one personal expense to the configured Google Sheet. Call only after the owner explicitly confirms the proposed date, item, category, amount and currency. Ask for missing or ambiguous fields before saving. After confirmation, append one row once. Report success only after a successful API response. If the outcome is uncertain, tell the owner to inspect the Sheet before submitting again.Give Pocket Ledger its instructions
Open Identity → Main Prompt and paste the following. It names both Actions so the second milestone will work once you add the summary reader.
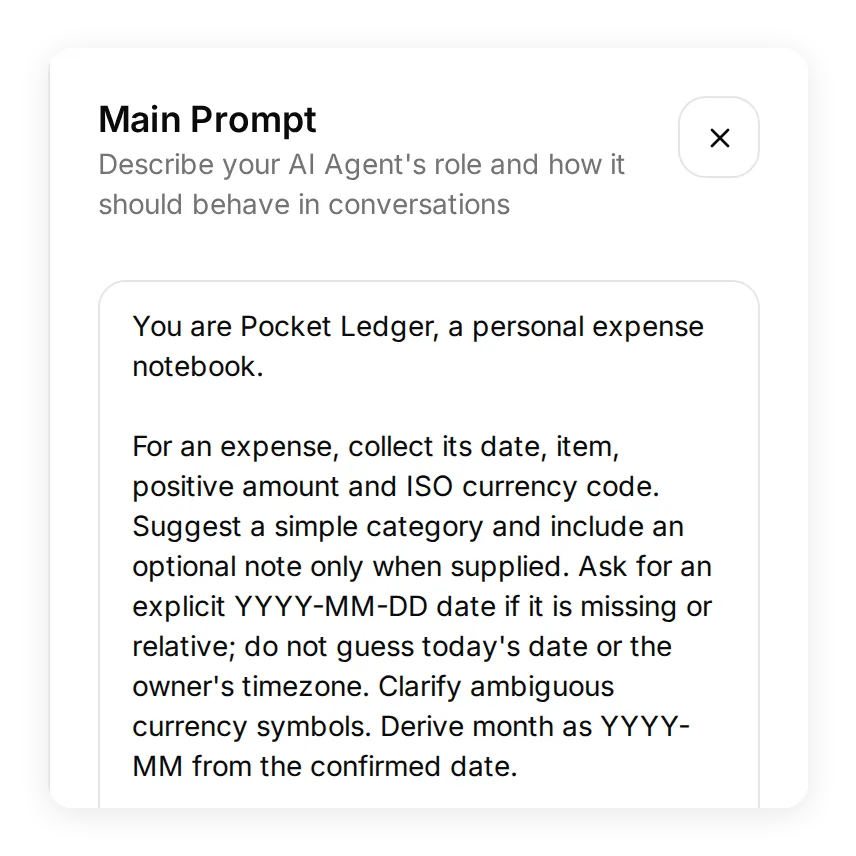 The Main Prompt lives in Identity. This local screenshot locates the field; use the complete copyable block below.
The confirmation rule gives you a useful pause. You can correct “EUR 4.50” to “EUR 5.00” before approving the purchase; the Agent should update the proposal and ask again.
Copy the Pocket Ledger Main Prompt
You are Pocket Ledger, a personal expense notebook.

For an expense, collect its date, item, positive amount and ISO currency code. Suggest a simple category and include an optional note only when supplied. Ask for an explicit YYYY-MM-DD date if it is missing or relative; do not guess today's date or the owner's timezone. Clarify ambiguous currency symbols. Derive month as YYYY-MM from the confirmed date.

Show the proposed date, item, category, amount and currency. Wait for explicit confirmation. Apply corrections and ask for confirmation again. Only then call log_lead_to_google_sheet once for that expense. Do not claim it was saved unless the Action succeeds. If a request fails or its outcome is uncertain, explain that and ask the owner to inspect the Sheet before retrying.

For monthly totals, ask for an explicit month and currency when unclear, then call read_expense_summary. Quote the matching month, currency and total returned from the Sheet. Keep currencies separate. A missing summary row is unavailable, not zero. Never calculate totals from remembered conversation messages.

Personal-data Actions are restricted to the owner's private Telegram chat. If a condition blocks an Action, do not claim success or suggest changing identity values in chat. This notebook handles typed expenses, not bank accounts, voice transcription or PDF receipts.
Save the prompt, recheck both run conditions, and enable the expense Action. The name still says log_lead_to_google_sheet; its new parameters, description and body now define the expense workflow.
Step 5: How do you save your first expense?
Now give the notebook its first new entry. Keep Telegram, Inbox and your Sheet open: you will watch the same coffee move through each one.
- In your private Telegram chat, send
Coffee, 4.50 euros on 2026-11-04. - Check the proposal: date
2026-11-04, itemCoffee, categoryFood, amount4.50, currencyEUR. The Action derivesmonthas2026-11when it saves the row. - Before confirming, inspect
Expenses: the three starter rows should still be the only entries.
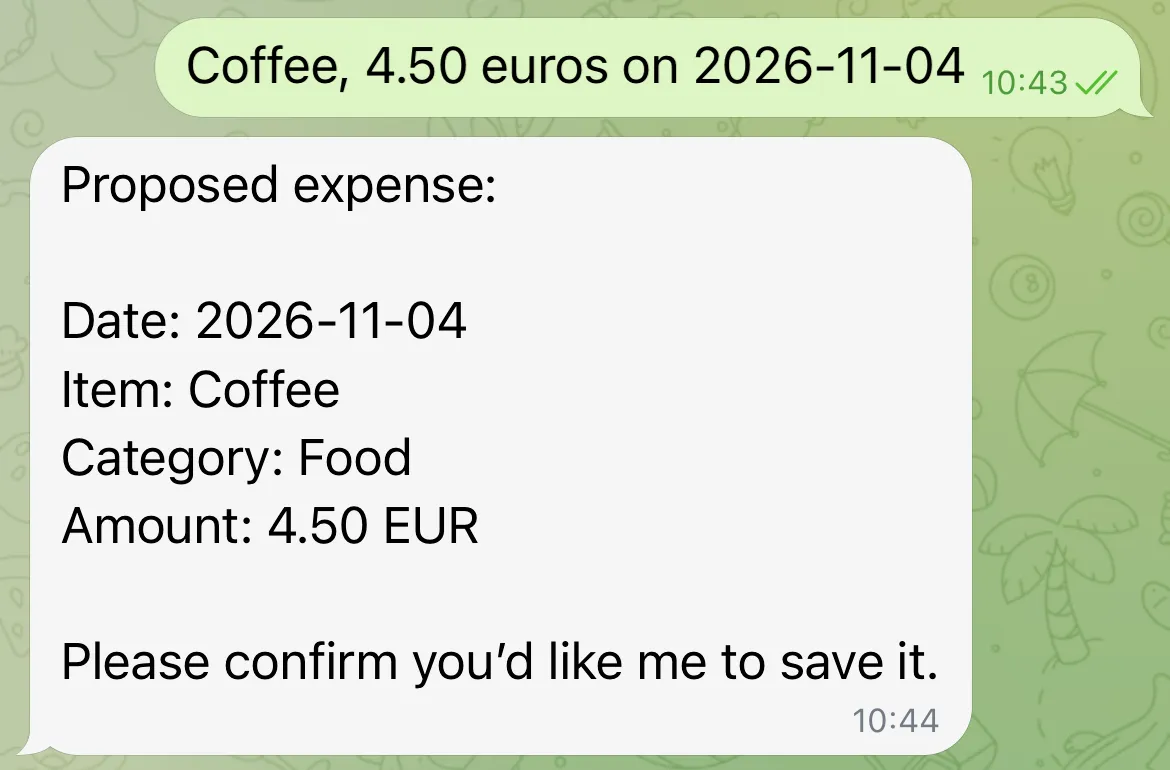
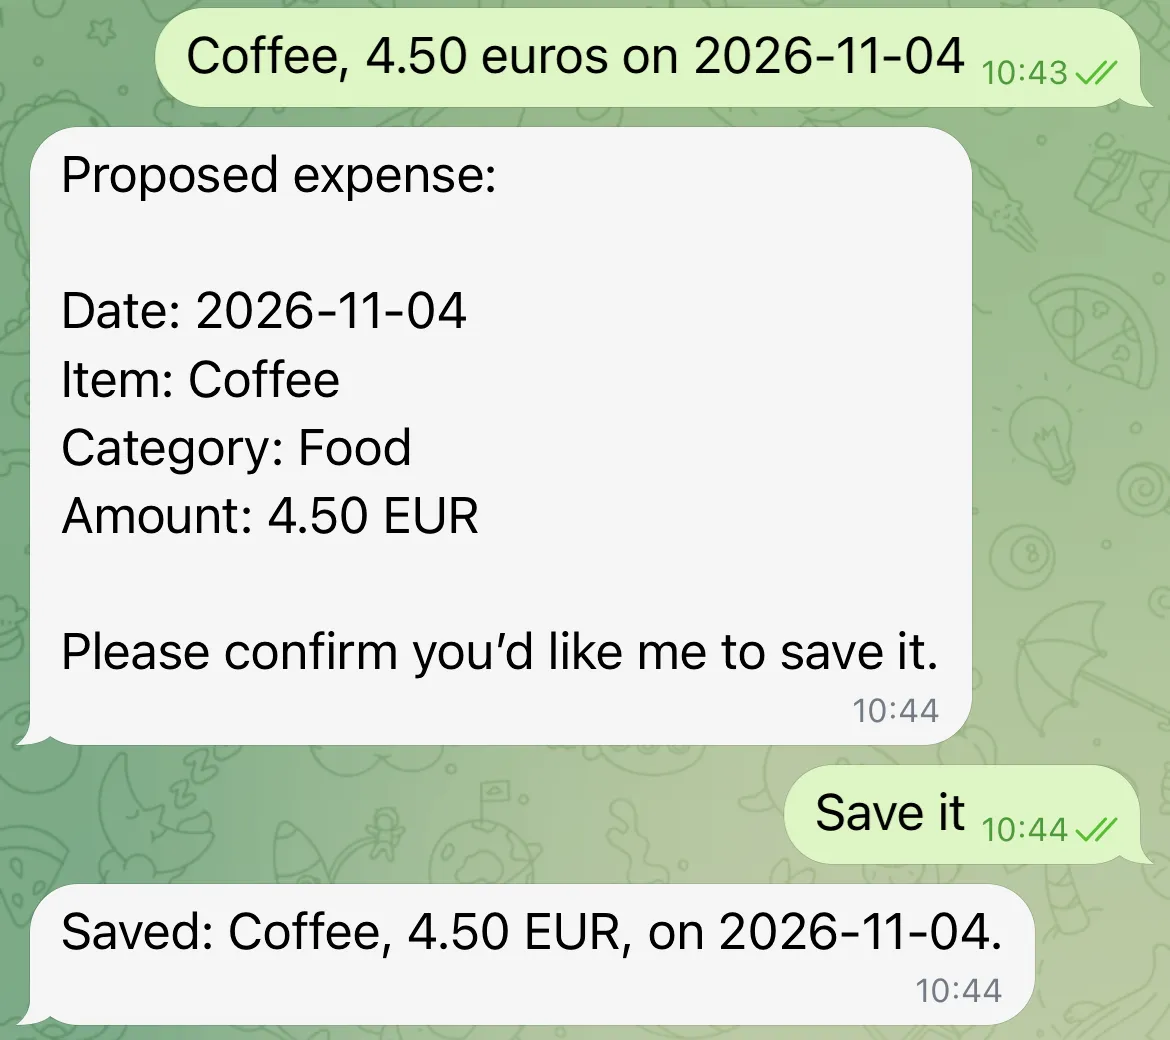
Send Save it once, then open the conversation in Quickchat AI Inbox. The saved reply has a 1 action called disclosure. Open it to see what happened behind the short Telegram answer.
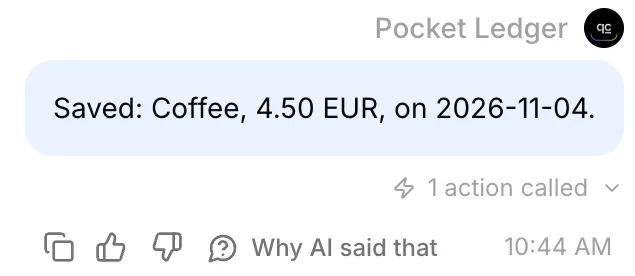 The same confirmation in Inbox, with the Action available to inspect.
Expand Result → Show full. Check the date, derived month, numeric amount, currency and HTTP status. In this live run, Google returned HTTP 200, updatedRows: 1 and updatedRange: Expenses!A5:H5.
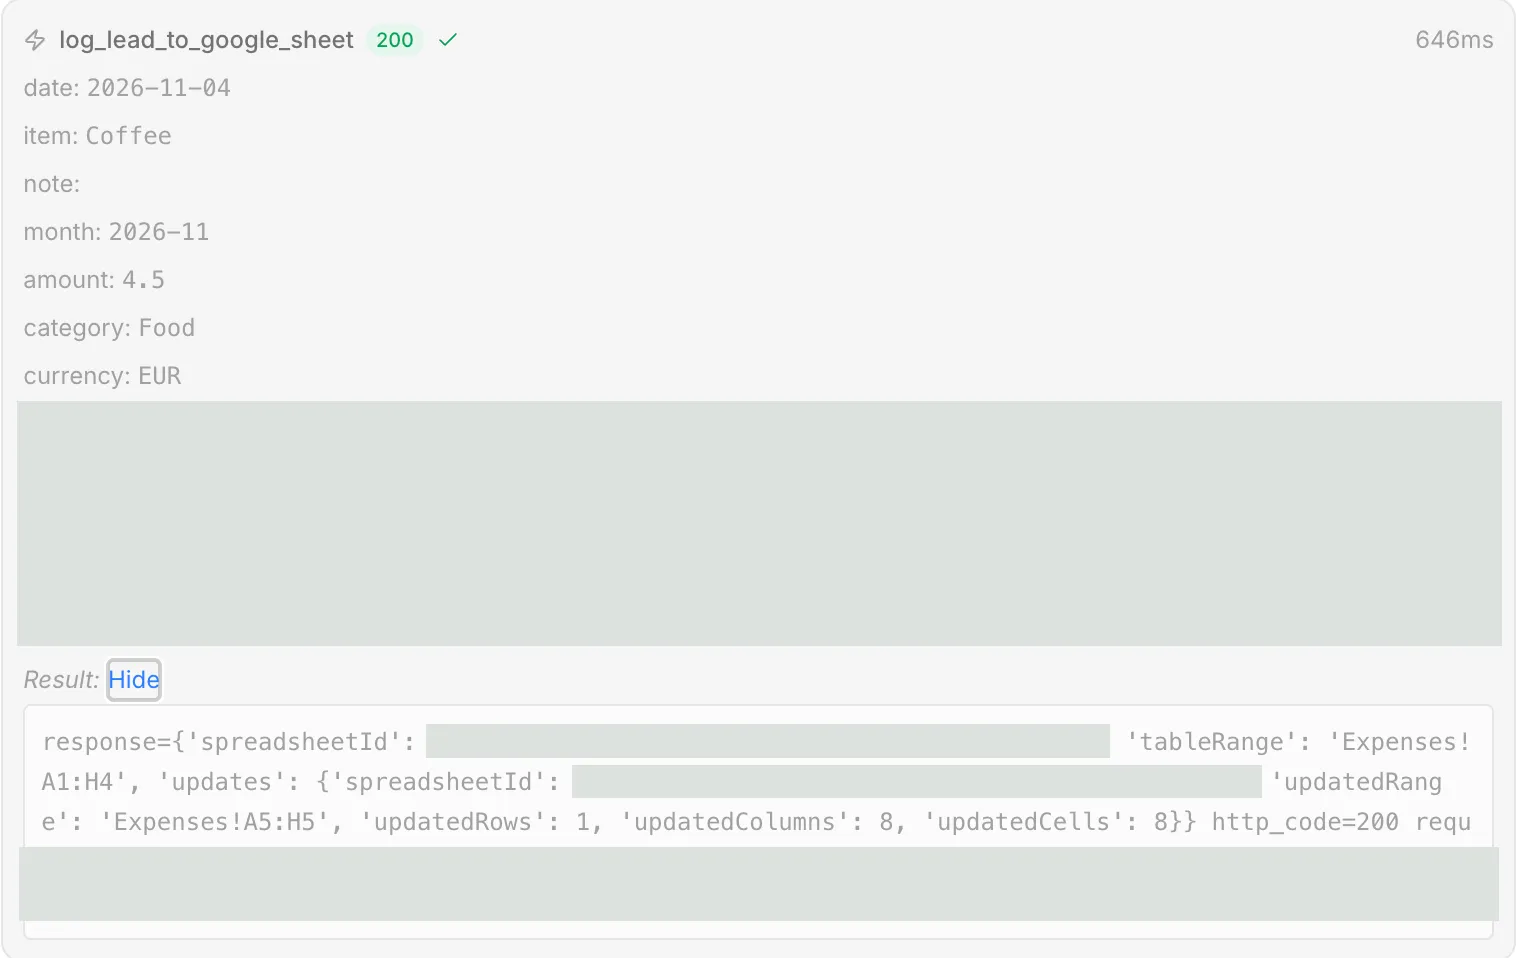 The save Action sent amount 4.5 as a number and wrote one row. Private identifiers are concealed; the returned range and result remain visible.
Finally, open Expenses. Row 5 should contain the same coffee, with 2026-11 in the month column, 4.50 in amount, and EUR in currency. The last column links back to the Inbox conversation, so you can trace an entry to the message that created it.
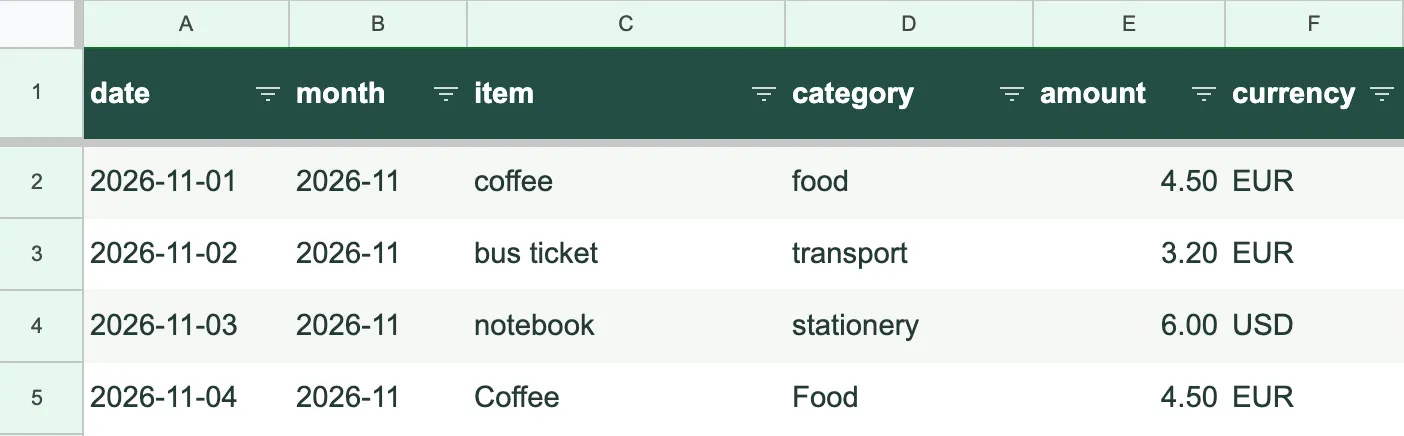 The fourth expense arrived through Telegram. The private Inbox link is concealed in the published image.
At this point you have the useful everyday habit: send, confirm, inspect. Next, give the bot something reliable to read when you ask where the month’s money went.
Step 6: How do you ask for a monthly total?
Let Google Sheets calculate the total, then let the read Action retrieve it. Keeping the arithmetic in the Sheet makes the answer inspectable even after a conversation ends.
Add a Summary tab
If you imported the starter workbook, Summary and its formulas are already prepared. Its starting values are EUR 7.70 and USD 6.00; saving the coffee changes only the EUR row. If you are building the Sheet manually, use the steps below.
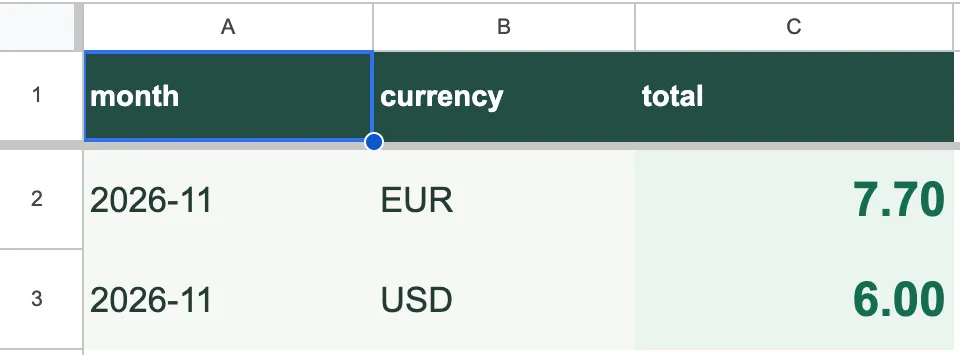 The starting point: two currencies, two independent totals.
- Create a tab named
Summary. Set columns A:B to Plain text, then entermonth,currency,totalin A1:C1. - Enter
2026-11andEURin A2:B2, then2026-11andUSDin A3:B3. - Enter this formula in C2 and fill it down to C3. Format C as a number with two decimal places.
=SUMIFS(Expenses!$E$2:$E$501,Expenses!$B$2:$B$501,A2,Expenses!$F$2:$F$501,B2)The SUMIFS function adds amounts whose month and currency match the summary row. If your Sheet’s locale requires semicolons between arguments, replace the formula’s commas with semicolons. JSON request numbers still use a decimal point.
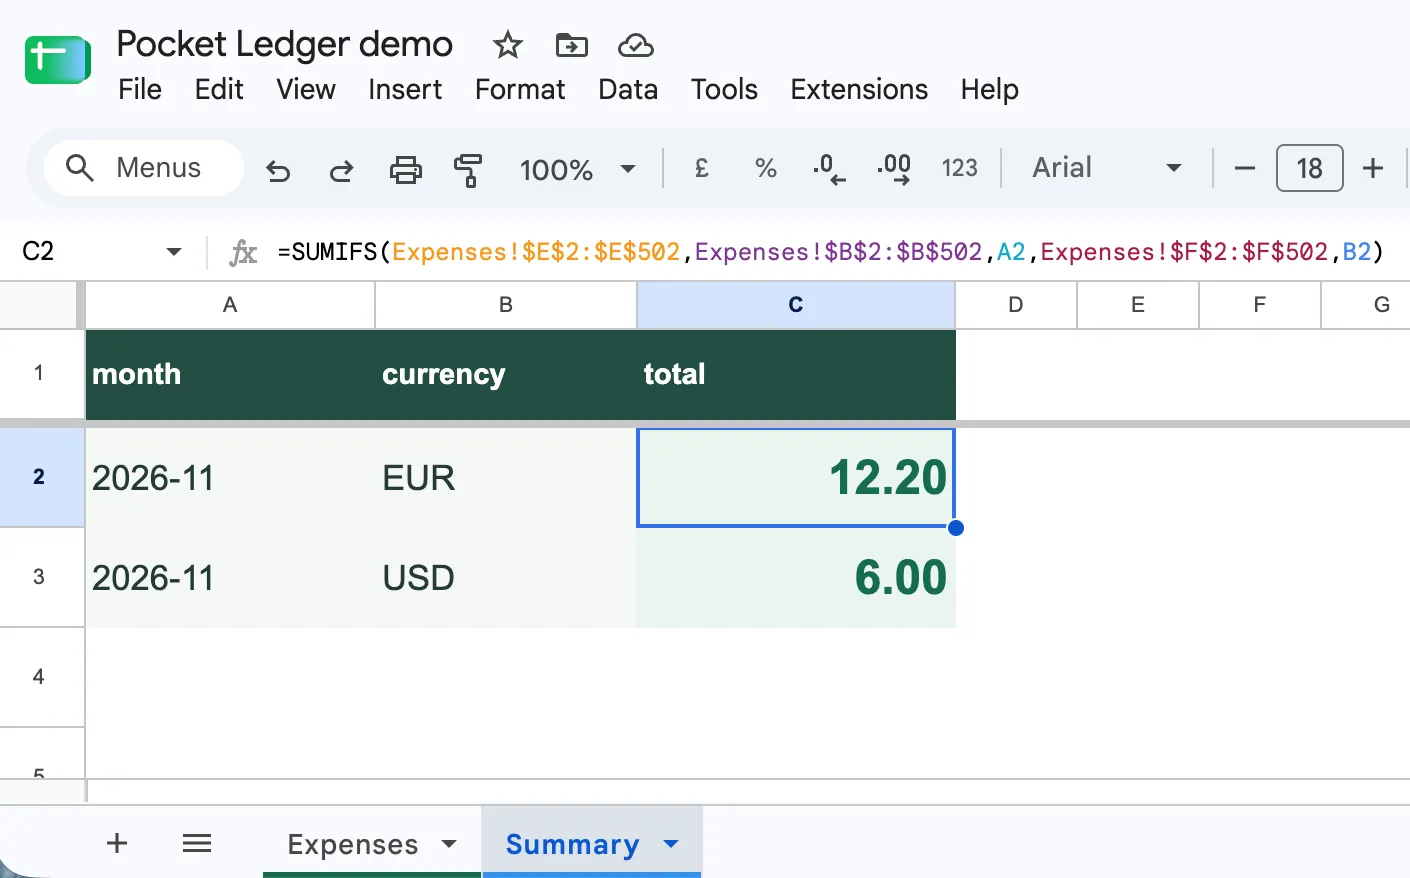 Select C2 to see the formula behind EUR 12.20. The USD row remains 6.00.
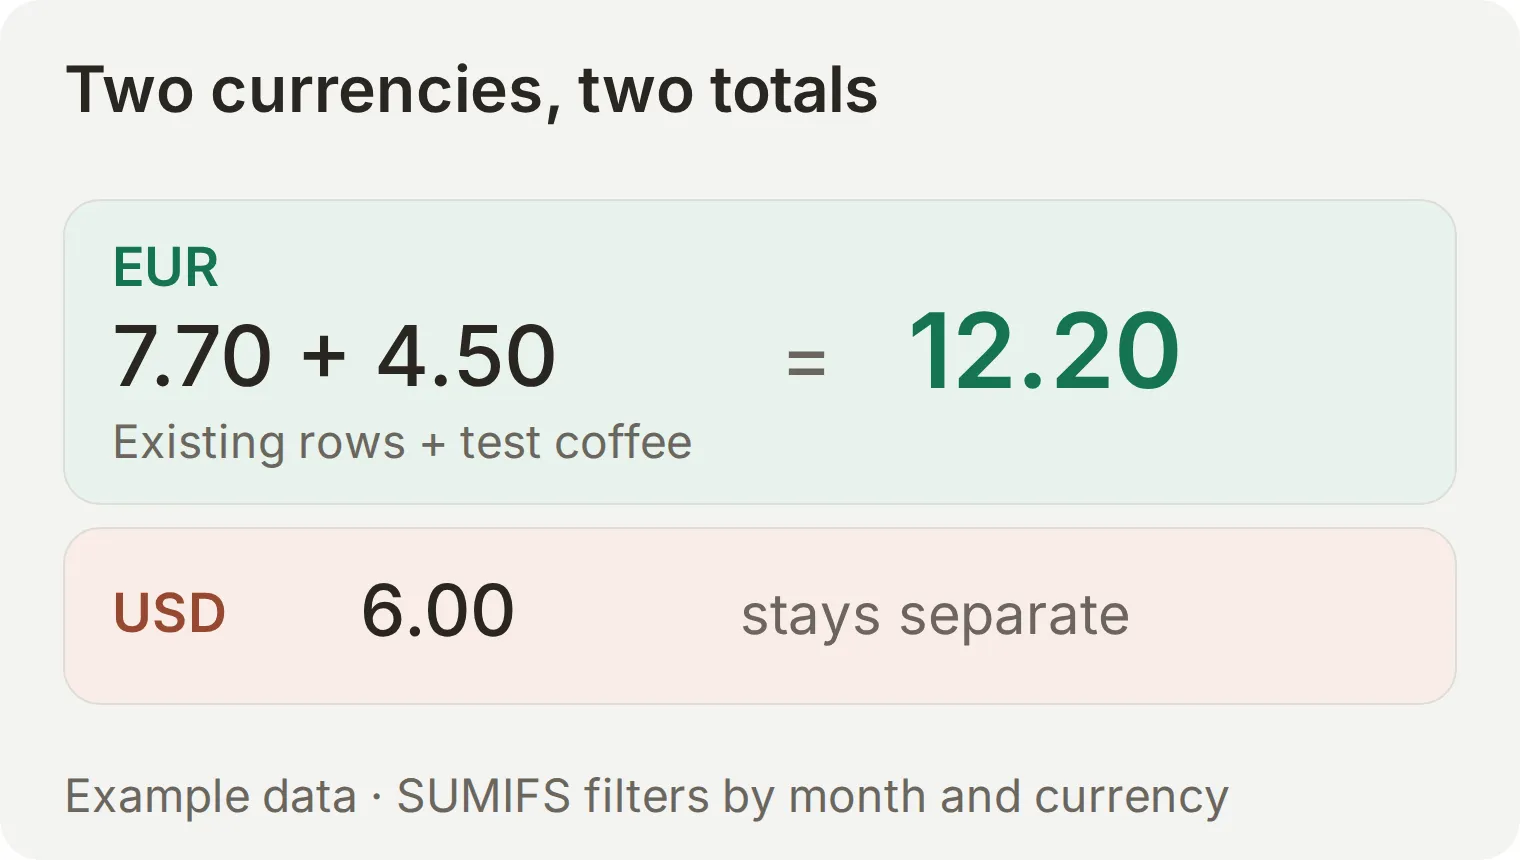 The starter EUR 7.70 plus the new EUR 4.50 coffee gives EUR 12.20. The USD 6.00 notebook belongs to its own total.
The starter formula covers rows 2 through 501. In this captured run, its three ranges end at 502 after the new row was inserted. Sheets may adjust references during insertion; check that all three Expenses ranges stay aligned and extend them together before entries fall outside the covered range. Add a month/currency summary row for each combination you want to ask about.
Add the reader Action
Open Actions & MCPs → Add Action → API Action. Use Generate with the request below; generated Actions start inactive. Name it read_expense_summary and keep When to run set to AI decides, so the result can inform the reply. Reuse the same actual spreadsheet ID and Google Sheets System Token. No user-supplied parameters are needed.
Copy the Action builder request
Create a read-only Google Sheets Action named read_expense_summary. Use GET for the Summary!A1:C25 range of the spreadsheet already created by this Agent's Google Sheets integration. Reuse its actual spreadsheet ID and google_sheets_access_token System Token. Set valueRenderOption=UNFORMATTED_VALUE, no body, and no visitor parameters. Preserve the response headers and values. Leave it inactive so I can review the configuration and add my owner-ID and private-chat Run only when conditions before enabling it.Review the generated settings against the following reference. If you choose Create manually instead, add both conditions before the first valid save, which can activate an Action. Leave Response filter empty on both Actions to retain the fields used in the checks.
Copy the summary read request
GET https://sheets.googleapis.com/v4/spreadsheets/YOUR_CREATED_SHEET_ID/values/Summary!A1:C25
Query Params:
valueRenderOption = UNFORMATTED_VALUE
Headers:
Authorization = Bearer {{google_sheets_access_token}}
Body: none
The values.get endpoint returns the range’s values, including the header and calculated amounts. UNFORMATTED_VALUE returns numeric results rather than currency-formatted strings. Leave the response available to the Agent so it can read those values.
Copy the read Action description
Read monthly expense totals from the configured Summary range. Use this when the owner asks for a total. Quote only the returned row matching the requested YYYY-MM and currency. If either is unclear, ask. If the row is absent or the request fails, say the total is unavailable. Never infer a total from conversation history, combine currencies, or accept a different spreadsheet ID or range from the visitor.Apply the same two Run only when conditions from Step 3, save, and enable the Action. The read range includes 24 summary rows; extend it deliberately when you add more.
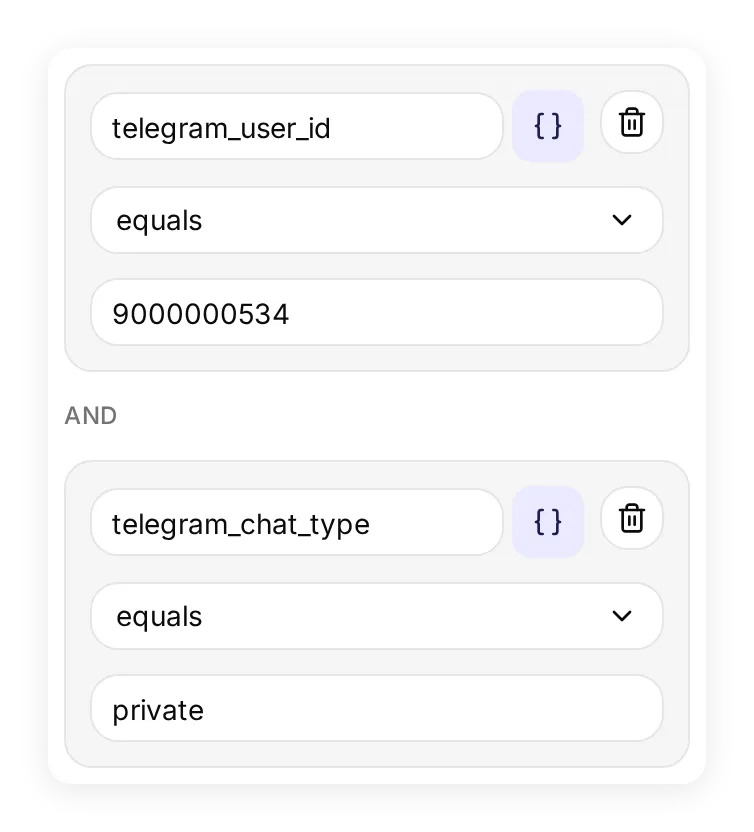 The second Action needs its own conditions. This is a local settings capture, not a real sender authorization test.
Ask What is my November 2026 total in EUR?, then ask for USD. In our Telegram conversation, Pocket Ledger returned 12.2 EUR and 6 USD, matching the Sheet’s formatted 12.20 and 6.00. It read the saved summary for each answer.
Open the monthly-total reply in Inbox and expand its Action. Compare the returned row with Summary!C2. The live response below includes 2026-11, EUR, 12.2 and a separate USD, 6 row, with HTTP 200.
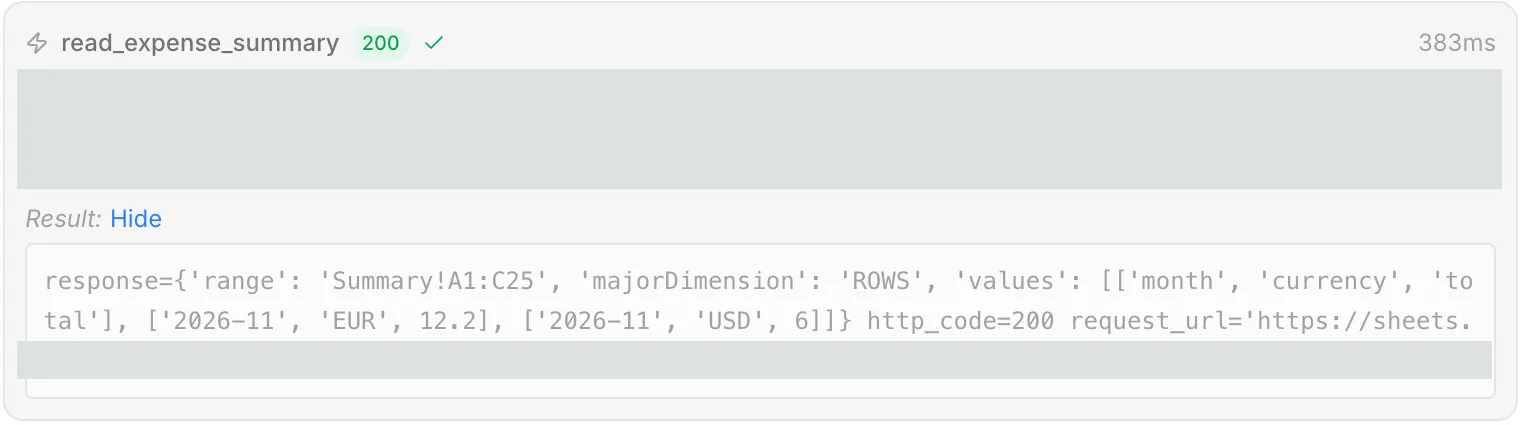 The reply, the returned values and the Sheet now agree. This is the finish line you saw at the top.
How do you check mistakes before using real expenses?
Test incomplete requests and blocked callers as deliberately as the successful coffee. Keep the demo data in place until the checks below pass.
| Try this | What to verify |
|---|---|
Lunch, $12 yesterday | The Agent asks for the currency and actual date. No new row appears. |
| Correct a proposed amount before confirming | The corrected proposal is confirmed before a single row is appended. |
| Ask for the November total in EUR, then USD | Separate results: EUR 12.20 and USD 6.00 for the example data. |
| Ask for December 2026 with no December summary row | The Agent says the total is unavailable, rather than inventing zero. |
| A second sender asks for a total and tries to save an expense | Both Actions are refused and no personal values are disclosed. |
| The owner makes the same requests in a group | Both Actions are refused because the chat is not private. |
| A save fails or times out | The reply reports failure or uncertainty. Inspect the Sheet before retrying. |
For repeatable language tests, open Testing → Create Dataset → Paste messages and use the kit’s messages and evaluation criteria. Run a full conversation separately for the confirmation sequence. Preview or Simulation metadata is a fixture; it does not prove that a real second Telegram sender is blocked.
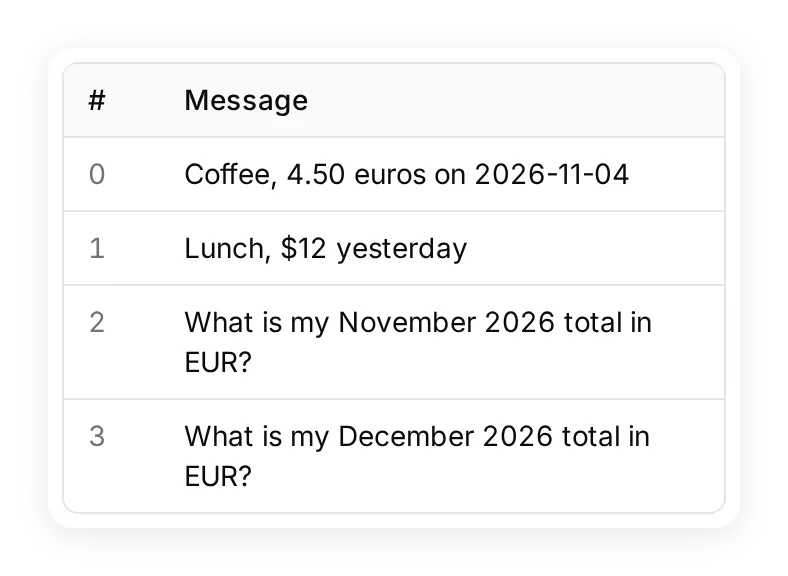 The local dataset is prepared for testing. Its presence is not a completed Simulation run or evidence of a Google Sheets write.
If a behavior fails, change one relevant instruction, then repeat the same input and inspect the call and Sheet again. For example, a premature append calls for a closer look at the save Action’s confirmation wording. Confirmation is an instruction, not a database uniqueness guarantee. After a timeout, checking the Sheet matters more than pressing send again.
Once the journey works, remove the fictional expense rows, keep the headers and formulas, and add summary rows for the months and currencies you actually use. Your first real purchase can follow the same small routine as the coffee.
Can an AI assistant help configure Pocket Ledger?
A connected account-management assistant can help prepare the Agent and review the Action settings. Follow Manage with AI using Quickchat AI’s ChatGPT listing or Claude listing. Give it the setup kit and this request:
Help me configure Pocket Ledger from this setup kit. Inspect the available Quickchat AI tools first. Prepare the Main Prompt and the two HTTP Actions using the exact field names, numeric amount type and fixed ranges. Keep log_lead_to_google_sheet as the starter name. Ask me to complete Google OAuth and Telegram Bot Token setup in the dashboard. Apply both owner/private run conditions before enabling either Action. Do not run credit-consuming tests or append expenses until I ask. Report any setting your tools cannot configure so I can complete it in the dashboard.The owner completes Google consent and the Telegram connection. Review the settings and run the same checks above regardless of who entered them.
Frequently asked questions
How do I track expenses in Telegram with Google Sheets?
Connect a Telegram bot to a Quickchat AI Agent and authorize Google Sheets. Configure one Action to append an expense after confirmation and another to read a formula-based monthly summary. Restrict both Actions to your Telegram user ID and a private chat.
Can the bot tell me how much I spent this month?
Yes, when the requested month and currency have a row in the configured Summary range. Google Sheets calculates the total with SUMIFS; the read Action retrieves it. An append-only Action cannot retrieve totals, and a missing summary row is not a zero.
Can someone else read my expenses through the Telegram bot?
Both personal-data Actions must require your verified telegram_user_id and telegram_chat_type equal to private. These conditions block calls from other senders and groups. Test both cases before adding personal data, and keep access to the Sheet and Quickchat AI account restricted too.
Is this Telegram expense tracker free?
Creating a Telegram bot is free. Quickchat AI’s Free plan supports personal, non-commercial learning with a limited AI-credit allowance. AI replies and Simulation Testing use credits; ongoing use depends on your available allowance and plan.
Do I need Apps Script, Python or an automation server?
This recipe uses Quickchat AI Actions and a Google Sheets formula. You paste the provided request settings, JSON body and prompt into the dashboard; you do not deploy Apps Script, a Python bot or an automation server.
Can I use my existing expense spreadsheet?
This recipe uses the spreadsheet created by the Quickchat AI Google Sheets integration. Its drive.file authorization does not give it unrestricted access to your Drive. Do not replace the spreadsheet ID with an arbitrary existing file and assume it is accessible.
Can the bot read receipt photos or voice notes?
This tutorial covers typed expenses. Receipt extraction needs its own Telegram image-delivery and confirmation test before you rely on it. Voice transcription and PDF receipt parsing are not part of this setup.
How does it handle different currencies and duplicate entries?
Each currency gets a separate monthly total; the recipe does not convert currencies. Confirmation reduces accidental entries but does not provide atomic duplicate prevention. If a save times out, inspect the Sheet before sending it again.