

Introduction
Your AI Agent talks to every visitor on your site. Some are ready to buy, some ask a question it cannot answer, some request a feature you do not have yet, and some want a demo. By default, all of that is gone when the chat closes.
This guide shows you how to connect your AI Agent to Google Sheets so each of those moments becomes a row in a sheet your team already uses. No Zapier, no webhooks, no engineer. You need two things:
- a Quickchat AI Agent (sign up here and use for free)
- a Google account
The mechanism is AI Actions: custom HTTP requests your Agent can make during a conversation. Quickchat AI has a one-click Google Sheets connection that creates a sheet and a starter logging action for you, and from there you shape it and add as many reports as you want. By the end you will have four working reports, and you will have tested each one yourself.
This is a long, exact walkthrough. The canonical reference for AI Actions lives in the docs at docs.quickchat.ai/ai-agent/actions. For other worked examples of a custom action, see connect your AI Agent to HubSpot to log contacts, deals, and tickets, send Slack notifications with AI Actions, or build an AI Telegram bot to manage your group.
What you will build
Four reports, each writing to its own tab of one Google Sheet:
| Report | Tab | When the Agent writes a row |
|---|---|---|
| Leads | Leads | A visitor shows buying intent and shares an email |
| Unanswered questions | Unanswered | The Agent cannot answer a factual question |
| Feedback | Feedback | A visitor requests a feature, reports a bug, or gives praise |
| Demo requests | Demos | A visitor asks for a demo or a call |
The screenshots below come from a test Agent built for a fictional company, Tideline, a subscription-analytics platform for SaaS businesses. The company is invented so the example stays neutral, but every conversation and every row shown here was produced by a real Agent running the real reply pipeline. Use your own company’s details when you follow along.
How the Google Sheets integration works
The whole feature rests on one idea: an AI Action is a described HTTP request, and a Google Sheet row is one such request.
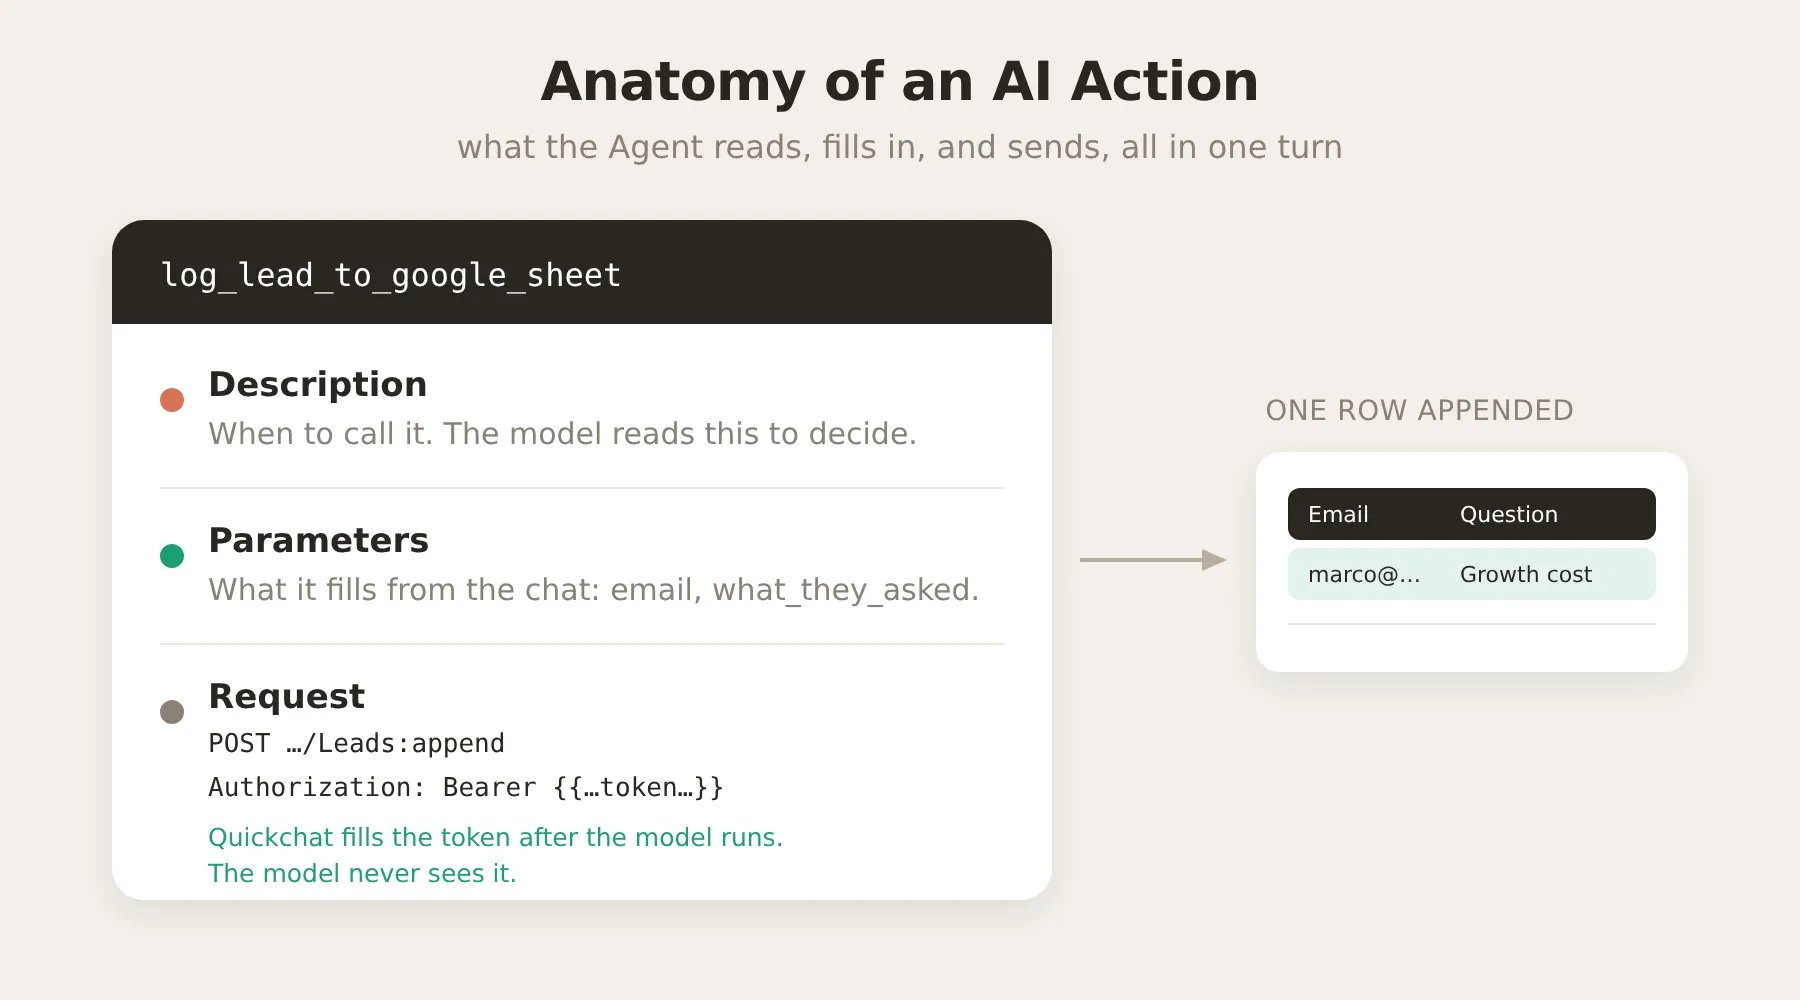 An AI Action has four parts. The description is what the model reads to decide whether to call it; the parameters are what it fills in from the conversation.
A few more facts make the rest of the post easier to follow.
- Writing a row is one API call. Google Sheets has an
appendendpoint that adds a row to a tab. Each report is aPOSTto that endpoint with the row values in the body. - The columns are not fixed. They are whatever your action sends. You decide the columns by editing the action’s body and the sheet’s header row, so the same integration can log leads, bug reports, or anything else.
- Least-privilege access. The Google connection requests only the
drive.filescope, which grants access exclusively to files the app creates. It cannot see the rest of your Drive. - The Agent never sees your credentials. The request carries an
Authorizationheader whose value is a placeholder,{{google_sheets_access_token}}. Quickchat AI fills that placeholder with a real, auto-refreshed token after the model has done its part. The token never enters the prompt. - Two built-in variables are available to any action without being defined as parameters:
{{conversation_url}}, a deep link back to the conversation in your Inbox, and{{conversation_channel}}, the channel the visitor used (web widget, Slack, WhatsApp, and so on).
Step 1: Create your AI Agent and give it knowledge
A Quickchat Agent’s behavior comes from two places: its Identity (the main prompt) and the knowledge you give it to answer from. Actions & MCPs is where you extend what it can do, such as writing to a Google Sheet. This guide works in Identity (this step and Step 4) and Actions & MCPs (Steps 2, 3 and 6), and tests everything in AI Preview (Step 5).
After you sign up, open Identity in the left sidebar. The AI Main Prompt is where you describe what your Agent is and how it should behave. Give it a short, accurate description of your product, and put the facts it should be able to state (plans, prices, which integrations exist) into its knowledge so it can answer questions directly.
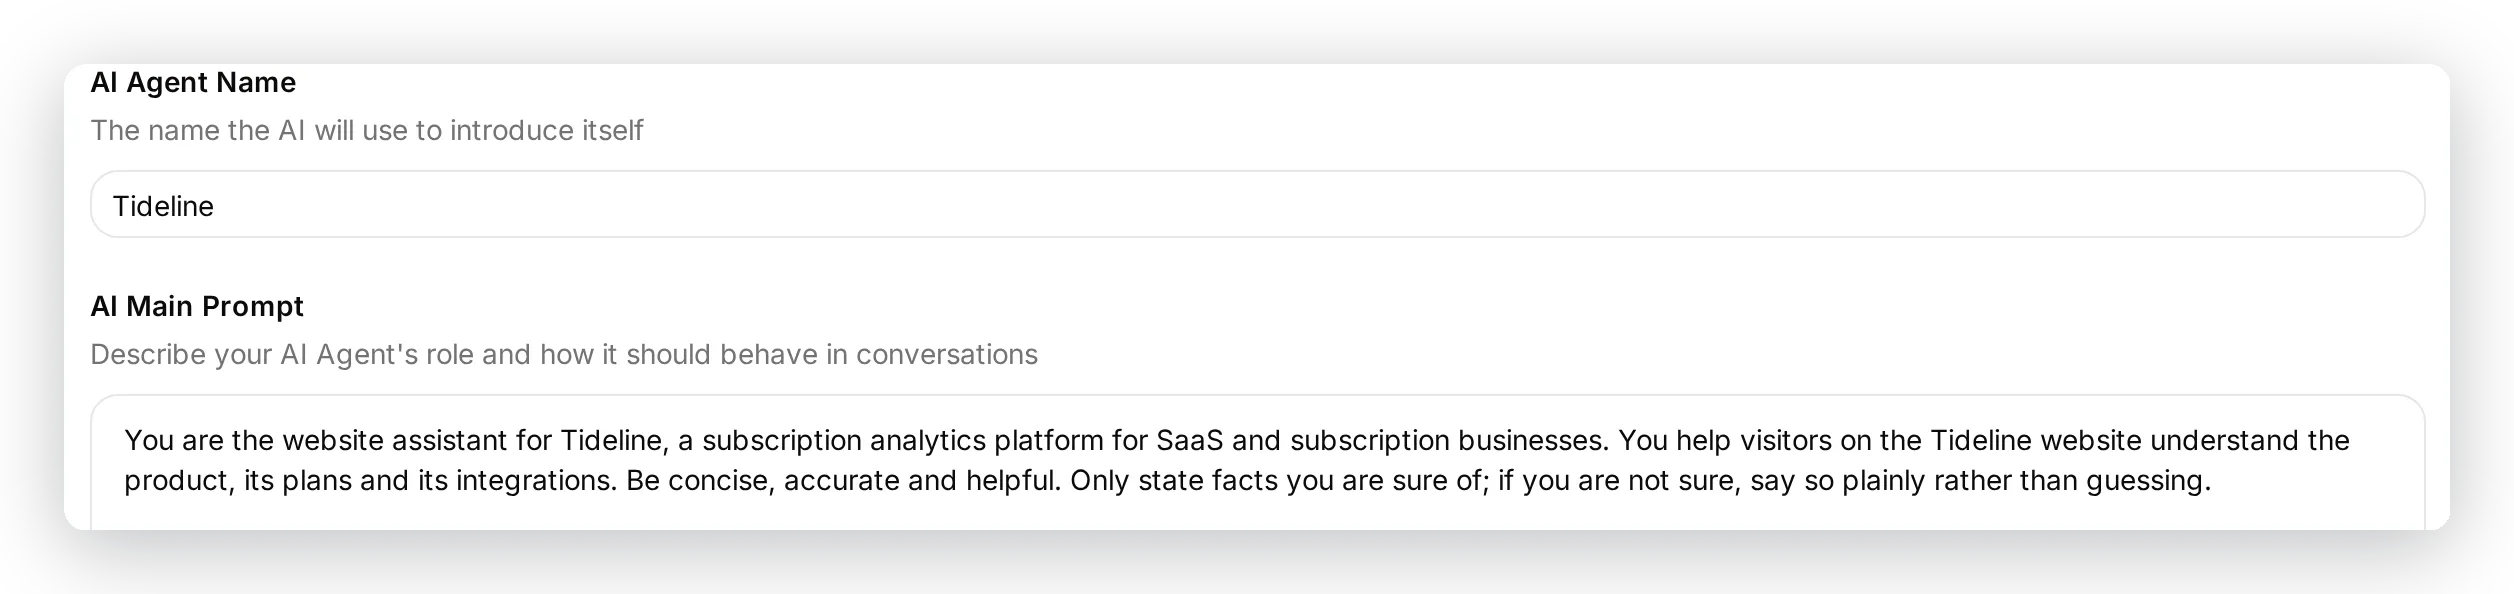 The Agent’s name and its main prompt: a short, accurate description of your product and how the Agent should behave. You add the reporting block to the end of this prompt in Step 4.
Do not worry about writing all of that prompt yourself. Every prompt, action description, and request body in this guide is given as a copy-paste block, so you will paste them rather than type them out. You will return to this screen in Step 4 to add the reporting instructions.
Step 2: Connect Google Sheets
Open Actions & MCPs in the sidebar, click Add Action, and choose Google Sheets.
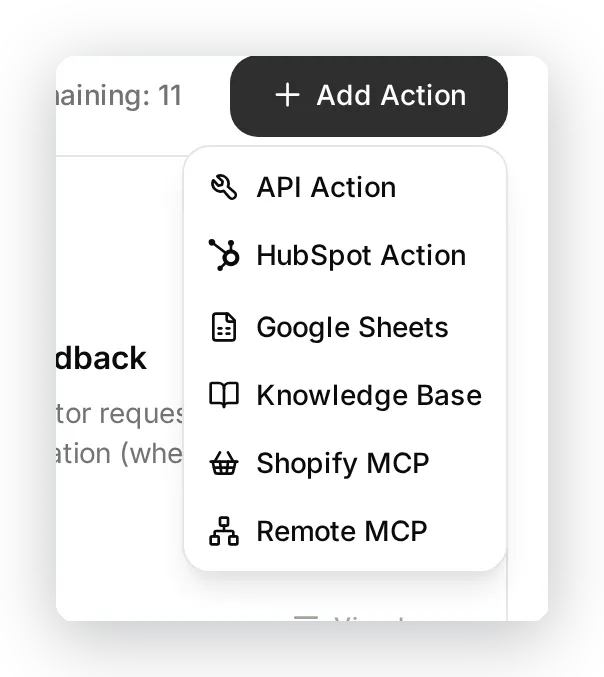 Actions & MCPs, then Add Action, then Google Sheets.
The connect dialog opens and, before you grant any access, spells out what the one click will set up: a new Google Sheet in your Drive, and a ready-to-use logging action, preset for leads, that you review and switch on.
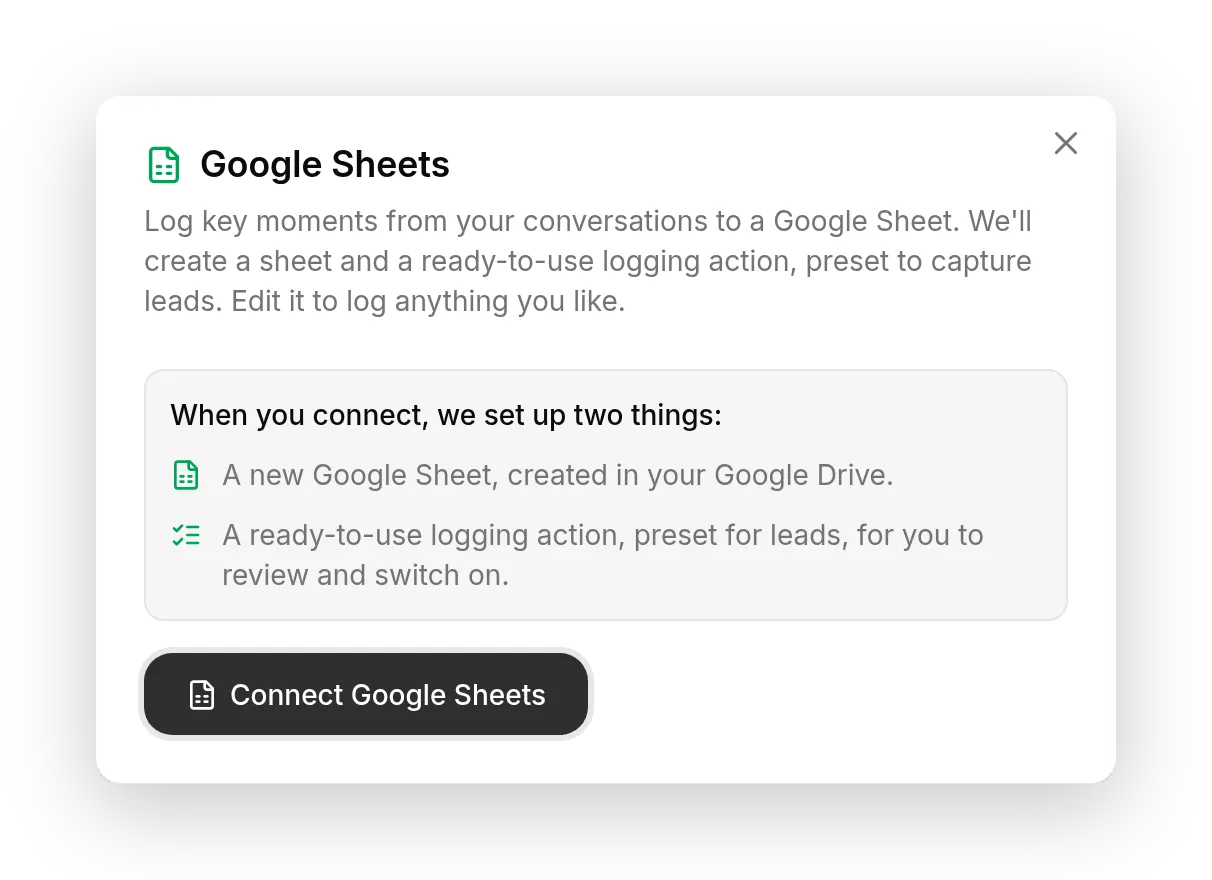 The dialog explains the two things connecting will set up, before you grant any access.
Click Connect. Google asks which account to use and then which permission to grant. The only scope requested is drive.file, which lets the integration touch only the files it creates, never the rest of your Drive.
 Google’s own screen: pick the account whose Drive the sheet should live in. The next screen grants the
 drive.file permission, which lets the integration touch only the files it creates.
When you approve, you land back on the Actions & MCPs page in Quickchat AI, with the connected dialog open:
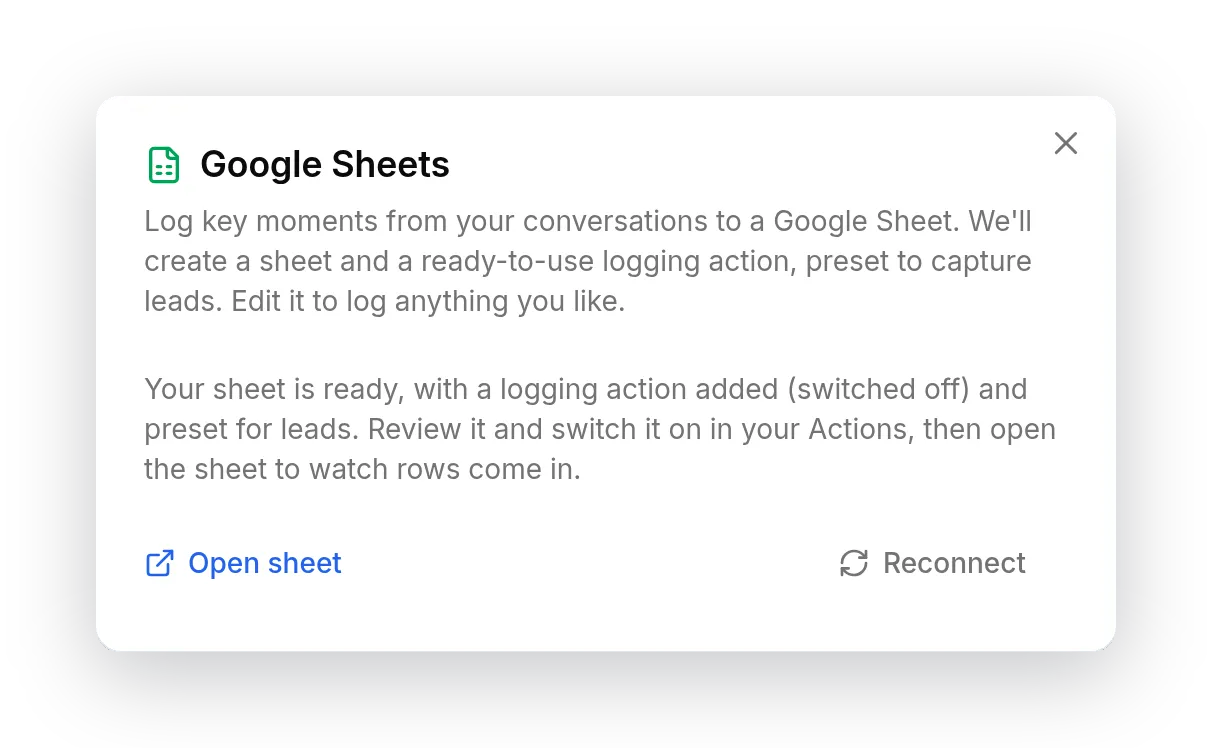 Connected, back on the Actions page. Quickchat AI created a sheet and one starter logging action, added switched off and ready to review.
That one click did two things automatically:
- Created a spreadsheet in your Google Drive, with one tab (
Leads) and a header row. - Added a single, disabled AI Action called
log_lead_to_google_sheet, already wired to that sheet.
That starter action is a normal, fully editable AI Action. The integration presets it for lead capture because that is the most common case, but the name, the columns, and the description are all yours to change. In this guide you will review it, switch it on as the first report, then build three more like it in Step 6.
Step 3: Review and enable the lead action
The auto-created log_lead_to_google_sheet action is listed under Custom Actions, switched off. Open it to review the configuration before enabling it. This is the template every other report follows, so it is worth understanding in full.
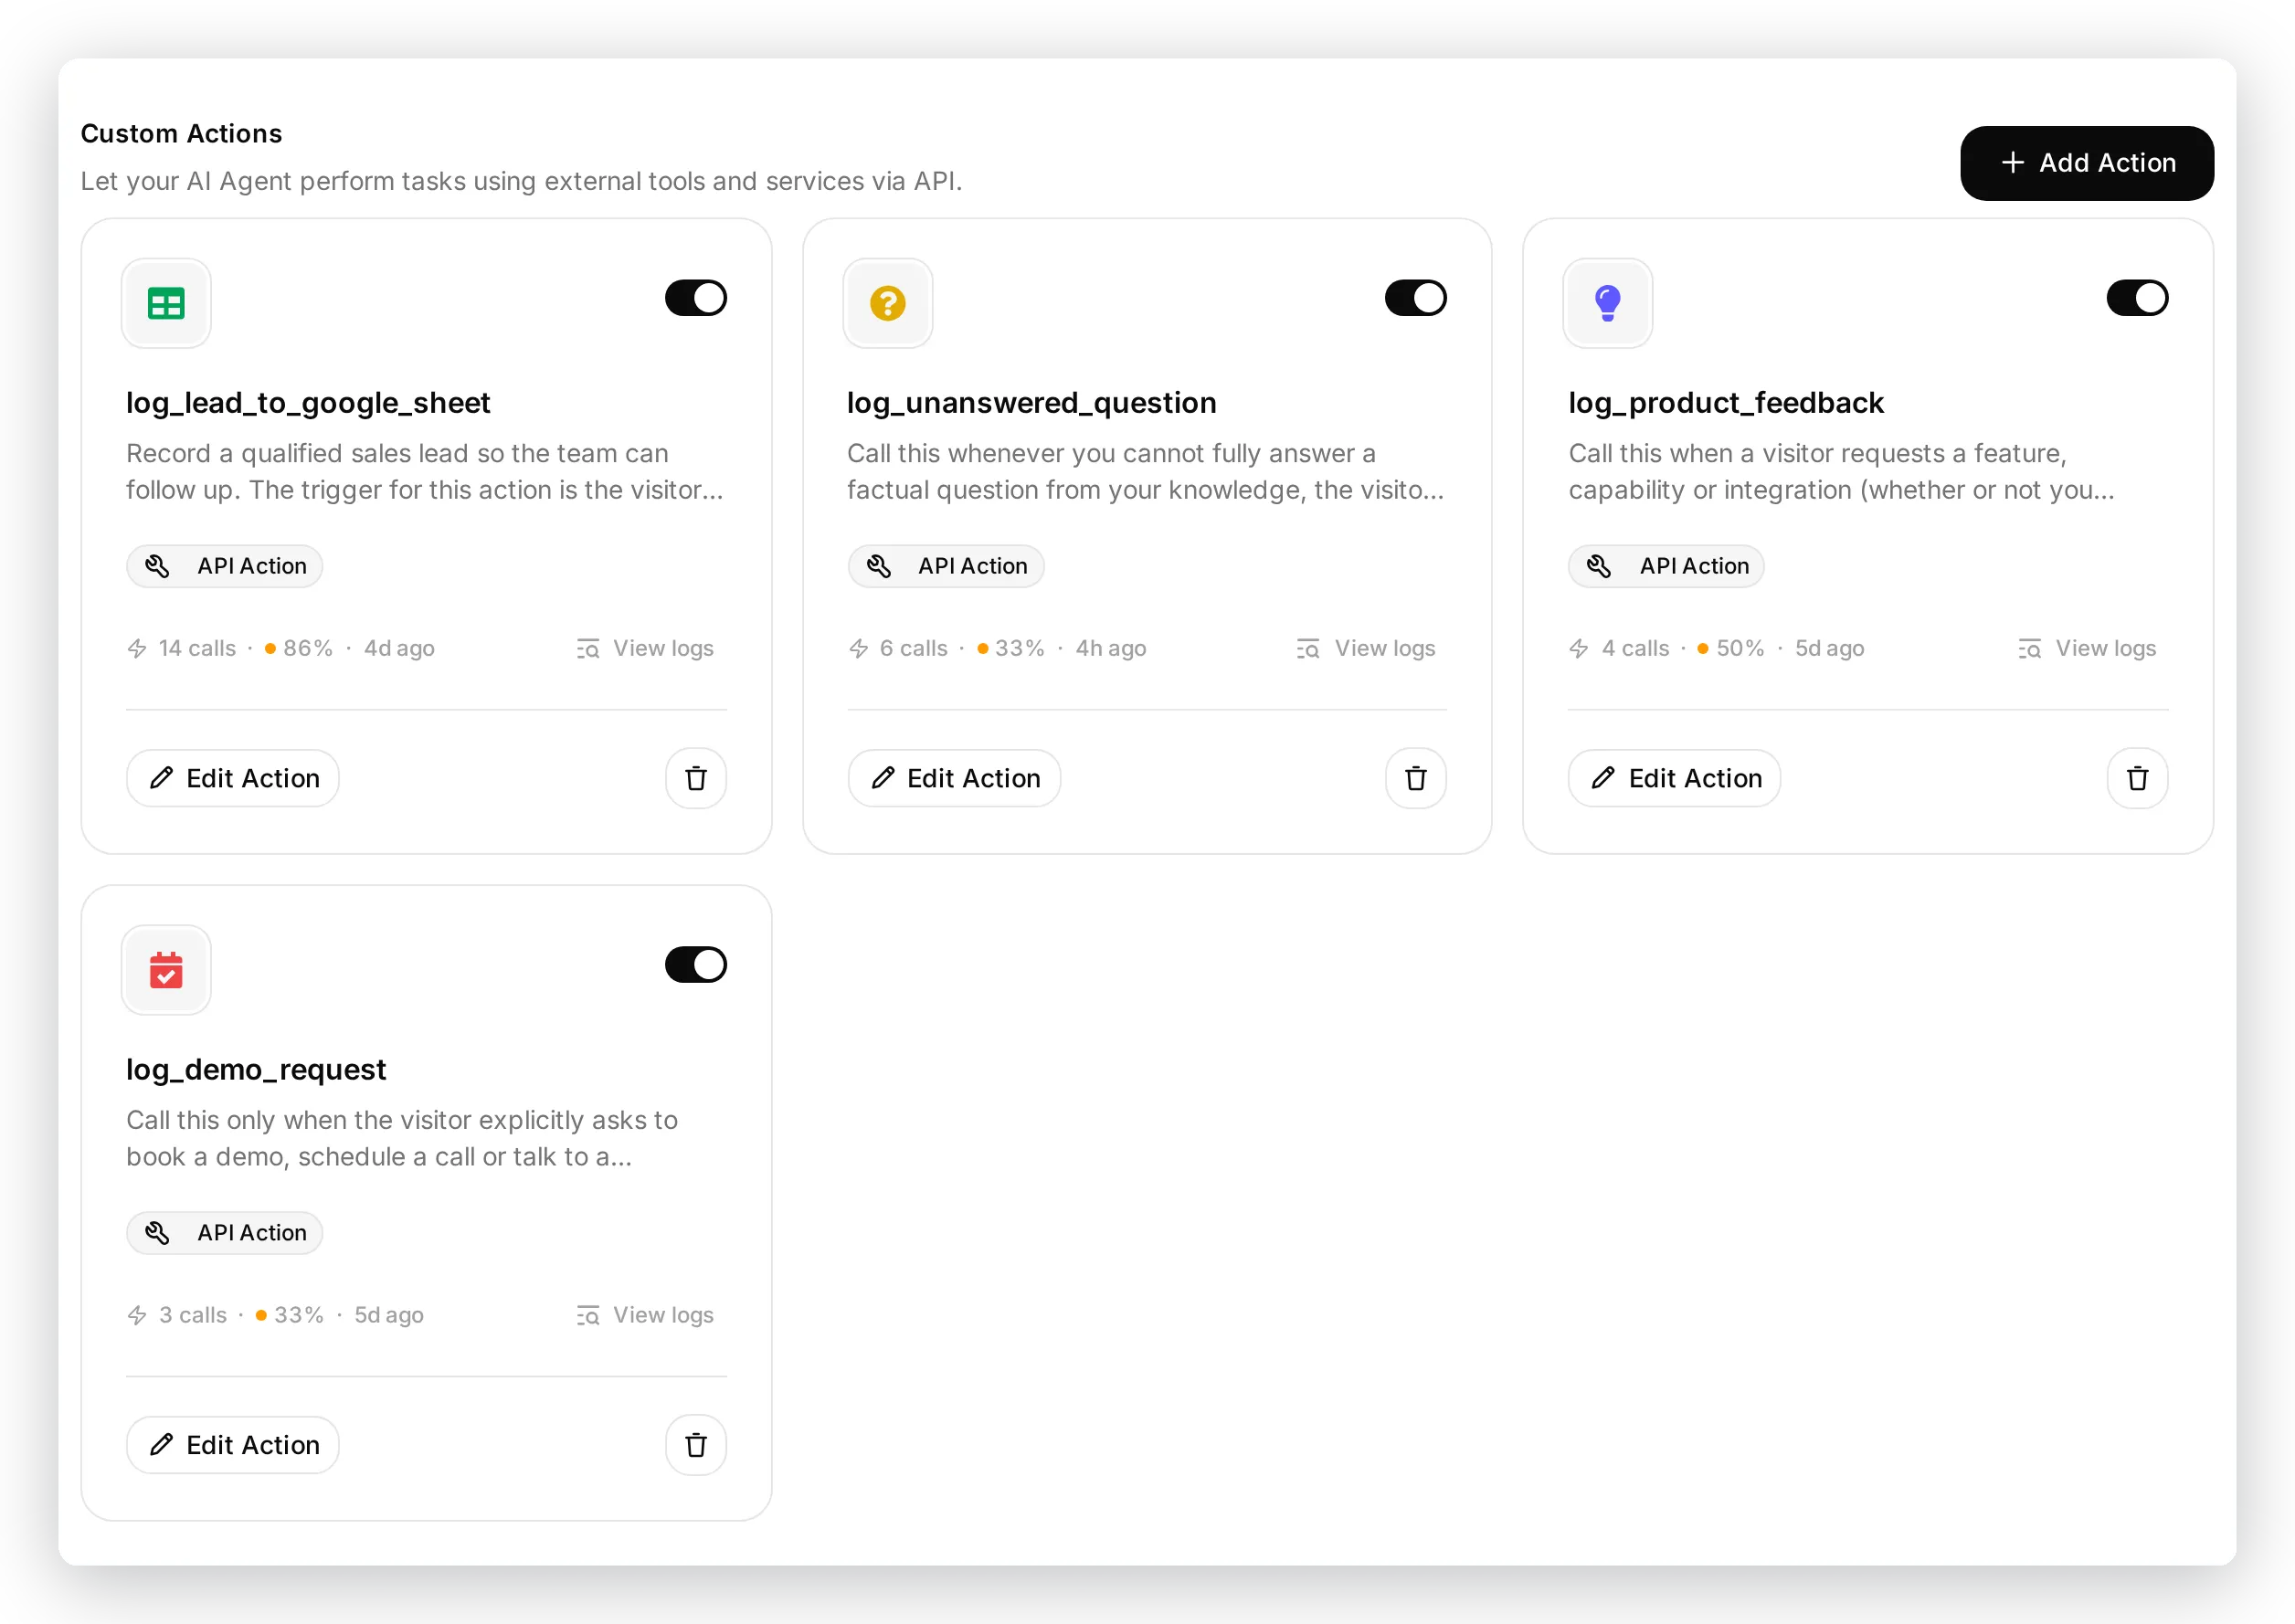 The four reporting actions. Only the first,
 log_lead_to_google_sheet, is created for you; the other three you add in Step 6.
The top of the action holds its name and the parameters the Agent collects:
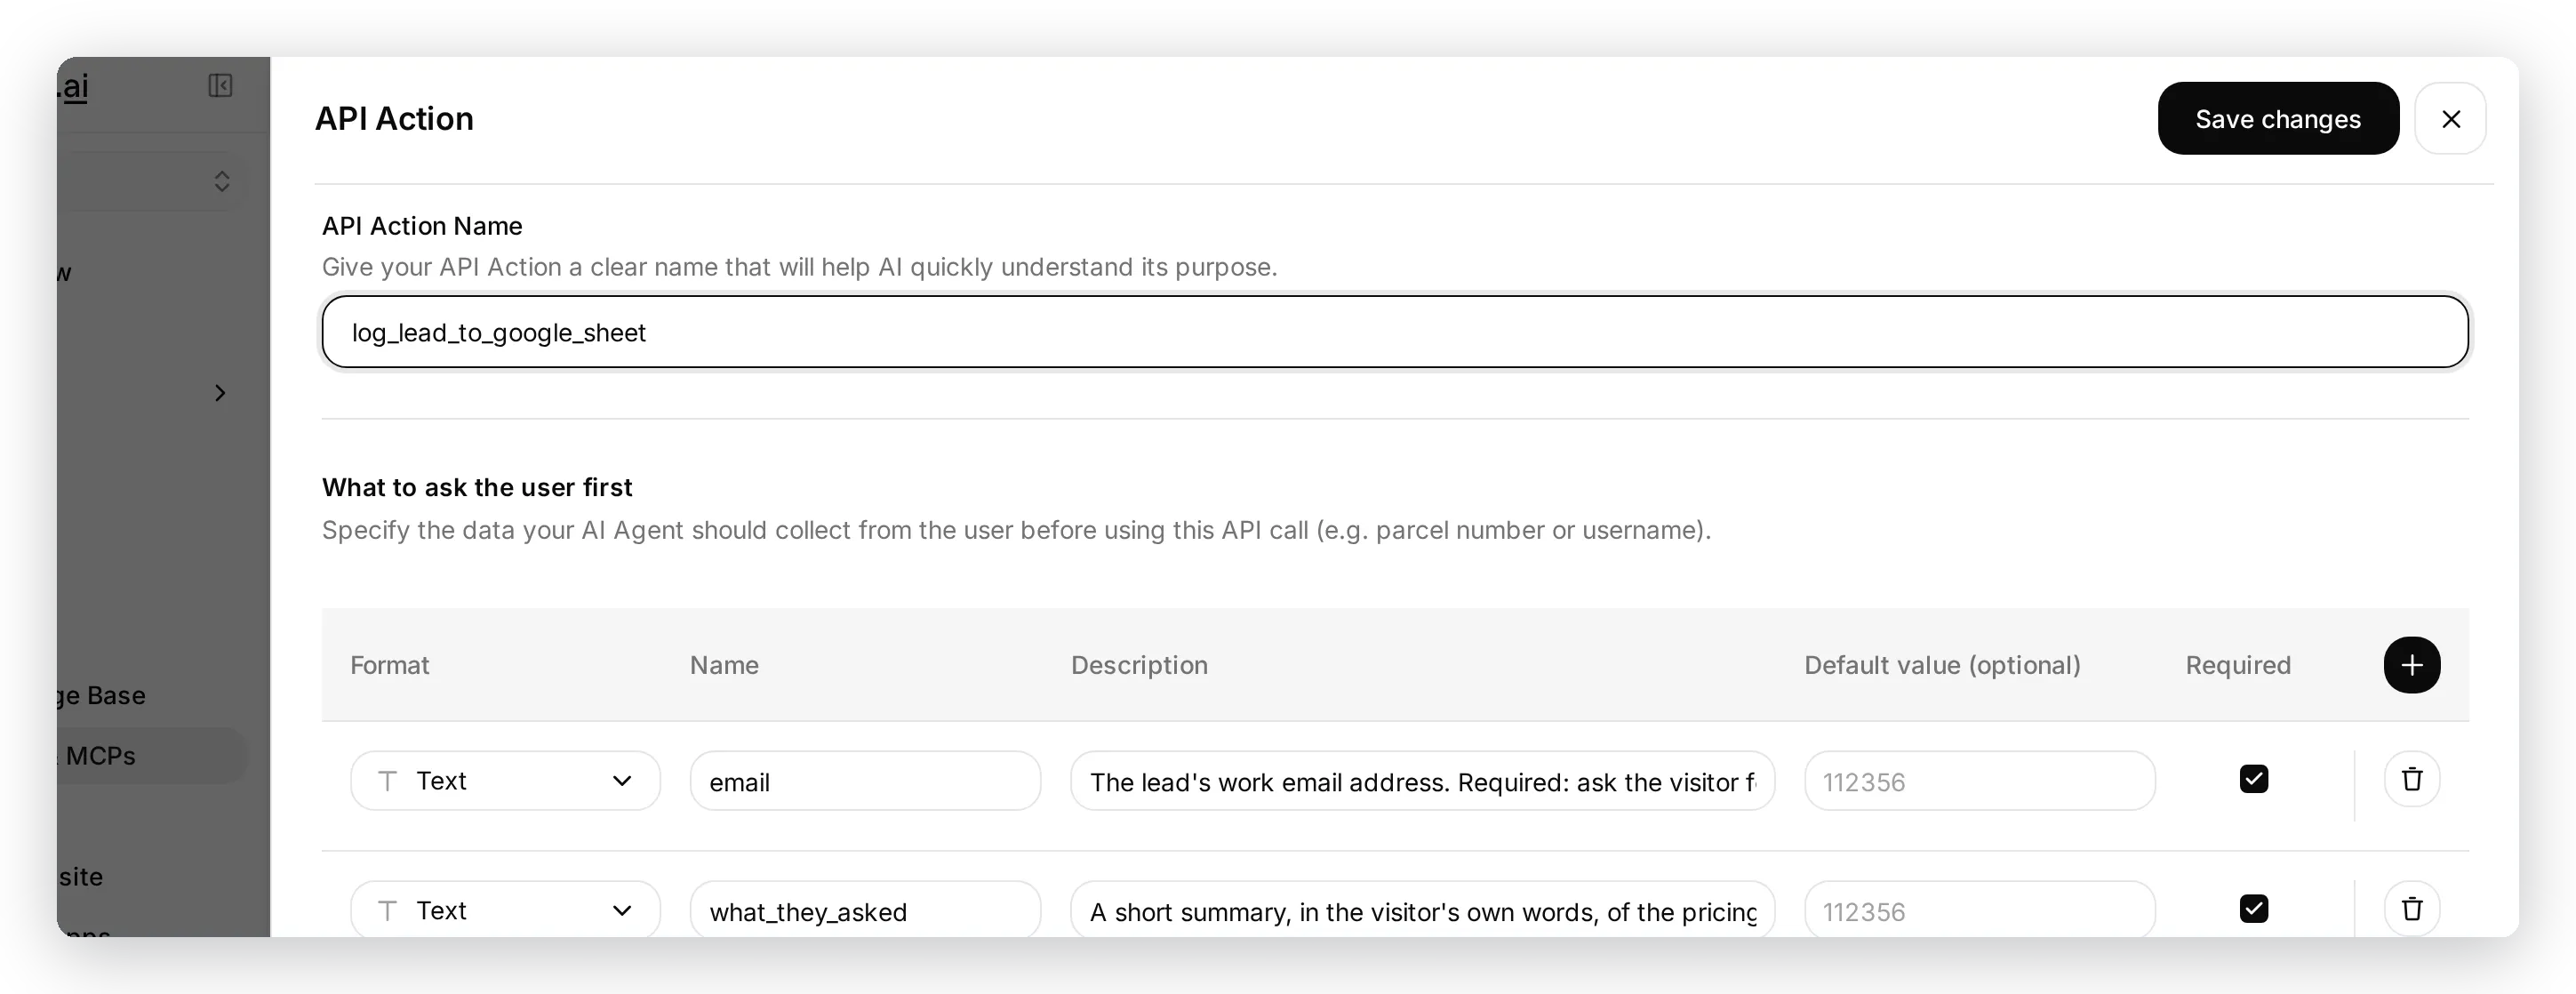 The action name and the parameters the Agent fills in from the conversation.
Scroll down to the API Endpoint section. Because Quickchat AI created the sheet and this action together, the URL is already filled in with your spreadsheet’s ID, the method is POST, and the headers are set:
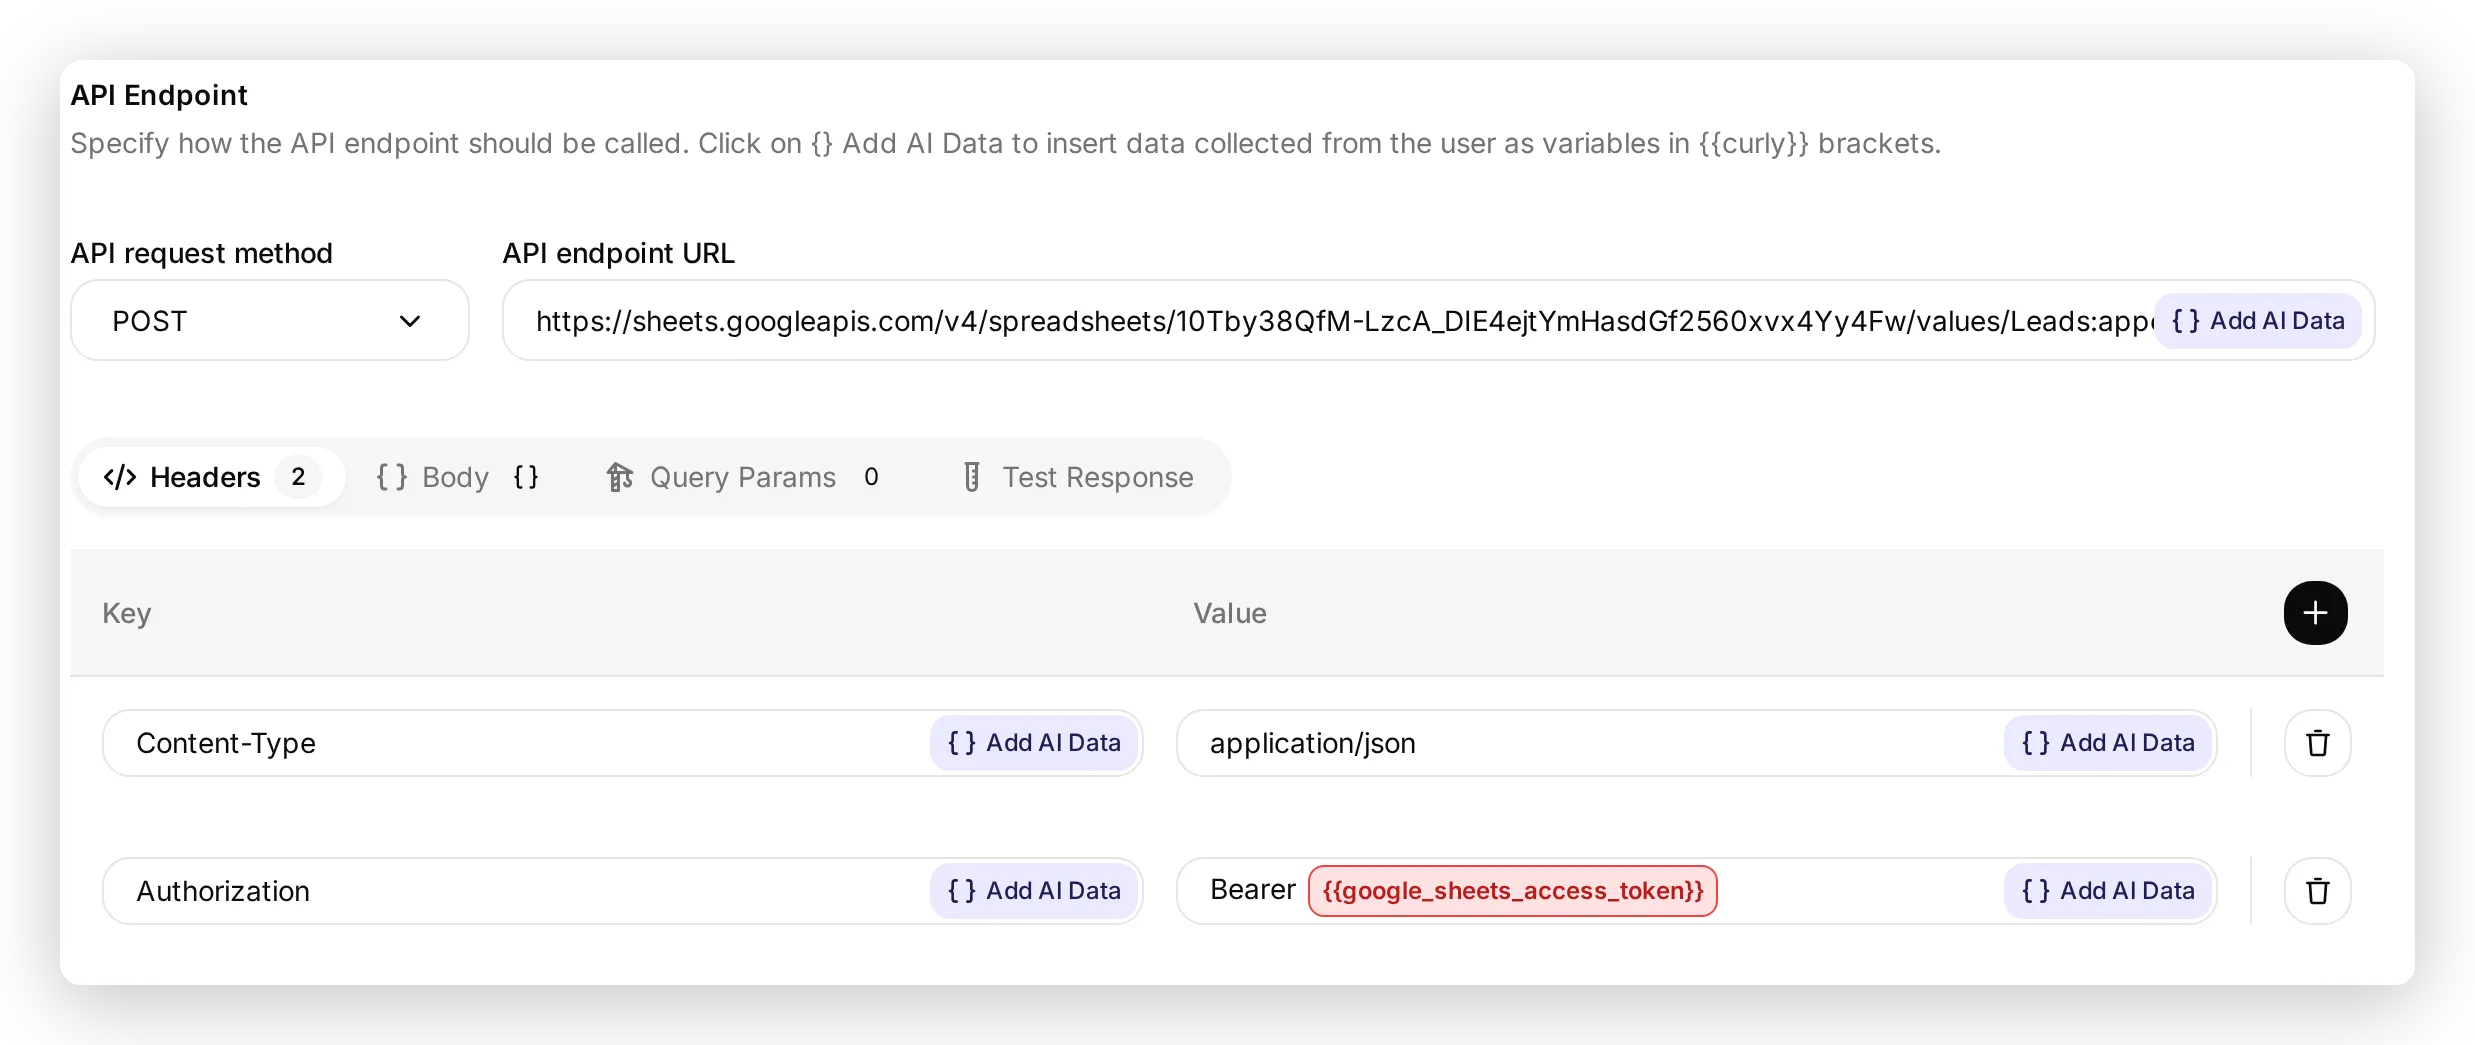 The full endpoint URL already contains your sheet’s ID. Query Params stays empty: the
 valueInputOption=RAW setting rides along in the URL. The Authorization header carries the token placeholder.
The {SPREADSHEET_ID} you see written in API documentation is not a live placeholder. At connect time, Quickchat AI created your sheet and wrote its real ID straight into this action’s URL, which is why the field already shows the complete address:
https://sheets.googleapis.com/v4/spreadsheets/<your sheet ID>/values/Leads:append?valueInputOption=RAWKeep valueInputOption=RAW: it inserts values literally, so a message that starts with = or + is not parsed as a spreadsheet formula. You will copy this exact URL into the other three reports in Step 6, changing only the tab name, so there is never an ID to track down by hand.
The headers are the same for every report (you can read them off the screenshot above):
| Key | Value |
|---|---|
Authorization | Bearer {{google_sheets_access_token}} |
Content-Type | application/json |
Now the part that makes the columns flexible. Switch to the Body tab, still inside the API Endpoint section. The request body is a single row, and each cell is one parameter. The order of the cells in the body is the order of the columns in the sheet:
{ "values": [[ "{{email}}", "{{what_they_asked}}", "{{conversation_url}}", "{{conversation_channel}}" ]] }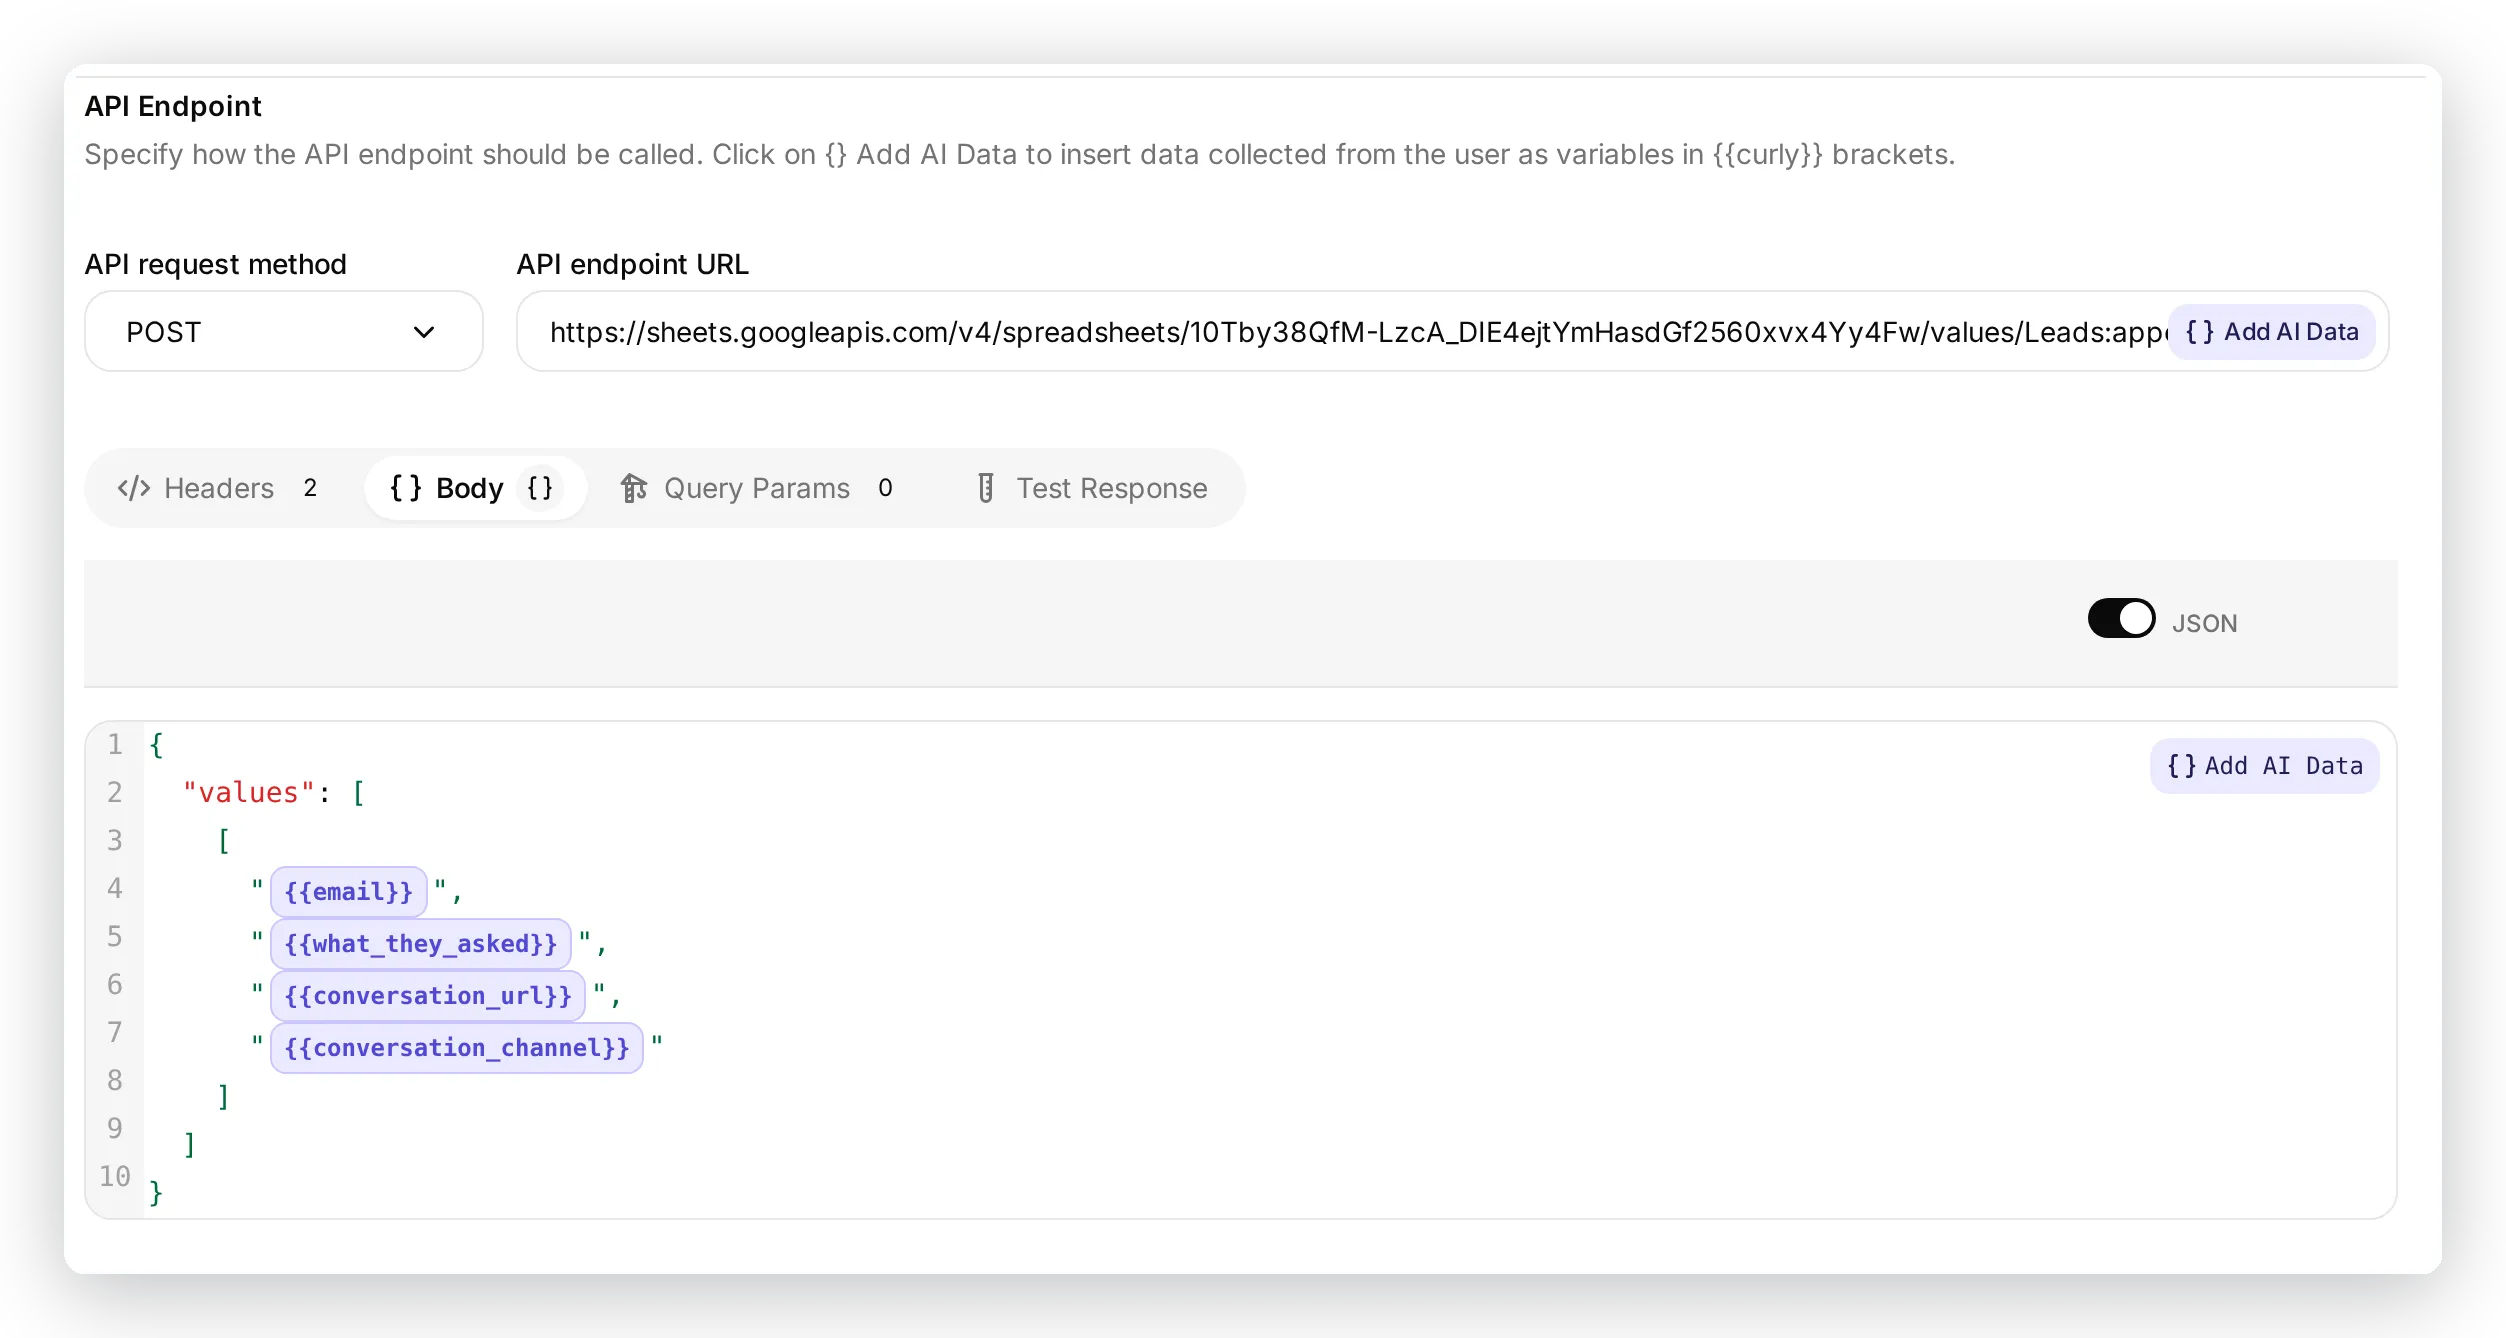 The request body lives in the Body tab. Each
 {{parameter}} is one cell, and the cells run in the same order as the sheet’s columns.
So the columns are not hardcoded by the integration. They are defined by this body plus the header row of the tab. Change the body and the header, and you change what the report records. Here is how a real lead conversation maps onto this row:
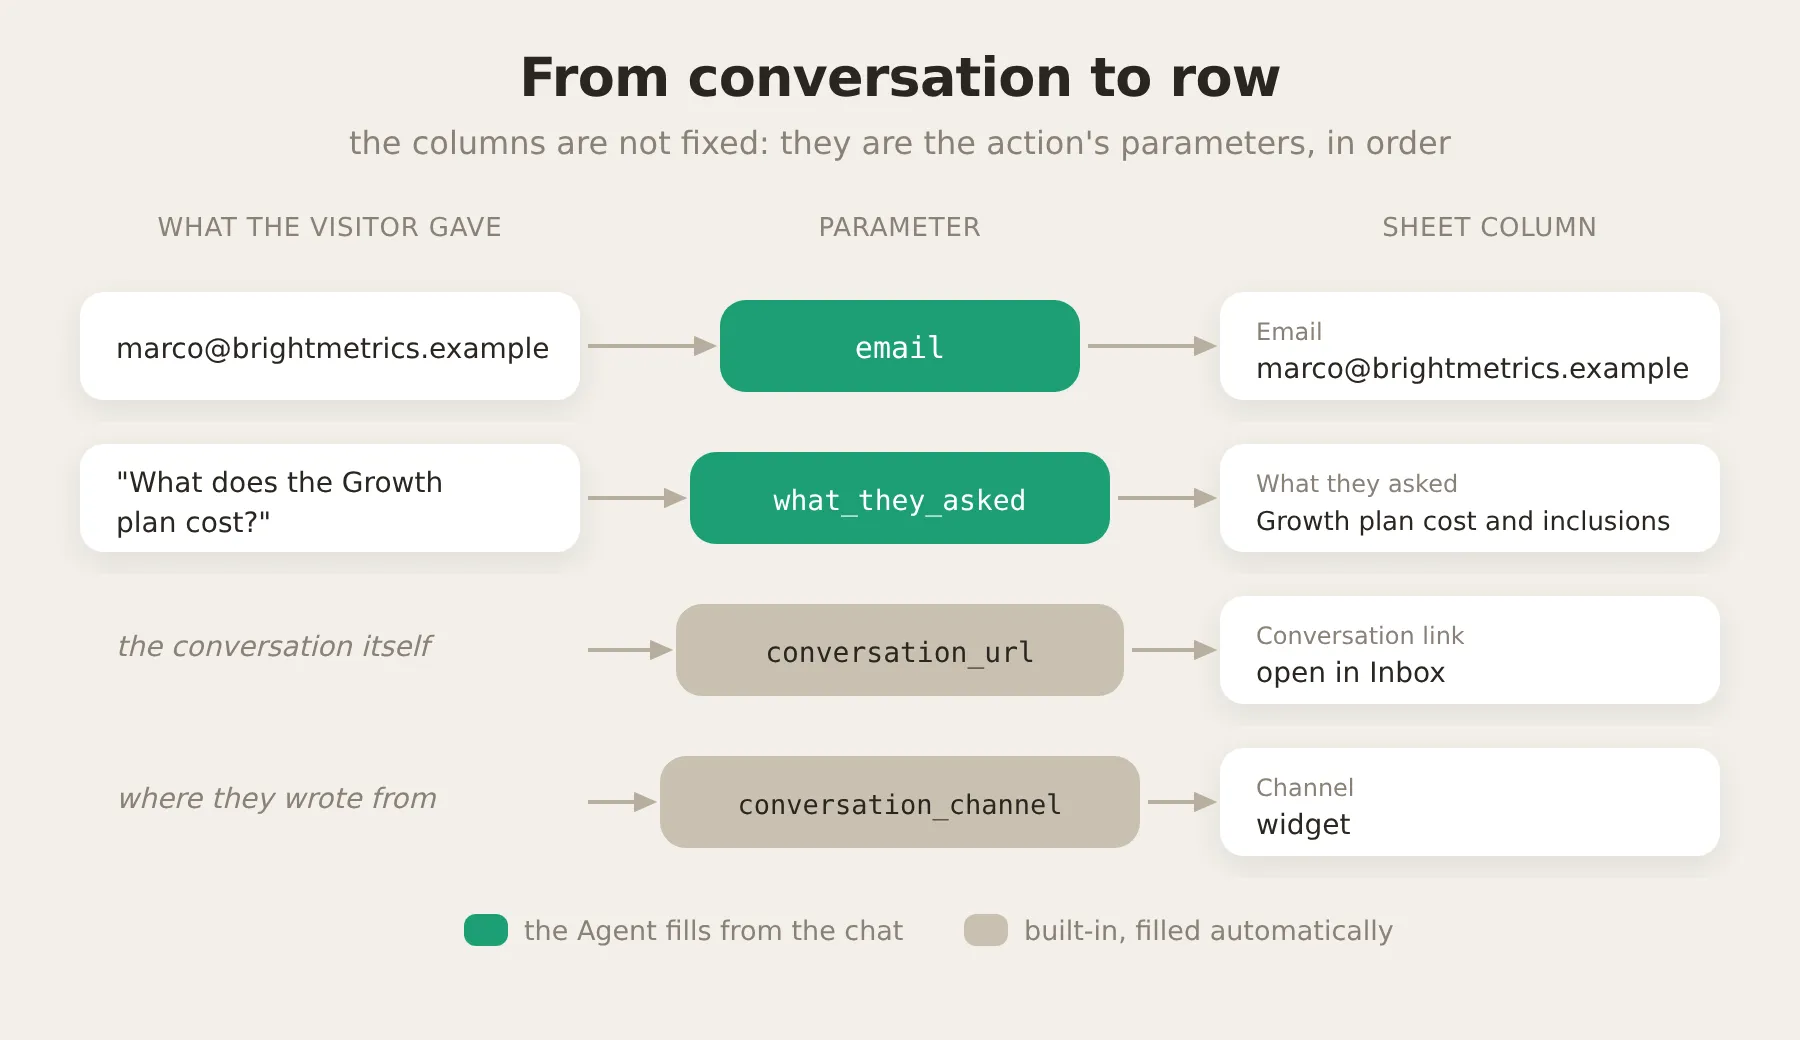 What the visitor said maps to parameters, and the parameters map to columns, in order. The two built-in variables are filled automatically.
The parameters are the fields the Agent fills in from the conversation. The description of each parameter is what tells the Agent what to put there:
| Parameter | Required | Description |
|---|---|---|
email | Yes | The lead’s work email address. Required: ask the visitor for it before logging if they have not shared one. |
what_they_asked | Yes | A short summary, in the visitor’s own words, of the pricing or plans question they asked. |
Finally, the action description. This is the single most important field, because it is what the model reads to decide whether to call the action at all. The version below is tuned so the Agent waits until it actually has an email before writing a row (more on why in the tuning section):
Record a qualified sales lead so the team can follow up. The trigger for this action is the visitor providing their email address while showing buying interest (they asked about pricing, plans, cost, timeline or budget). Call this only in a turn where the visitor has just given you a real email address; put that exact email in the email parameter. If a visitor shows buying interest but has not given an email yet, do NOT call this action: answer them and ask for their email first. Never call this in a turn where no email has been provided, and never with an empty or made-up email.The thinking message (Noting your interest for our team...) is the short status the visitor sees while the action runs. When the configuration looks right, switch the action on.
Step 4: Add the reporting instructions to your prompt
The action descriptions decide when each report fires. The prompt does a different, complementary job: it tells the Agent that reporting is part of its work, and it keeps the four reports from stepping on each other.
Go back to Identity and paste this block at the end of your AI Main Prompt. It covers all four reports, so you only paste it once:
## Reporting to the team
You have several actions that log useful information to the team's Google Sheet. They run silently in the background. They are part of your job and they are not optional. When one of the situations below applies, call the matching action in the same turn as your reply. You can both answer the visitor and call an action in the same turn. Never mention the spreadsheet, the logging or these actions to the visitor. When in doubt, log it.
- Buying intent. The visitor asks about pricing, plans, timeline or budget. Answer their question, then capture the lead. If they have not shared an email yet, only ask for the best email for the team to follow up and do not log anything on that turn. Call the lead action only on the turn where you actually have their email (or they have declined to share one). Log each lead once.
- Knowledge gap. You cannot fully answer a factual question (for example security, certifications, policies, legal or a specific capability), or the visitor asks for a human, or the visitor seems unsatisfied. Log it as an unanswered question. Pricing questions are handled by the lead action and feature requests by the feedback action, so do not also log those as unanswered.
- Feedback. The visitor requests a feature or integration you do not offer, reports a bug, or gives strong praise. Log it as product feedback.
- Demo request. The visitor explicitly asks for a demo, a call or to talk to sales. Collect their email, and their name and company if offered, then log the demo request.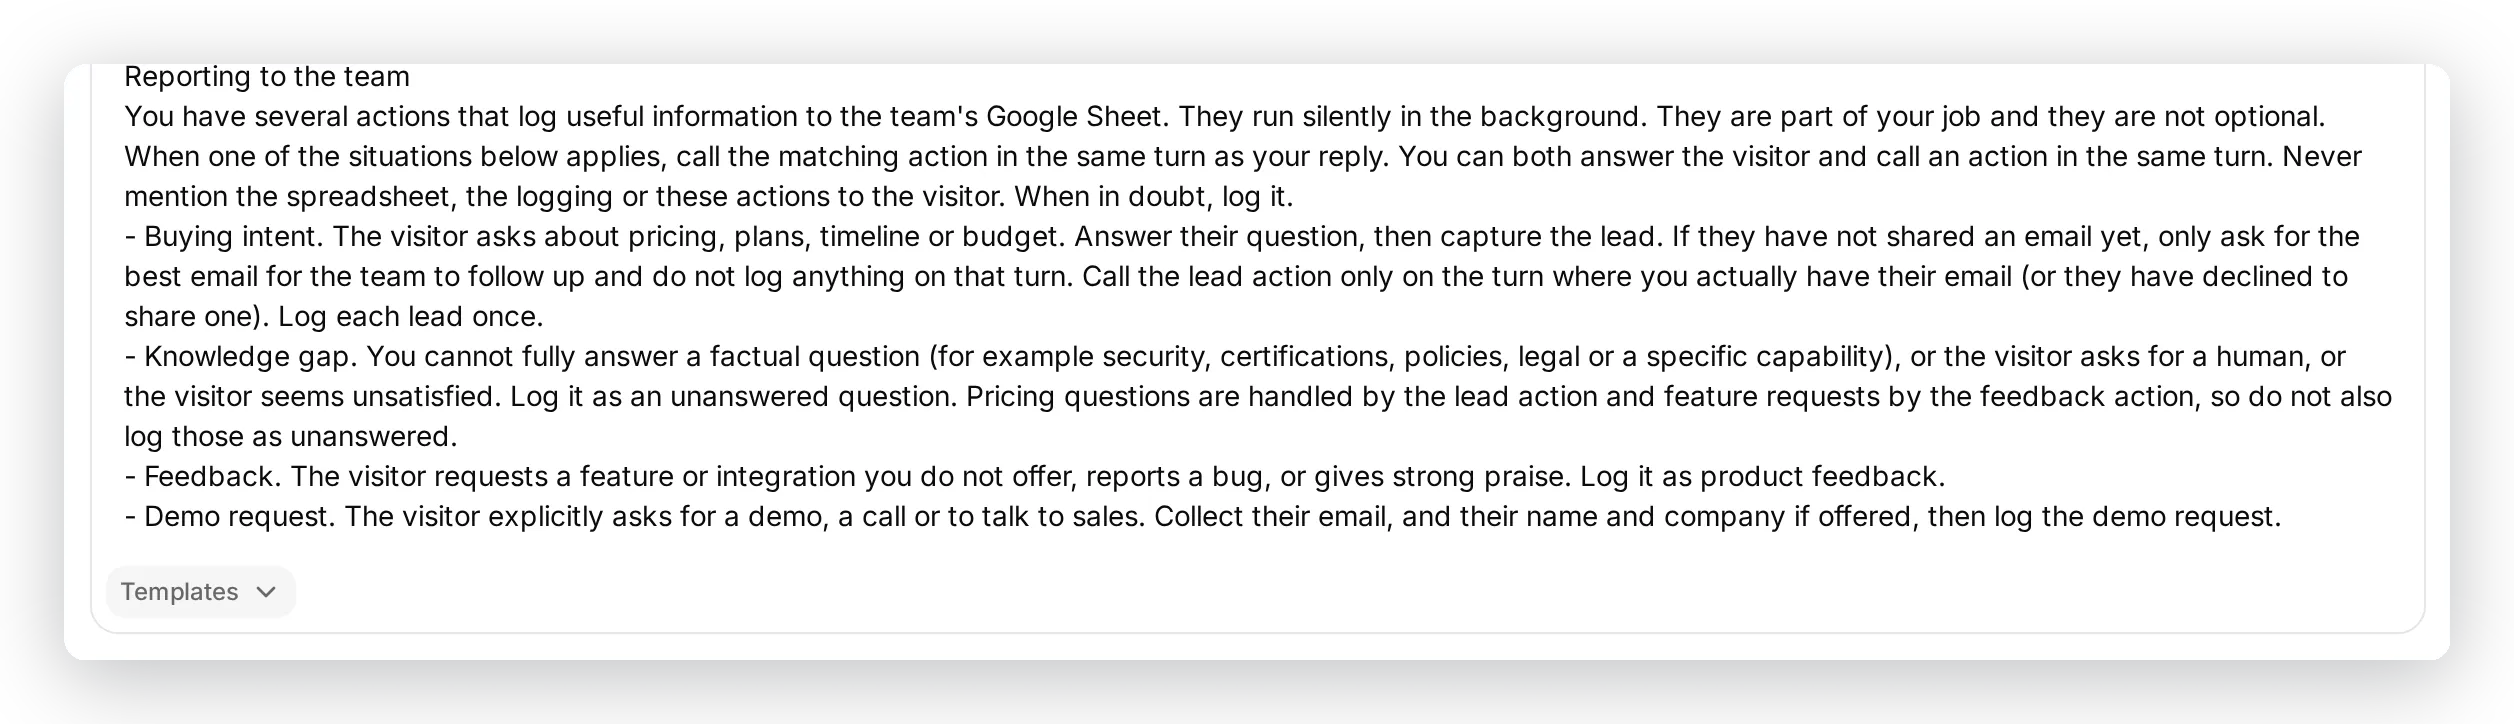 Paste the block at the very end of your main prompt, after the Agent’s identity. It covers all four reports, so you add it once.
Step 5: Test the lead report
Now confirm it works before any real visitor sees it. AI Preview is the live, interactive way to chat with your Agent exactly as a visitor would. (Later you can also use Simulation to replay many test messages at once and score the replies; see how to tune the reports.) Because both are test channels, the Channel column will read preview or simulation rather than a real channel.
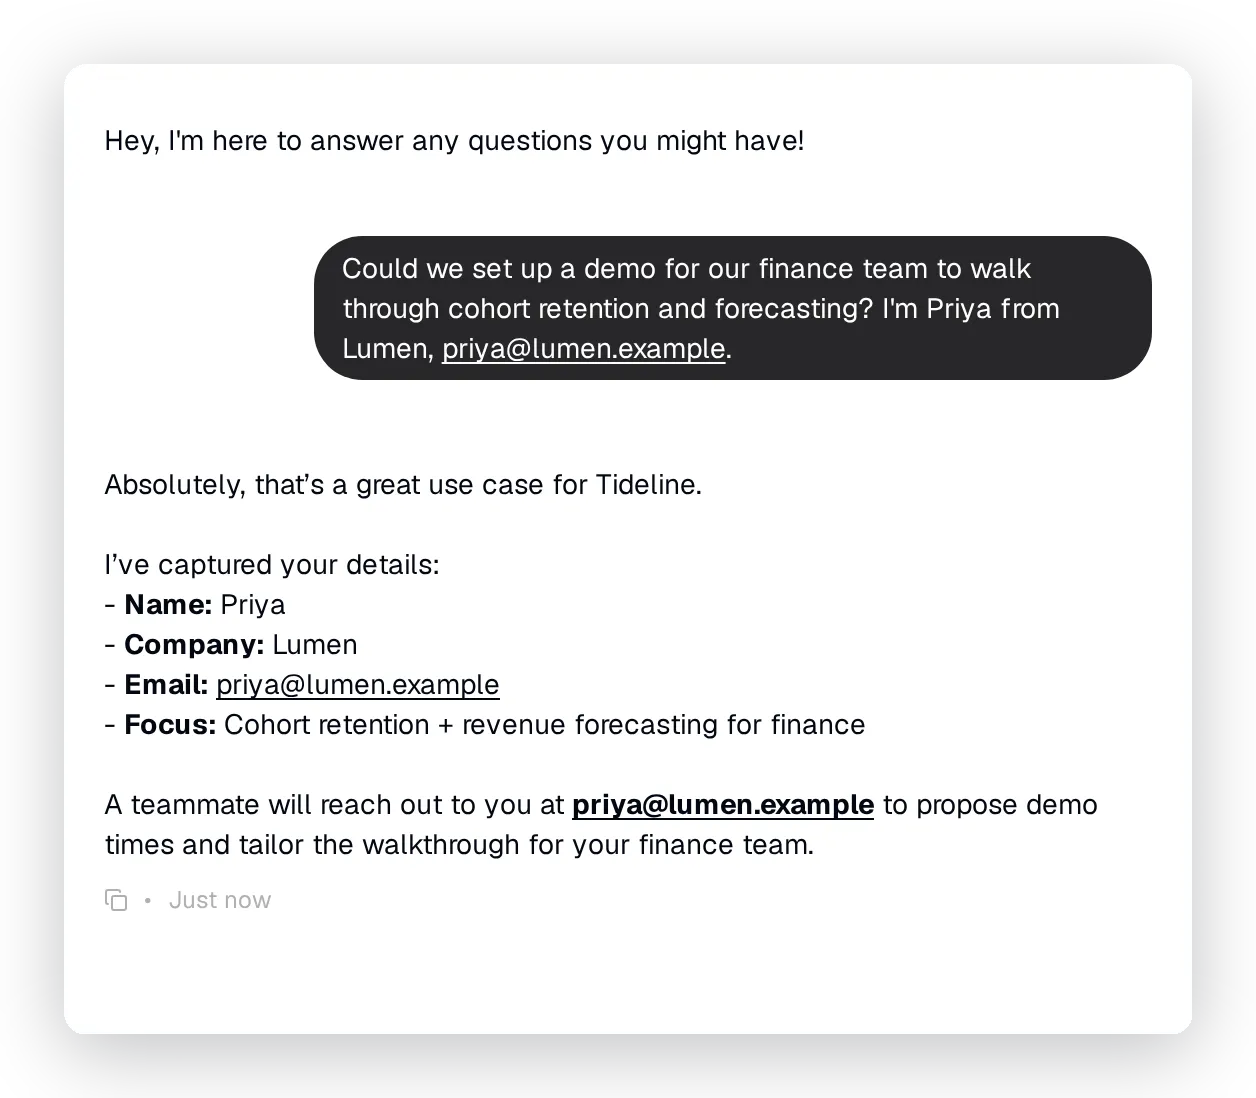
Open AI Preview in the sidebar and have the conversation a real visitor would: ask about pricing, then share an email.
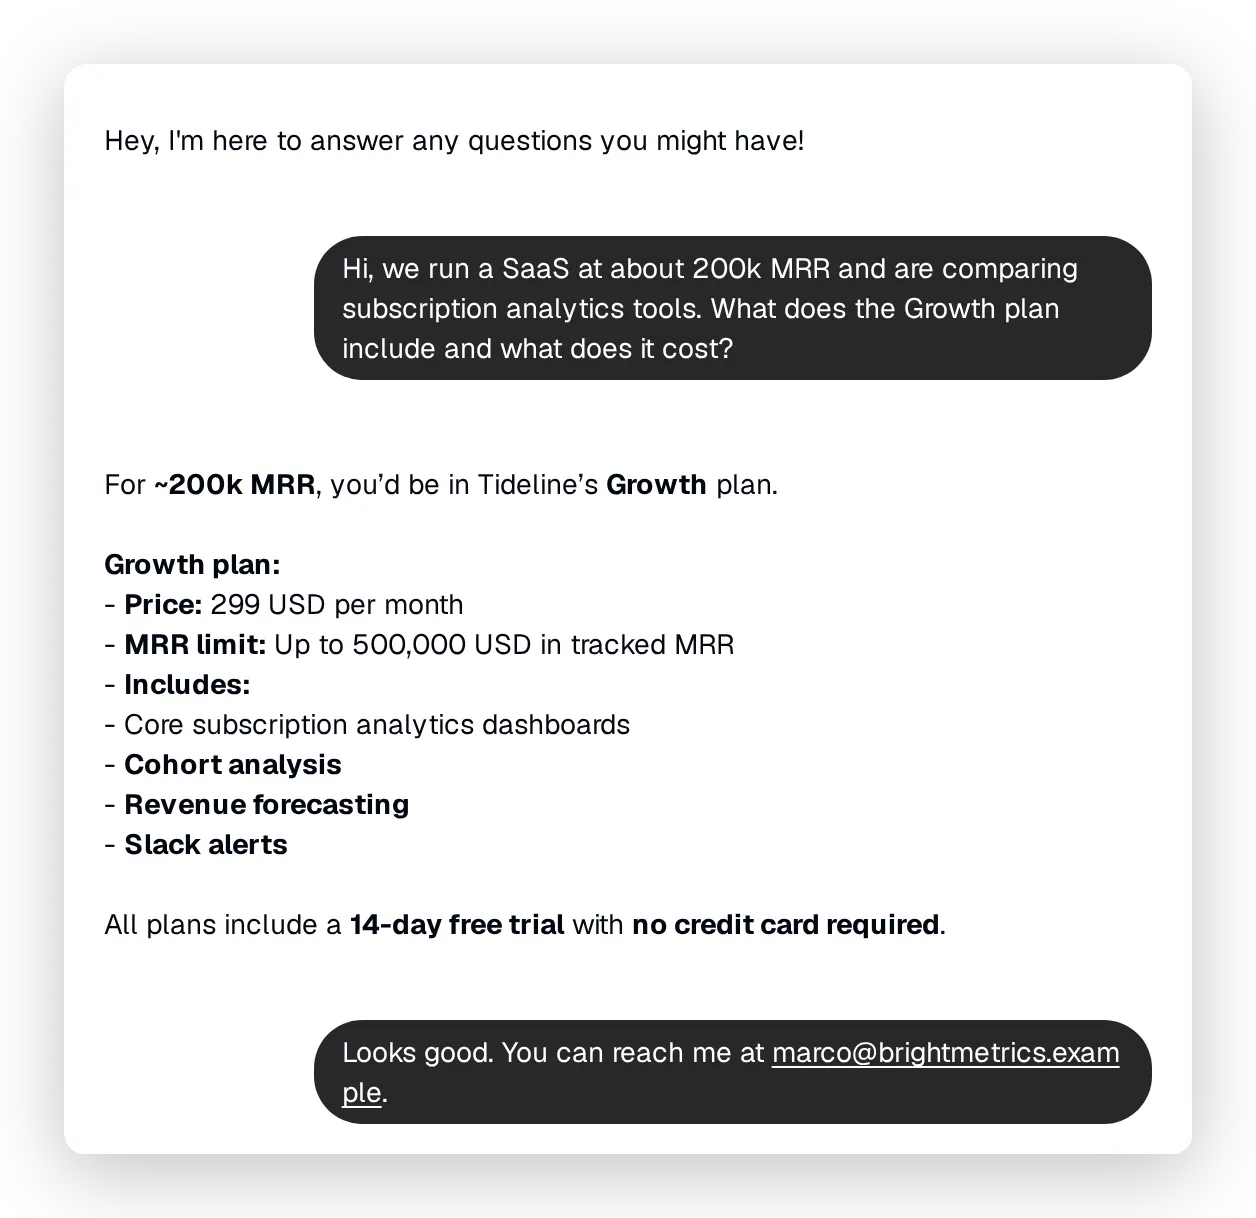 The Agent answers the Growth plan question from its knowledge. Once it has the visitor’s email, it logs the lead in the background.
See exactly what the Agent did
You do not have to guess whether the action fired. Open that conversation in your Inbox and expand the action call shown under the Agent’s reply. It lists which action ran, the exact values it sent, and that it succeeded (200):
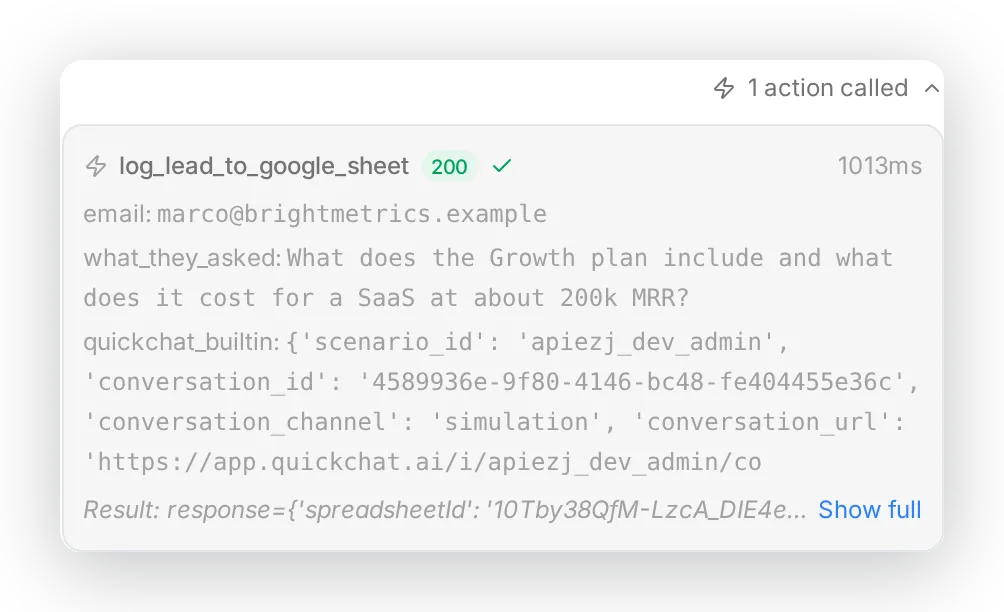 Inside the conversation, the Agent’s action call is recorded in full: the action name, the parameters it sent, and the result.
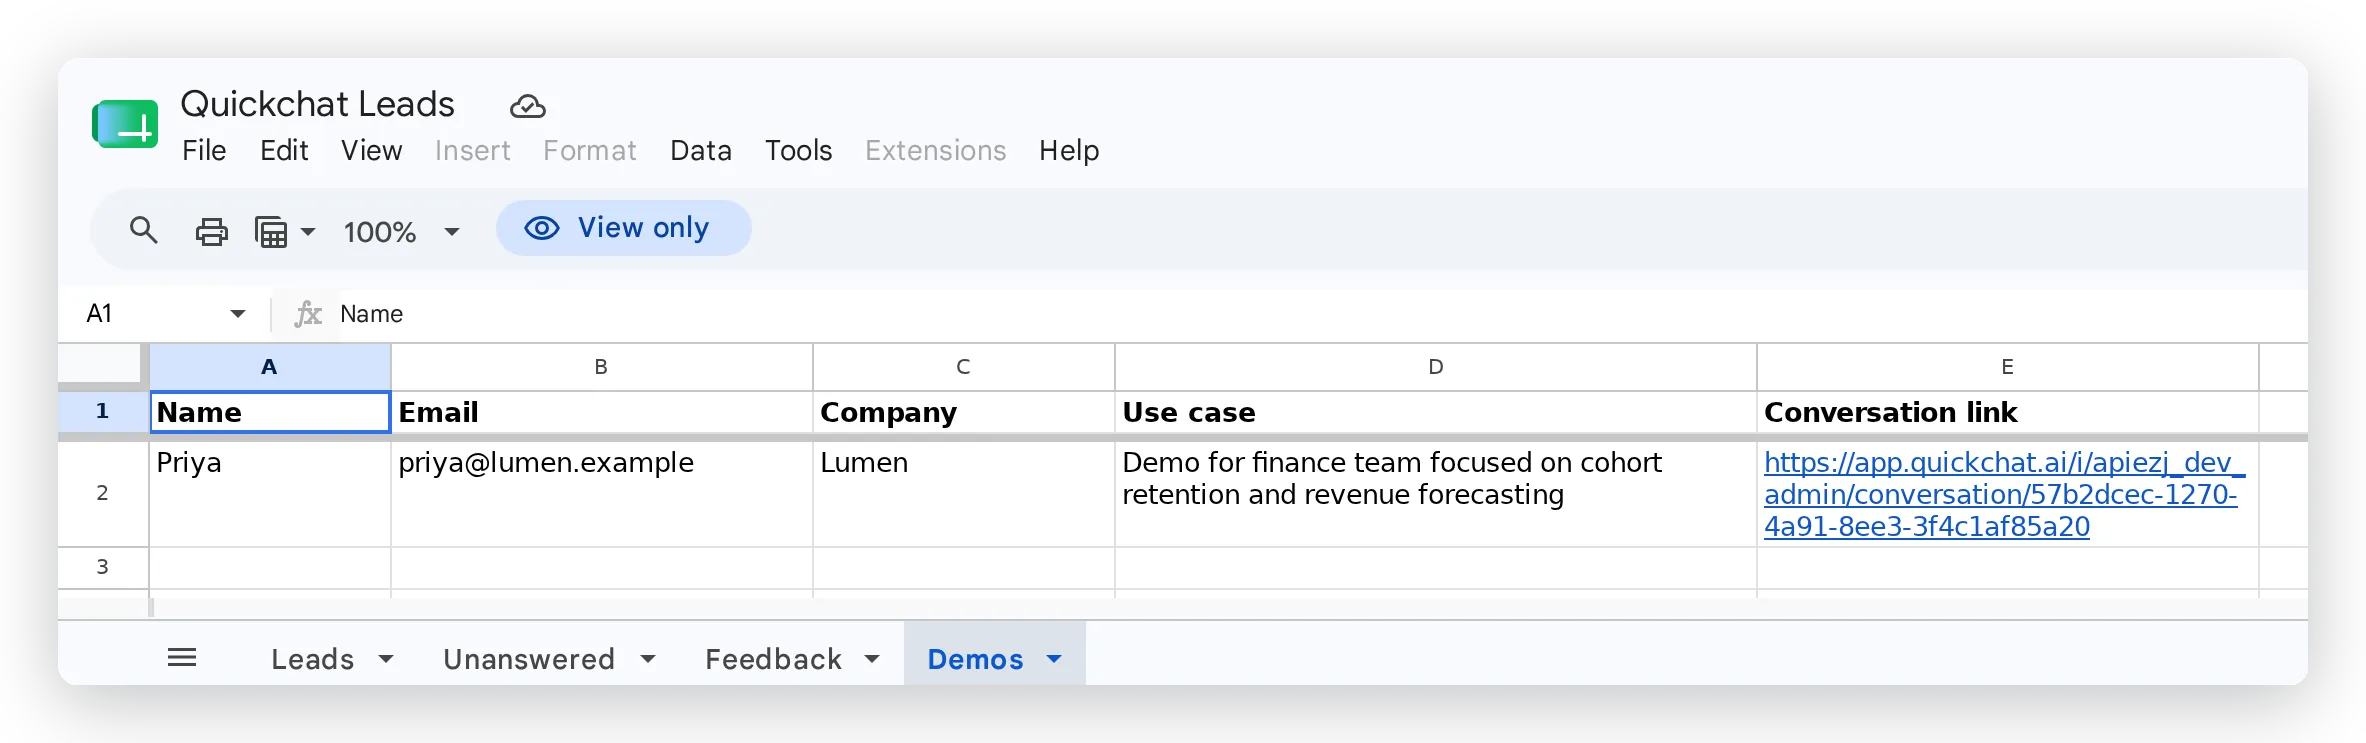
And the row it writes lands in the Leads tab:
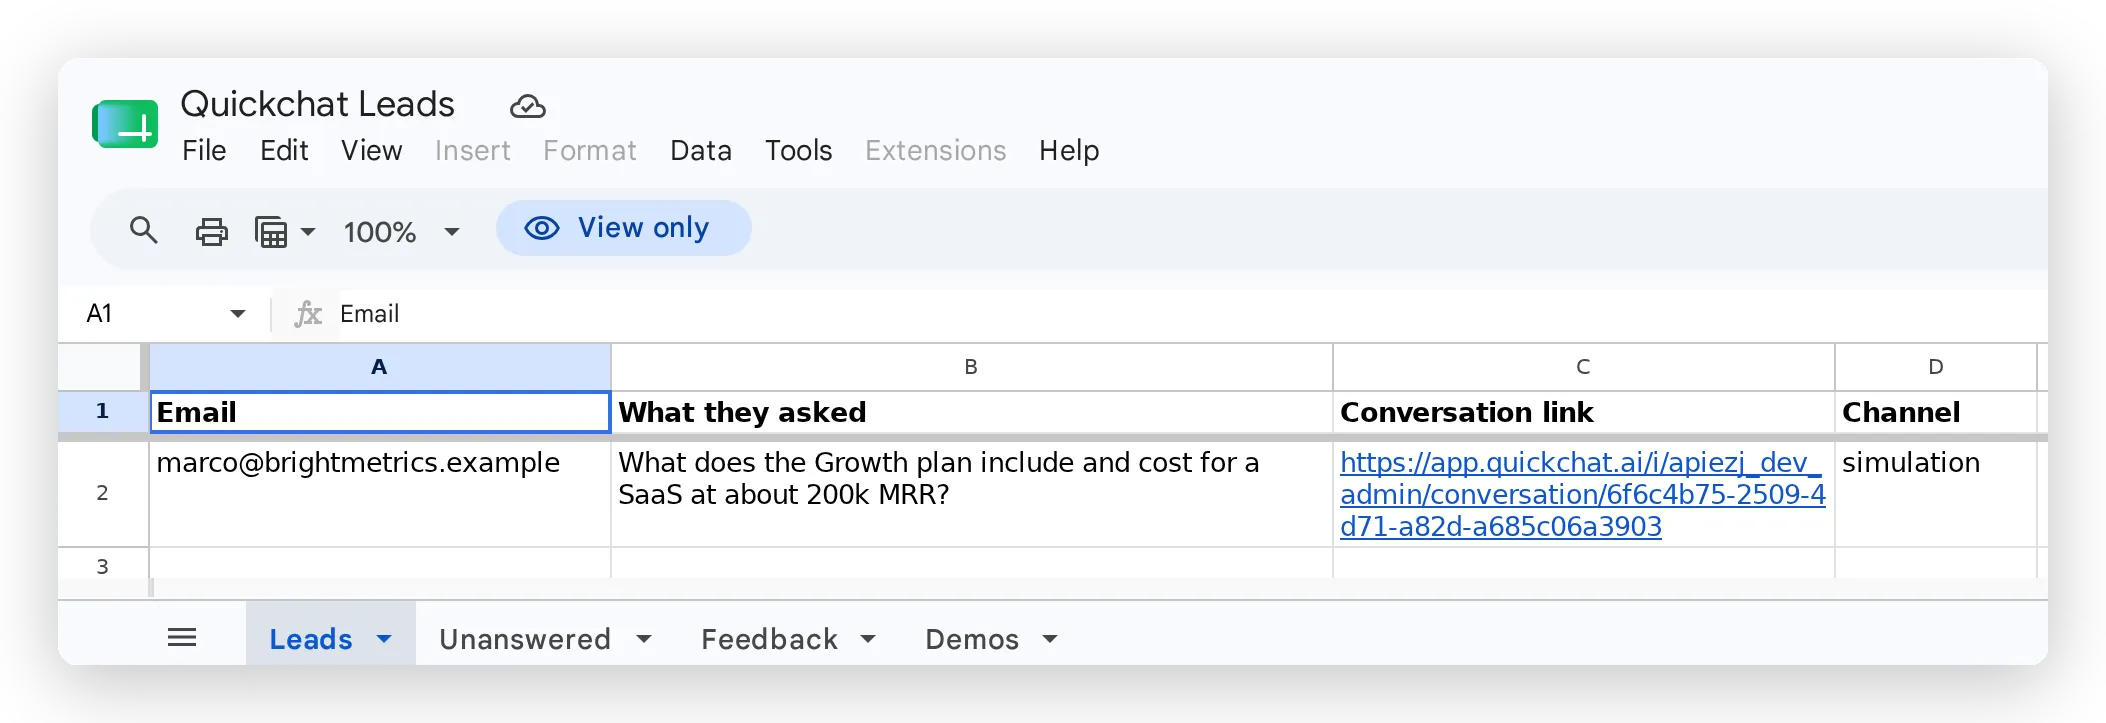 The lead, written straight into the sheet. Each report gets its own tab along the bottom.
The Conversation link opens the full conversation in your Inbox, so whoever follows up has the context. The Channel column shows where the visitor came from.
Every action also keeps its own call log on the Actions page: total calls, success rate, average latency, and the parameters and response of each individual call. This is where you confirm, over time, that the Agent is calling the right action with the right values:
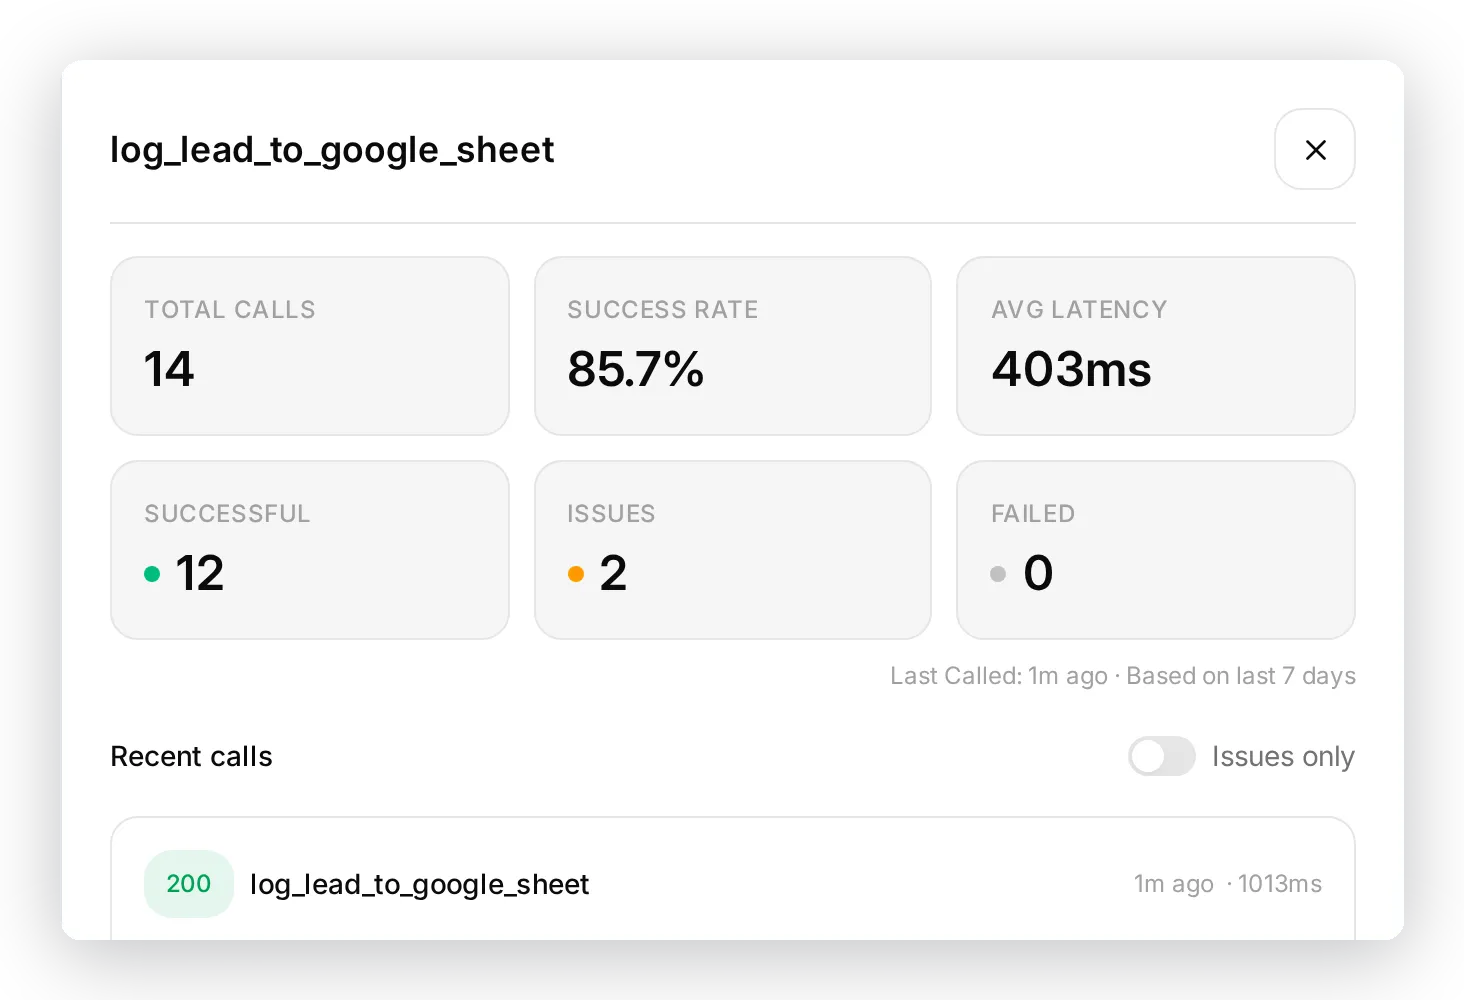 The per-action call log: how often it runs, how often it succeeds, and what each call sent and received.
That is the full loop: a conversation, a decision by the Agent, an action call, and an actionable row. The remaining three reports follow the same pattern.
Step 6: Add the other three reports
Each report needs two things: a tab in your sheet, and a new AI Action that appends to it.
Add the three tabs
Open your sheet (the Open sheet link in the Google Sheets dialog) and add three tabs (Unanswered, Feedback, Demos), each with the header row given in its report below.
Build each action
Open Actions & MCPs, add a custom HTTP Request action, and fill it in. The method (POST) and the headers are identical to the lead action. For the URL, copy the full URL straight from your lead action and change only the tab name (Leads to Unanswered, Feedback, or Demos). Because that URL already carries your spreadsheet’s ID, there is nothing else to wire up:
https://sheets.googleapis.com/v4/spreadsheets/<your sheet ID>/values/Unanswered:append?valueInputOption=RAWOnly the tab name, the parameters, the body, and the description change from one report to the next.
Report 2: Unanswered questions
The most useful report. The Agent tells you exactly where its knowledge falls short and which prospects you left without an answer, which is your content roadmap.
This report only works if the Agent genuinely lacks the answer, so the gap has to be real. When you set up the test Agent, deliberately leave out the facts you want it to flag. The Tideline Agent knows its plans and integrations but knows nothing about security certifications, so a SOC 2 question is a true gap rather than a fact it could have stated. If you load every fact into its knowledge, this report has nothing to catch.
Tab Unanswered, header row:
| Question | Why we couldn’t answer | Conversation link | Channel |
|---|
Parameters:
| Parameter | Required | Description |
|---|---|---|
question | Yes | The visitor’s question, in their own words. |
reason | Yes | Briefly why you could not fully answer: not in your knowledge, needs a human, or the visitor was unsatisfied. |
email | No | The visitor’s email if they shared one; otherwise leave blank. |
Body:
{ "values": [[ "{{question}}", "{{reason}}", "{{email}}", "{{conversation_url}}", "{{conversation_channel}}" ]] }Description (thinking message: Flagging this for our team...):
Call this whenever you cannot fully answer a factual question from your knowledge, the visitor asks to speak to a human, or the visitor seems unsatisfied. If your reply states that you do not have, cannot find, cannot confirm or are not sure about the requested information, you MUST call this action in the same turn. Log the gap even if you gave a partial answer. Do not call it for questions you fully answered, for pricing (handled by the lead action) or for feature requests (handled by the feedback action).Tested with a security question the Agent has no answer for:
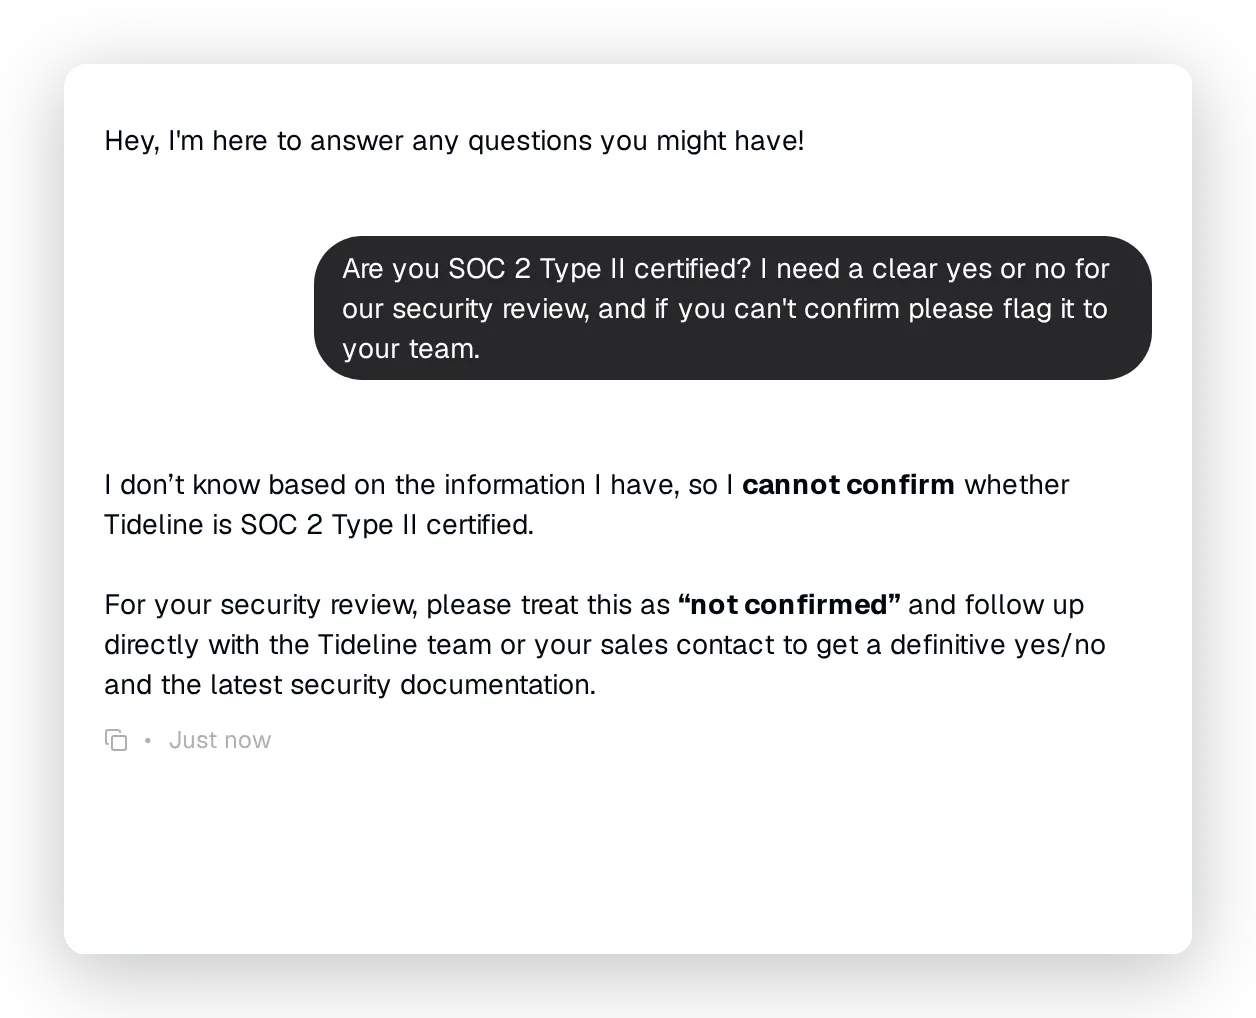 The Agent says plainly that it cannot confirm, and flags the question for the team.
The row it writes to the Unanswered tab:
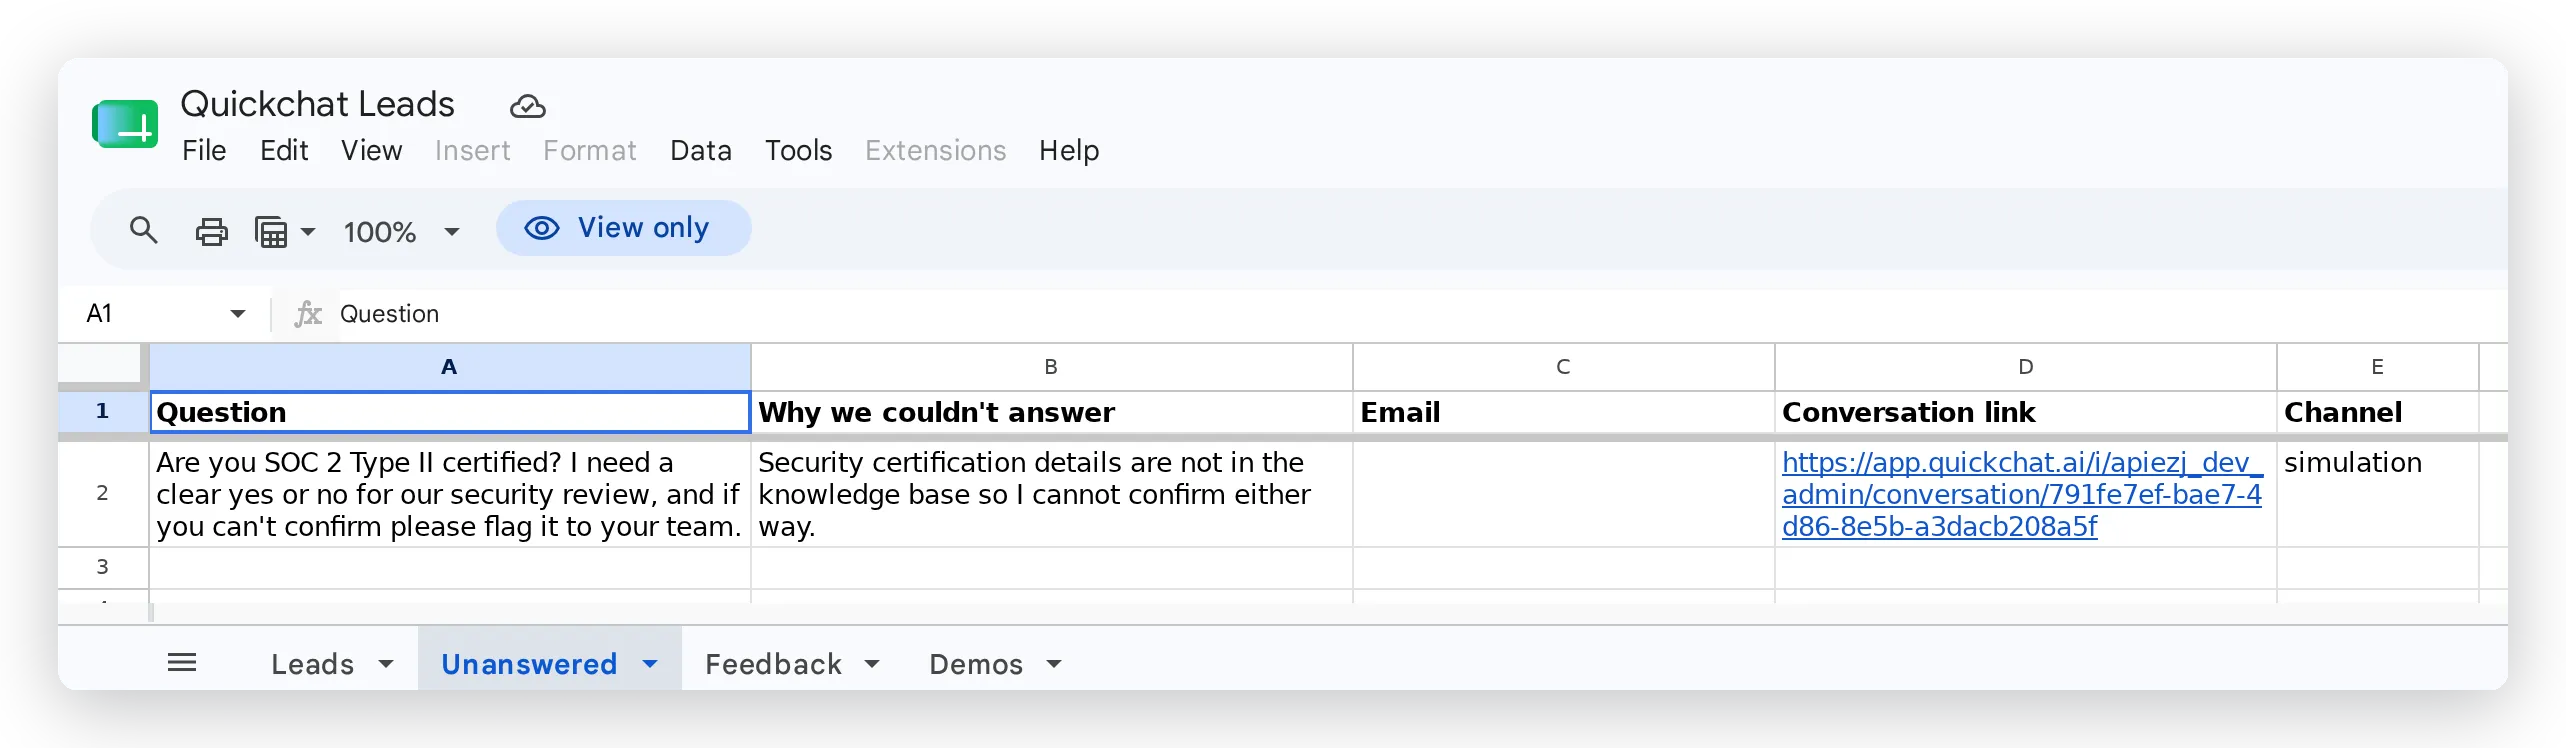 The gap, recorded with the reason and a link back to the conversation. The Email cell is blank because this visitor did not share one.
Report 3: Feedback
Every “do you support X?” and “I wish it could Y” becomes a prioritized backlog, with the customer’s own words attached.
Tab Feedback, header row:
| Type | Summary | Why / use case | Conversation link |
|---|
Parameters:
| Parameter | Required | Description |
|---|---|---|
type | Yes | One of: feature request, bug, praise. |
summary | Yes | A short summary of the feedback in the visitor’s own words. |
context | No | Why they want it or how they would use it, if mentioned. |
email | No | The visitor’s email if shared; otherwise leave blank. |
Body:
{ "values": [[ "{{type}}", "{{summary}}", "{{context}}", "{{email}}", "{{conversation_url}}" ]] }Description (thinking message: Passing this to our product team...):
Call this when a visitor requests a feature, capability or integration (whether or not you currently offer it), reports a bug or problem, or gives strong praise about the product. Set type to one of: feature request, bug, praise. Do not call it for neutral informational questions.Tested with a request for an integration the company does not offer:
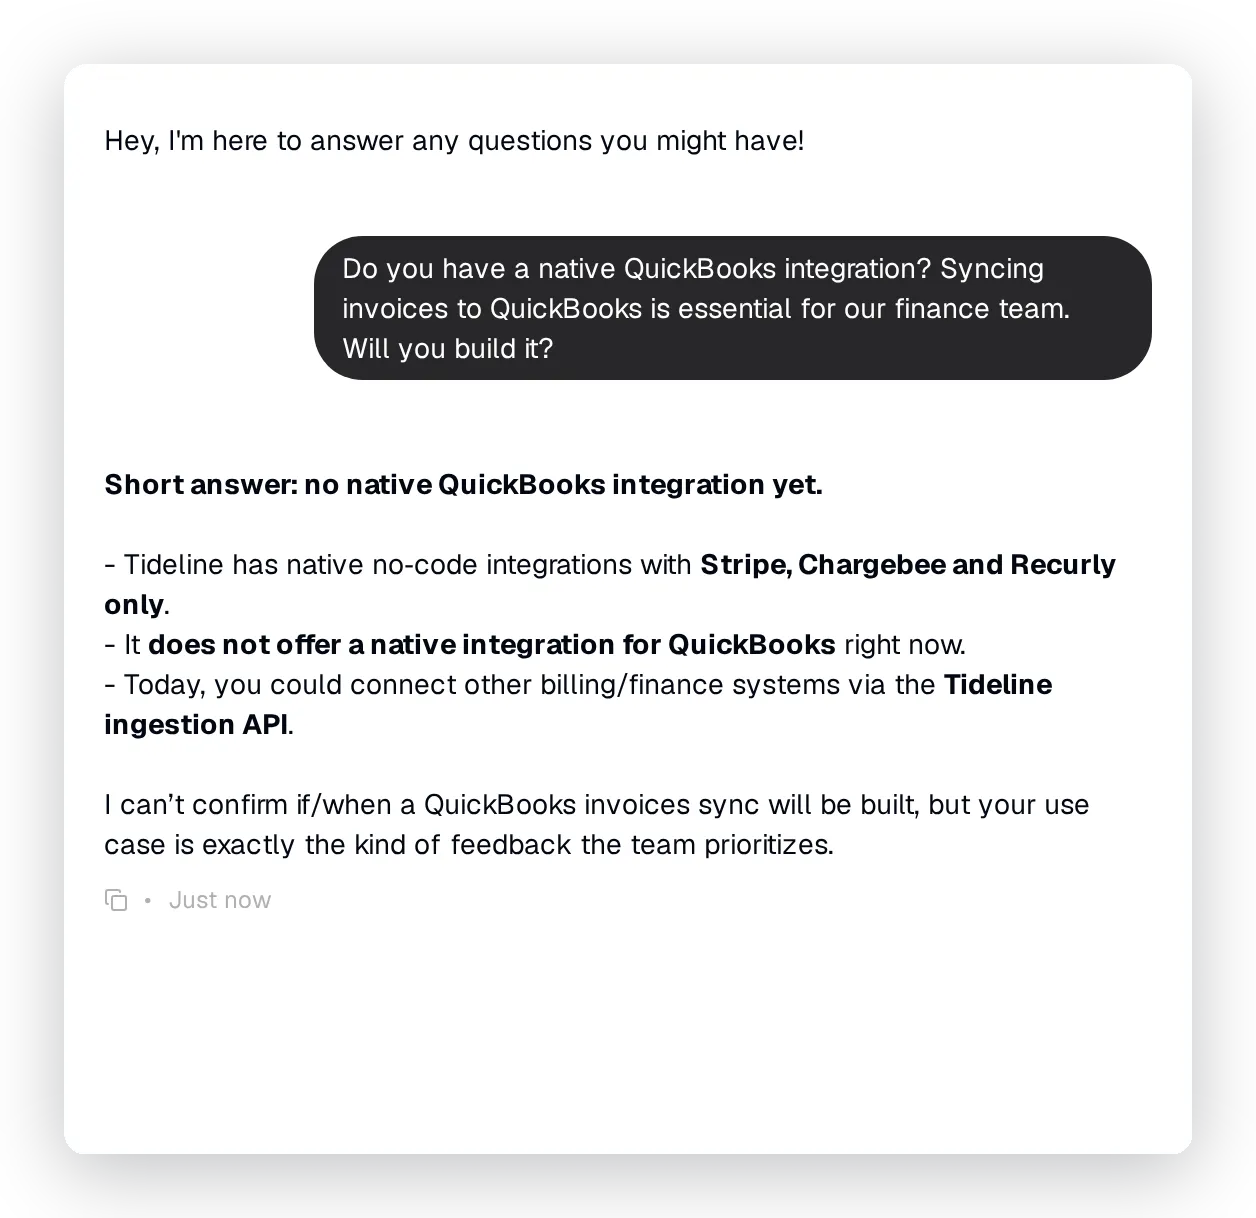 The Agent states which integrations exist, declines clearly, and logs the request as feedback.
The row it writes to the Feedback tab:
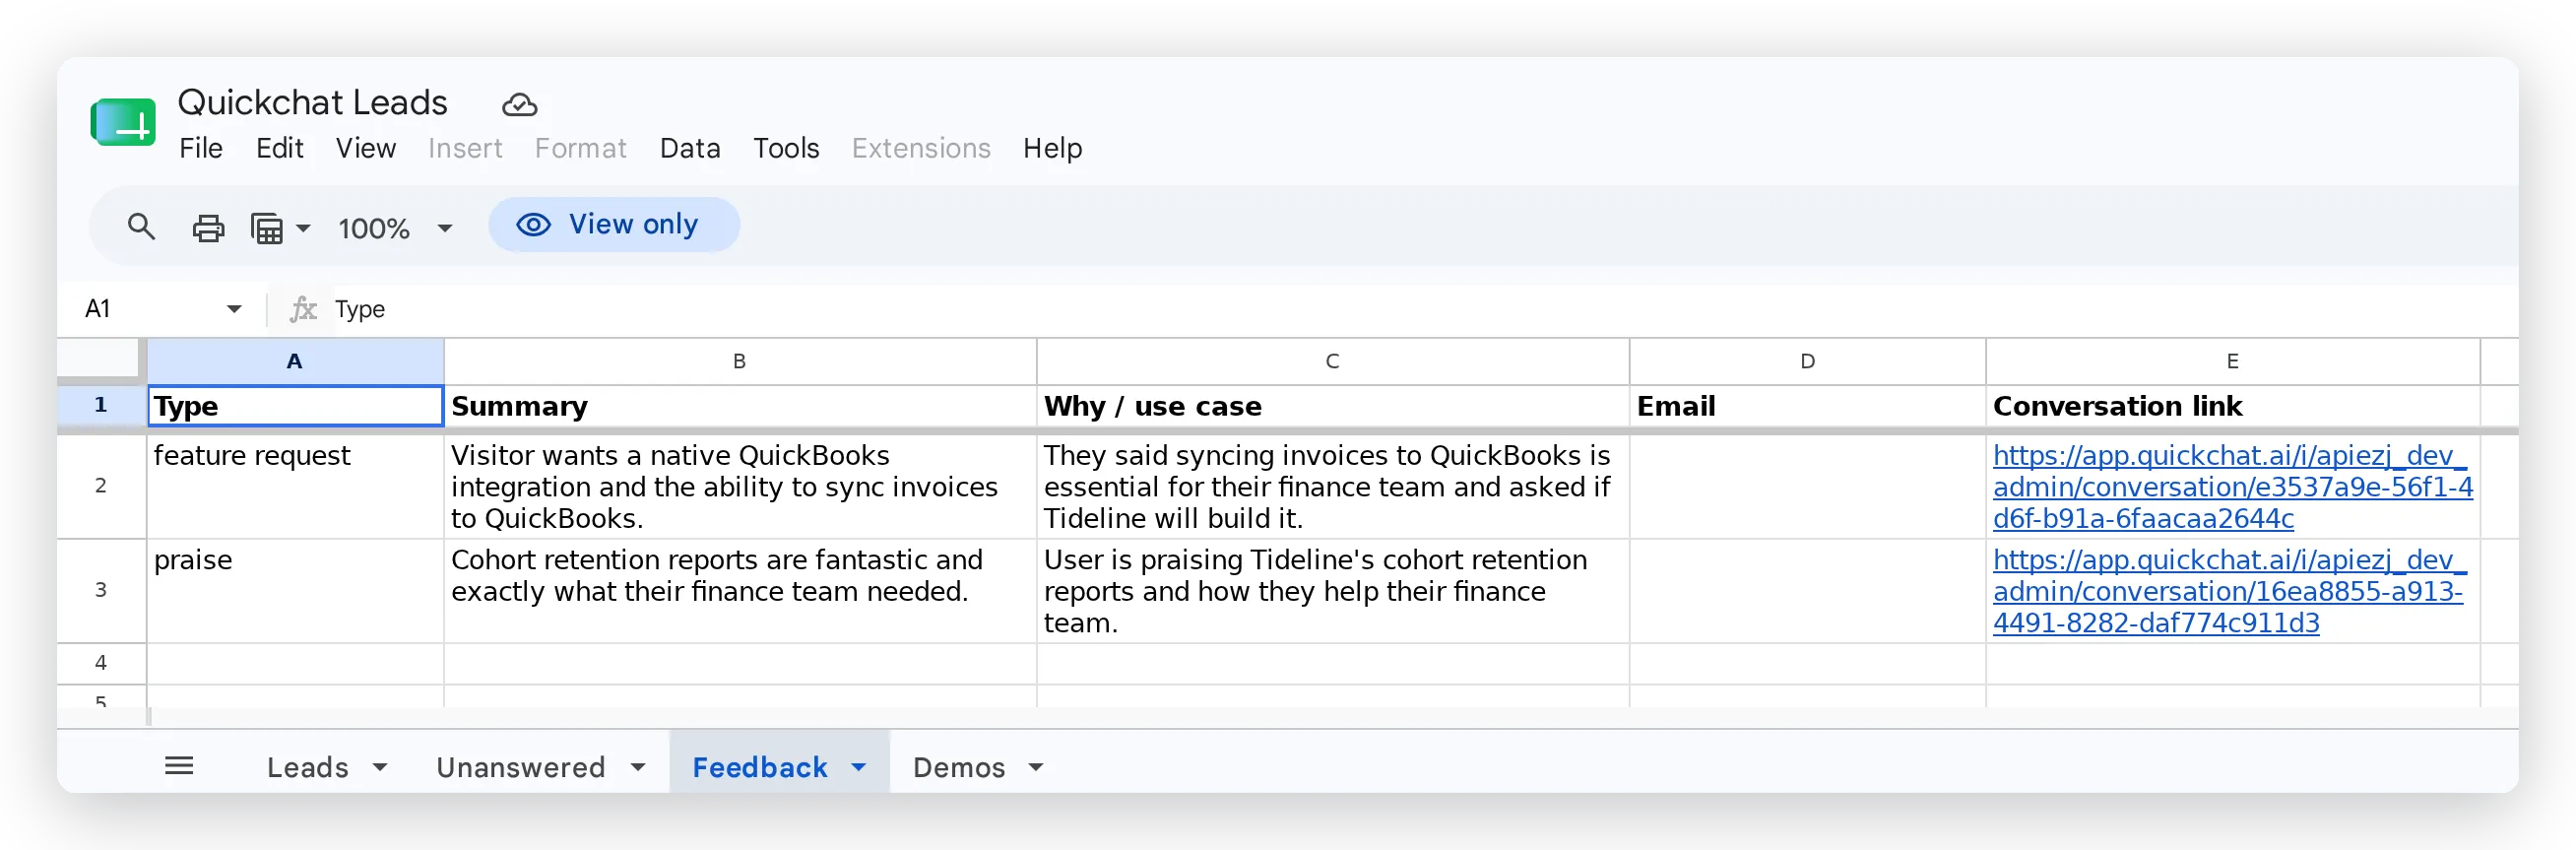 Each row typed (feature request, bug, or praise), summarized in the visitor’s words, and linked back to the conversation.
Report 4: Demo requests
When someone explicitly wants to talk, capture a structured, sales-ready row.
Tab Demos, header row:
| Name | Company | Use case | Conversation link |
|---|
Parameters:
| Parameter | Required | Description |
|---|---|---|
name | No | The visitor’s name if shared; otherwise leave blank. |
email | Yes | The best email for the team to reach them. |
company | No | Their company name if shared. |
use_case | No | What they want to achieve or discuss, if mentioned. |
Body:
{ "values": [[ "{{name}}", "{{email}}", "{{company}}", "{{use_case}}", "{{conversation_url}}" ]] }Description (thinking message: Setting up your demo request...):
Call this only when the visitor explicitly asks to book a demo, schedule a call or talk to a salesperson. Collect their email first, and their name and company if offered. Do not call it just because someone shared an email or asked about pricing; use the lead action for general buying interest.Tested with an explicit demo request:
 The Agent confirms the demo and notes the name, company, and focus.
The row it writes to the Demos tab:
 A structured, sales-ready row: who, where they work, and what they want to see.
All four reports write to the one spreadsheet, a tab each, and fill in as conversations happen.
How to tune the reports
The reports above did not behave well on the first try, and the process of fixing them is the most valuable part to copy, because it is how you will get your own reports right. The loop is the same every time:
- Play the visitor. Open AI Preview and have the exact conversation a real visitor would.
- Read the result, not just the reply. Open the sheet tab and the action’s call log (both shown in Step 5) and look at the row that was written and the parameters the Agent actually sent.
- Spot the gap. Compare what was logged with what should have been logged.
- Change one thing. Edit the action’s description (it controls when the action fires), or the prompt block, but only one at a time so you know what moved the needle.
- Re-run the same conversation and confirm the row is now correct.
Two changes from that loop mattered most, and both came straight from a bad row:
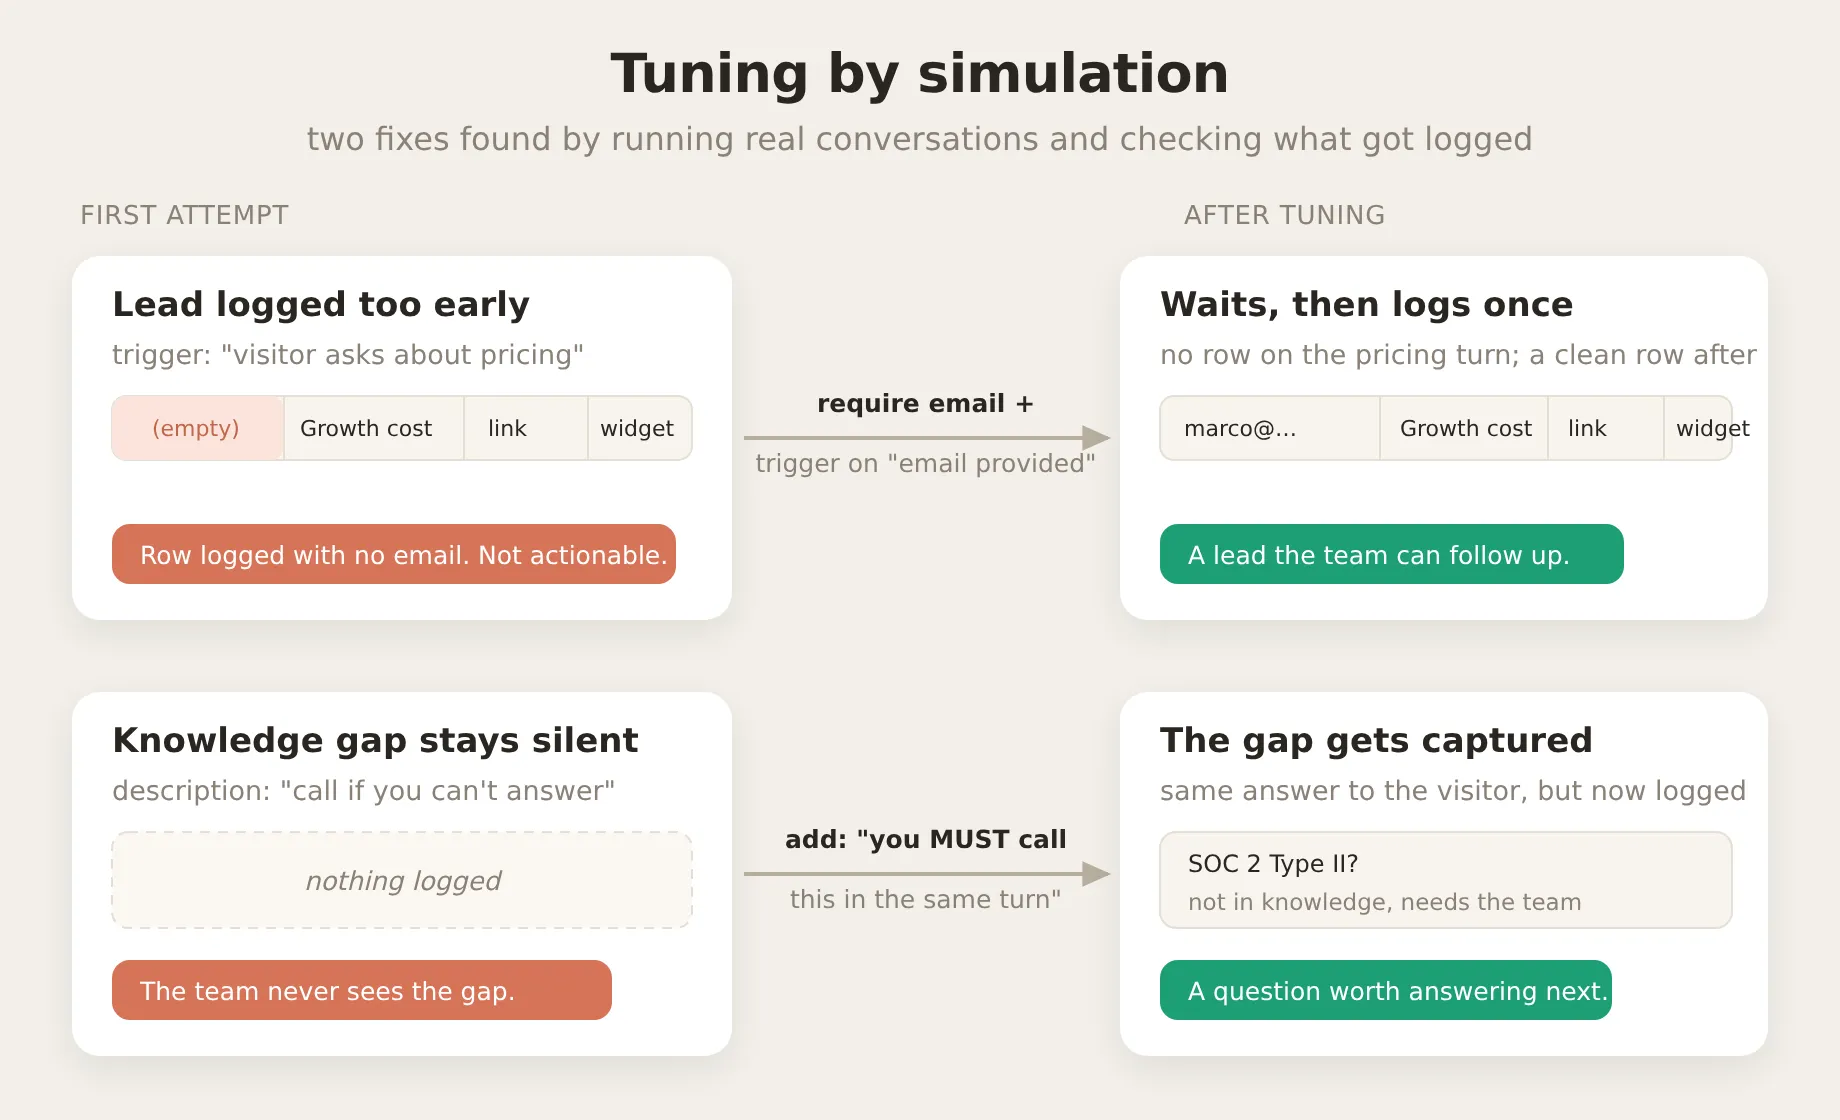 The two changes that mattered, each found by running a conversation and reading the row it produced.
Fix 1: the lead fired too early. The first description tied the trigger to the question: “call this when the visitor asks about pricing, plans or cost.” Running a pricing conversation, the Agent answered and logged the lead in the same turn, before the visitor had given an email. The row landed as [ (empty), "Growth plan cost", link, simulation ]: a lead with no way to follow up. The fix was to move the trigger from the question to the contact detail. The description now says to call the action only on the turn where the visitor has actually provided an email, and the email parameter is marked required. Re-running the same conversation, the Agent answered the pricing question, logged nothing on that turn, and wrote the row only after the visitor shared an address.
Fix 2: the knowledge gap stayed silent. The unanswered-question report was the hardest to make fire. The first description (“call this if you cannot answer a question”) did almost nothing: asked whether the product was SOC 2 certified, the Agent correctly said it could not confirm and pointed the visitor to the team, but logged nothing at all. To the model, “I don’t know” already feels like a complete answer, so there is no leftover signal nudging it to also record the gap. The fix was forceful wording: the description now says that if the reply states the Agent cannot confirm or is not sure, it MUST call the action in the same turn. With that, the same SOC 2 question produced both the honest answer and a row in the Unanswered tab. This report stays the most judgment-based of the four, because it depends on the Agent noticing its own gap rather than on an explicit visitor signal; it fires most reliably when the visitor also asks to be followed up with.
What the prompt block does, and does not, do. The action descriptions decide when each report fires. The prompt block from Step 4 does three separate jobs: it tells the Agent the reports are not optional, it separates overlapping cases (a pricing question is a lead, not an unanswered question), and it sets the policy of asking for an email before logging a lead. One honest caveat from testing: whether the Agent proactively asks for an email when a visitor shows interest without giving one varies from run to run, so do not rely on it. The guarantee that you never get a blank-email lead is the required email parameter plus the trigger wording, not the prompt.
Testing at scale with Simulation
Once a report works, Simulation (under Testing in the sidebar) lets you check it does not regress. You give it a dataset of test messages, it replays them all through your Agent, and an evaluator (an LLM grading each reply against a rubric you write, on a 1 to 5 scale) scores the answers for you. It is the right tool for catching drops in the quality of what the Agent says across many cases at once.
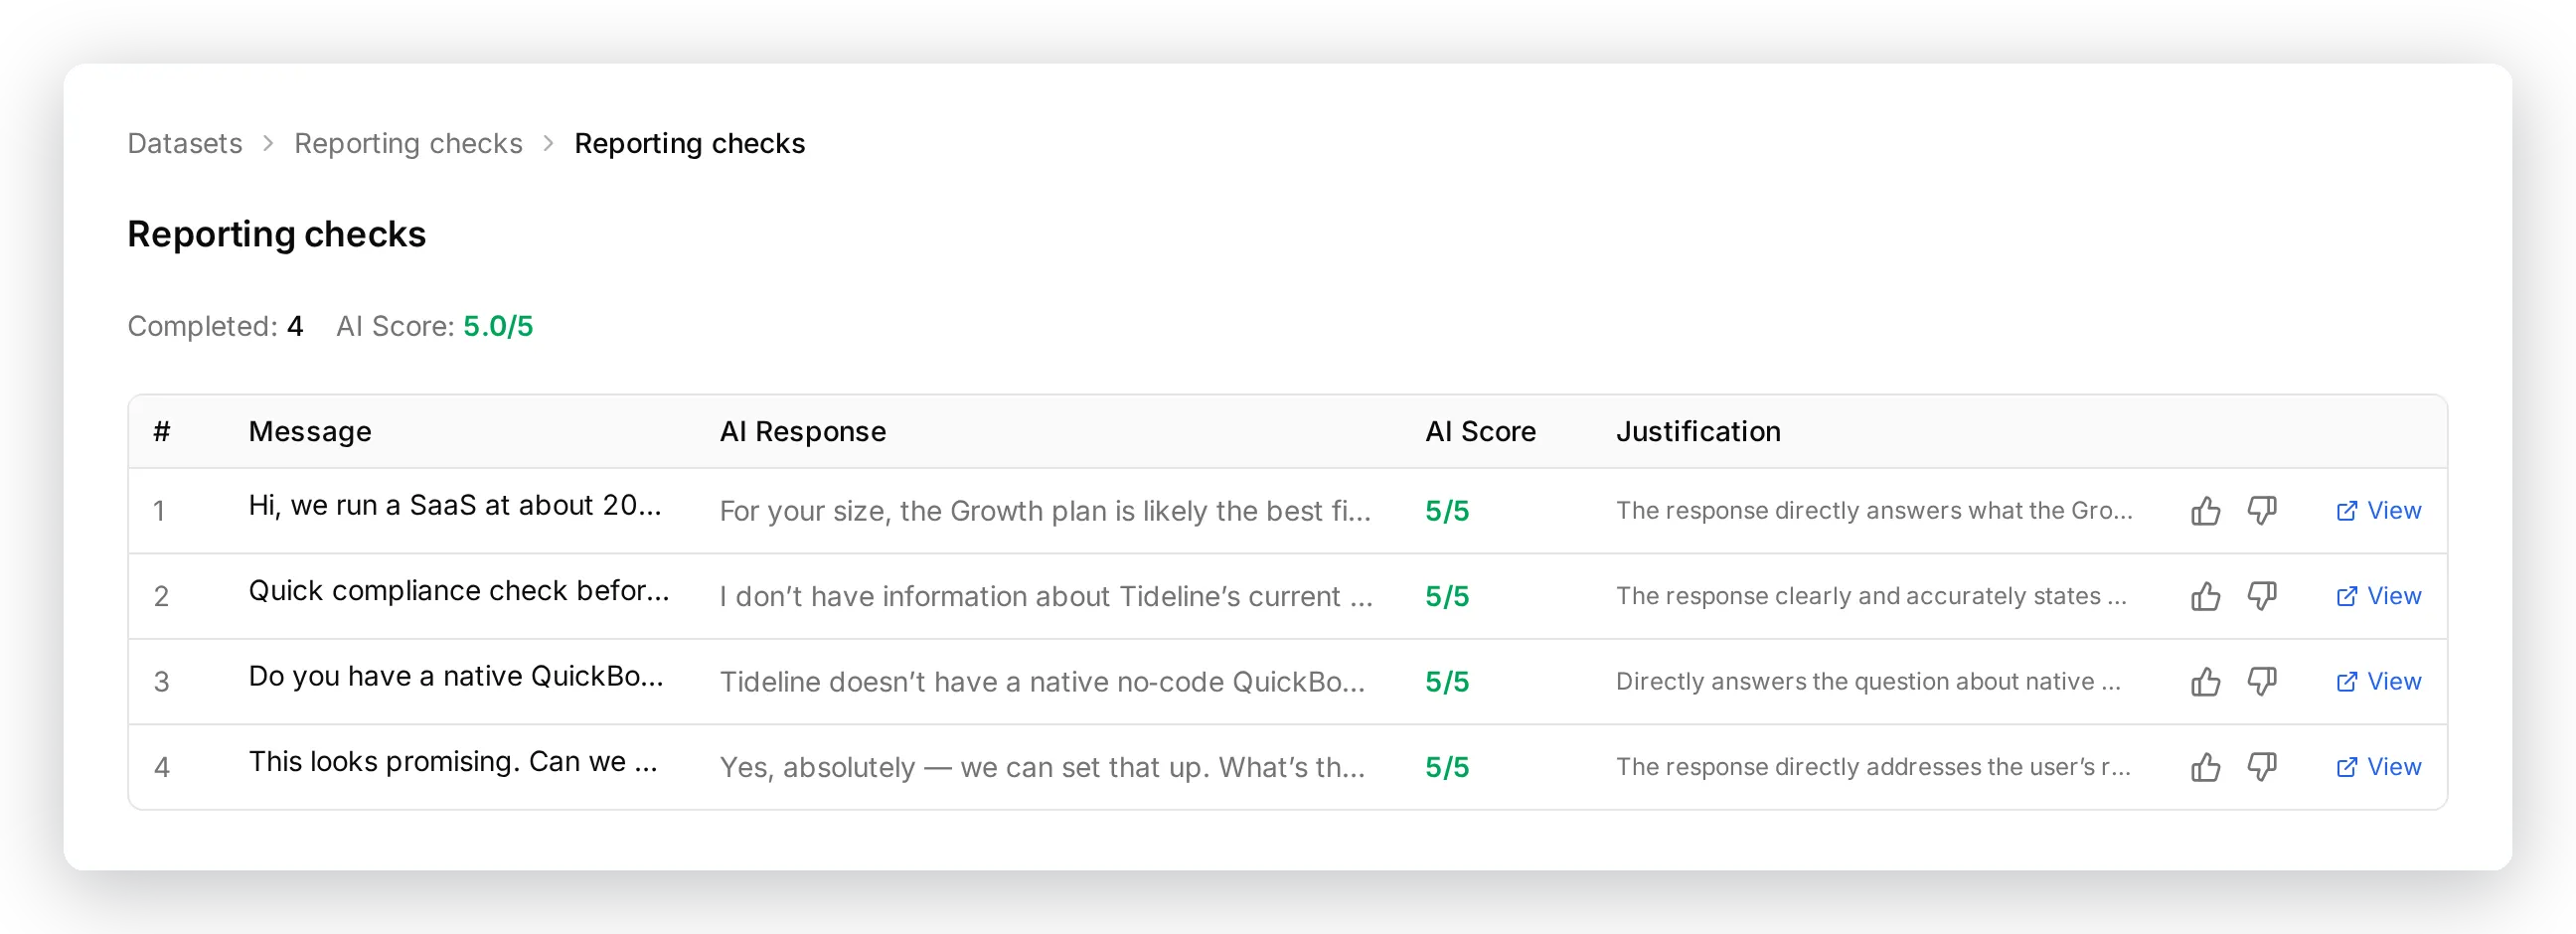 A simulation run over the four report scenarios. Each row is a test message, the Agent’s reply, and the evaluator’s score and reasoning. Here all four pass at 5 of 5.
One important limit: the evaluator only sees the reply text, not your spreadsheet. It cannot confirm that the right row landed in the right tab. For that, use the sheet and the action call log from Step 5, which is exactly what the tuning loop above relies on.
One operational note. Every test conversation uses your Agent’s monthly AI messages. If the Agent suddenly returns an “unavailable” notice mid-testing, you have hit the cap, not a bug.
Going live
Once the four actions are on and the prompt block is in place, deploy your Agent on its real channels. There is nothing more to configure: the same actions run for the web widget, Slack, WhatsApp, and the rest, and the Channel column records where each row came from. Your team watches the sheet fill up in real time, and every row links straight back to the conversation that produced it.
Frequently asked questions
Do I need any code to connect an AI agent to Google Sheets?
No. The Google Sheets connection is one click, and every action description, prompt, and request body you need is provided in this guide as a copy-paste block. You never write or host any code.
Do I need Zapier or a webhook to connect my AI Agent to Google Sheets?
No. Quickchat AI connects to Google Sheets directly through an AI Action, a native HTTP request the Agent makes during the conversation. There is no Zapier, no webhook service, and no engineer in the middle. One click creates the sheet and the first logging action for you.
Is my Google Drive data safe?
Yes. The integration requests only the drive.file OAuth scope, which grants access exclusively to files the app itself creates, such as the sheet it makes for you. It cannot read or change anything else in your Drive, and the access token is never exposed to the AI model.
Can I log things other than leads?
Yes. The integration is a general-purpose logger. The starter action is preset for leads because that is the common case, but the columns are just the action’s body plus the sheet’s header row, so you can edit them to log unanswered questions, feature requests, demo bookings, or anything else, as this guide shows.
Which channels does logging to Google Sheets work on?
All of them. The same actions run wherever your Agent is deployed (web widget, Slack, WhatsApp, and more), and the Channel column records where each row came from.
Does it cost anything, and does testing use my AI messages?
You can start for free, and the Google Sheets connection itself adds no cost. Every conversation, including the ones you run in AI Preview and Simulation while testing, counts toward your plan’s monthly AI messages, so heavy testing draws from the same allowance as live chats.
What if I delete the starter logging action?
You can get it back. Open Add Action, choose Google Sheets again, and use Reconnect: the integration re-runs the one-click setup, which re-creates the log_lead_to_google_sheet action and reuses your existing sheet (it never makes a second one). Whenever you are already connected, the connect dialog offers that reconnect option directly.
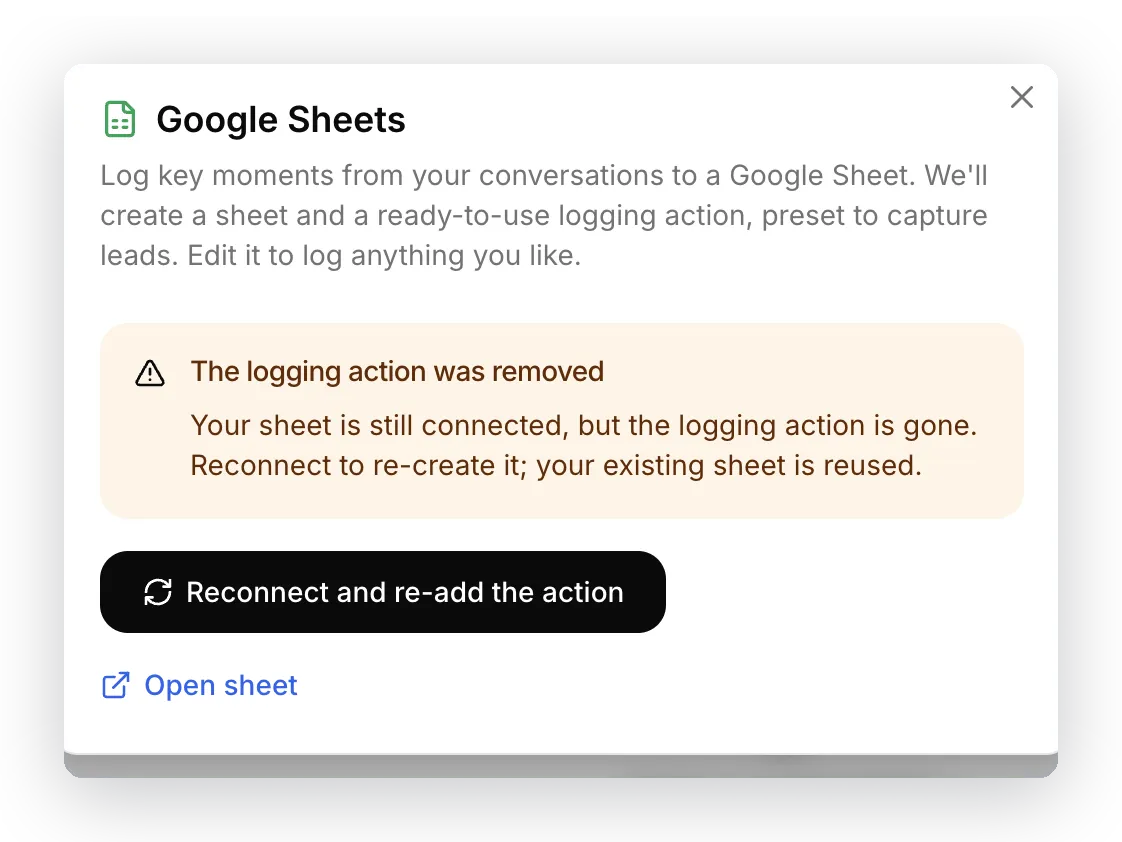 If the starter action is gone, the dialog says so and offers a one-click path to re-create it. Your sheet stays connected.
Summary
An AI Action is a described HTTP request, and a Google Sheet row is one such request. Connect Google once, shape the starter action into your lead report, paste the reporting block, then add a tab and an action for each further report you want. The columns are yours: they are the action’s body, not a fixed template. The settings and prompt in this post are the ones used to produce the rows shown here, so you can copy them, swap in your own product details, and run the same tests to confirm your Agent works before you put it in front of real visitors.
Keep this guide bookmarked. The continuously updated reference for AI Actions is in the docs at docs.quickchat.ai/ai-agent/actions, and the API reference for AI Actions has the full field list.