

You can build an AI agent on Quickchat AI in an afternoon. The part most guides skip is making it look like you built it, rather than like a chatbot bolted on from somewhere else. This tutorial covers that part in full.
You will start from an empty account, build a real support agent for a company called Brightwater, and then brand it end to end: its colors, its logo, its avatar, the launcher visitors tap, the shared chat page you can send as a link, and the “Powered by” line in the corner. By the end you will have a widget you could hand to a client, and a before-and-after screenshot of every surface to prove it.
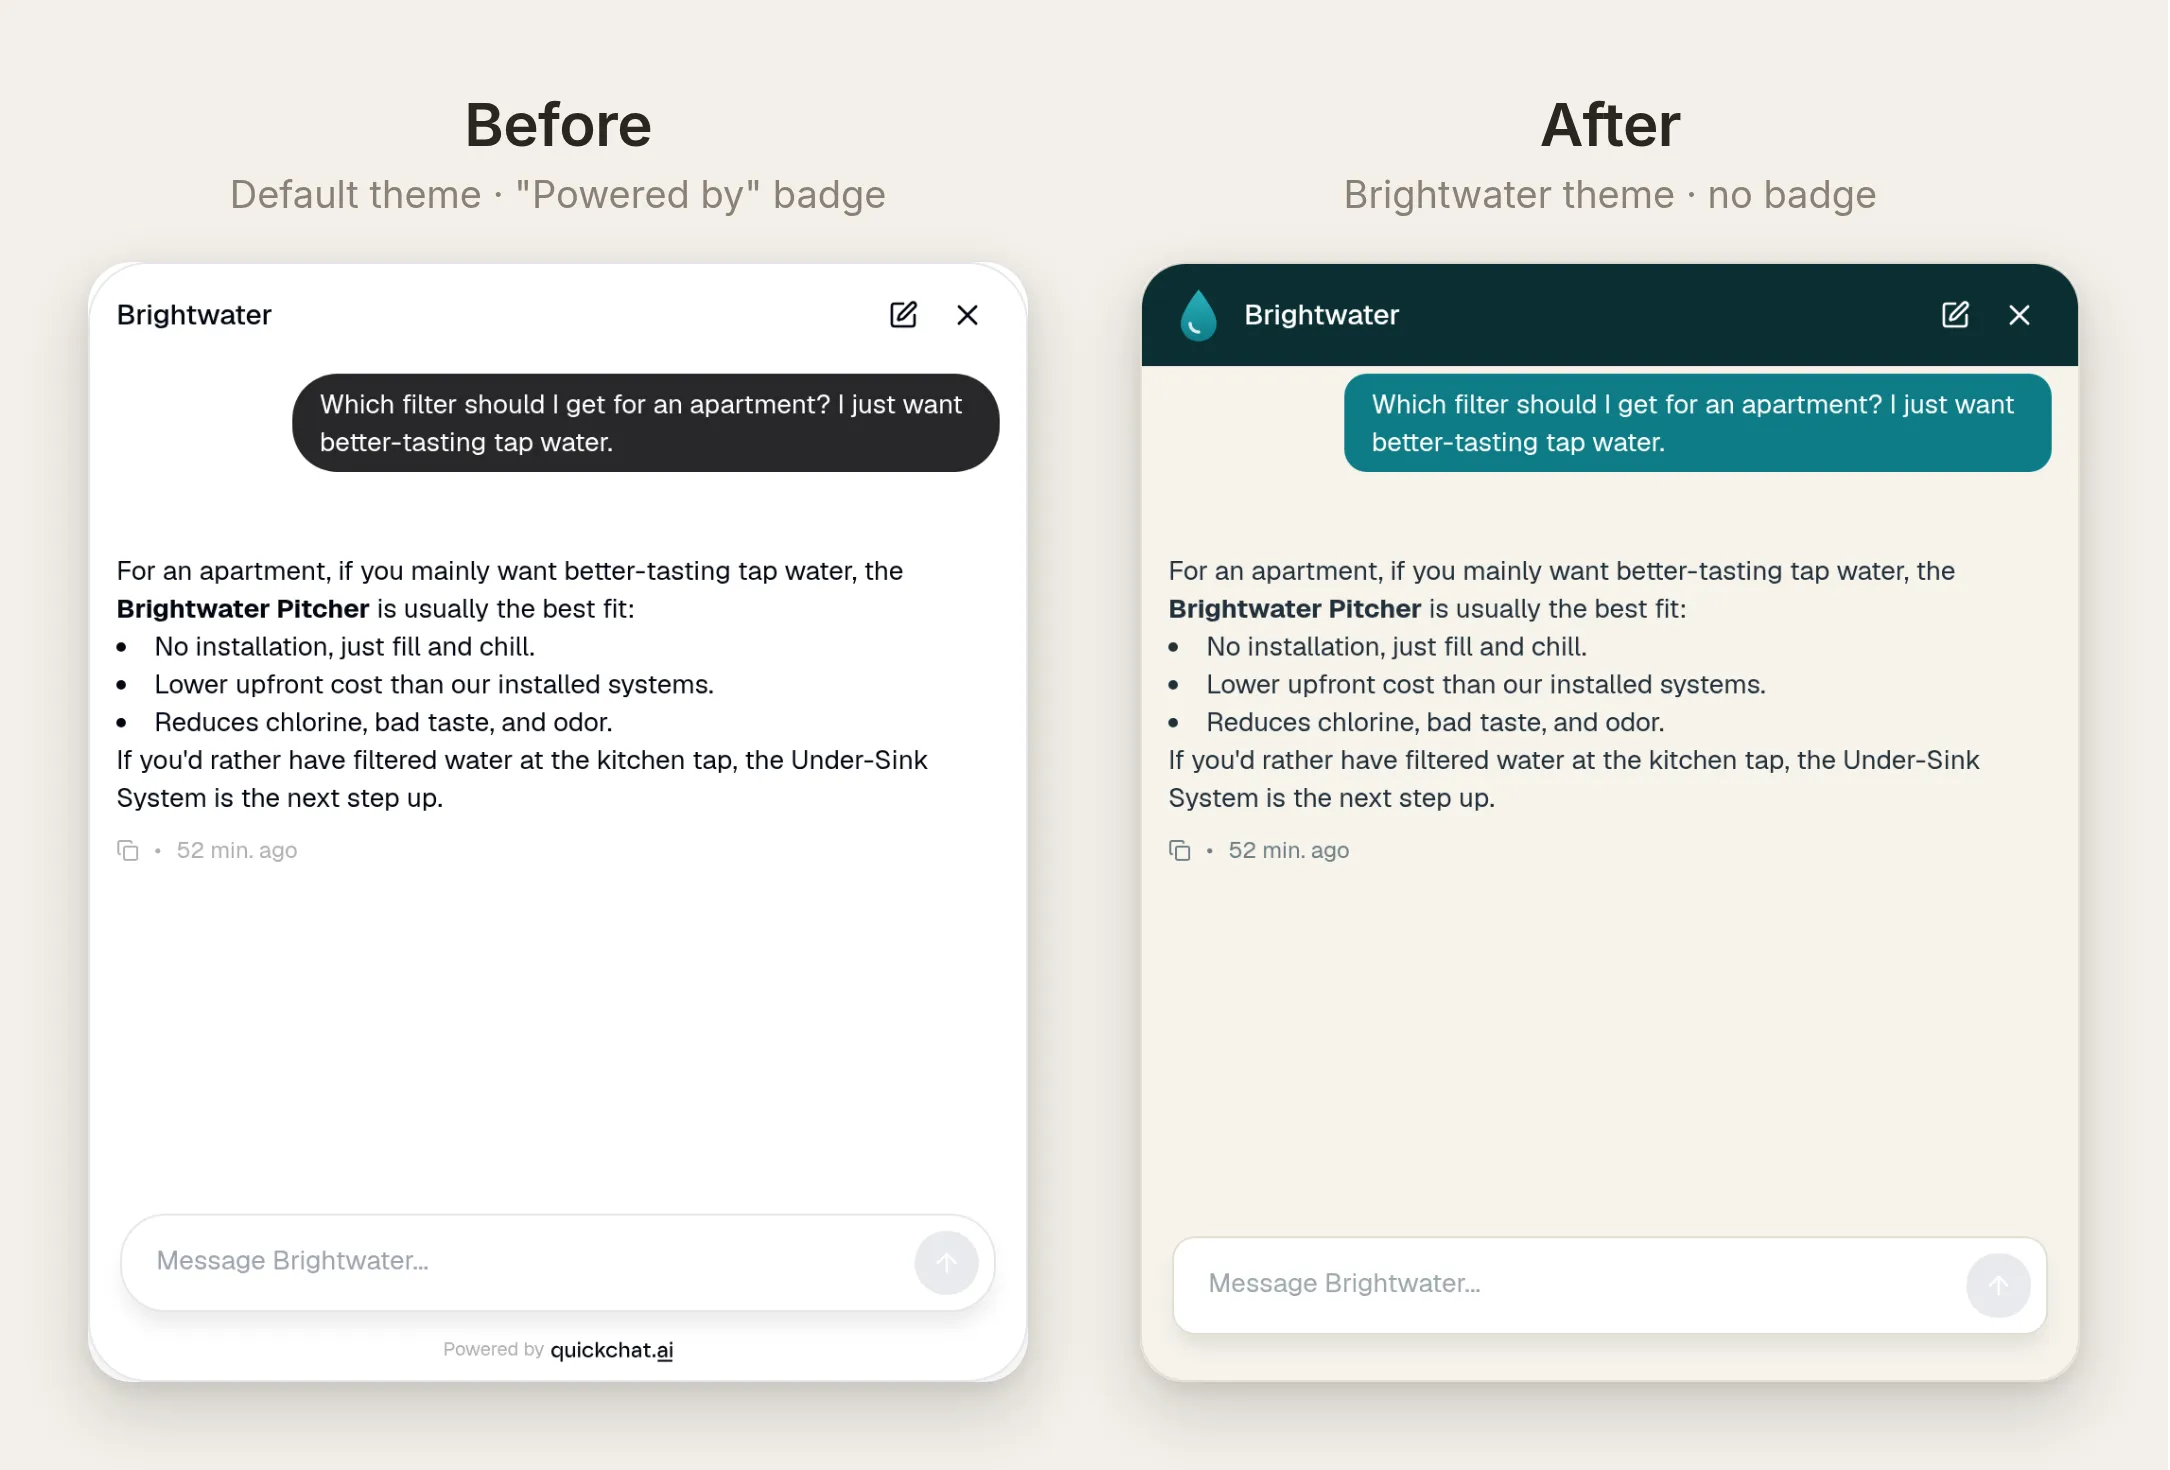 The same agent, before and after. Same answers, same actions, a completely different face.
Matching your brand is free on every plan. Removing the “Powered by Quickchat AI” line is the one part that needs the Professional plan. There is no code and nothing to install. And the range goes well beyond one look: three more fictional brands further down turn the same widget dark, pastel, and loud with nothing but Appearance settings.
The short version, if you want to skip ahead:
- Build a real agent first (a prompt, some knowledge, one action), so there is something worth branding.
- On Appearance, set the Theme to Custom and enter your brand colors. Upload your logo as the AI Agent Avatar and pick one of the three launcher styles.
- Watch the built-in contrast check as you pick colors, and fix any pair it flags.
- On the Professional plan, turn on Hide Quickchat AI Branding to clear the “Powered by” line and put your logo on the Chat Page.
- Embed the widget on your site, or share the Chat Page link.
The rest of this post does each step slowly, with the exact values to copy.
What does it mean to white-label a chatbot?
White-labeling a chatbot is two separate jobs, and it helps to keep them apart from the start.
The first job is matching your brand: the colors, the logo, the avatar, the shape of the bubbles, the font size. Everything a visitor sees can carry your identity, and all of it is available on every plan, including the free one.
The second job is removing the maker’s mark: the small “Powered by Quickchat AI” line in the chat footer, and the Quickchat logo on the hosted Chat Page. That switch lives on the Professional plan and above.
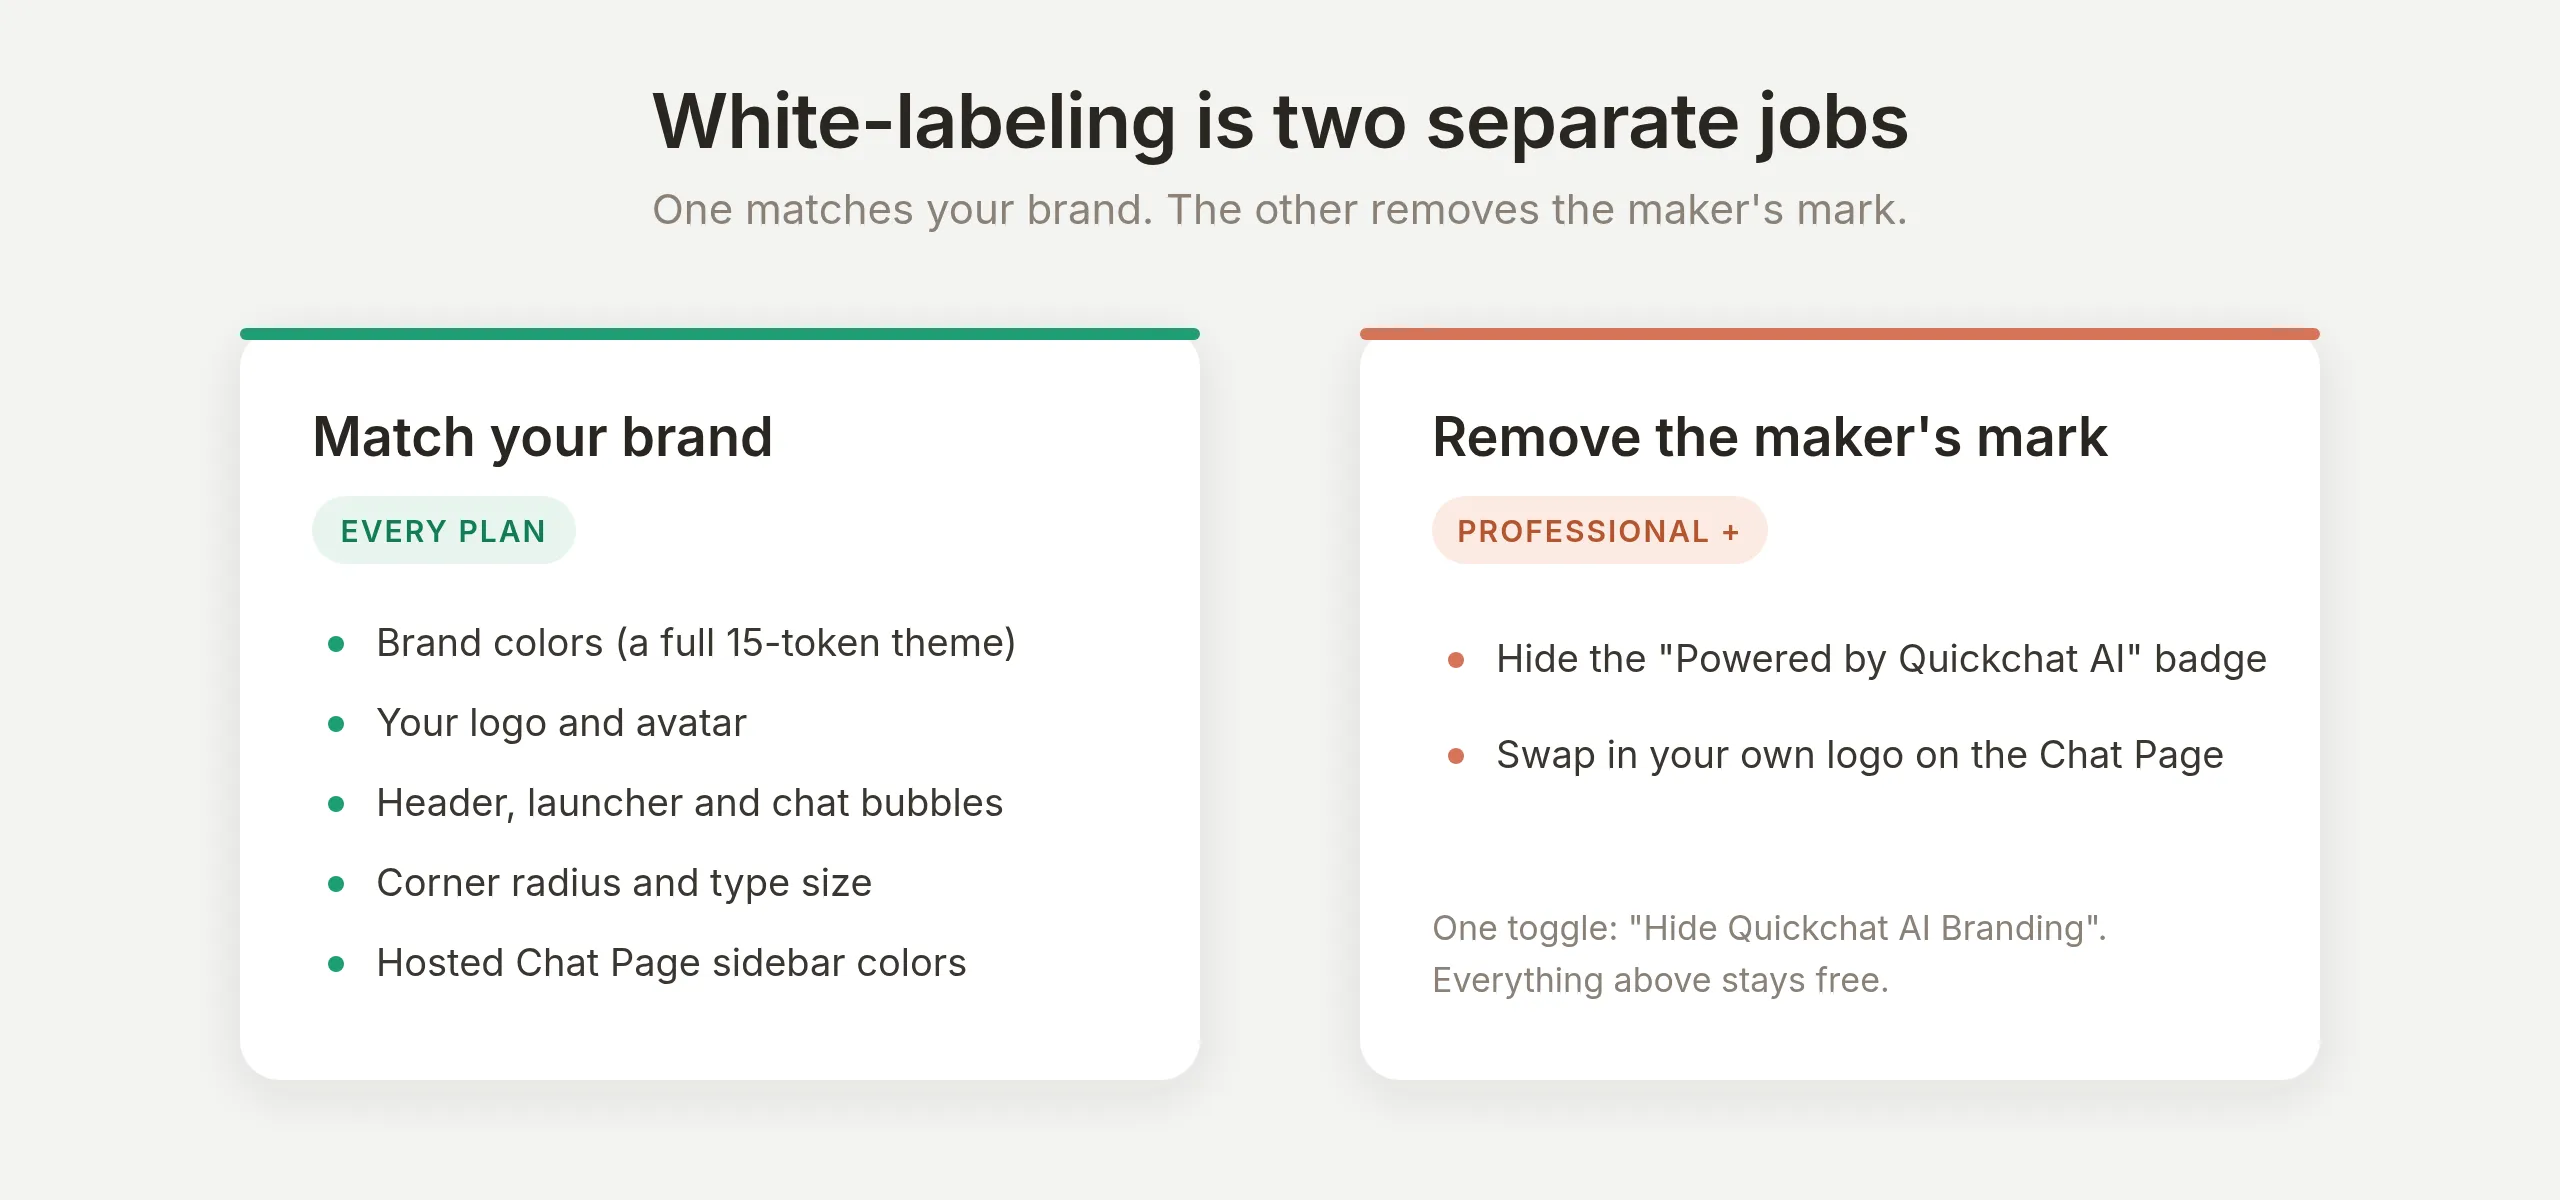 Two jobs, two plans. Almost everything is free; one switch is the paid part.
Keeping the two jobs separate matters because you can do most of the work, and see most of the result, before you decide to upgrade. A free account can make the widget look entirely like your brand. The Professional plan removes the last line of small print.
Build a real agent first, so it is worth branding
Before touching a single color, build an agent that actually answers questions and does something useful, so the branding wraps around a real product rather than an empty shell.
Our example is Brightwater, a company that sells home water filters: a countertop pitcher, an under-sink system, and a whole-house system. The agent helps visitors pick a filter, answers questions about shipping and returns, and can look up an order. If you are following along with a different business, keep your own facts in mind as you go.
Give it an identity and a prompt
Open Identity in the sidebar. Set the Name to what the agent should call itself (Brightwater), and put its job in the Main Prompt. The Main Prompt is the always-on instruction that shapes every reply, so describe the role, the scope, and how to behave when it does not know something.
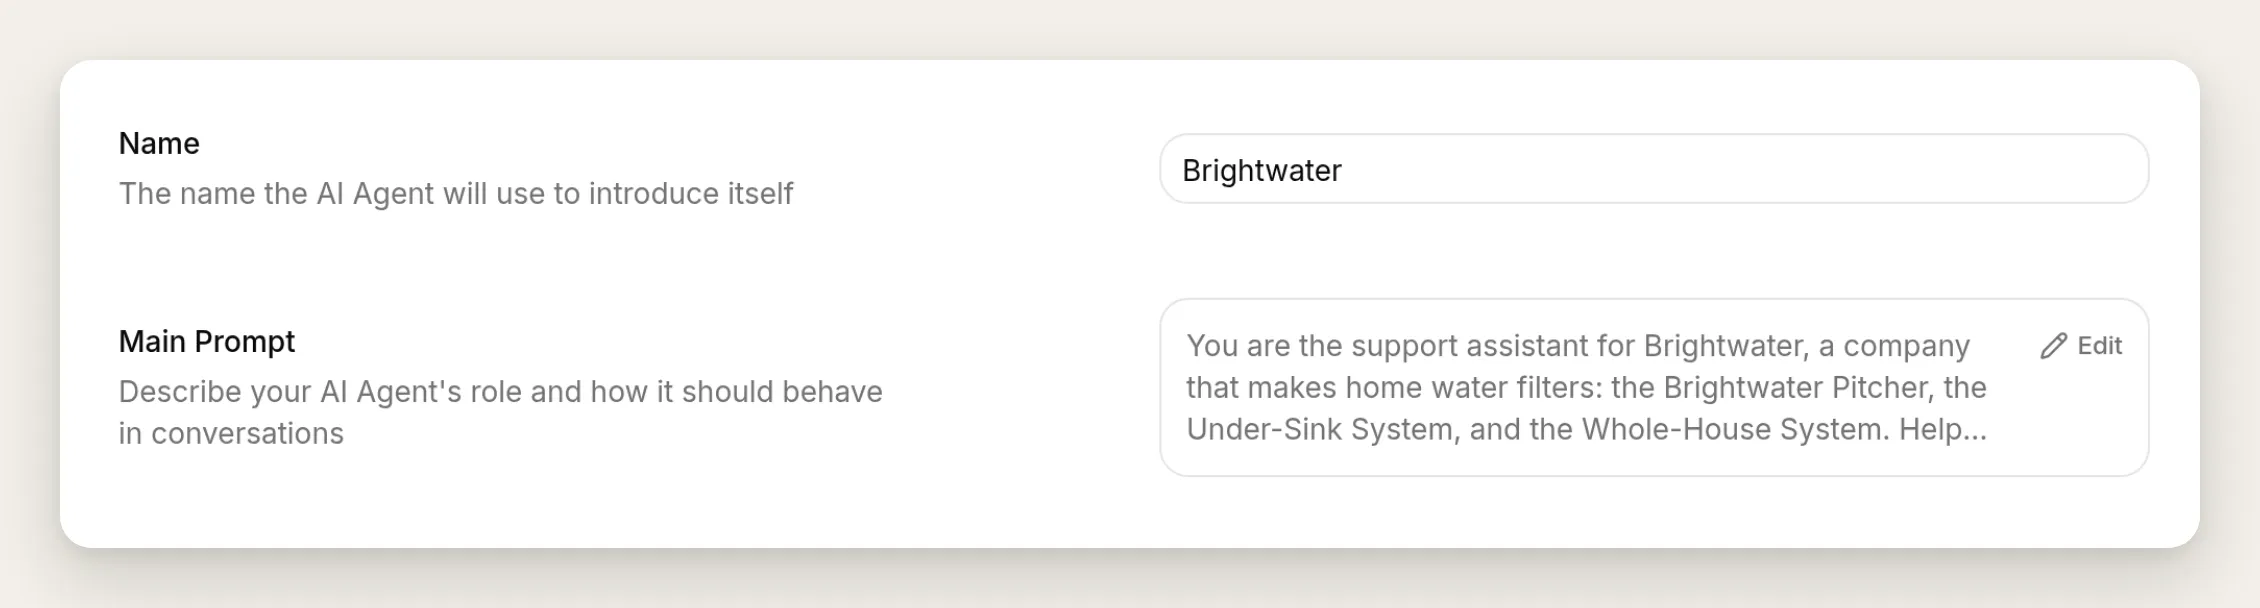 The two fields that matter on the Identity page: the Name and the Main Prompt.
Here is the prompt to copy:
You are the support assistant for Brightwater, a company that makes home water filters: the Brightwater Pitcher, the Under-Sink System, and the Whole-House System. Help visitors pick the right filter, understand filter lifespans and replacements, and answer questions about shipping, returns, and warranty. Be warm, concise, and practical, and keep answers short.

When a visitor asks about an existing order and gives an order number, call the "Check order status" action with their order number, then tell them the status, the carrier, and the estimated delivery date.

Only answer from what you actually know about Brightwater. If you do not have a detail (for example a specific certification you are not sure about), say you do not have that detail and offer to connect them with the Brightwater team, rather than guessing.
The last paragraph is the important one. It tells the agent to admit a gap instead of inventing an answer. We will test that it holds.
Add knowledge it can answer from
Open Knowledge Base and add a few short articles: the product line and prices, filter lifespans and replacement costs, shipping, returns and warranty, and installation. Plain text is fine. The agent reads these to answer questions, so write them the way you would explain the facts to a new support hire. For more on sourcing and structuring that content, see our chatbot knowledge base guide.
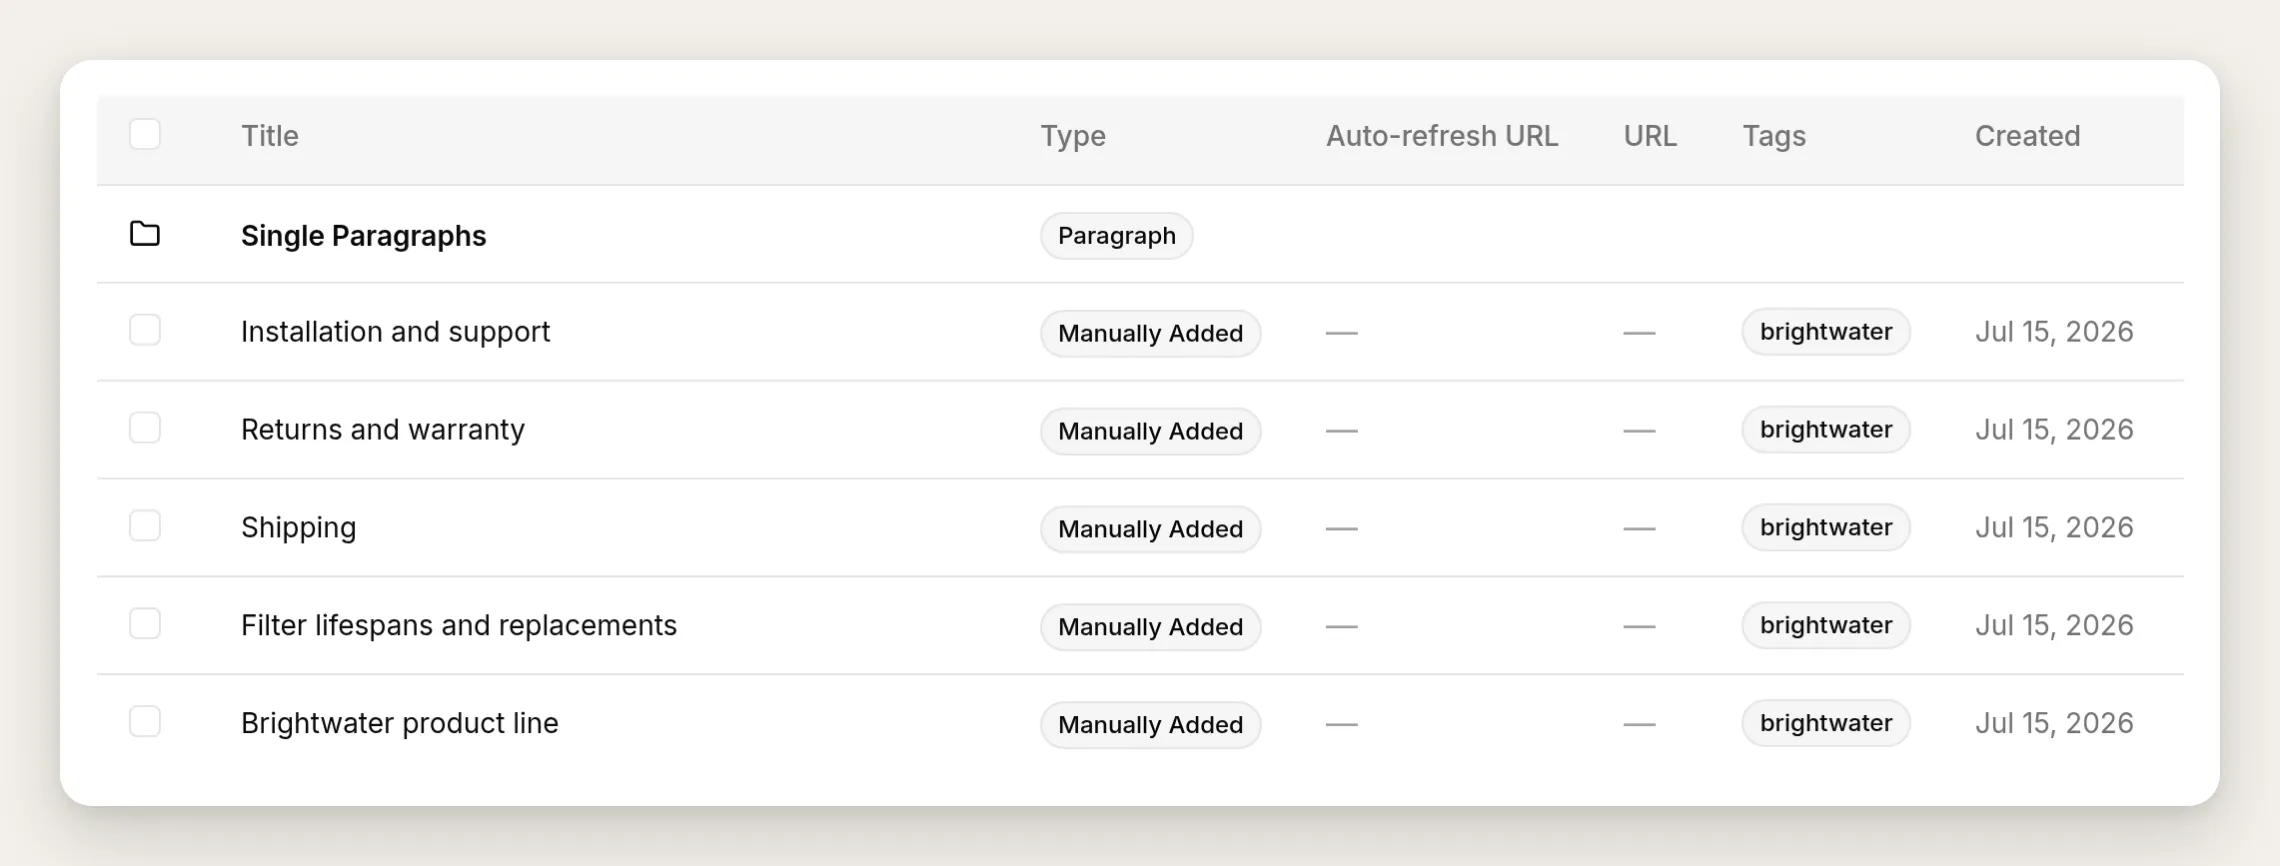 Five short articles cover the whole demo. Each one is a few sentences of plain text.
Leave one thing out on purpose. Brightwater’s knowledge base says nothing about NSF certification for lead removal. That gap is deliberate, so we can check what the agent does when a visitor asks a question it cannot answer from its knowledge.
Give it one action so it can do something
Knowledge covers what the agent can say. An action covers what it can do: call an API mid-conversation and use the response in its reply. Add one so the agent is more than a FAQ. Open Actions & MCPs, choose Add Action, and build an order lookup. Every action follows the same shape, so this one recipe is the pattern for any API you connect later.
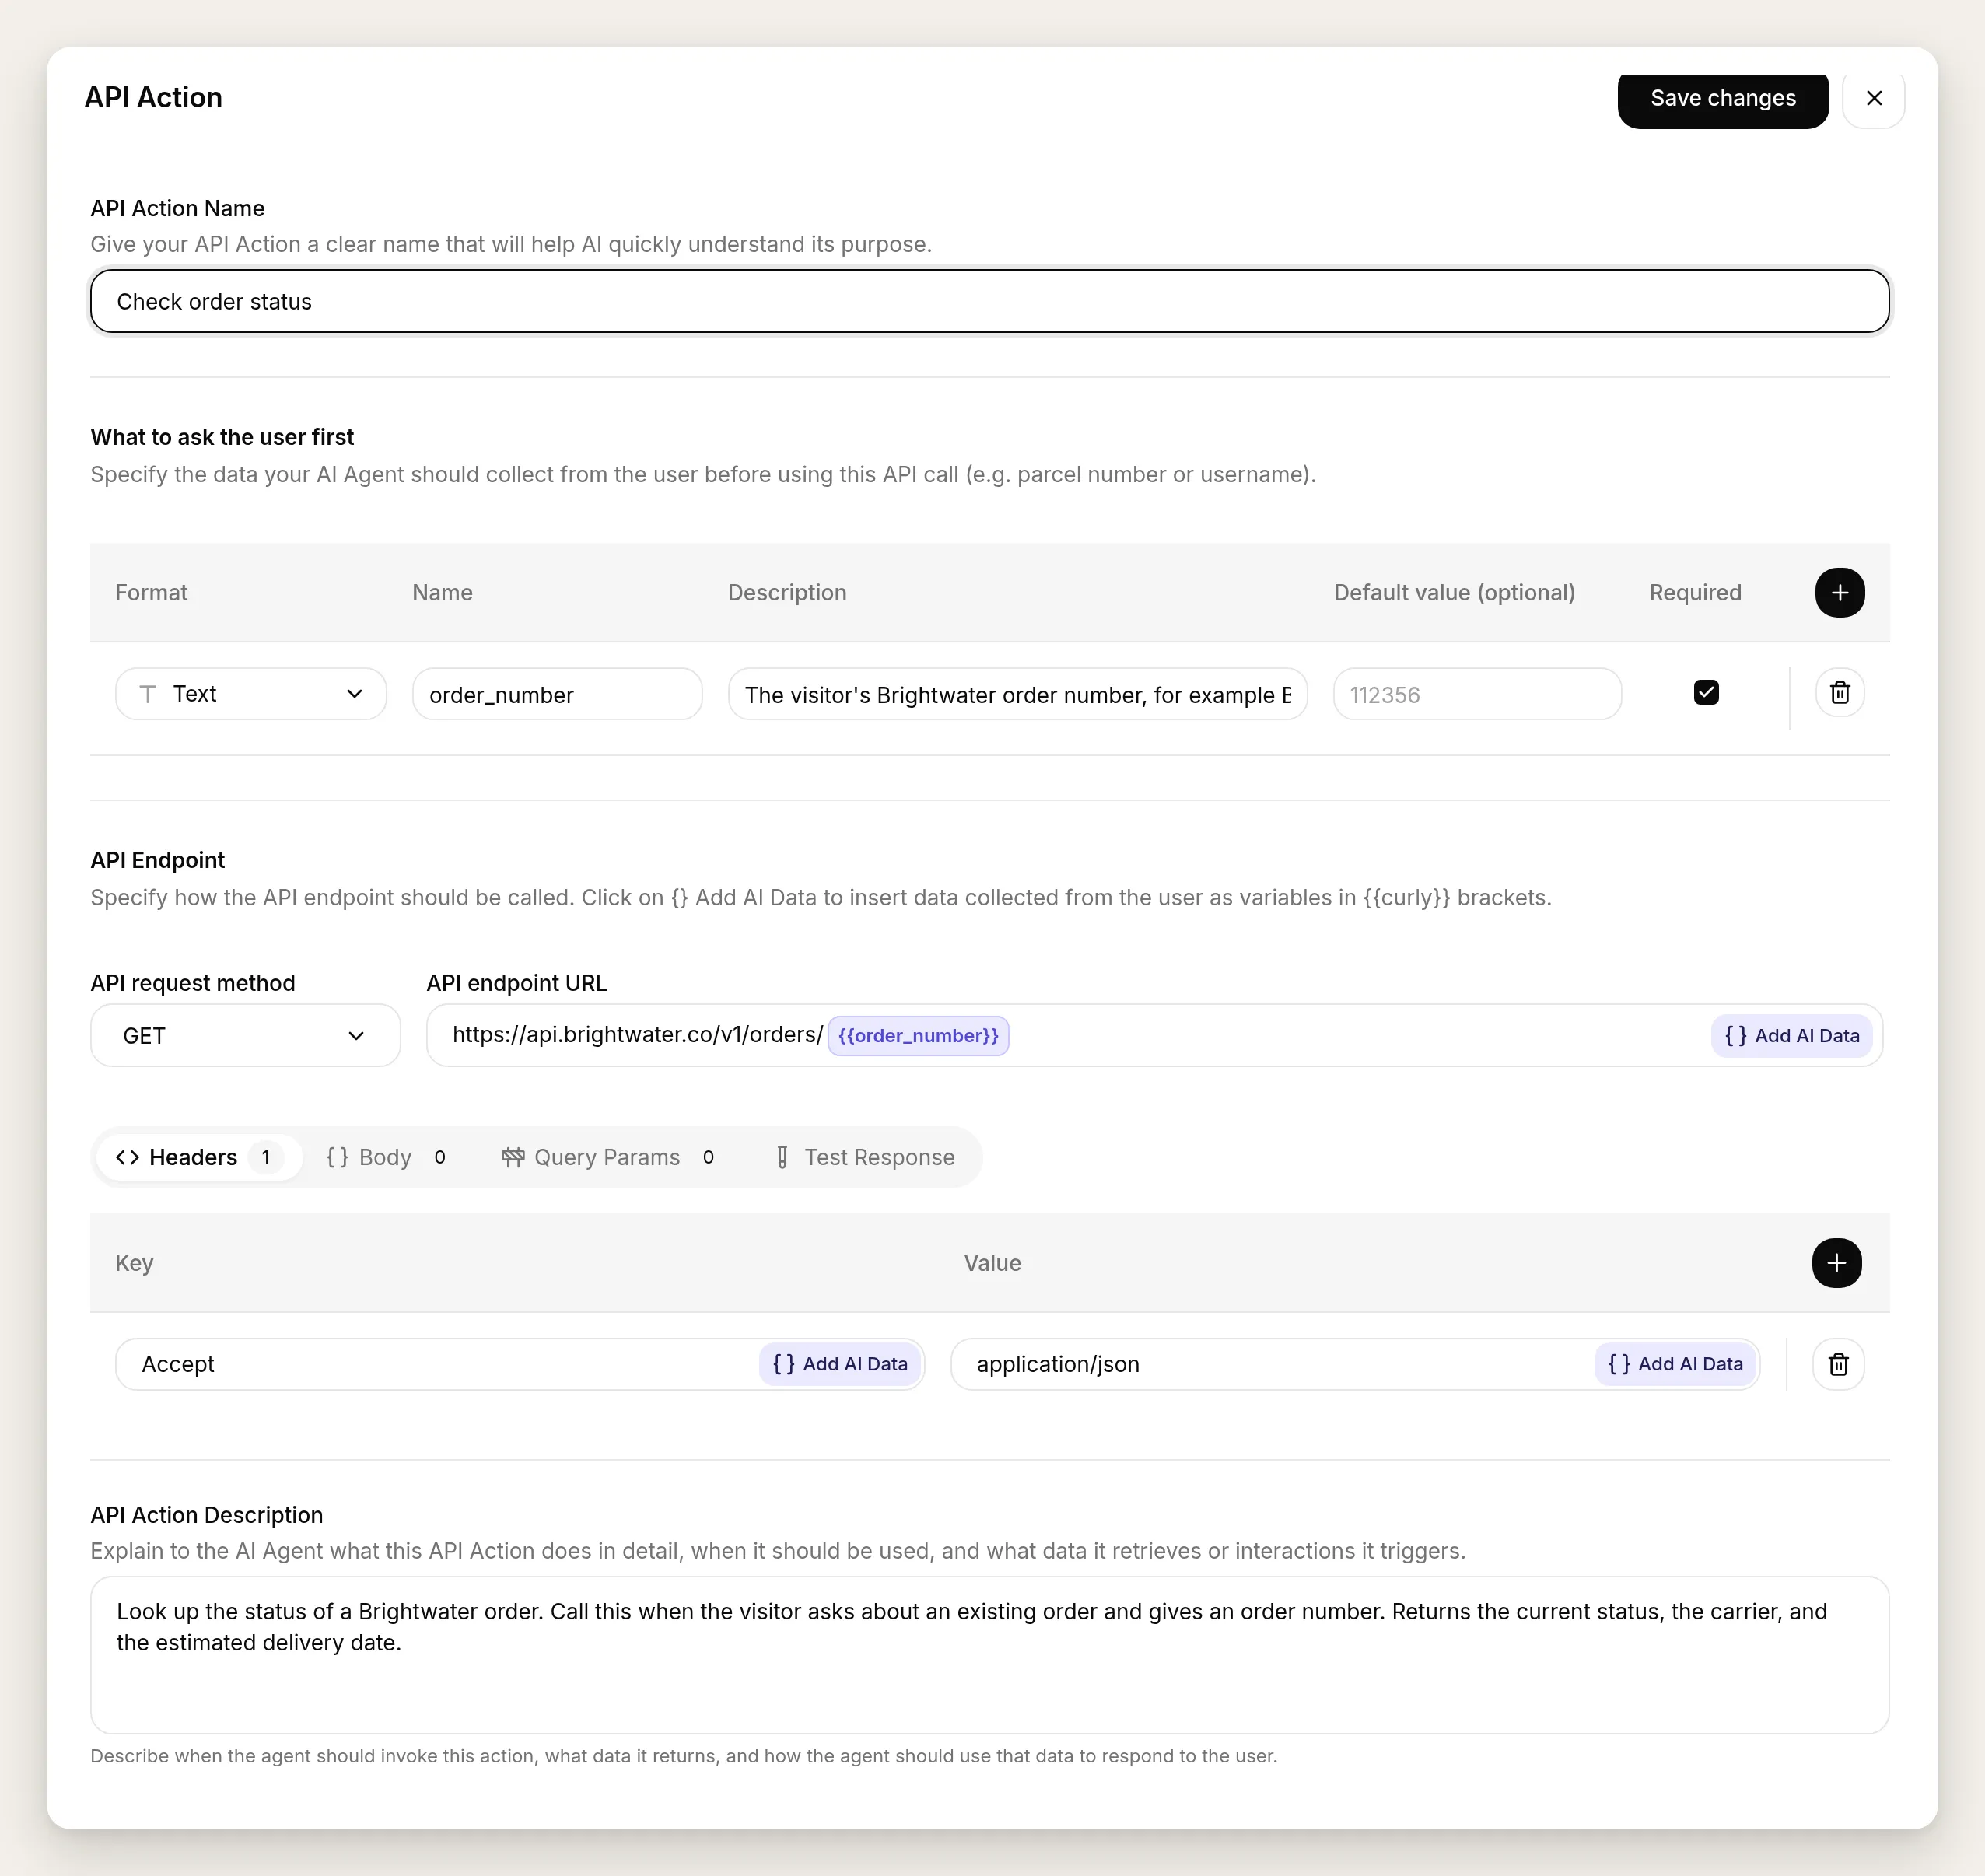 The whole action in one editor. Each field below maps to a box in this form.
- API Action Name: Check order status
- What to ask the visitor first (one parameter):
| Format | Name | Description | Required |
|---|---|---|---|
| Text | order_number | The visitor’s Brightwater order number, for example BW-10432. | Yes |
- Method and URL:
GET https://api.brightwater.co/v1/orders/{{order_number}} - Headers:
Accept: application/json - Body: none (this is a GET)
- API Action Description:
Look up the status of a Brightwater order. Call this when the visitor asks about an existing order and gives an order number. Returns the current status, the carrier, and the estimated delivery date.Point the URL at your own order API. The {{order_number}} chip is the parameter you defined above, inserted into the URL when the agent calls it. The API Action Description is what the agent reads to decide when to fire the action, so write it as an instruction, not a label. The generated path is covered in Connect Your AI Agent to Any API, where one sentence becomes a complete action grounded in the API’s live documentation. For a field-by-field manual build, see Build a Free AI Agent That Takes Actions.
Confirm it actually works
Before branding anything, check the agent behaves. Open AI Preview or the Testing simulator and run a few real messages. Each test run lands in your Inbox as a conversation, so afterwards you can inspect exactly what the agent did.
Ask a product question: “Which filter should I get for an apartment? I just want better-tasting tap water.” The agent should recommend the pitcher and explain why, drawing on the knowledge base.
Then ask it to do something: “Can you check my order BW-10432?” The reply comes back with the status, the carrier, and the delivery date, and the Inbox shows a 1 action called marker under it. Expanding the marker shows the call itself: the action name, the order_number it filled in, and the API’s response code.
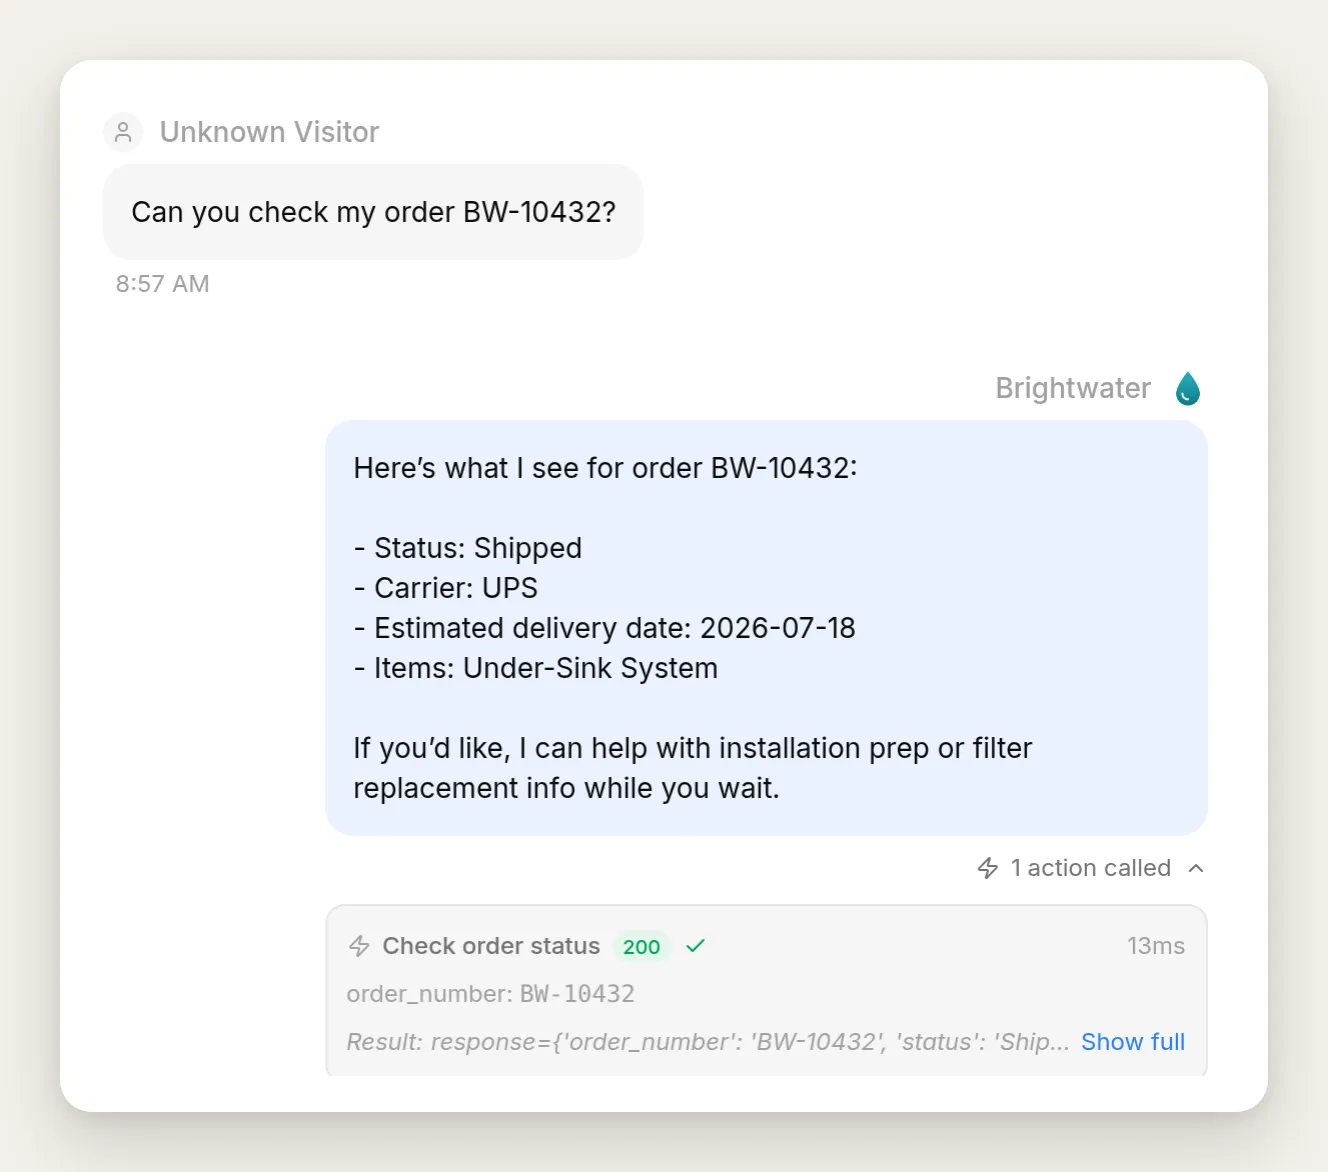 The receipt. The marker under the reply expands into the exact call, its parameter, and the 200 response.
Finally, ask the question you left unanswered: “Is the under-sink filter NSF certified to remove lead?” A weak agent invents a certification. A good one declines. Ours replies that it does not have that detail in its documentation, cannot confirm the certification, and offers to connect the visitor with the team. That honest “no” is worth more than a confident wrong answer, especially on a safety claim.
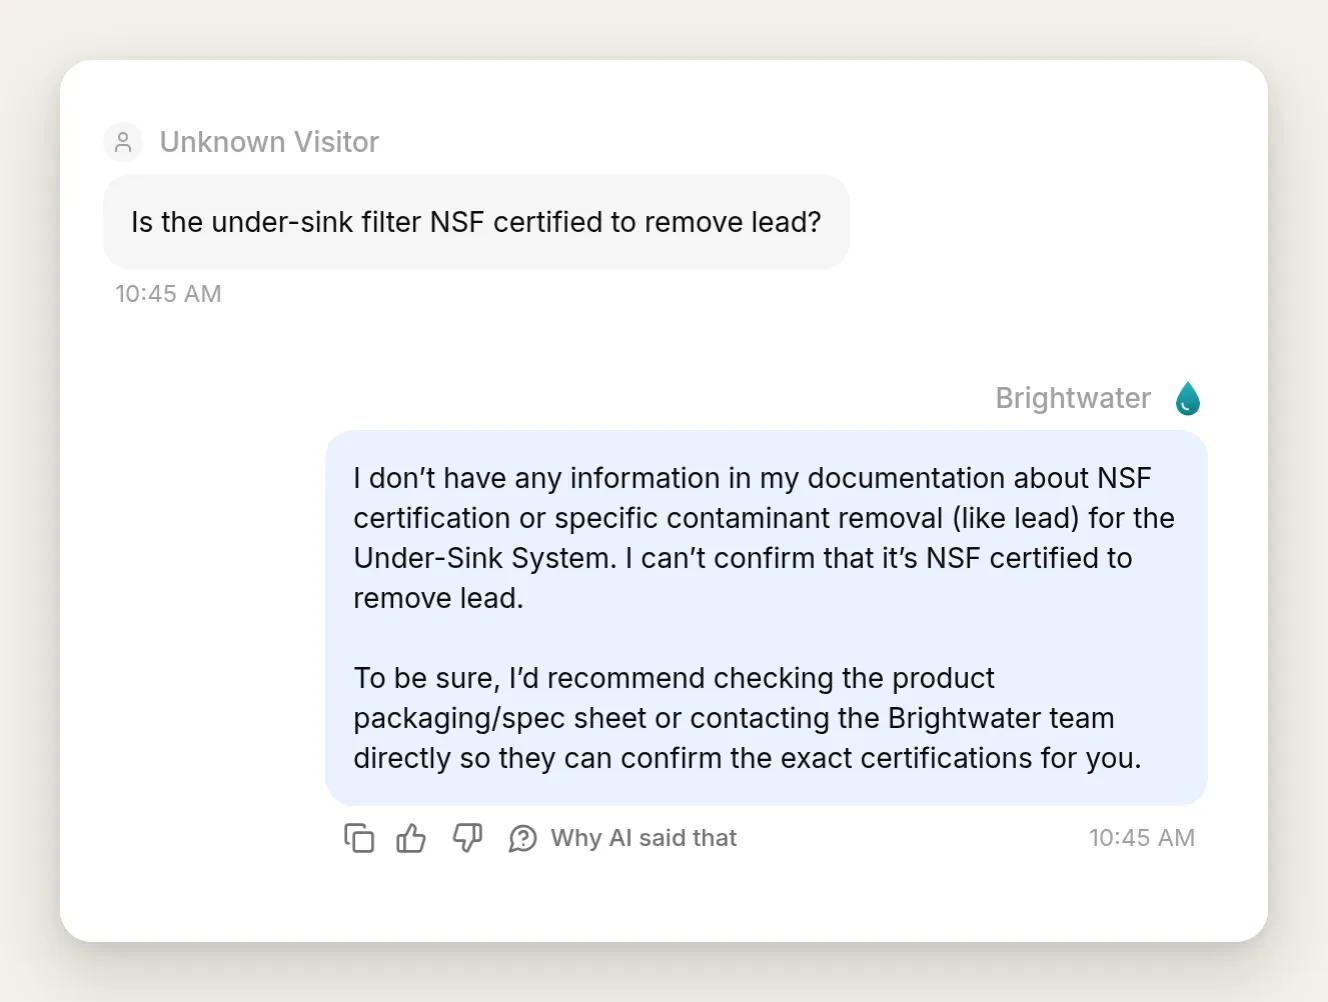 The honest “no”, verbatim. The agent declines the certification claim instead of guessing.
That is a working agent, tested and inspected. Everything from here on is appearance.
How do you match the chatbot to your brand?
Everything a visitor sees can carry your brand, and all of it lives on one page. Open Your Website, then the Appearance tab. The controls are grouped under Branding, Size & Position, Theme, and Other Settings.
Upload your logo once. Under Branding, the AI Agent Avatar is a single image that does three jobs: it is the icon on the launcher button, the avatar in the chat header, and, once you hide the Quickchat branding, the logo on your hosted Chat Page. Upload a square version of your mark and it appears everywhere the agent does.
Set your colors. Under Theme, switch the mode from Light to Custom. This opens a full palette: Background color, Header color, Accent color (used for buttons and the visitor’s chat bubbles), Message bubble color, input colors, and more. Enter your brand’s hex values. For Brightwater we used a sand Background (#F6F3EC), a deep navy Header (#0B2E33), and a teal Accent (#0E7C86). Below the colors, Corner radius and Typography let you match the roundness and text size of your own site.
Pick a launcher style. The launcher, the button a visitor sees before the chat opens, comes in three styles, set by the Launcher size control under Size & Position. Classic, the default, is a small card with your avatar, your agent’s name, and a message box. Input Only is a floating message bar that expands as soon as a visitor taps into it. Small is a compact pill with your avatar and a short call to action; its text is the Launcher label field, which appears when you pick the Small style, and leaving the label empty shows just the icon.
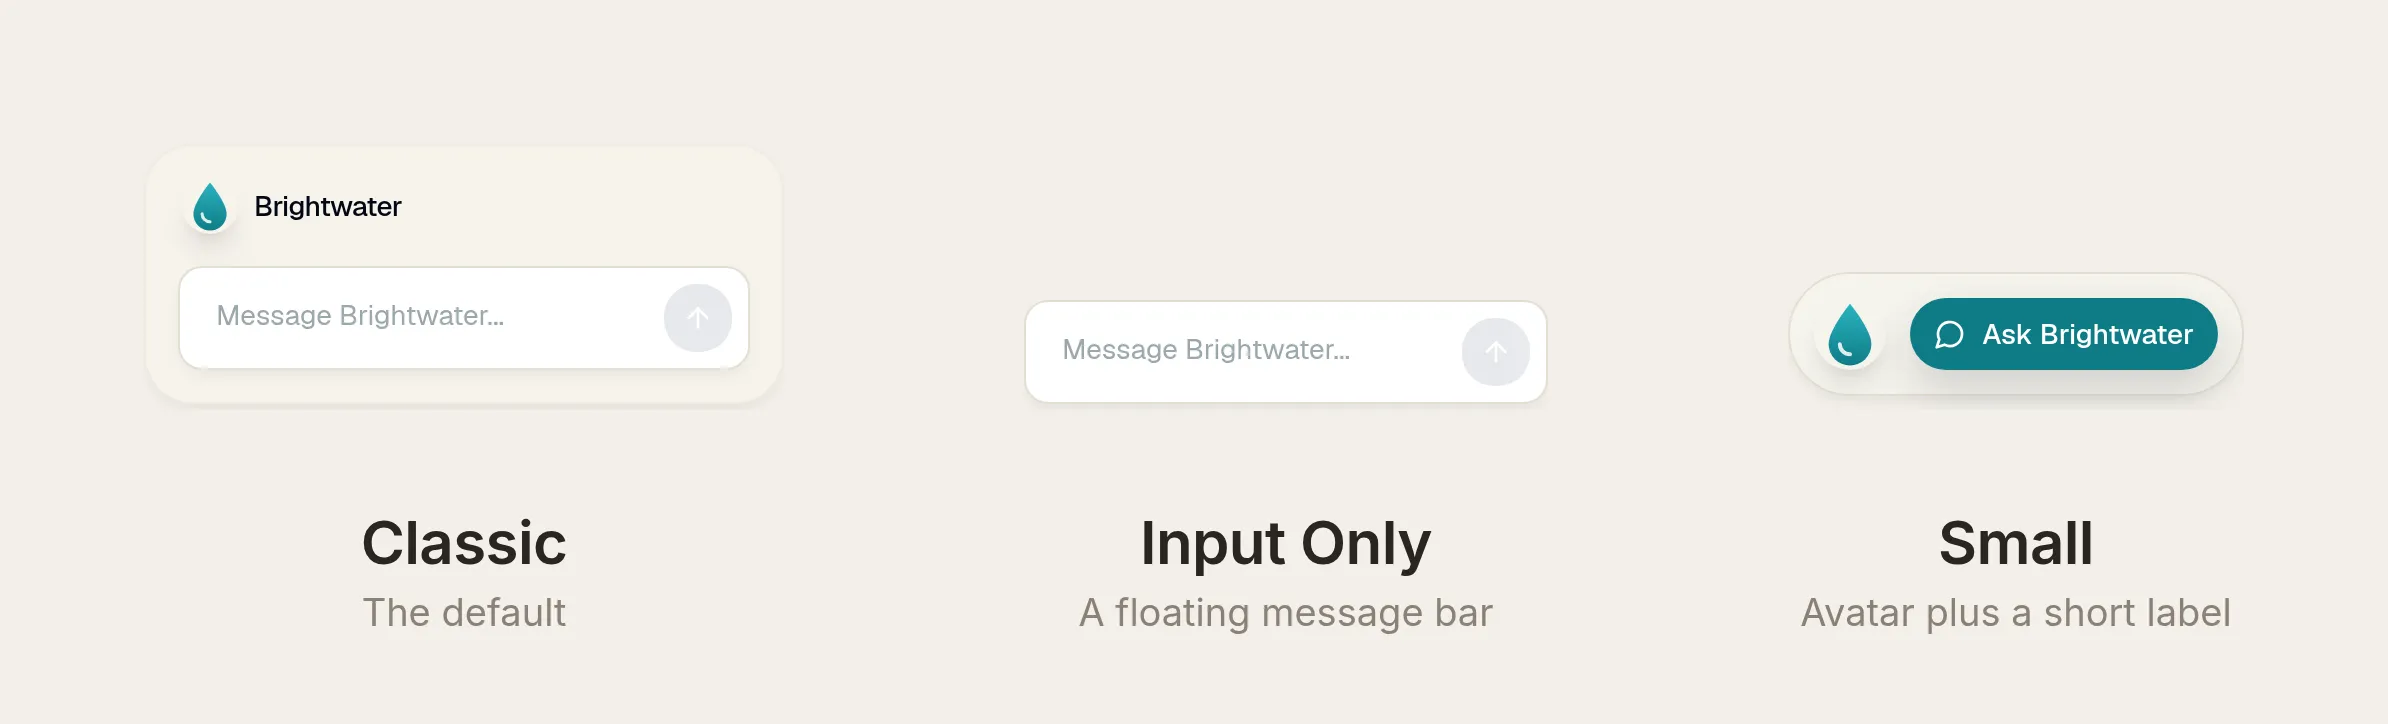 The three launcher styles, one control. All three pick up your theme colors and avatar.
The same section sets Widget position (either bottom corner), the open window’s size (Widget window max width, 300 to 700 pixels, and Widget window max height, 400 to 1200 pixels), and Draggable Launcher, which lets visitors slide the launcher along the edge of the page.
Because the launcher uses the same theme and avatar, the closed state carries your brand as much as the open window does. Here is the Classic launcher before and after the Brightwater treatment, with the welcome popup turned on:
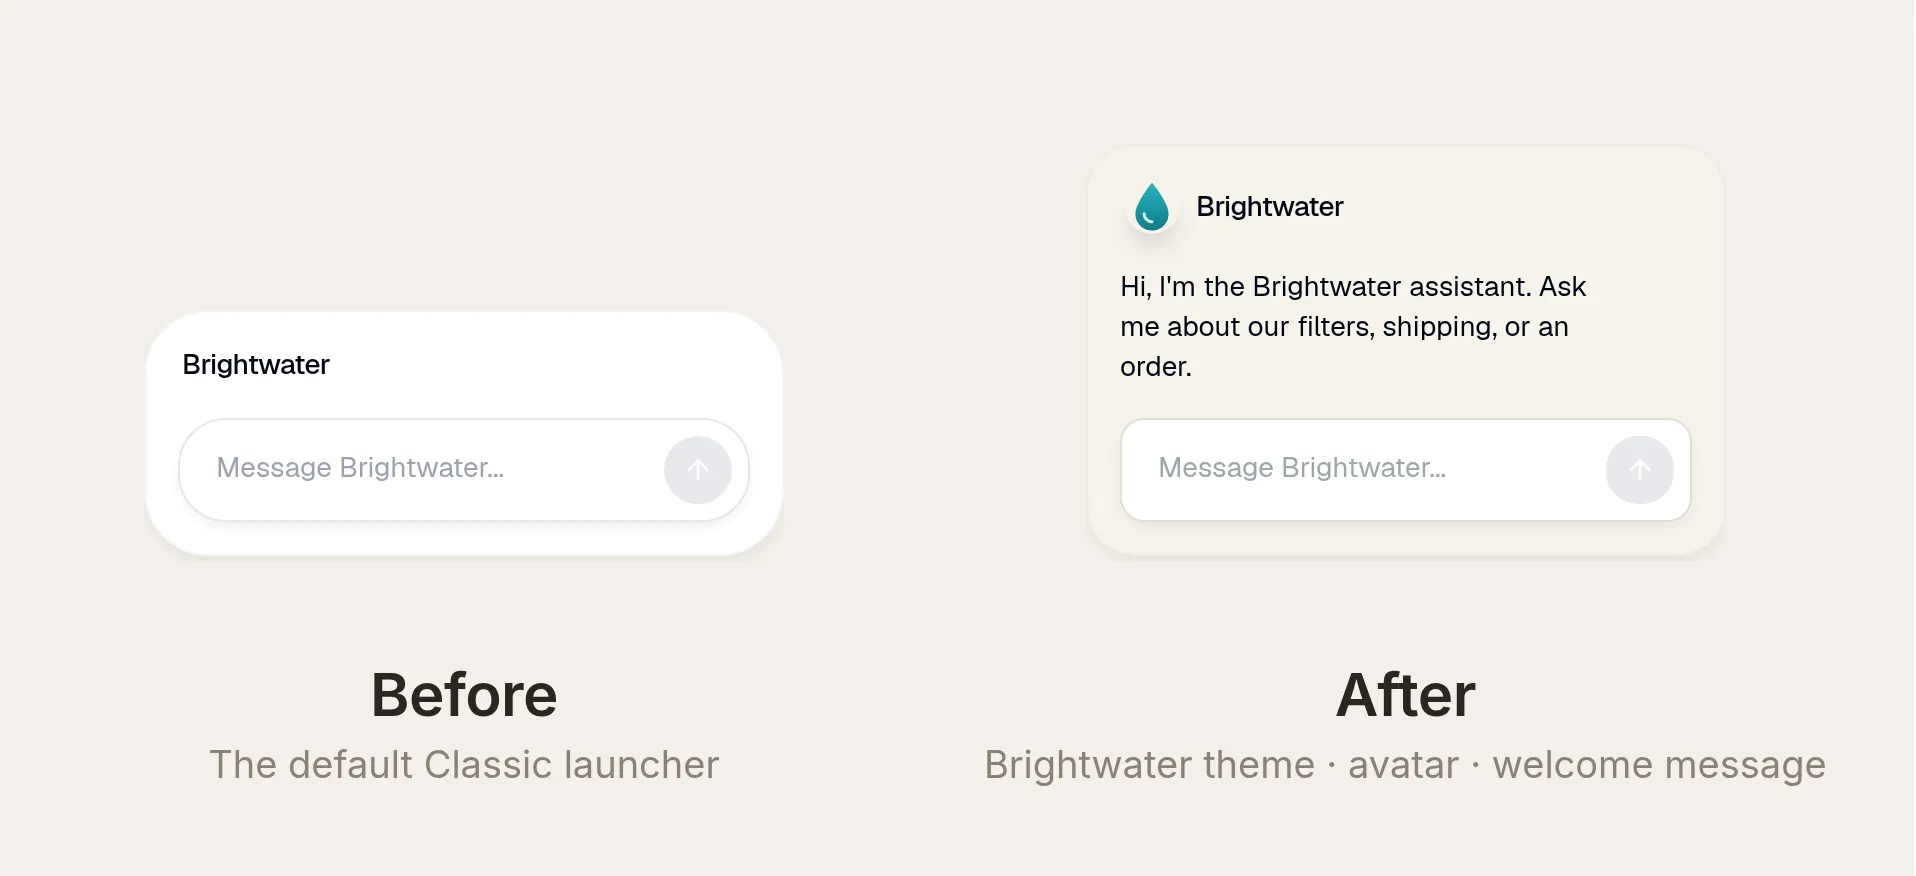 The same Classic launcher, default and branded. The greeting is the welcome message setting.
Each control updates the live preview beside the form, so you can watch the widget become yours as you go. Set your colors, upload your avatar, pick a launcher, and the “match your brand” job is done, on any plan.
Will your brand colors stay readable?
There is one trap in matching your brand, and the theme editor is built to catch it. A brand palette is designed for a logo on a hero image, not for fourteen-pixel chat text. Drop the same bright accent behind body copy and it often becomes hard to read.
As you pick colors, the editor computes the WCAG AA contrast ratio for each text-and-background pair and warns you in place when a pair falls below the 4.5:1 standard for normal text. Brightwater’s real palette trips it three times: the tertiary text, the link color, and the input placeholder all come in too light against their backgrounds.
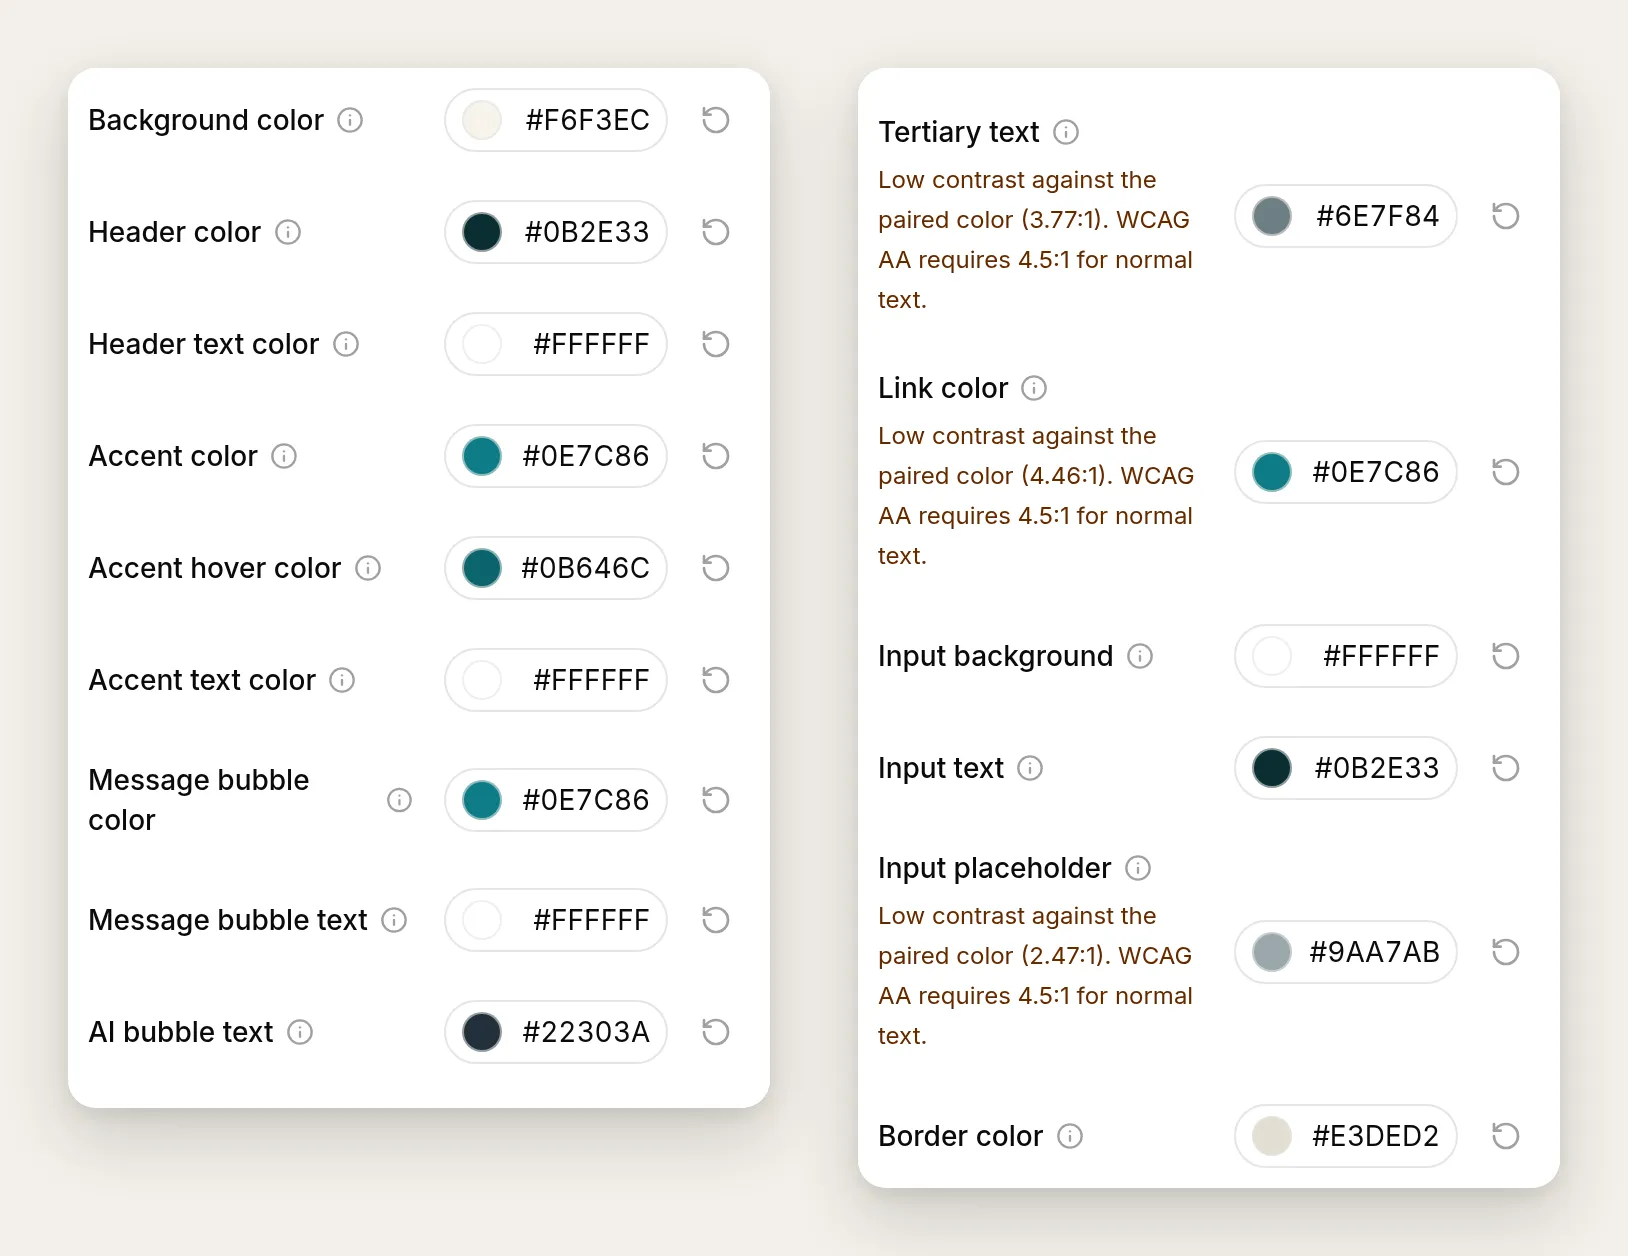 The editor flags low-contrast pairs as you pick them, with the exact ratio.
The fix keeps the brand color where it works, on buttons and the header, and assigns body text a darker shade. Your accent teal makes a great button; behind a paragraph of small print, it needs more depth.
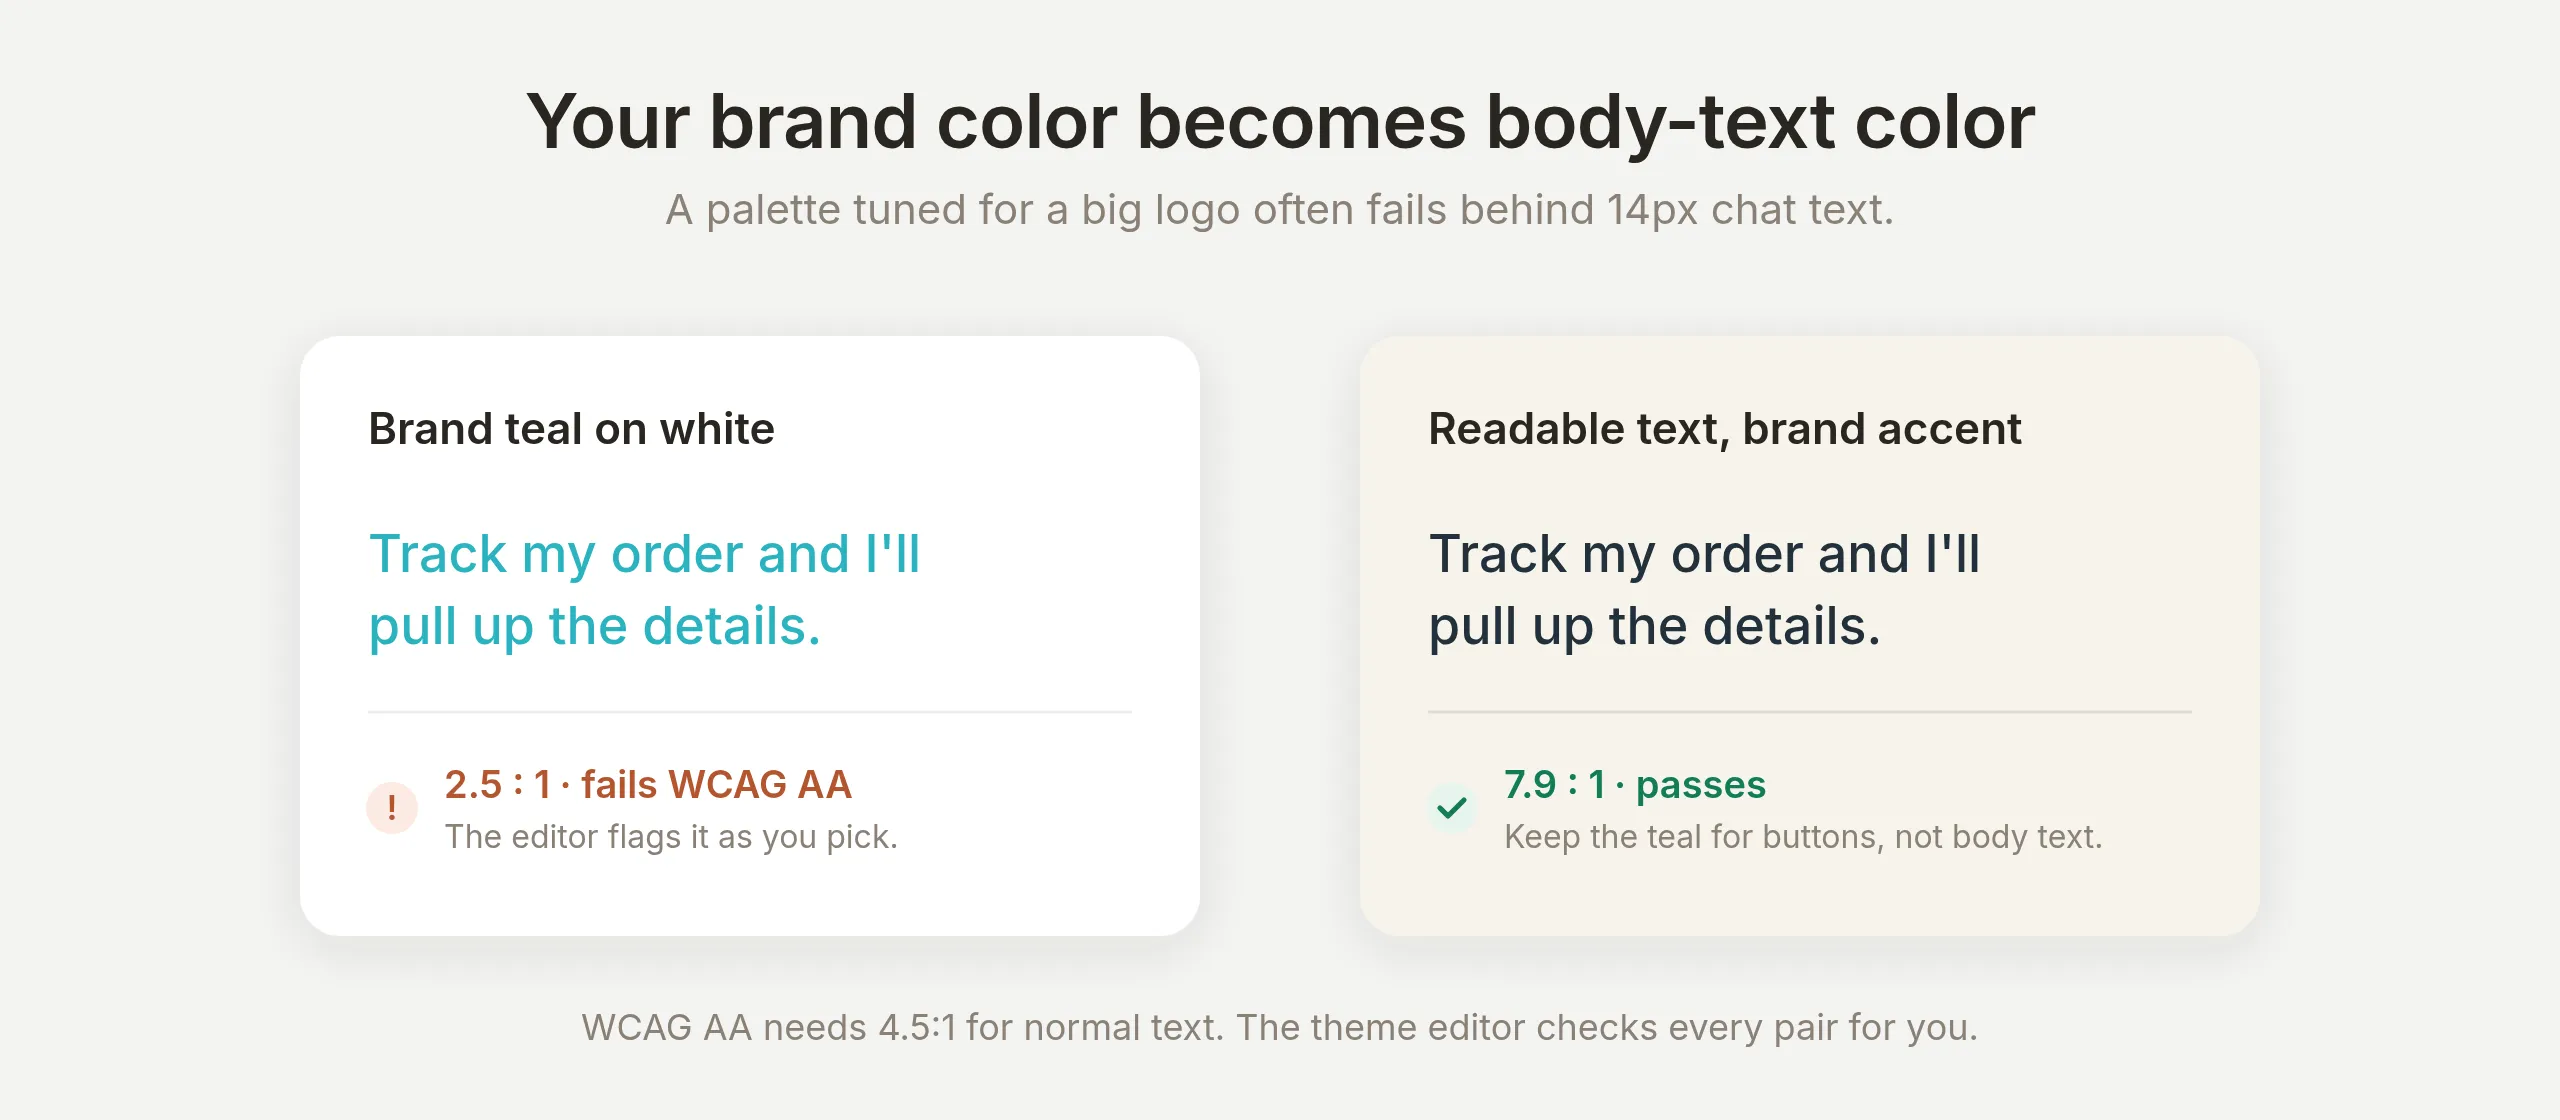 Same brand, readable text. White-labeling well means inheriting your brand’s legibility, not just its hex codes.
This is the part of white-labeling that competitors’ guides skip. A truly branded chatbot is one that reads as your brand and stays accessible. The editor does the arithmetic so you do not have to.
How different can the same widget look?
Everything in this section is the same widget, configured entirely from the Appearance tab. The theme system exposes each surface separately: fifteen color roles, corner radius, text size, three launcher styles, window size, and the avatar. None of it needs code or custom CSS.
To show the range, here are three more fictional brands, built exactly the way Brightwater was.
Basalt, a data-tools company, runs a fully dark widget: near-black backgrounds, a violet accent, sharp corners, small text, and an icon-only Small launcher. (A built-in Dark theme mode exists too; a custom palette like this one goes further and sets every color.)
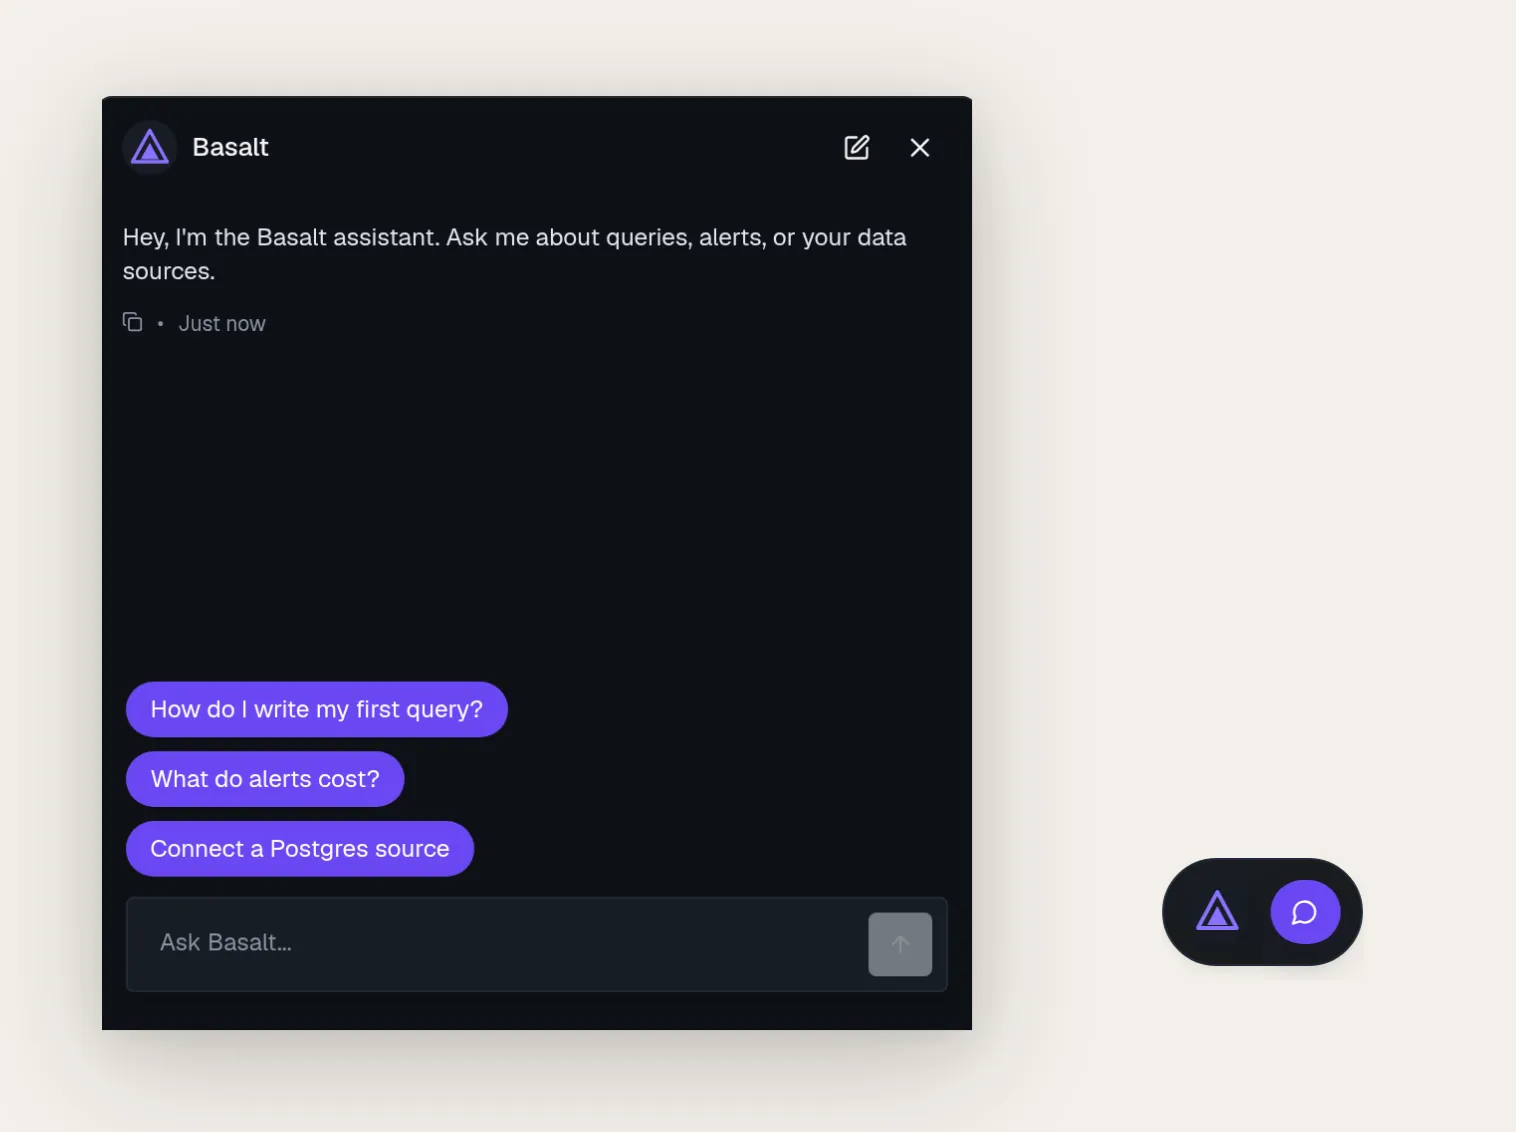 Basalt: a custom dark palette, Roundness set to Small, Text size Small, an icon-only Small launcher, and a 460px window.
Mara, a skincare brand, goes the opposite way: cream and blush tones, fully rounded corners, large text, and the Classic launcher greeting visitors with a welcome message.
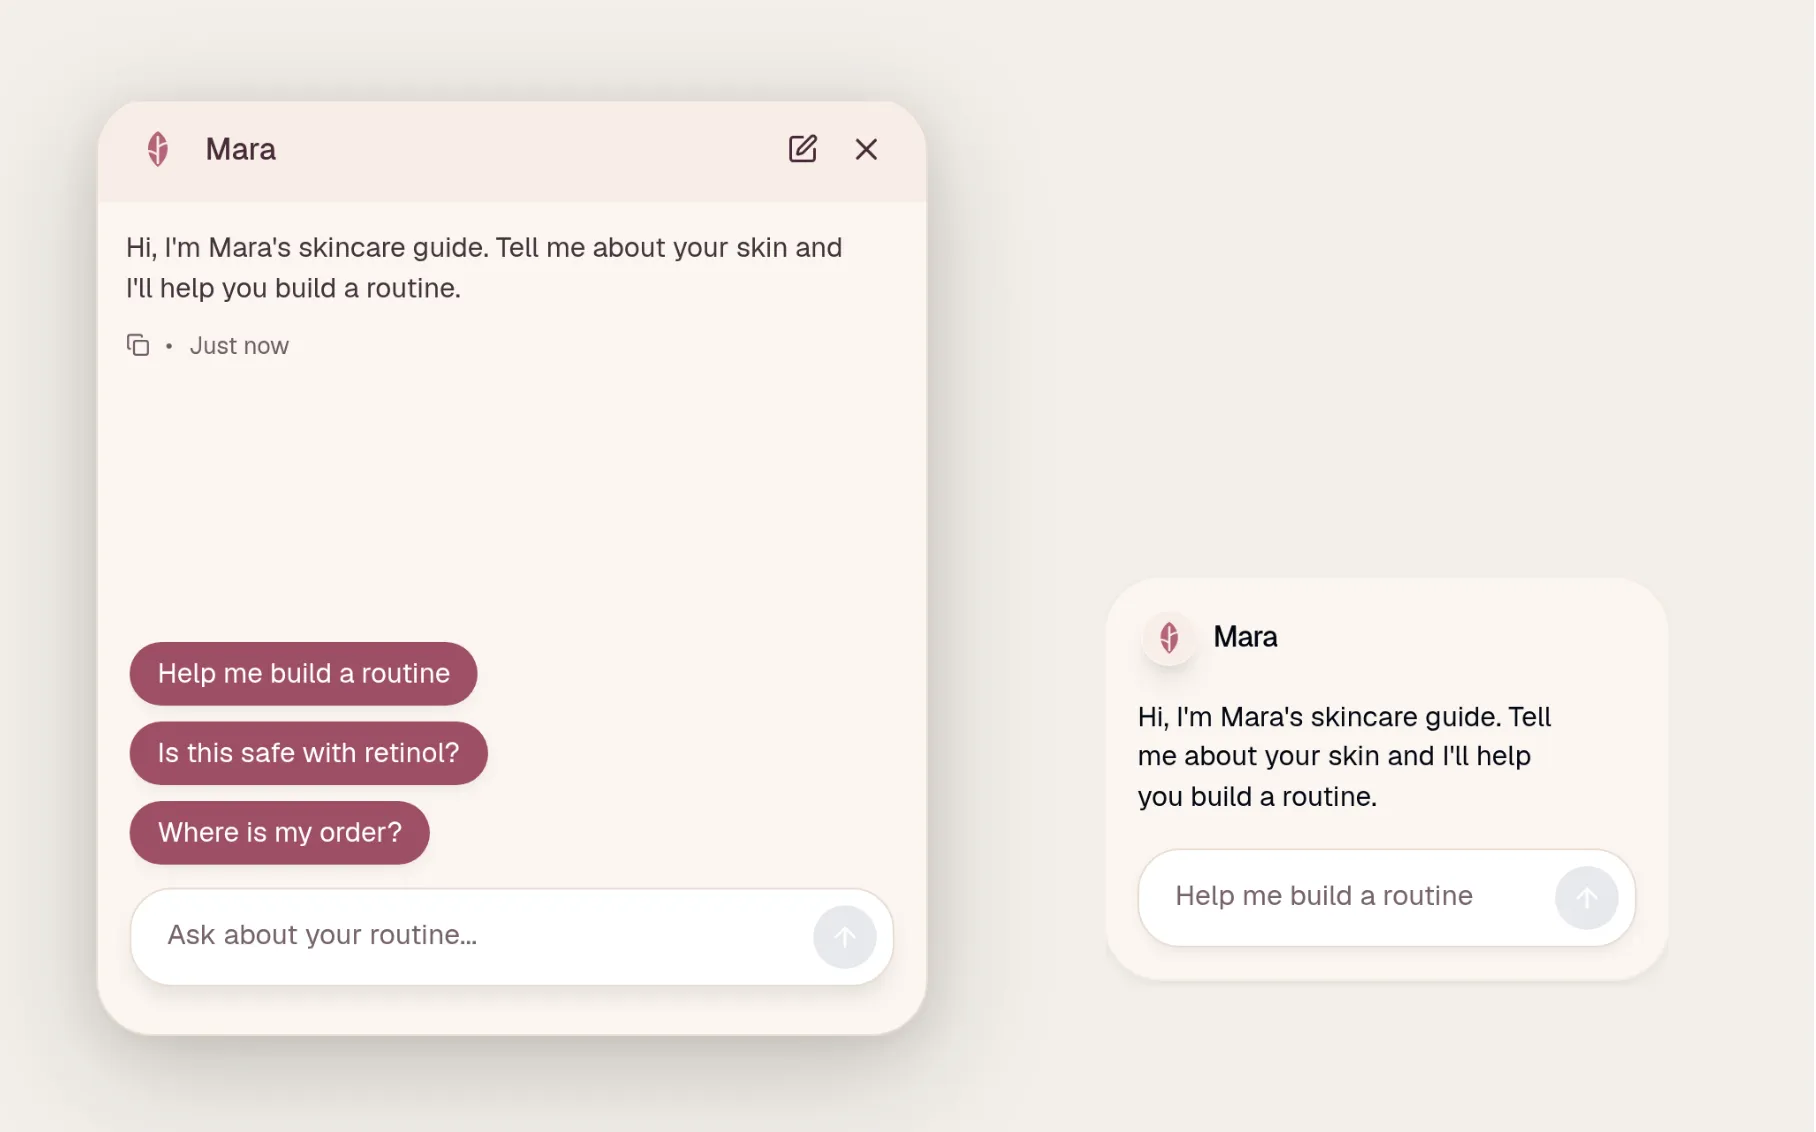 Mara: a warm custom palette, Roundness Full, Text size Large, and the Classic launcher with the welcome popup on.
Volt, an e-bike shop, pairs a black header with a vivid orange accent, medium roundness, and the Input Only launcher.
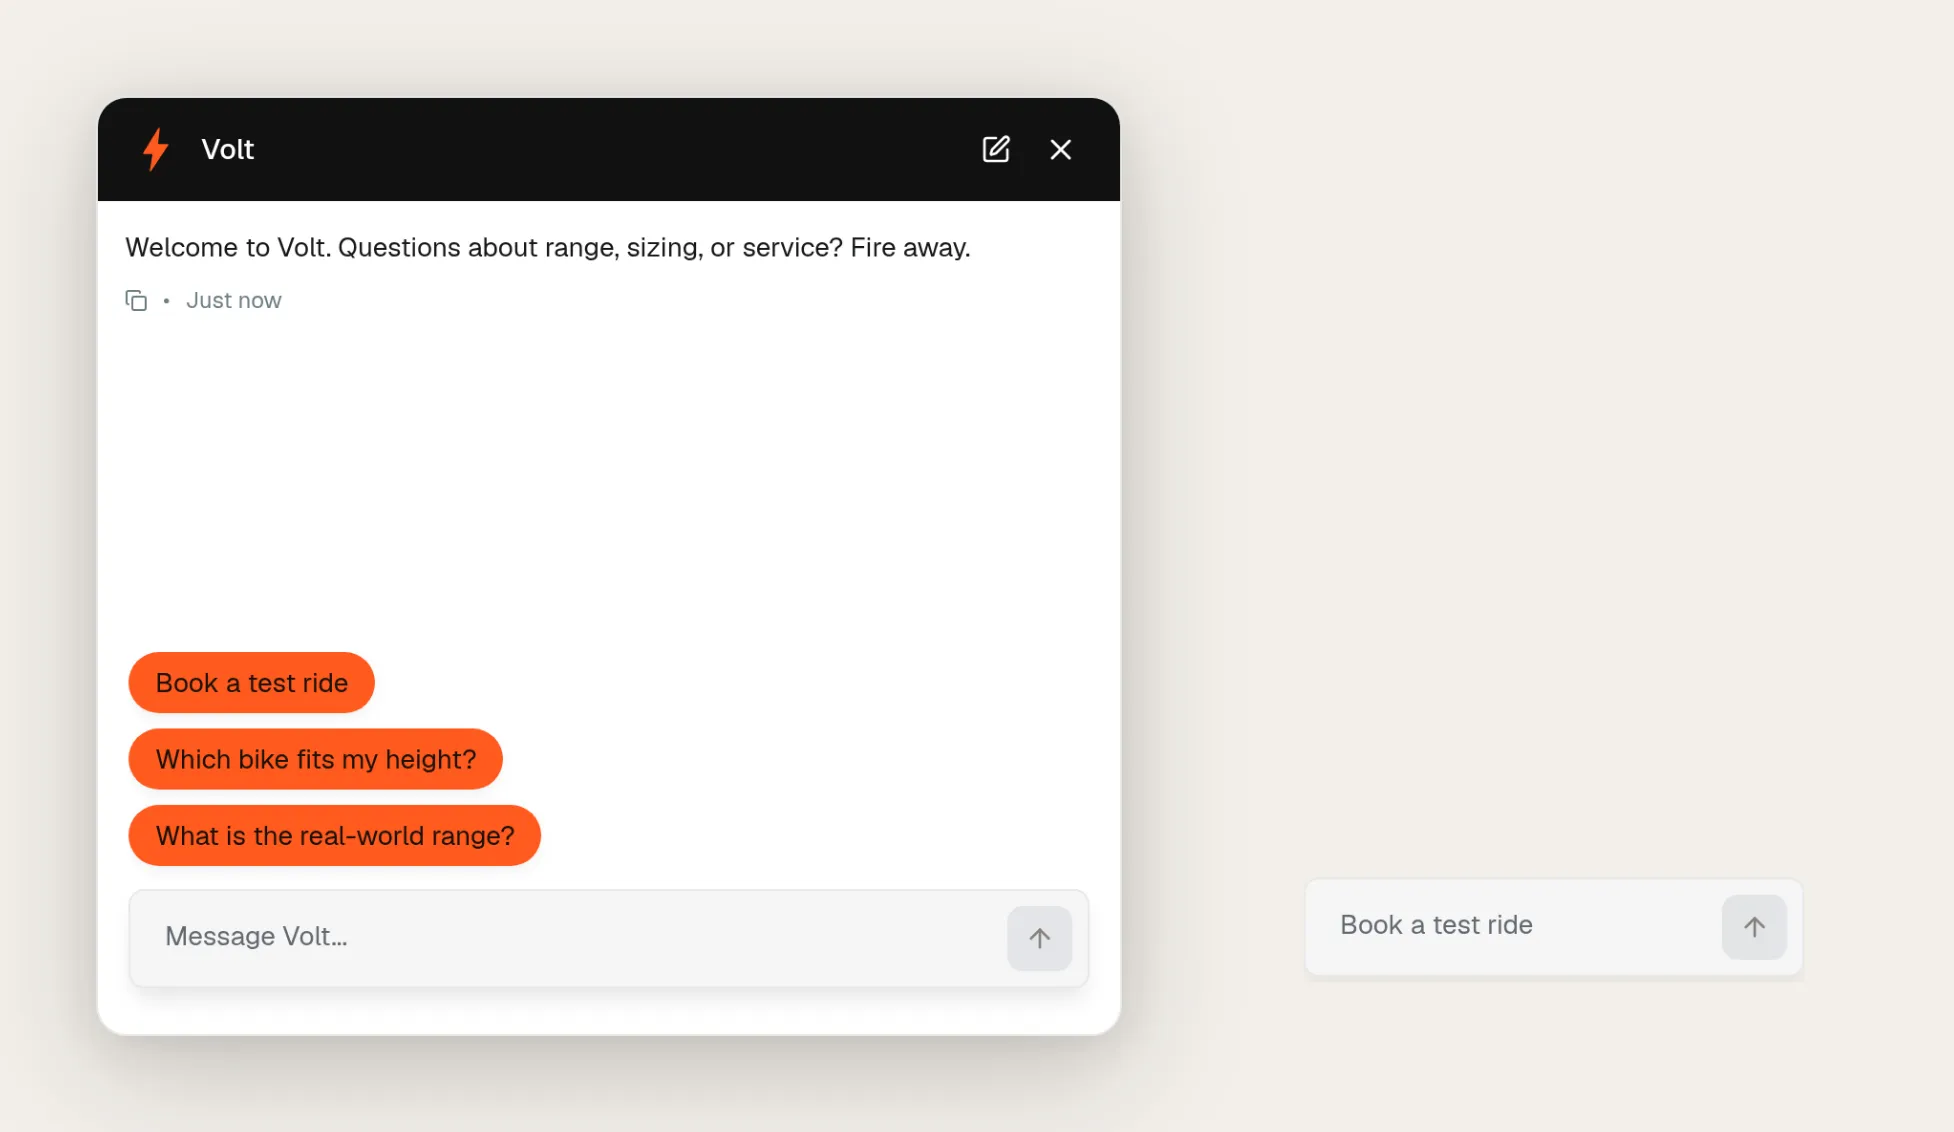 Volt: a high-contrast custom palette, Roundness Medium, the Input Only launcher, and a 560px window.
The exact values, in the same Appearance fields you already set for Brightwater:
| Setting | Basalt | Mara | Volt |
|---|---|---|---|
| Background color | #0E1116 | #FBF6F1 | #FFFFFF |
| Header color | #0E1116 | #F7EDE6 | #111111 |
| Accent color | #6A48F2 | #9E4F66 | #FF5A1F |
| Message bubble text | #FFFFFF | #FFFFFF | #1A1208 |
| Roundness | Small | Full | Medium |
| Text size | Small | Large | Medium |
| Launcher size | Small (empty label) | Classic | Input Only |
| Widget window max width | 460px | 500px | 560px |
One detail ties back to the contrast check: Volt’s bubbles use near-black text on orange rather than white, because white on that orange fails the 4.5:1 threshold. The check applies to any palette you pick, which is what keeps even a loud brand readable.
How do you remove the “Powered by” branding?
Matching your brand still leaves one line of small print: a “Powered by Quickchat AI” line in the chat footer. Removing it is a single switch, available on the Professional plan and above.
At the bottom of the Appearance tab, under Other Settings, find Hide Quickchat AI Branding. Its description reads “Hide all Quickchat AI branding from the widget, ensuring a fully white-labeled experience.” On the free and lower plans the toggle is visible but locked, with an Upgrade plan to unlock prompt next to it, so you always know exactly where the line is. On Professional and above, turn it on.
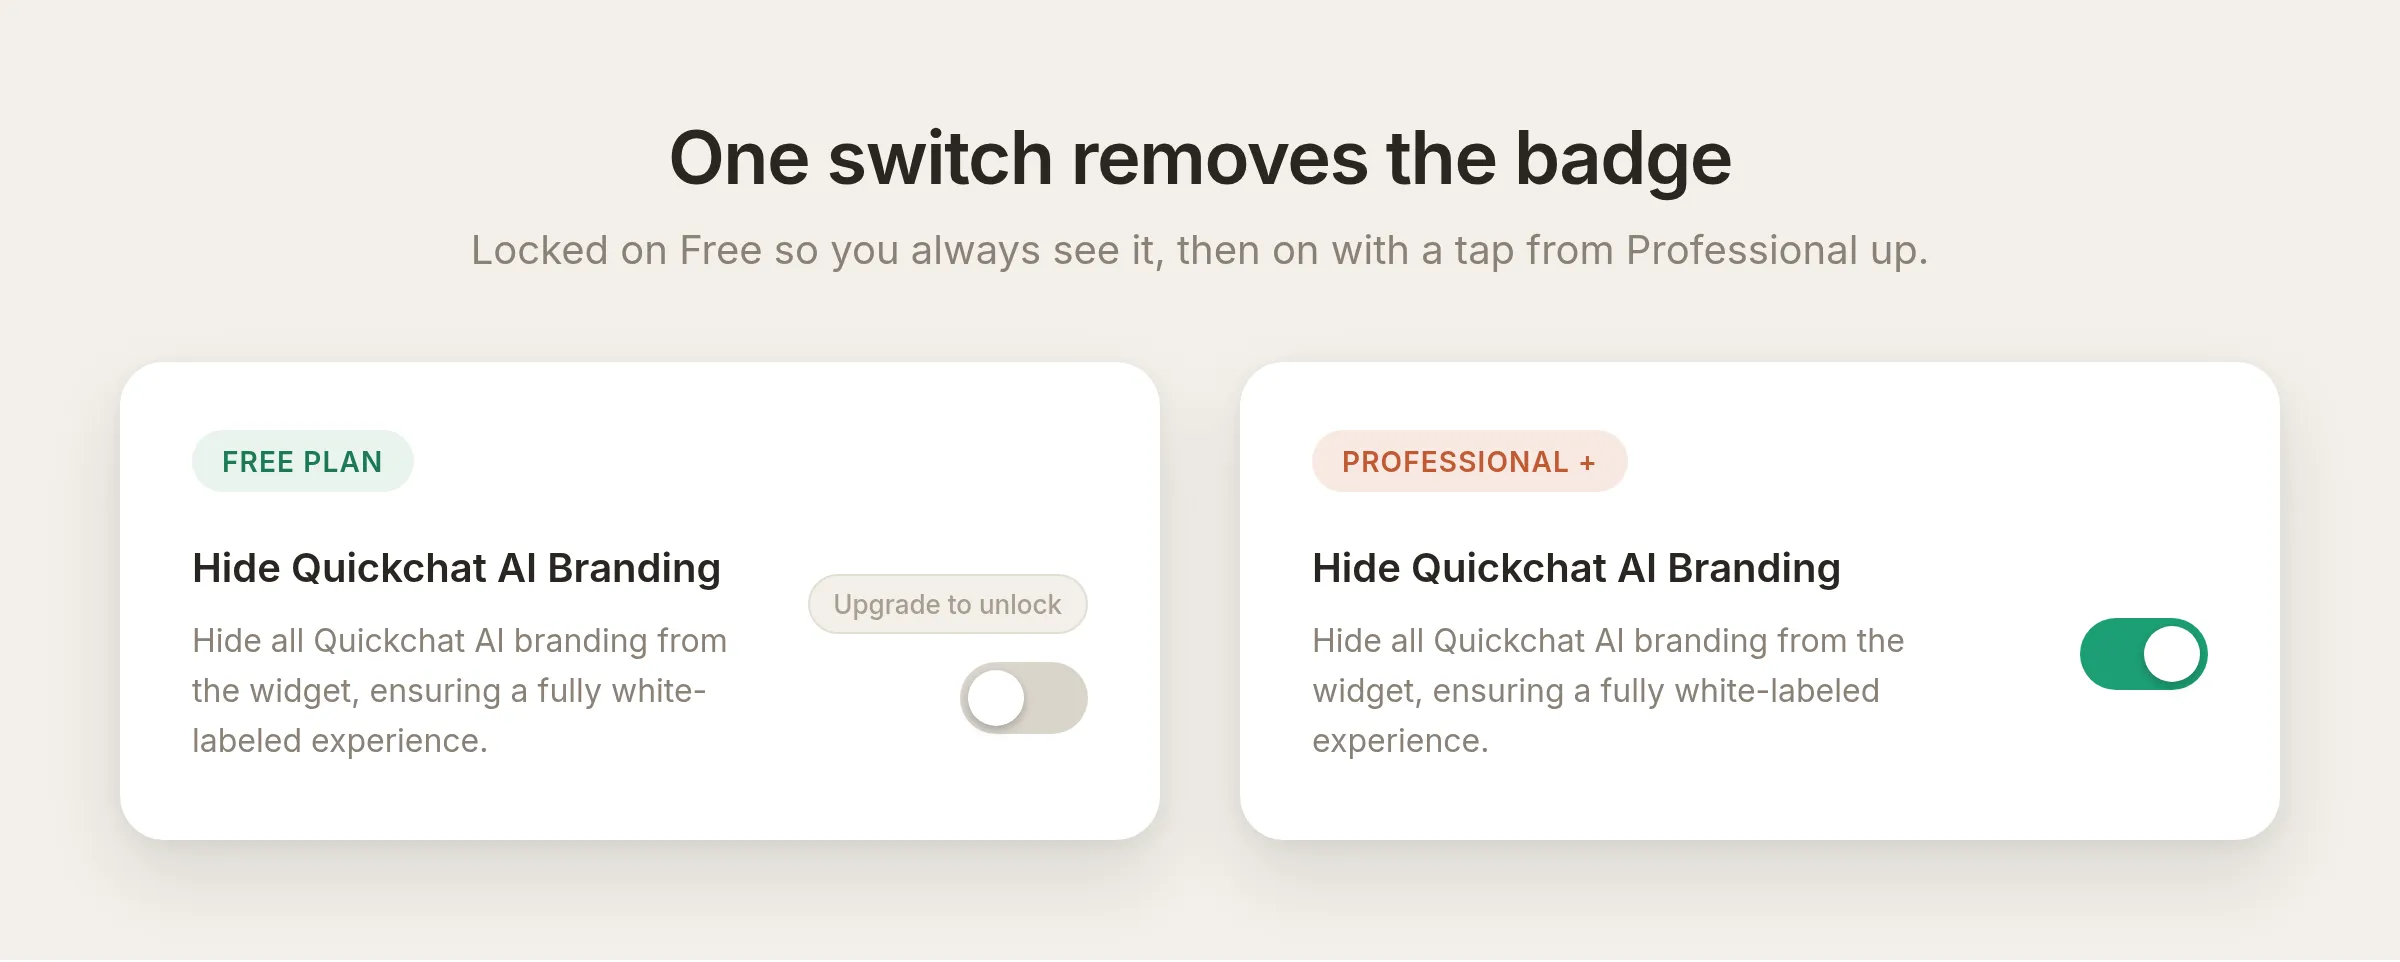 You can see exactly what the paid switch does before you decide to upgrade.
With the toggle on, the footer line disappears from the widget. The agent now carries nothing but your brand.
Does white-labeling work on the shared chat page too?
Not every visitor arrives through a widget on your site. Quickchat AI also gives every agent a hosted Chat Page, a full-page version you can share as a link, drop in an email, or put behind a QR code. Find it under Your Website, in the Share a link instead option.
Hiding the branding does more here than remove a line. On the Chat Page, the same switch swaps the Quickchat logo in the sidebar for your own logo (the avatar you uploaded earlier), and moves your avatar up into the sidebar masthead. The page reads as your product from the first glance.
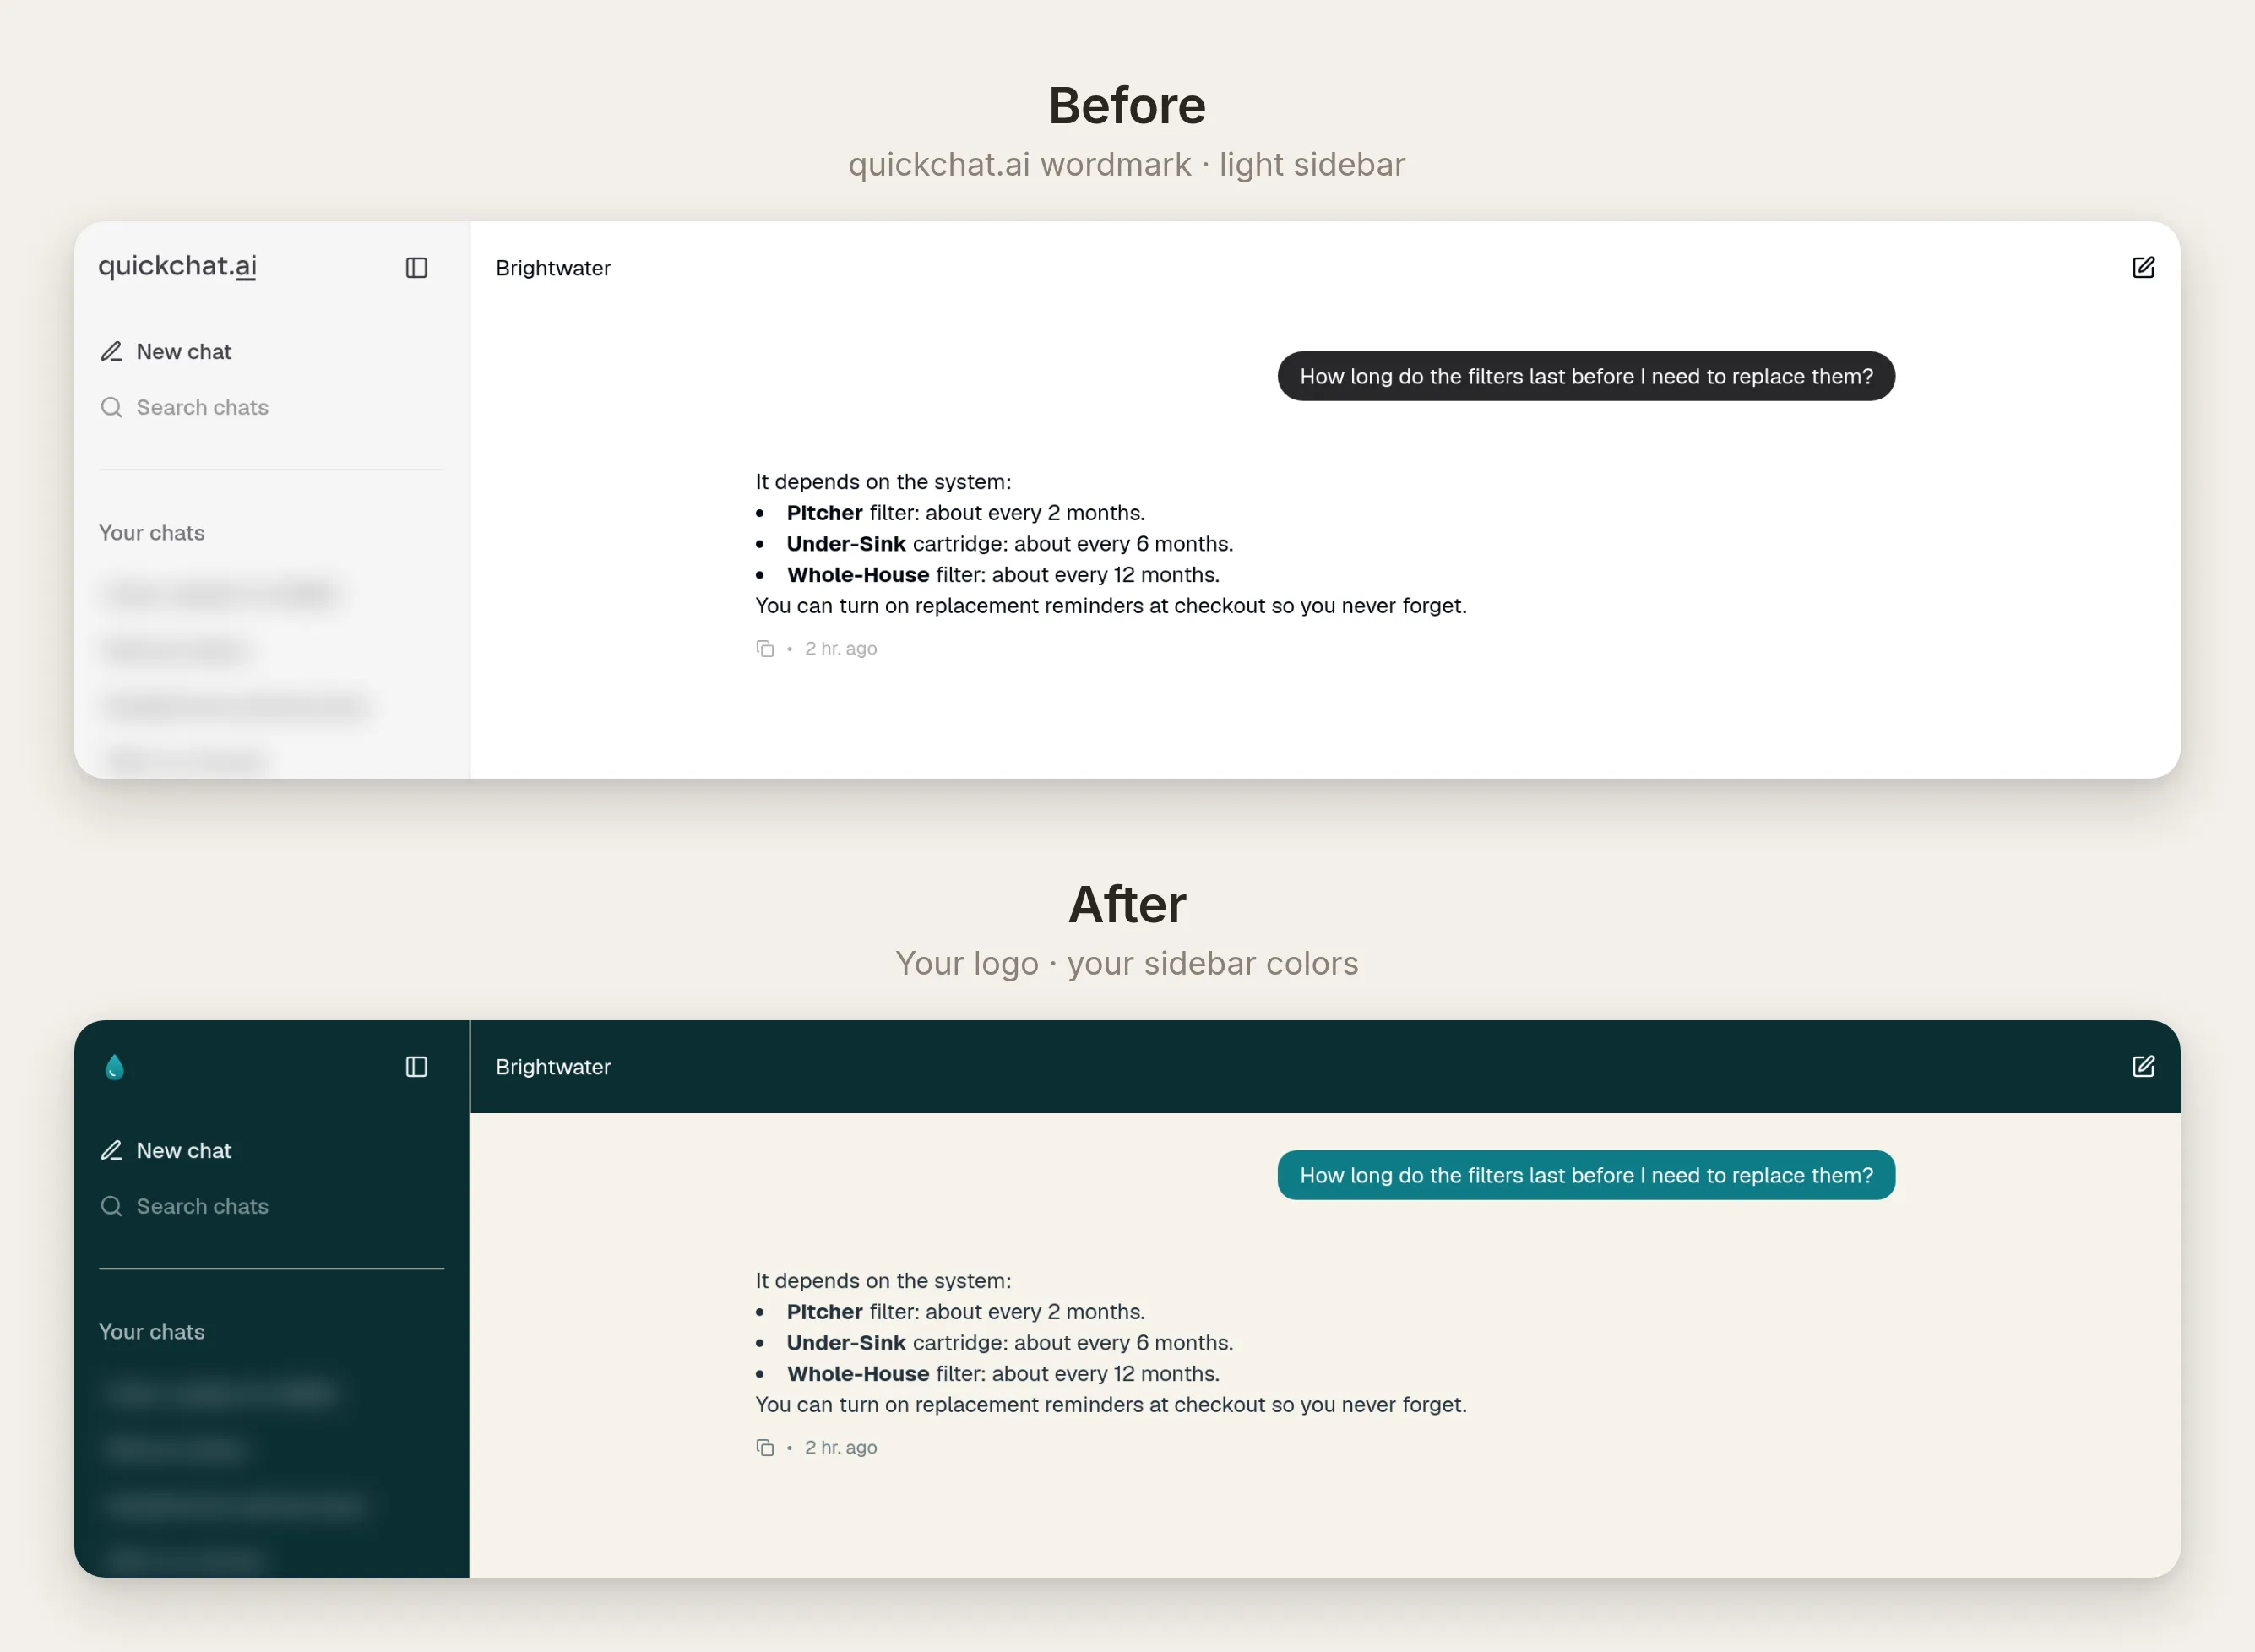 The Chat Page, before and after. Your logo, your sidebar colors, your masthead.
The Chat Page sidebar has its own colors under the Theme editor, so you can carry your palette all the way to the edges of the full-page view. One upload and one toggle brand both surfaces a visitor might see.
Taking your branded agent live
The branding belongs to the agent, so it travels with it. Whichever way a visitor reaches your agent, they see the same brand.
To put it on your website, open Your Website, choose Install manually with code (or the WordPress, Shopify, or Webflow options), and paste the snippet before the closing </body> tag. Because the widget loads on your own page, it already sits on your domain, next to the rest of your site.
To share a link, use the hosted Chat Page. To reach people on messaging channels, connect the agent to WhatsApp, Telegram, or others under External Apps, and the same identity carries across.
That completes the tutorial. You built a real agent that answers and acts, then put your brand on every surface a visitor sees, all from an empty account in about fifteen minutes. If you are doing this for clients rather than for your own site, the business side (packaging, pricing, and margins) is covered in our white label chatbot guide. For the platform side, you have the whole recipe above.
Frequently asked questions
What is a white-label AI chatbot?
A white-label AI chatbot is a chatbot you can present entirely as your own: your colors, your logo, and your avatar, with no trace of the tool it was built on. In Quickchat AI you match your brand on every plan, and removing the “Powered by Quickchat AI” line is available from the Professional plan up.
How do I remove the “Powered by” branding from a chatbot?
On the Appearance page, turn on “Hide Quickchat AI Branding”. That clears the “Powered by Quickchat AI” line in the chat footer and swaps the Quickchat logo on the hosted Chat Page for your own logo. The toggle is available on the Professional plan and above.
Can I brand the chatbot for free?
Yes. Matching your brand, the colors, the avatar and logo, the header, and the Chat Page sidebar colors, is available on every plan, including the free one. Removing the “Powered by” line is the part that needs the Professional plan.
Do I need a custom domain to white-label the chatbot?
No. You brand the widget and the hosted Chat Page inside the product itself, without any domain setup. When you embed the widget on your own website it already lives on your domain, next to the rest of your site.
Does white-labeling change how the chatbot works?
No. Branding only changes the look. The agent still answers from its knowledge and calls the same actions. You build a real, working agent first and then brand it, so a fully branded bot is still a capable one.
Which plan do I need to remove the Quickchat AI branding?
The “Hide Quickchat AI Branding” toggle is available on the Professional plan and above. On lower plans the toggle is visible but locked, with an “Upgrade plan to unlock” prompt. Every plan can still fully match your brand’s colors, logo, and avatar.
Will my brand colors stay readable in the chat?
The theme editor checks each text-and-background pair against the WCAG AA contrast standard (4.5:1) as you pick colors and warns you when a pair is too low. Brand palettes tuned for large logos often fail at chat-text size, so the checker tells you to adjust the text color rather than ship something hard to read.
Can I white-label the chatbot on my website and on a shared link?
Yes. The branding applies to both the widget you embed on your site and the hosted Chat Page you share as a link. On the Chat Page, white-labeling swaps in your logo and moves your avatar up into the sidebar.
Can I change the chatbot’s avatar and logo?
Yes. You upload one image as the AI Agent Avatar. It appears on the launcher button and in the chat header, and on the hosted Chat Page it becomes the sidebar logo when branding is hidden. One image does the work of an avatar and a logo.
Can I change the style of the chat launcher?
Yes. The Launcher size control on the Appearance tab offers three styles: Classic (a card with your avatar, your agent’s name, and a message box), Input Only (a floating message bar), and Small (a compact pill with your avatar and a short label you set in the Launcher label field). All three pick up your theme colors and avatar, and you can place the widget in either bottom corner.
How much can I customize the chatbot’s appearance?
A lot, and all of it without code. On the Appearance tab you set fifteen theme colors, the corner radius, and the text size, pick one of three launcher styles, choose the window size and position, and upload your own avatar. There is also a built-in dark theme. Because it is all settings and no custom CSS, two chatbots built on the same platform can look completely different.
How long does it take to white-label a chatbot?
About fifteen minutes: a few minutes to build a real agent with a prompt, some knowledge, and one action, and about ten to set the brand colors, upload the logo and avatar, and turn off the “Powered by” line. There is nothing to install and no code.