


Launch Your AI Chat Bot on Discord
Want to create a smart conversational AI bot for your Discord server? This step-by-step guide walks you through the process in just 10 minutes—no coding required!
Watch the Video
5 Simple Steps to Create Your AI Bot
By following these steps, you’ll have a fully functional AI chatbot on your Discord server:
- Create a Discord Server
- Create a Discord Application
- Add the Bot to Your Server
- Create a Quickchat AI Account
- Integrate Your Discord Bot with Quickchat AI
What Your AI Bot Will Look Like
Once set up, your bot will be live on Discord, ready to have natural conversations with your server members.

The Fastest Way: One-Click Deploy
If you already have a Quickchat AI account, you can skip the Developer Portal entirely. In the dashboard, open External Apps in the left sidebar, select Discord, and under Connect click Add to your Discord server.
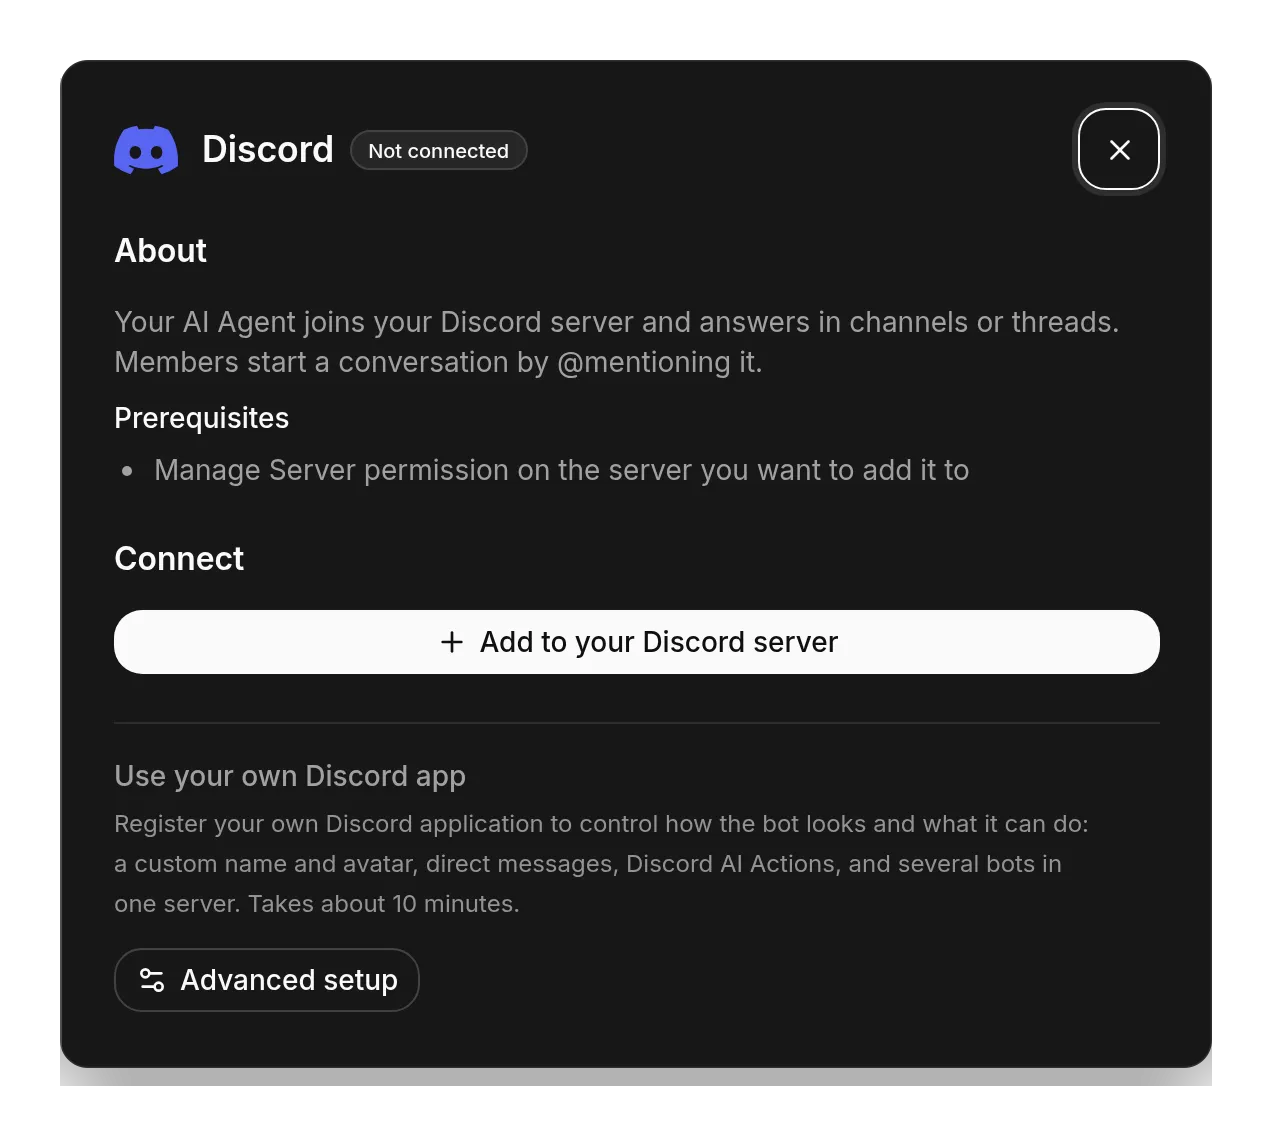 The one-click connect screen under External Apps → Discord.
Discord asks you to authorize the shared Quickchat AI app and pick a server. Click Authorize and the bot is live, ready for members to @mention it in any channel. The one requirement is the Manage Server permission on the server you choose.
New Quickchat AI signups get a Discord-branded setup that drops them straight into this flow.
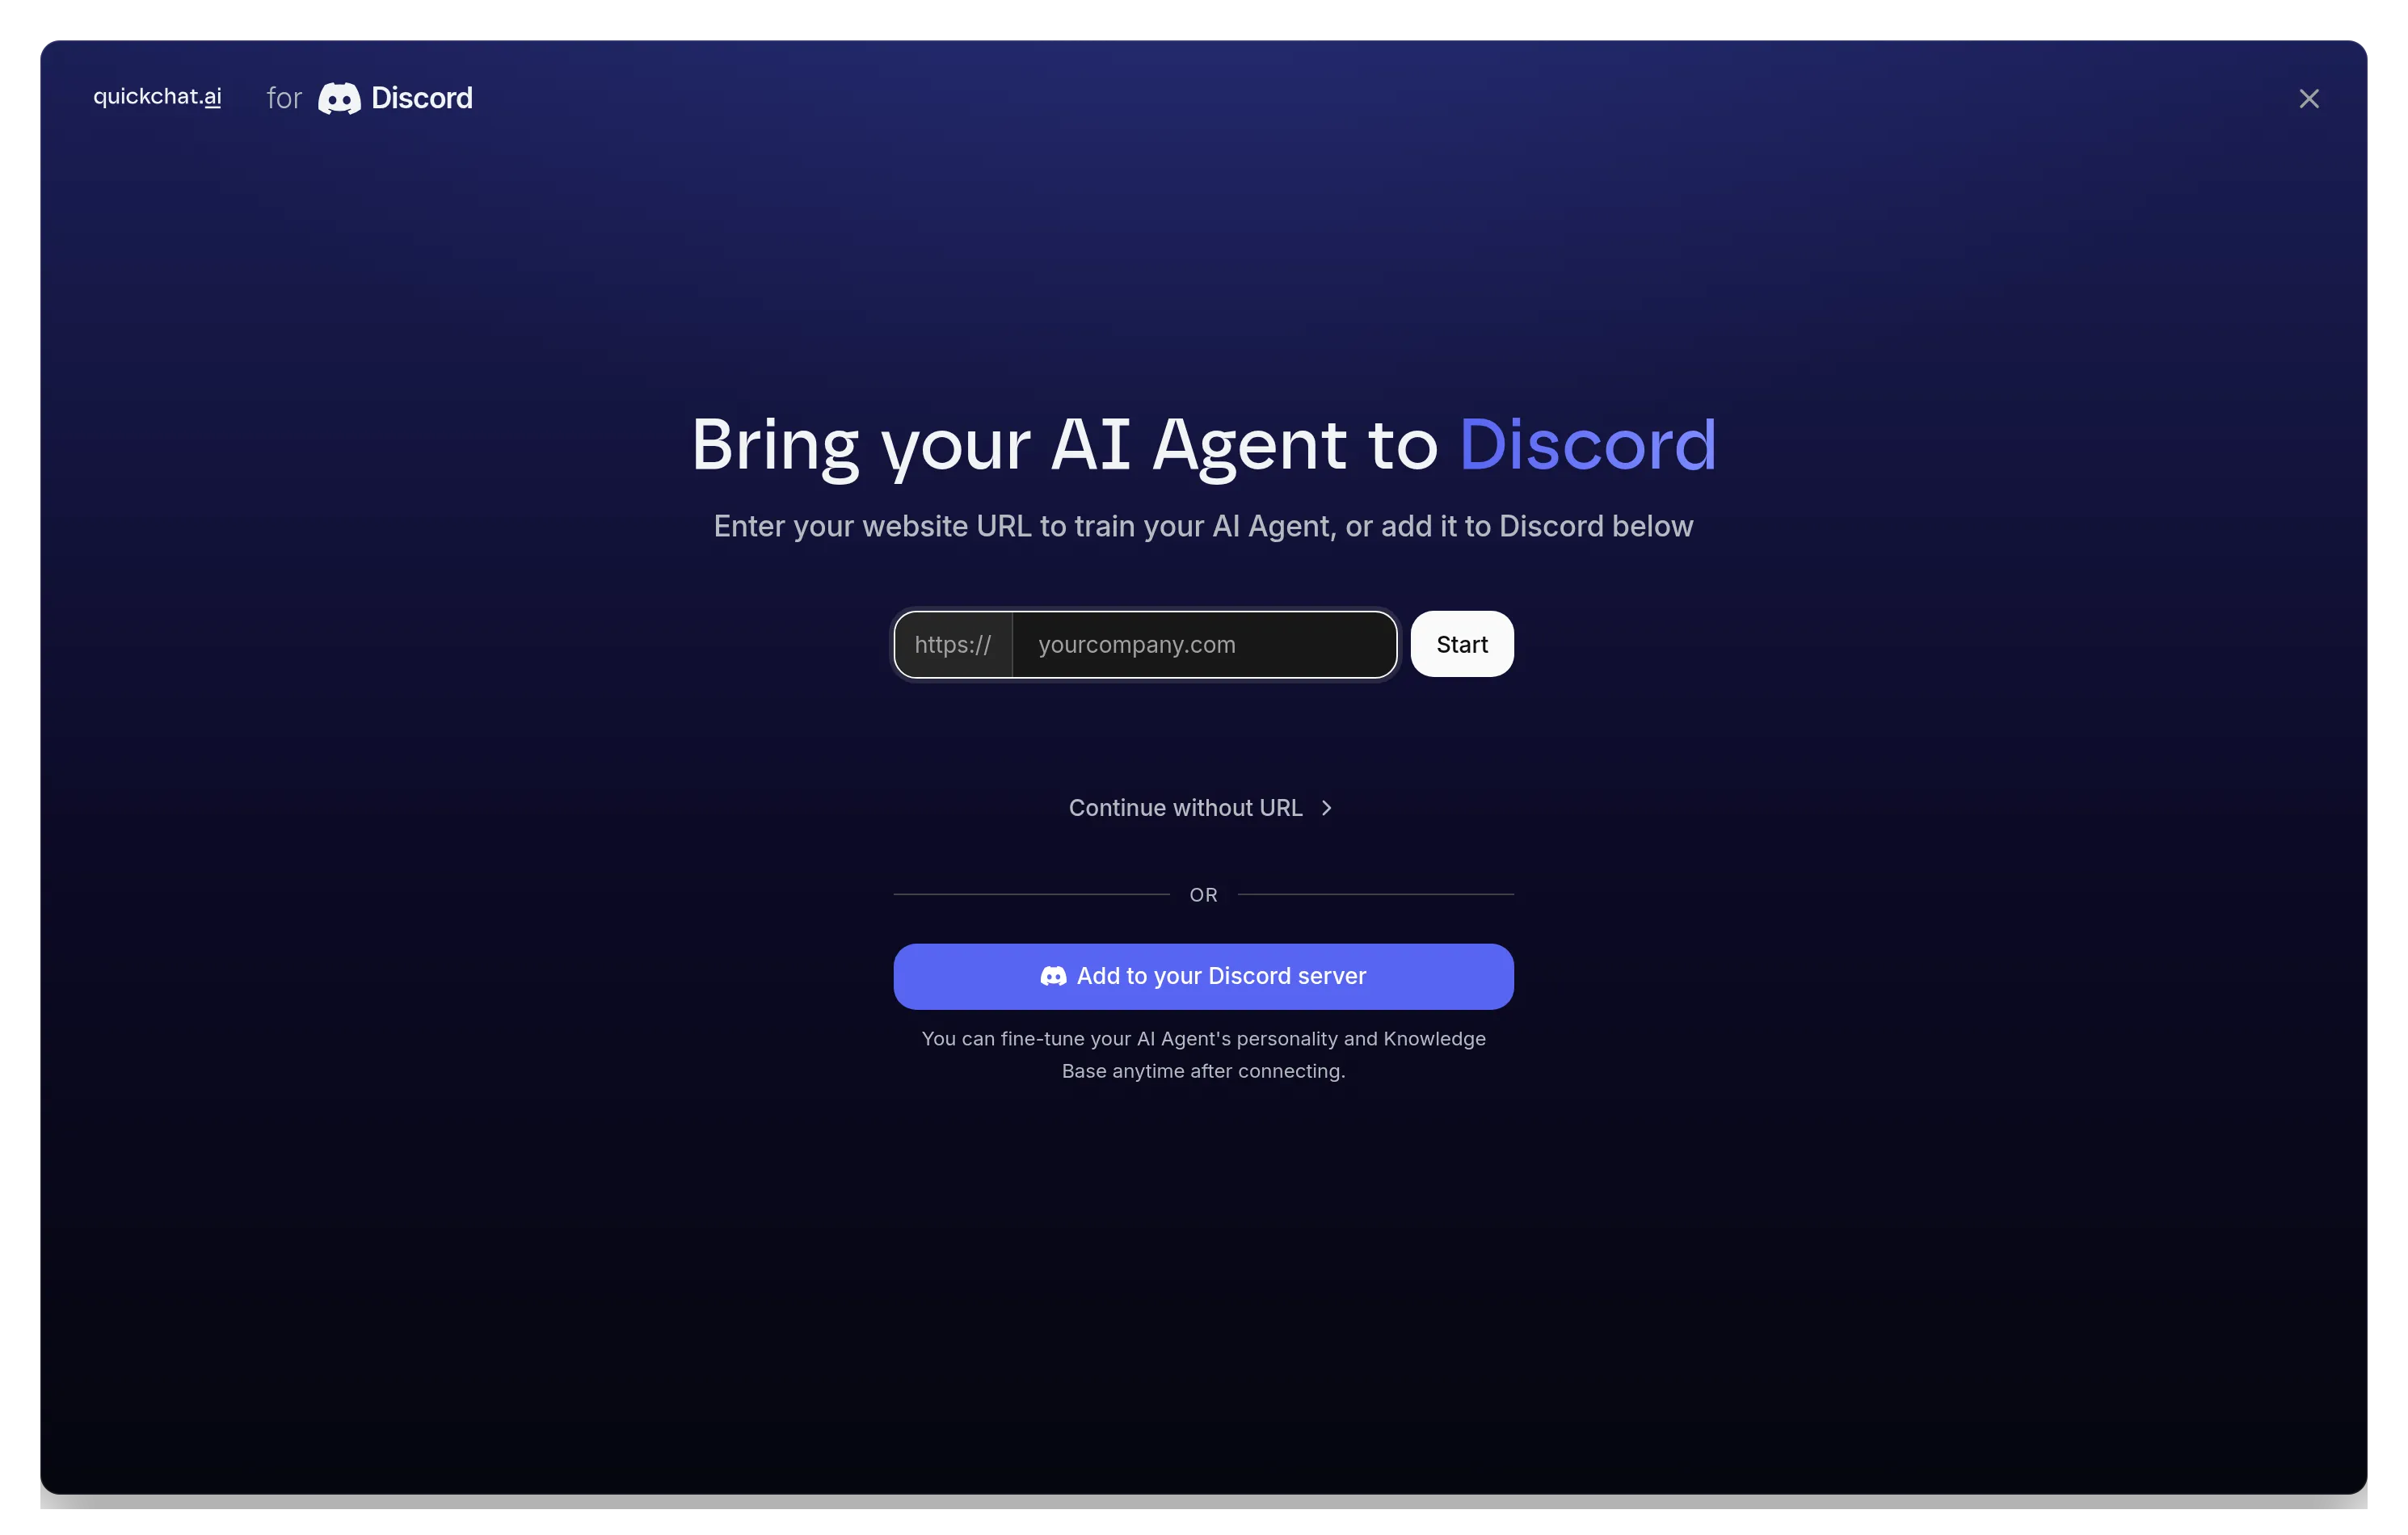 New signups begin on a Discord-branded onboarding screen that leads into the one-click connect.
The steps below are the manual alternative, the Use your own Discord app option: you create your own Discord application and connect it with a bot token. Use that path when you want a custom bot name and avatar, direct messages, Discord AI Actions, or several bots on one server.
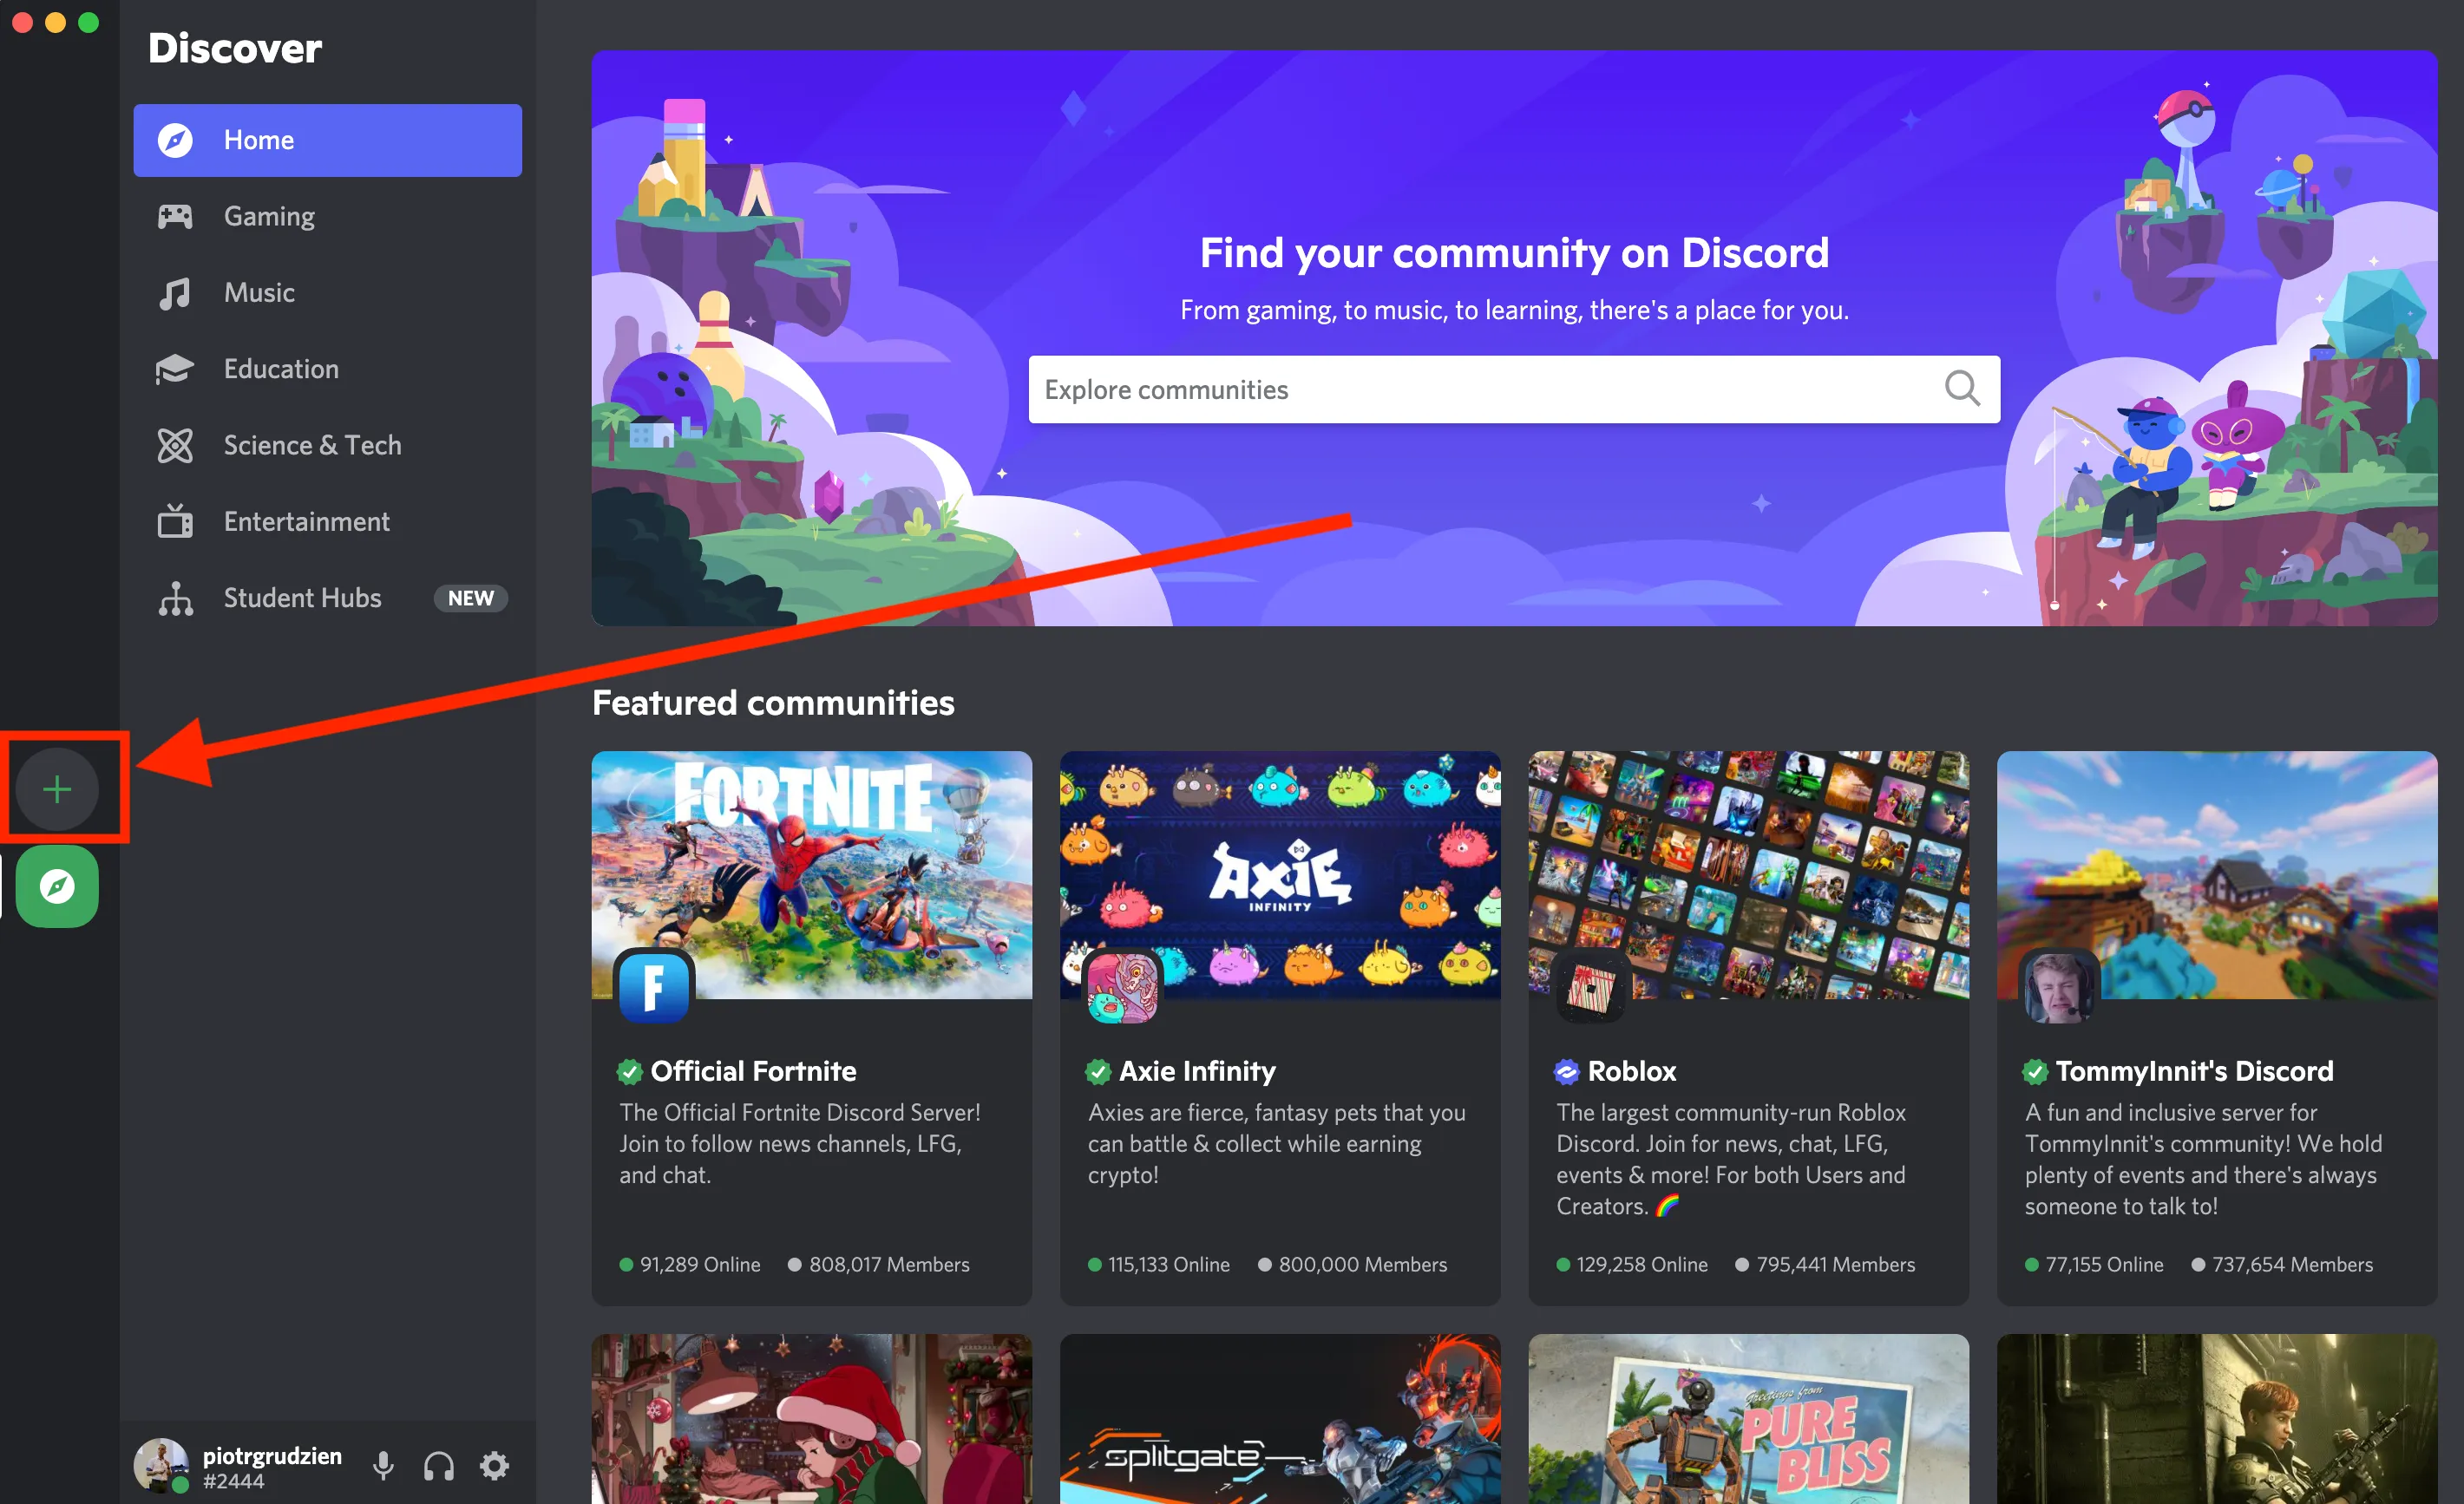
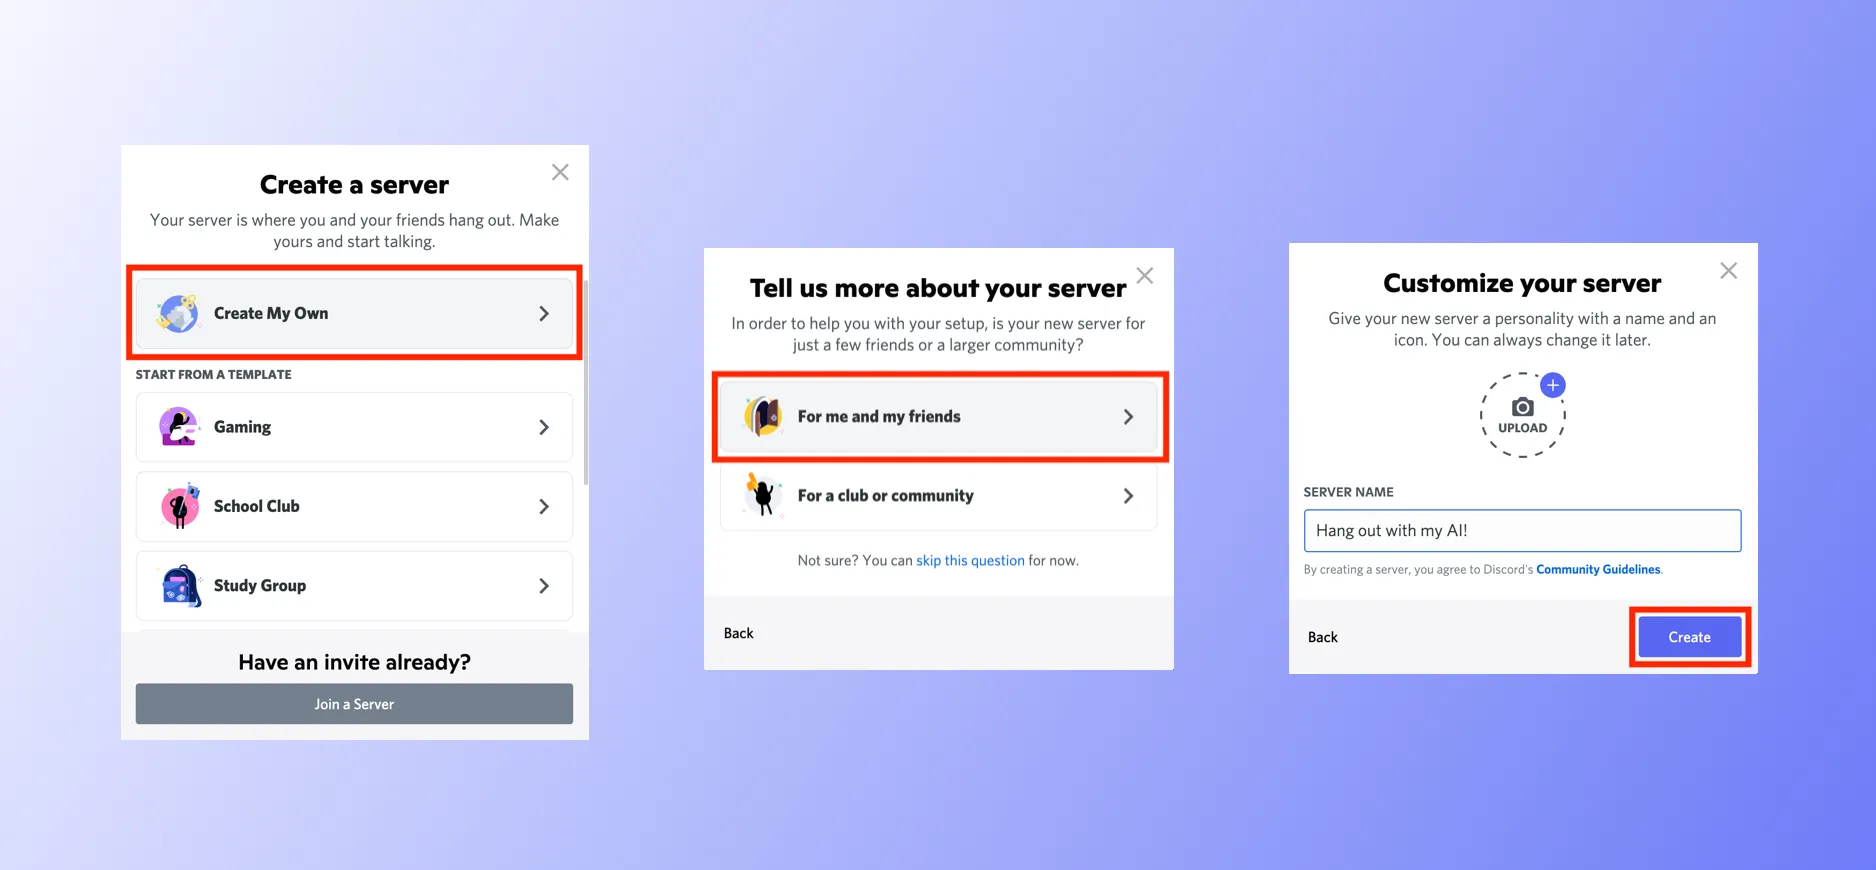
1. Create a Discord Server
If you don’t have a Discord account, create one at discord.com. Then, set up your first server:
2. Create a Discord Application
Go to the Discord Developer Portal and create a new application.
3. Add Your Bot to the Discord Server
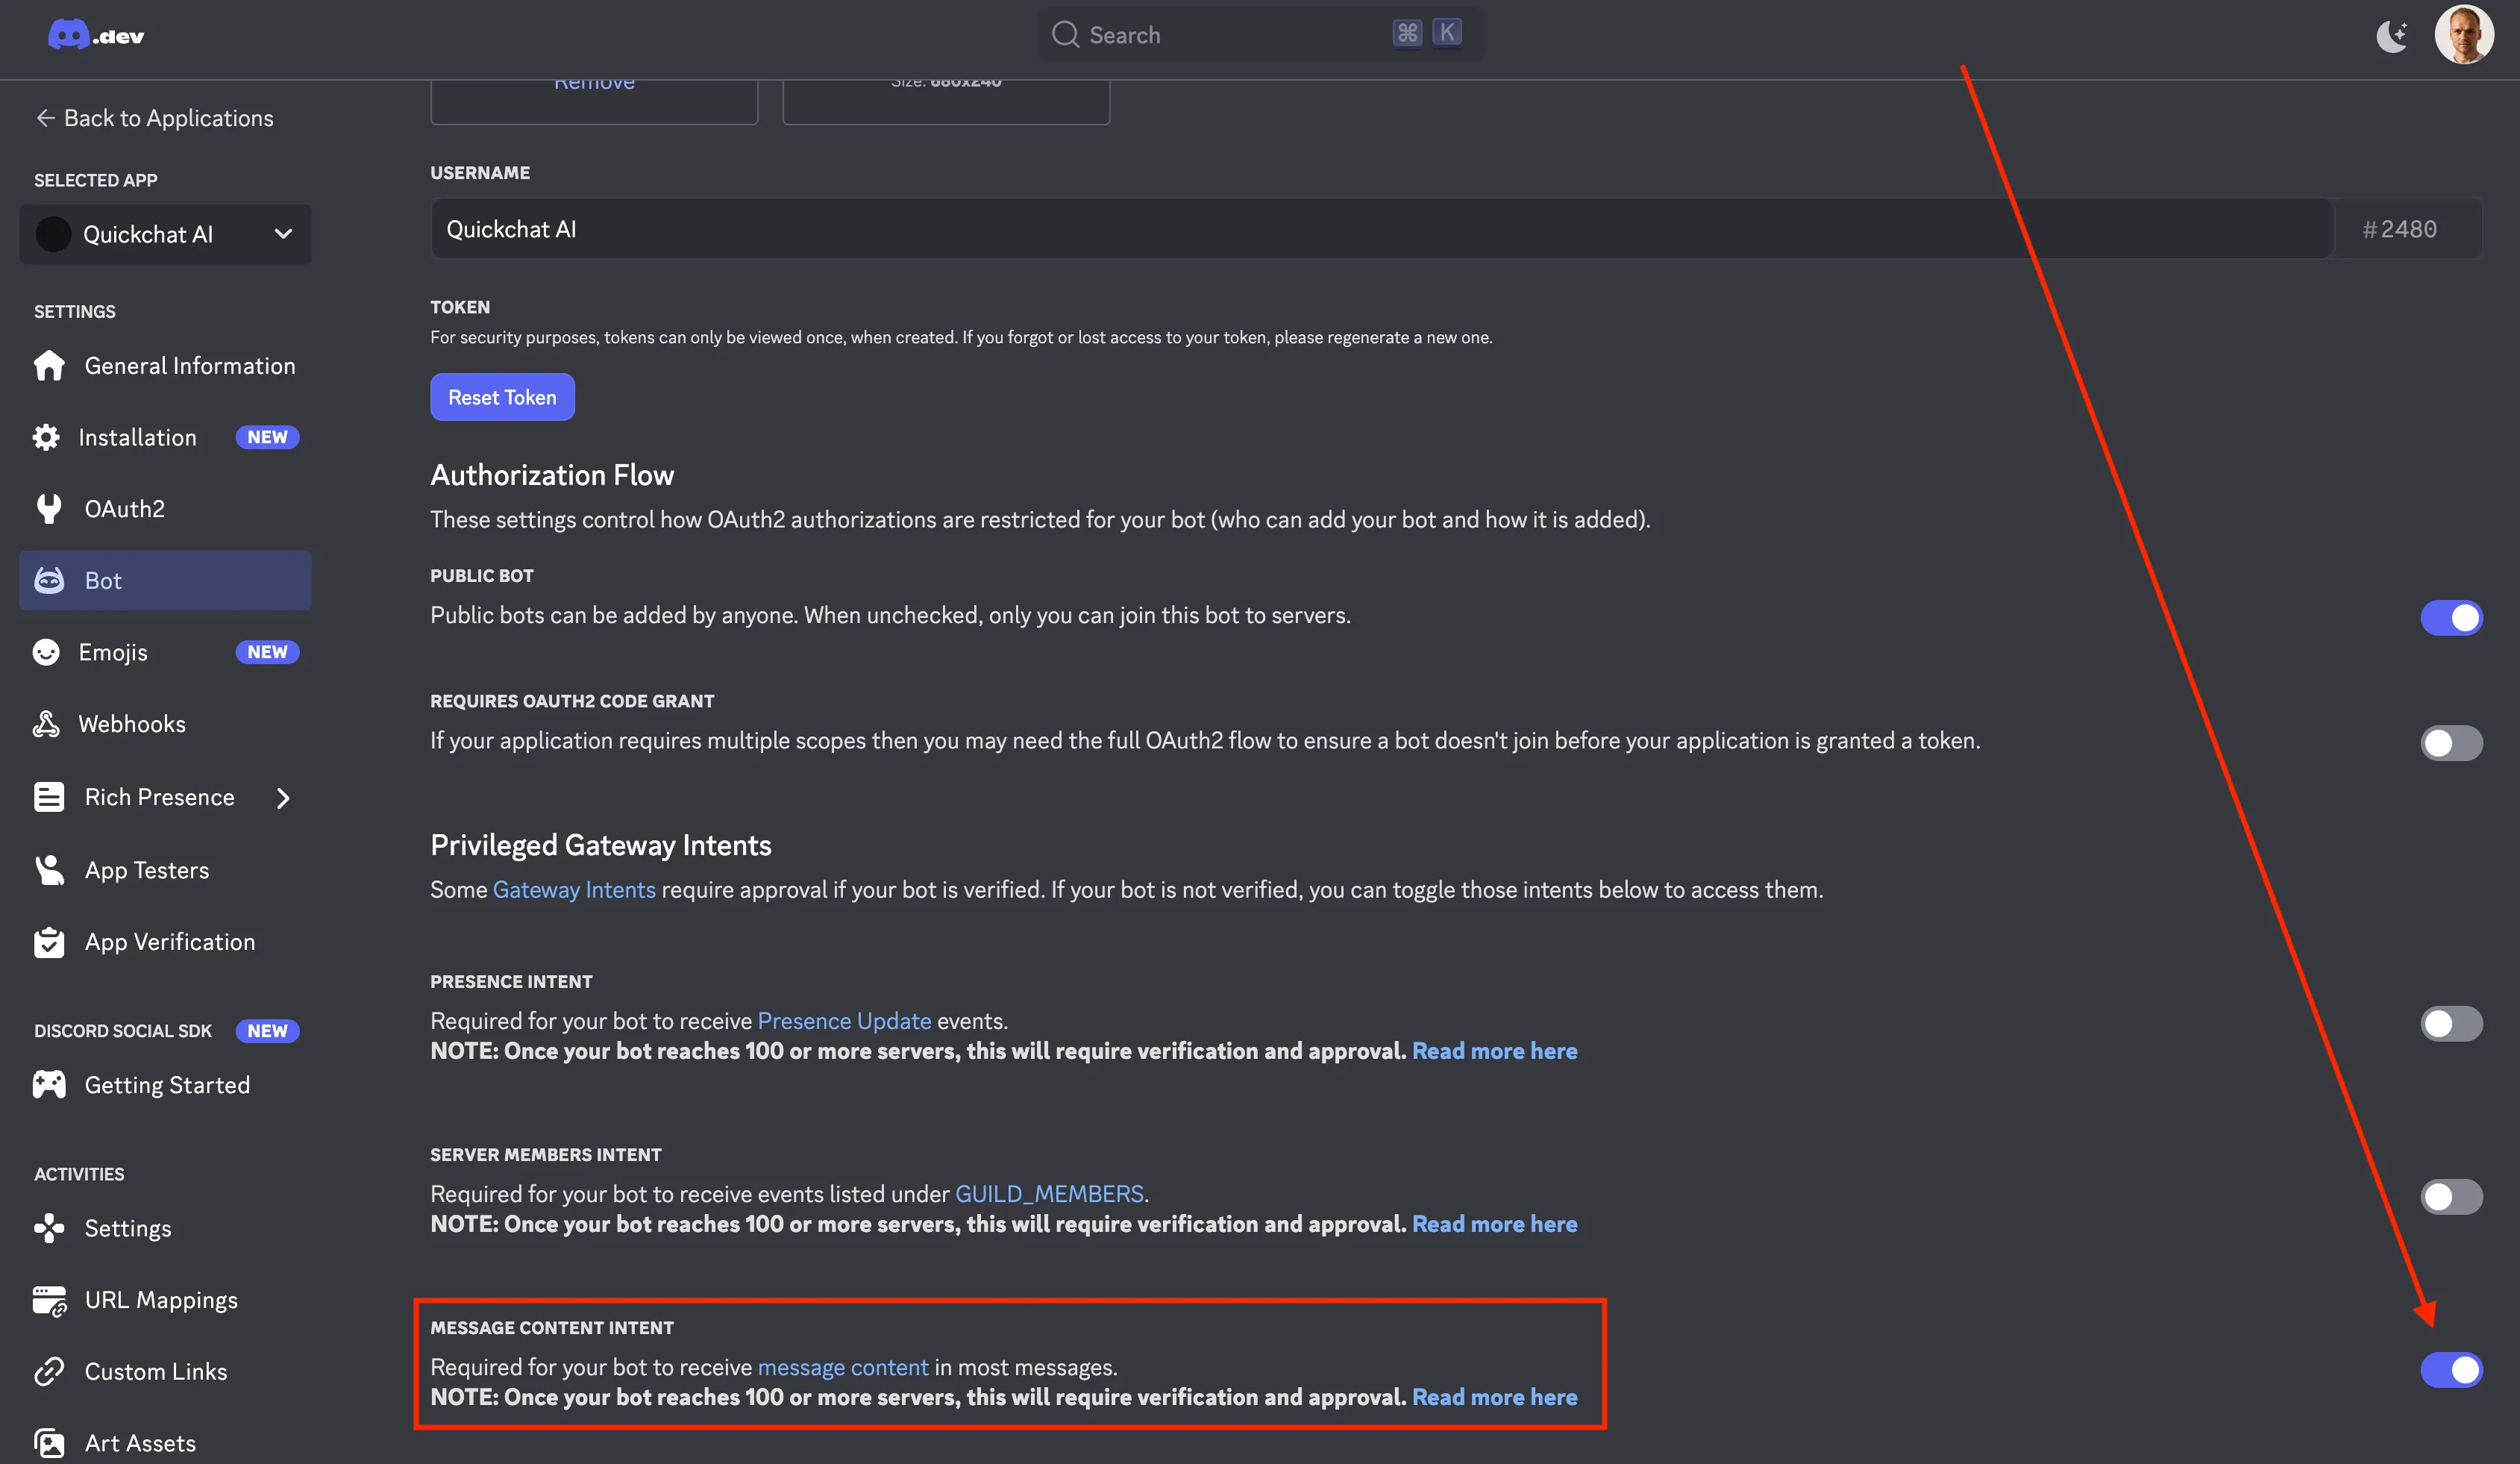
Remember to enable your bot to receive message content by clicking on the toggle below:
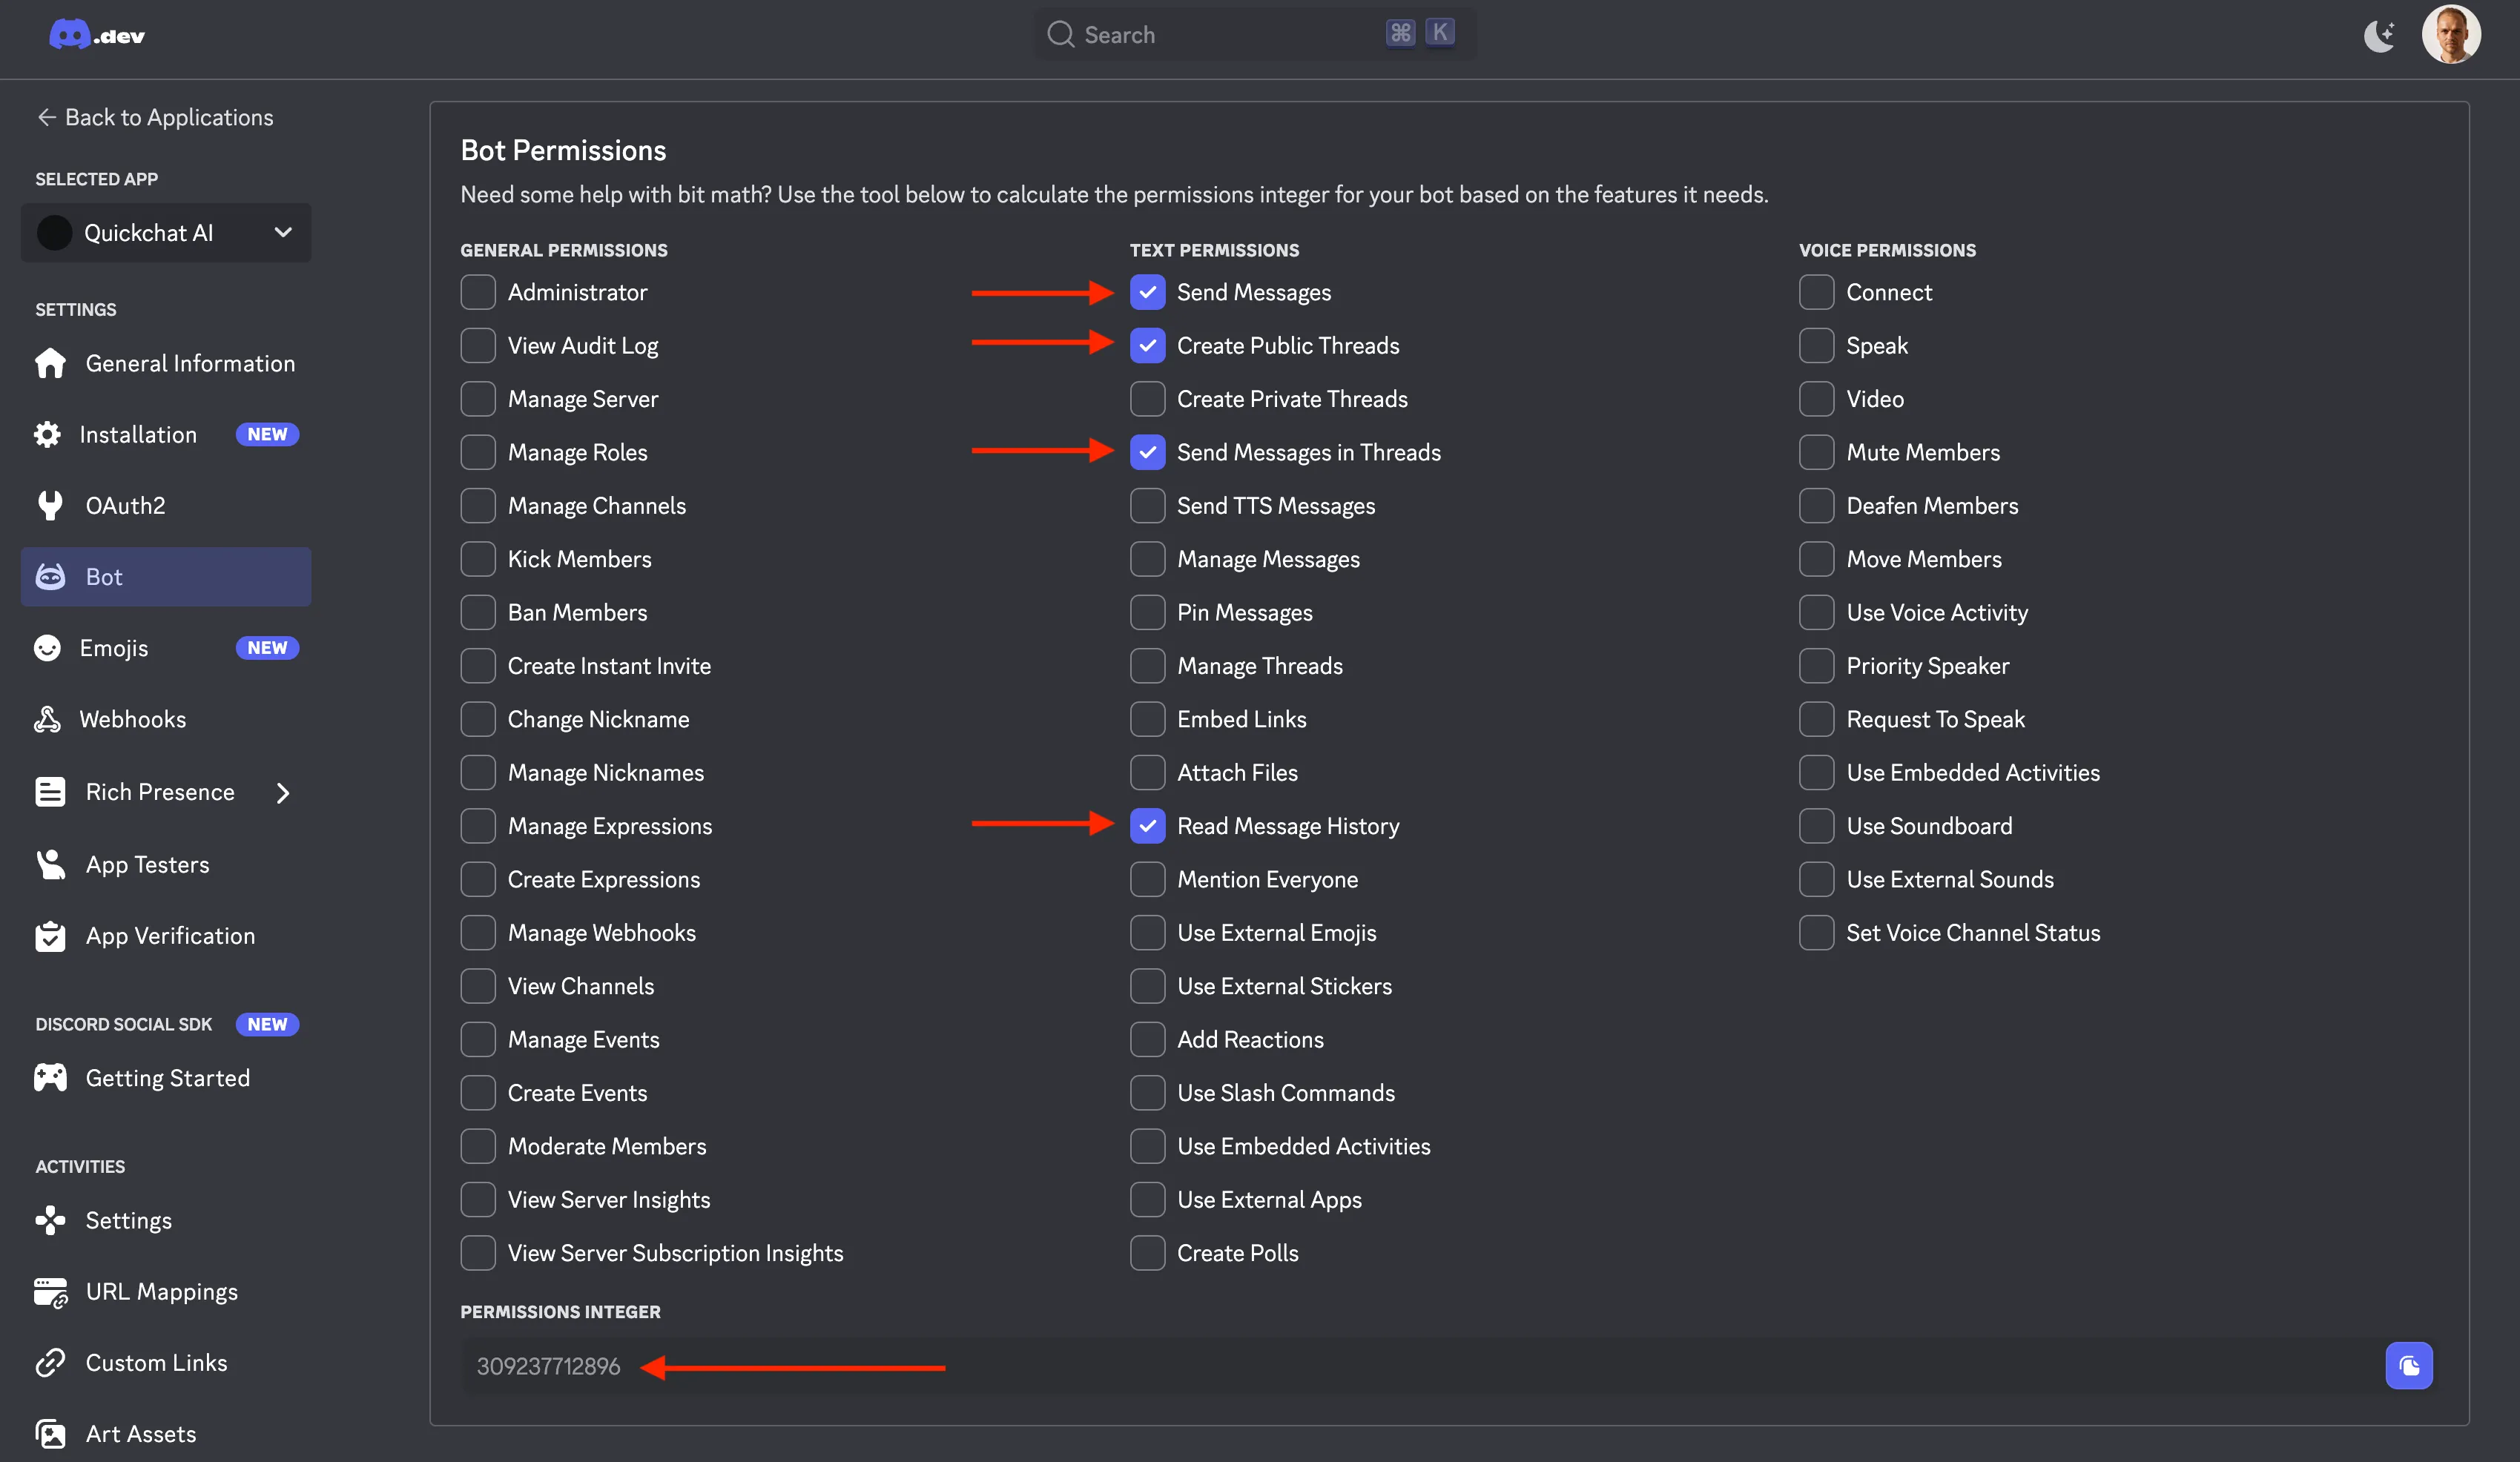
Once your bot is created, you need to add it to your server. The way to do it is to construct a Discord URL and paste it into your browser:
https://discord.com/api/oauth2/authorize?client_id=<YOUR CLIENT ID>&permissions=309237712896&scope=botWhere does the permissions number come from?
The permissions number (309237712896) comes from requesting the following permissions:
Send MessagesCreate Public ThreadsSend Messages in ThreadsRead Message History
Those are the minimal set of permissions required for your bot to operate correctly. You can see it for yourself by going to discord.com/developers/applications, selecting your application, clicking on Bot on the left and scrolling down:
Where to find YOUR CLIENT ID?
The easiest way will be to look at the address bar in your browser and copy the long number which is part of the address:
https://discord.com/developers/applications/<YOUR CLIENT ID>/bot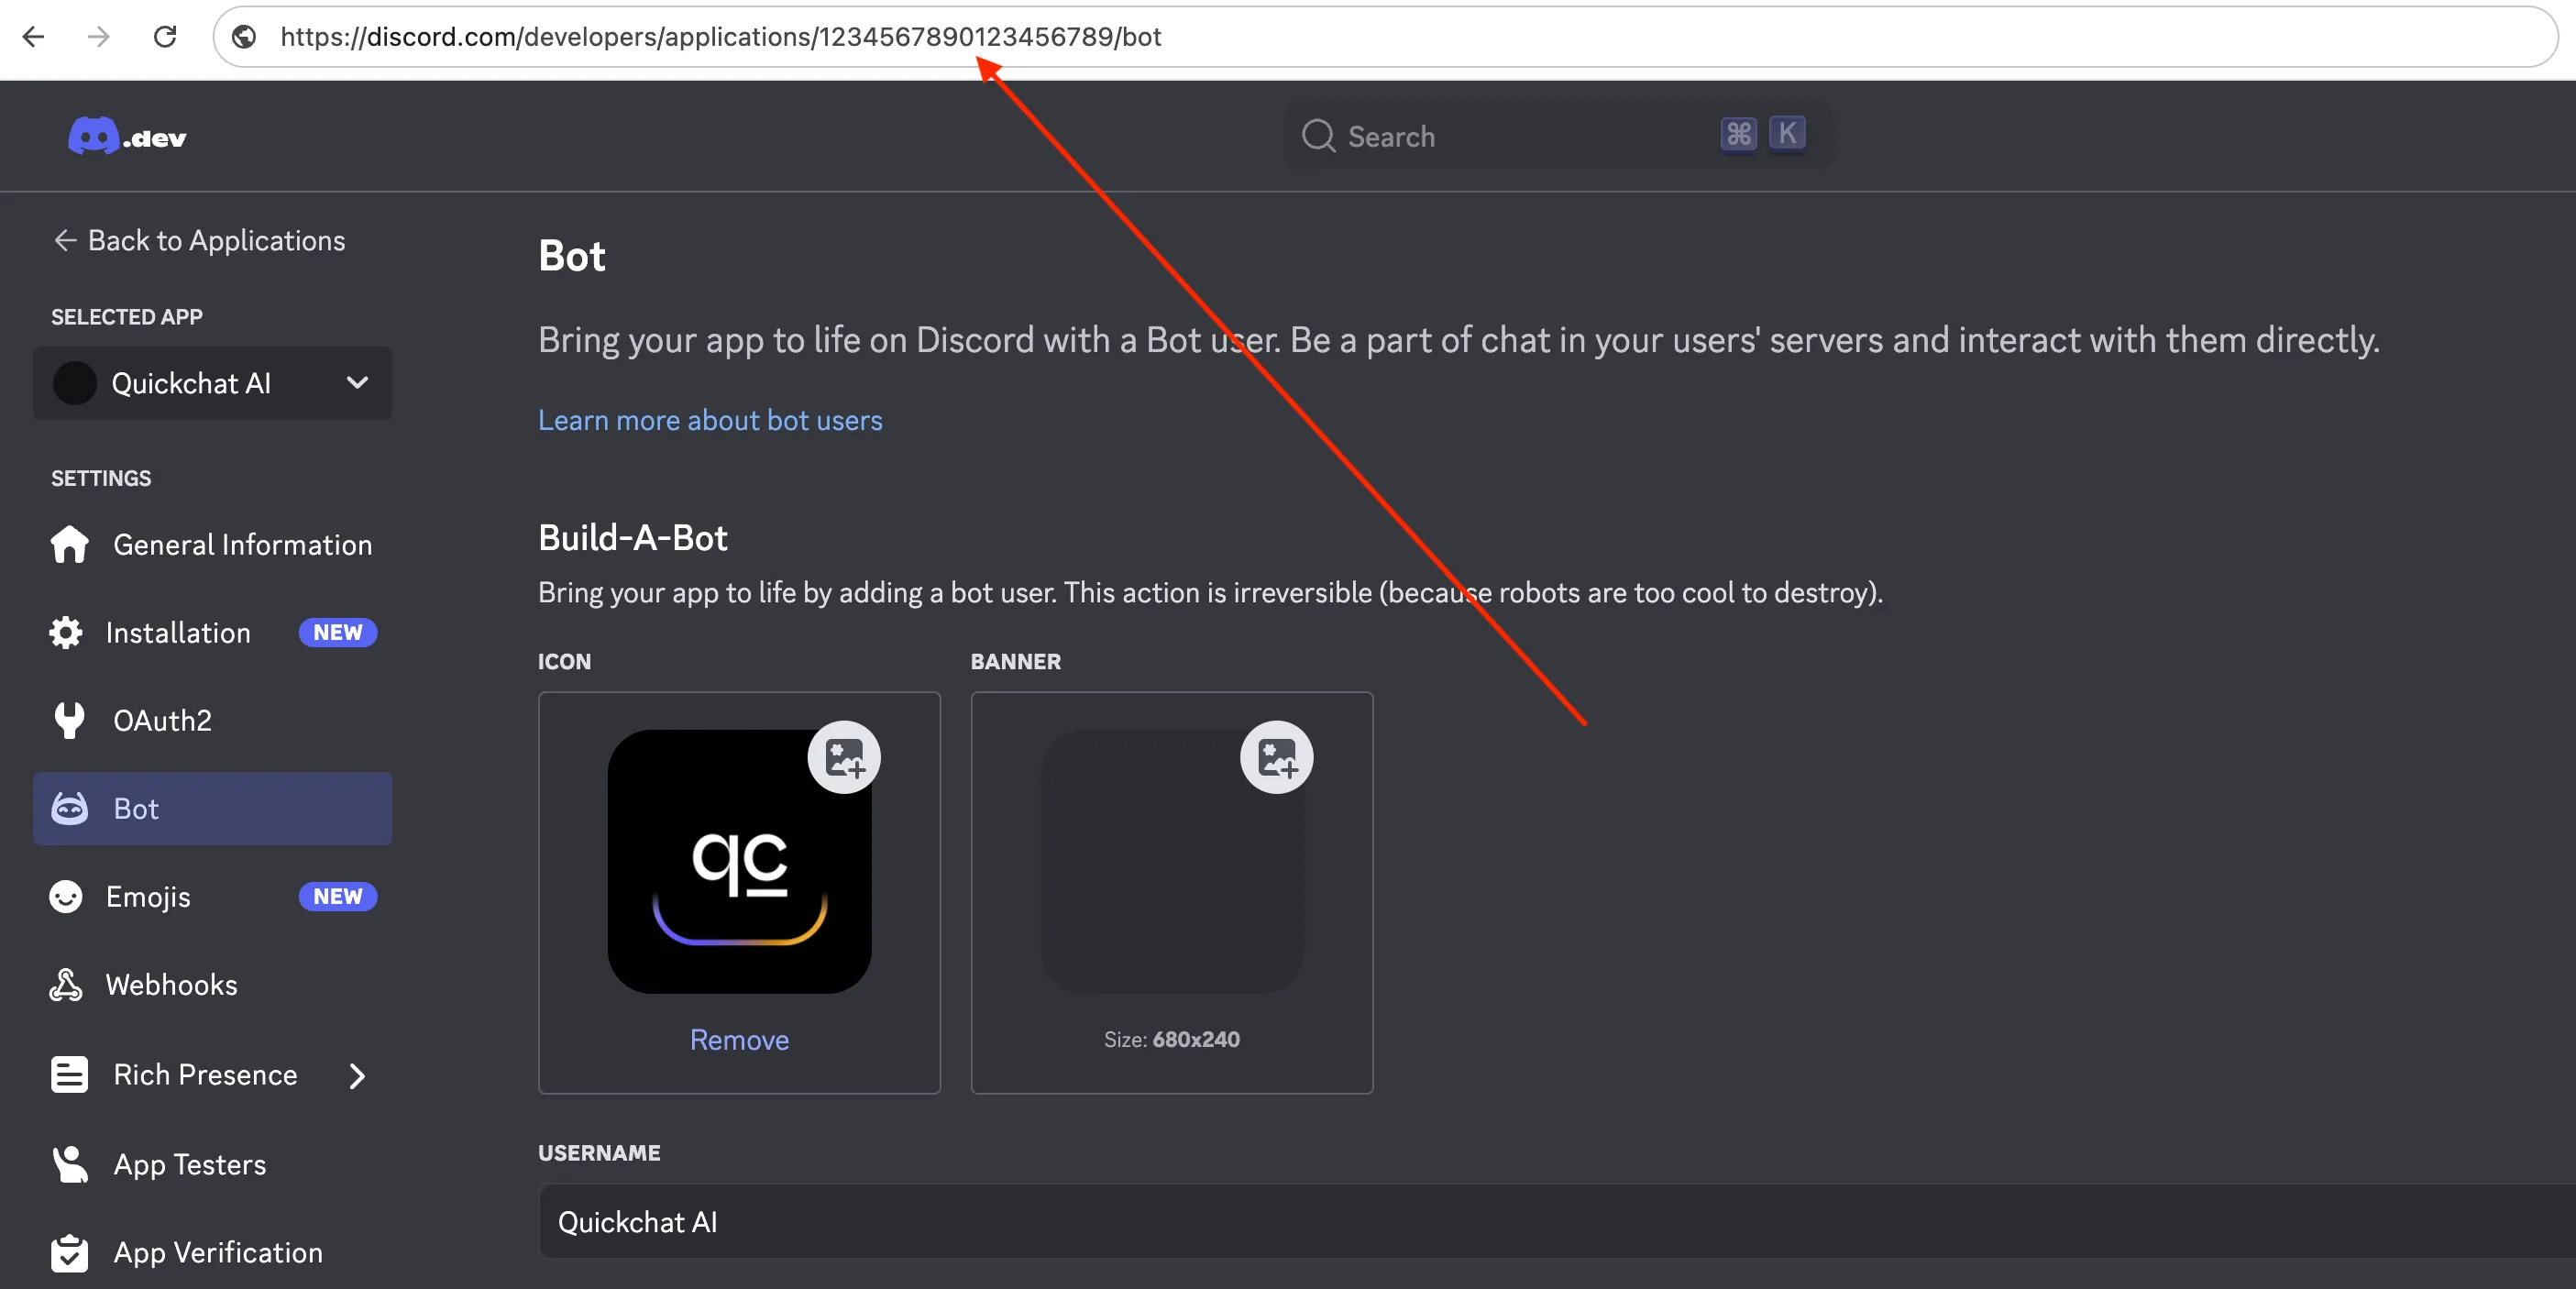
In this case the client id is 1234567890123456789 which means that the full URL you need to go to to add the server will be:
https://discord.com/api/oauth2/authorize?client_id=1234567890123456789&permissions=309237712896&scope=botIf something goes wrong at this step:
- “Integration requires code grant”: your application has Require OAuth2 Code Grant enabled. In the Developer Portal open your app, go to Bot, switch that option off, save, and open the invite URL again. (details)
- A cake / “baked” screen appears: that is Discord’s success page, your bot was added. Confirm under Server Settings → Integrations → Bots and Apps.
- Tip: once you paste your bot token in the Quickchat AI dashboard (step 5), the Discord integration page builds this invite URL for you and shows a setup checklist, so you can skip the manual URL assembly above.
4. Create a Quickchat AI Account
Sign up for Quickchat AI to power your bot with human-like conversational AI.
Quickchat AI allows you to create AI Agents with custom knowledge bases, AI Actions and more—perfect for Discord bots, websites, and more.
5. Integrate Your Bot with Quickchat AI
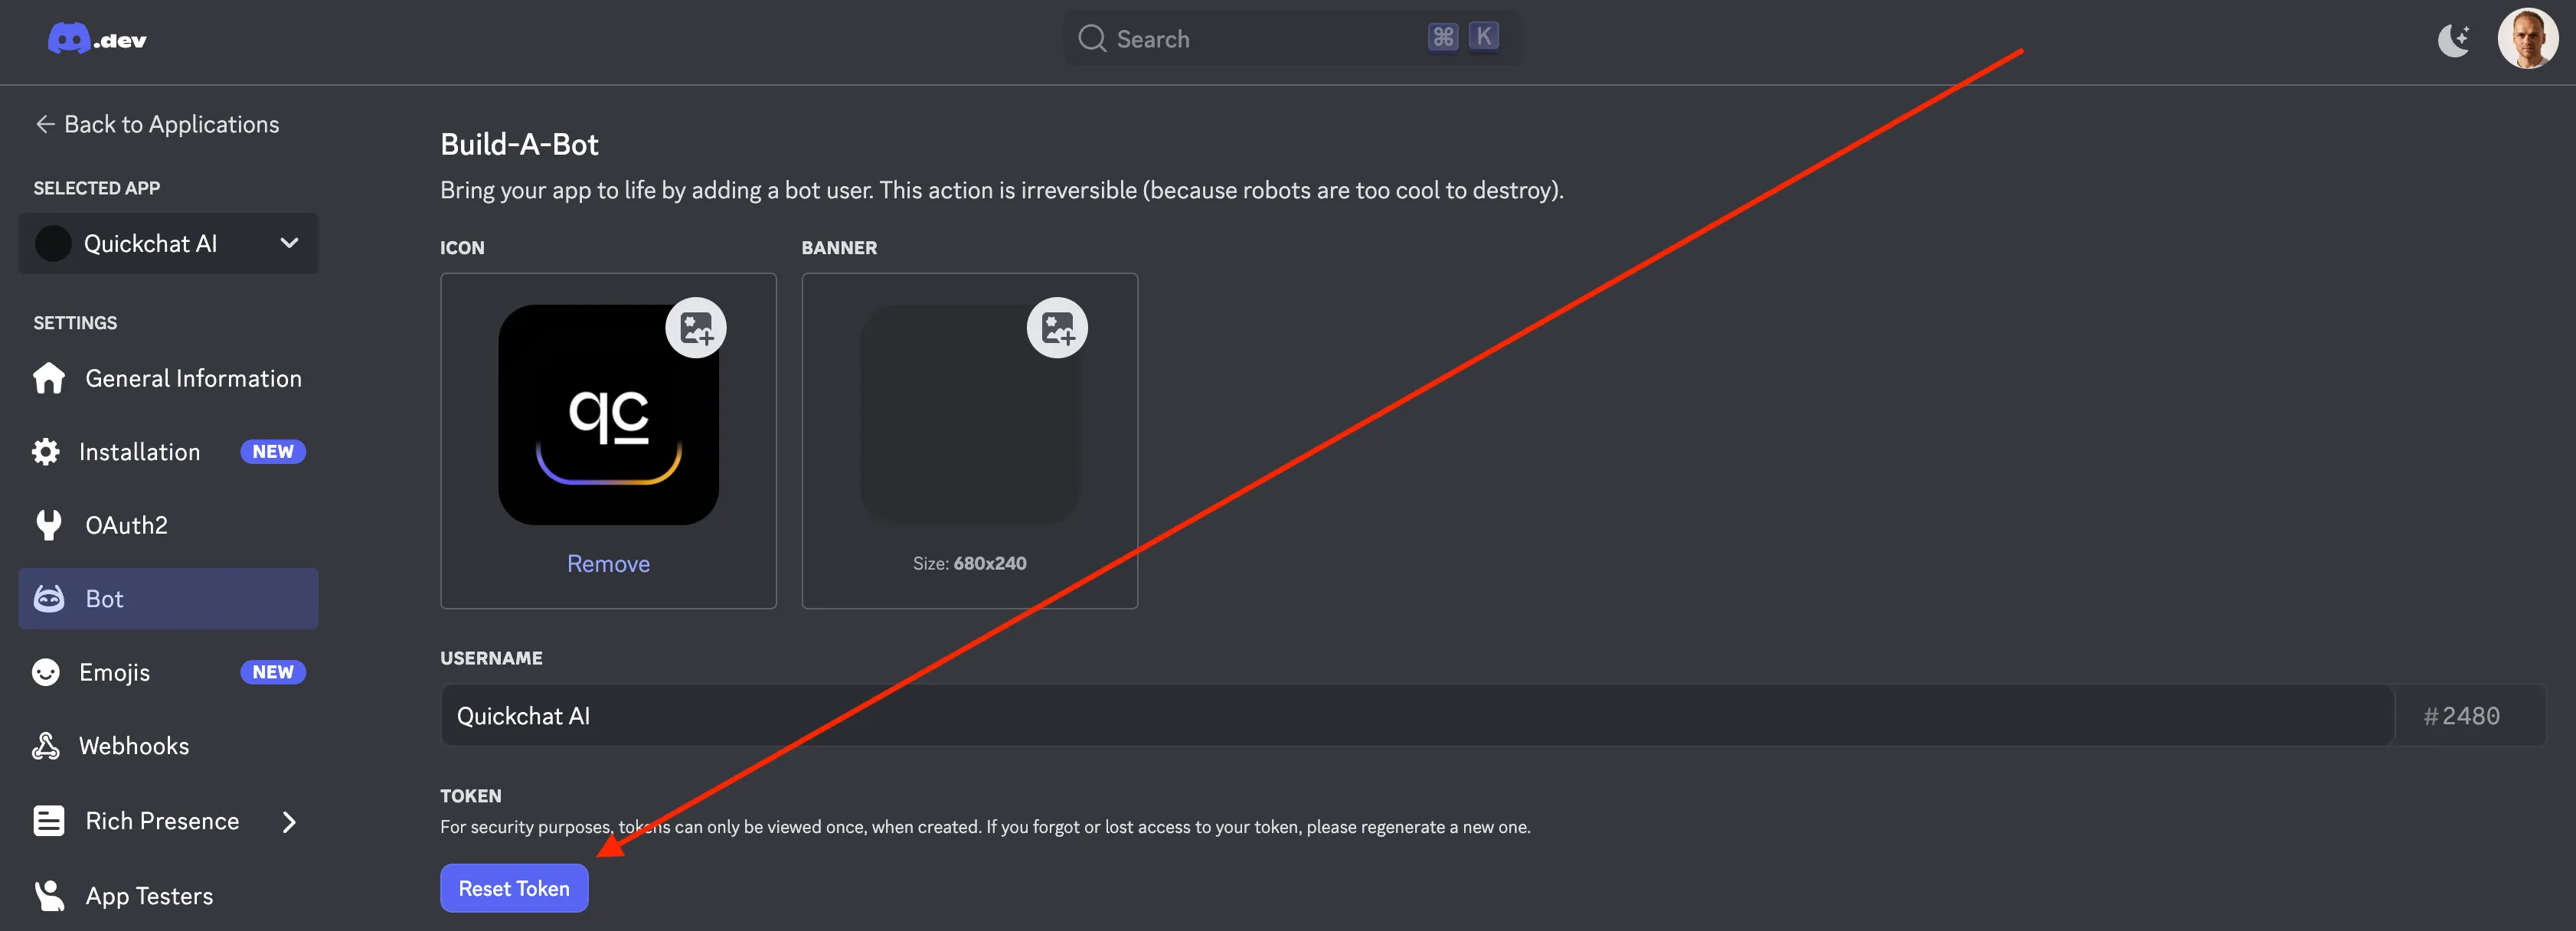
To connect your bot with Quickchat AI, retrieve your Discord Bot Token from the Developer Portal.
- Go to Bot Settings → Reset Token → Copy Token
- In the Quickchat AI Dashboard, open External Apps → Discord, choose Use your own Discord app, and paste your token. Quickchat AI turns the bot on and reports its status as it starts up.

If the bot does not come online
When a bot fails to start, the Discord integration page shows the exact error and links straight to the fix. The two most common ones:
- Invalid token: the token is wrong or was regenerated (resetting a token invalidates the old one). Open your bot in the Developer Portal, go to Bot → Reset Token, copy the new token, then click Reconnect in Quickchat AI and paste it. See Invalid bot token for the exact screenshot.
- Message Content Intent is off (reported as
PrivilegedIntentsRequired): the bot connected but cannot read messages. Open your bot in the Developer Portal, go to Bot → Privileged Gateway Intents, turn on Message Content Intent, and save. See Message Content Intent for the exact toggle.
The bot restarts whenever you change its token or settings, so give it up to a minute to come online.
Your AI Bot is Live!
Head back to Discord - your bot should be online and ready to chat! Just @mention it to start a conversation.
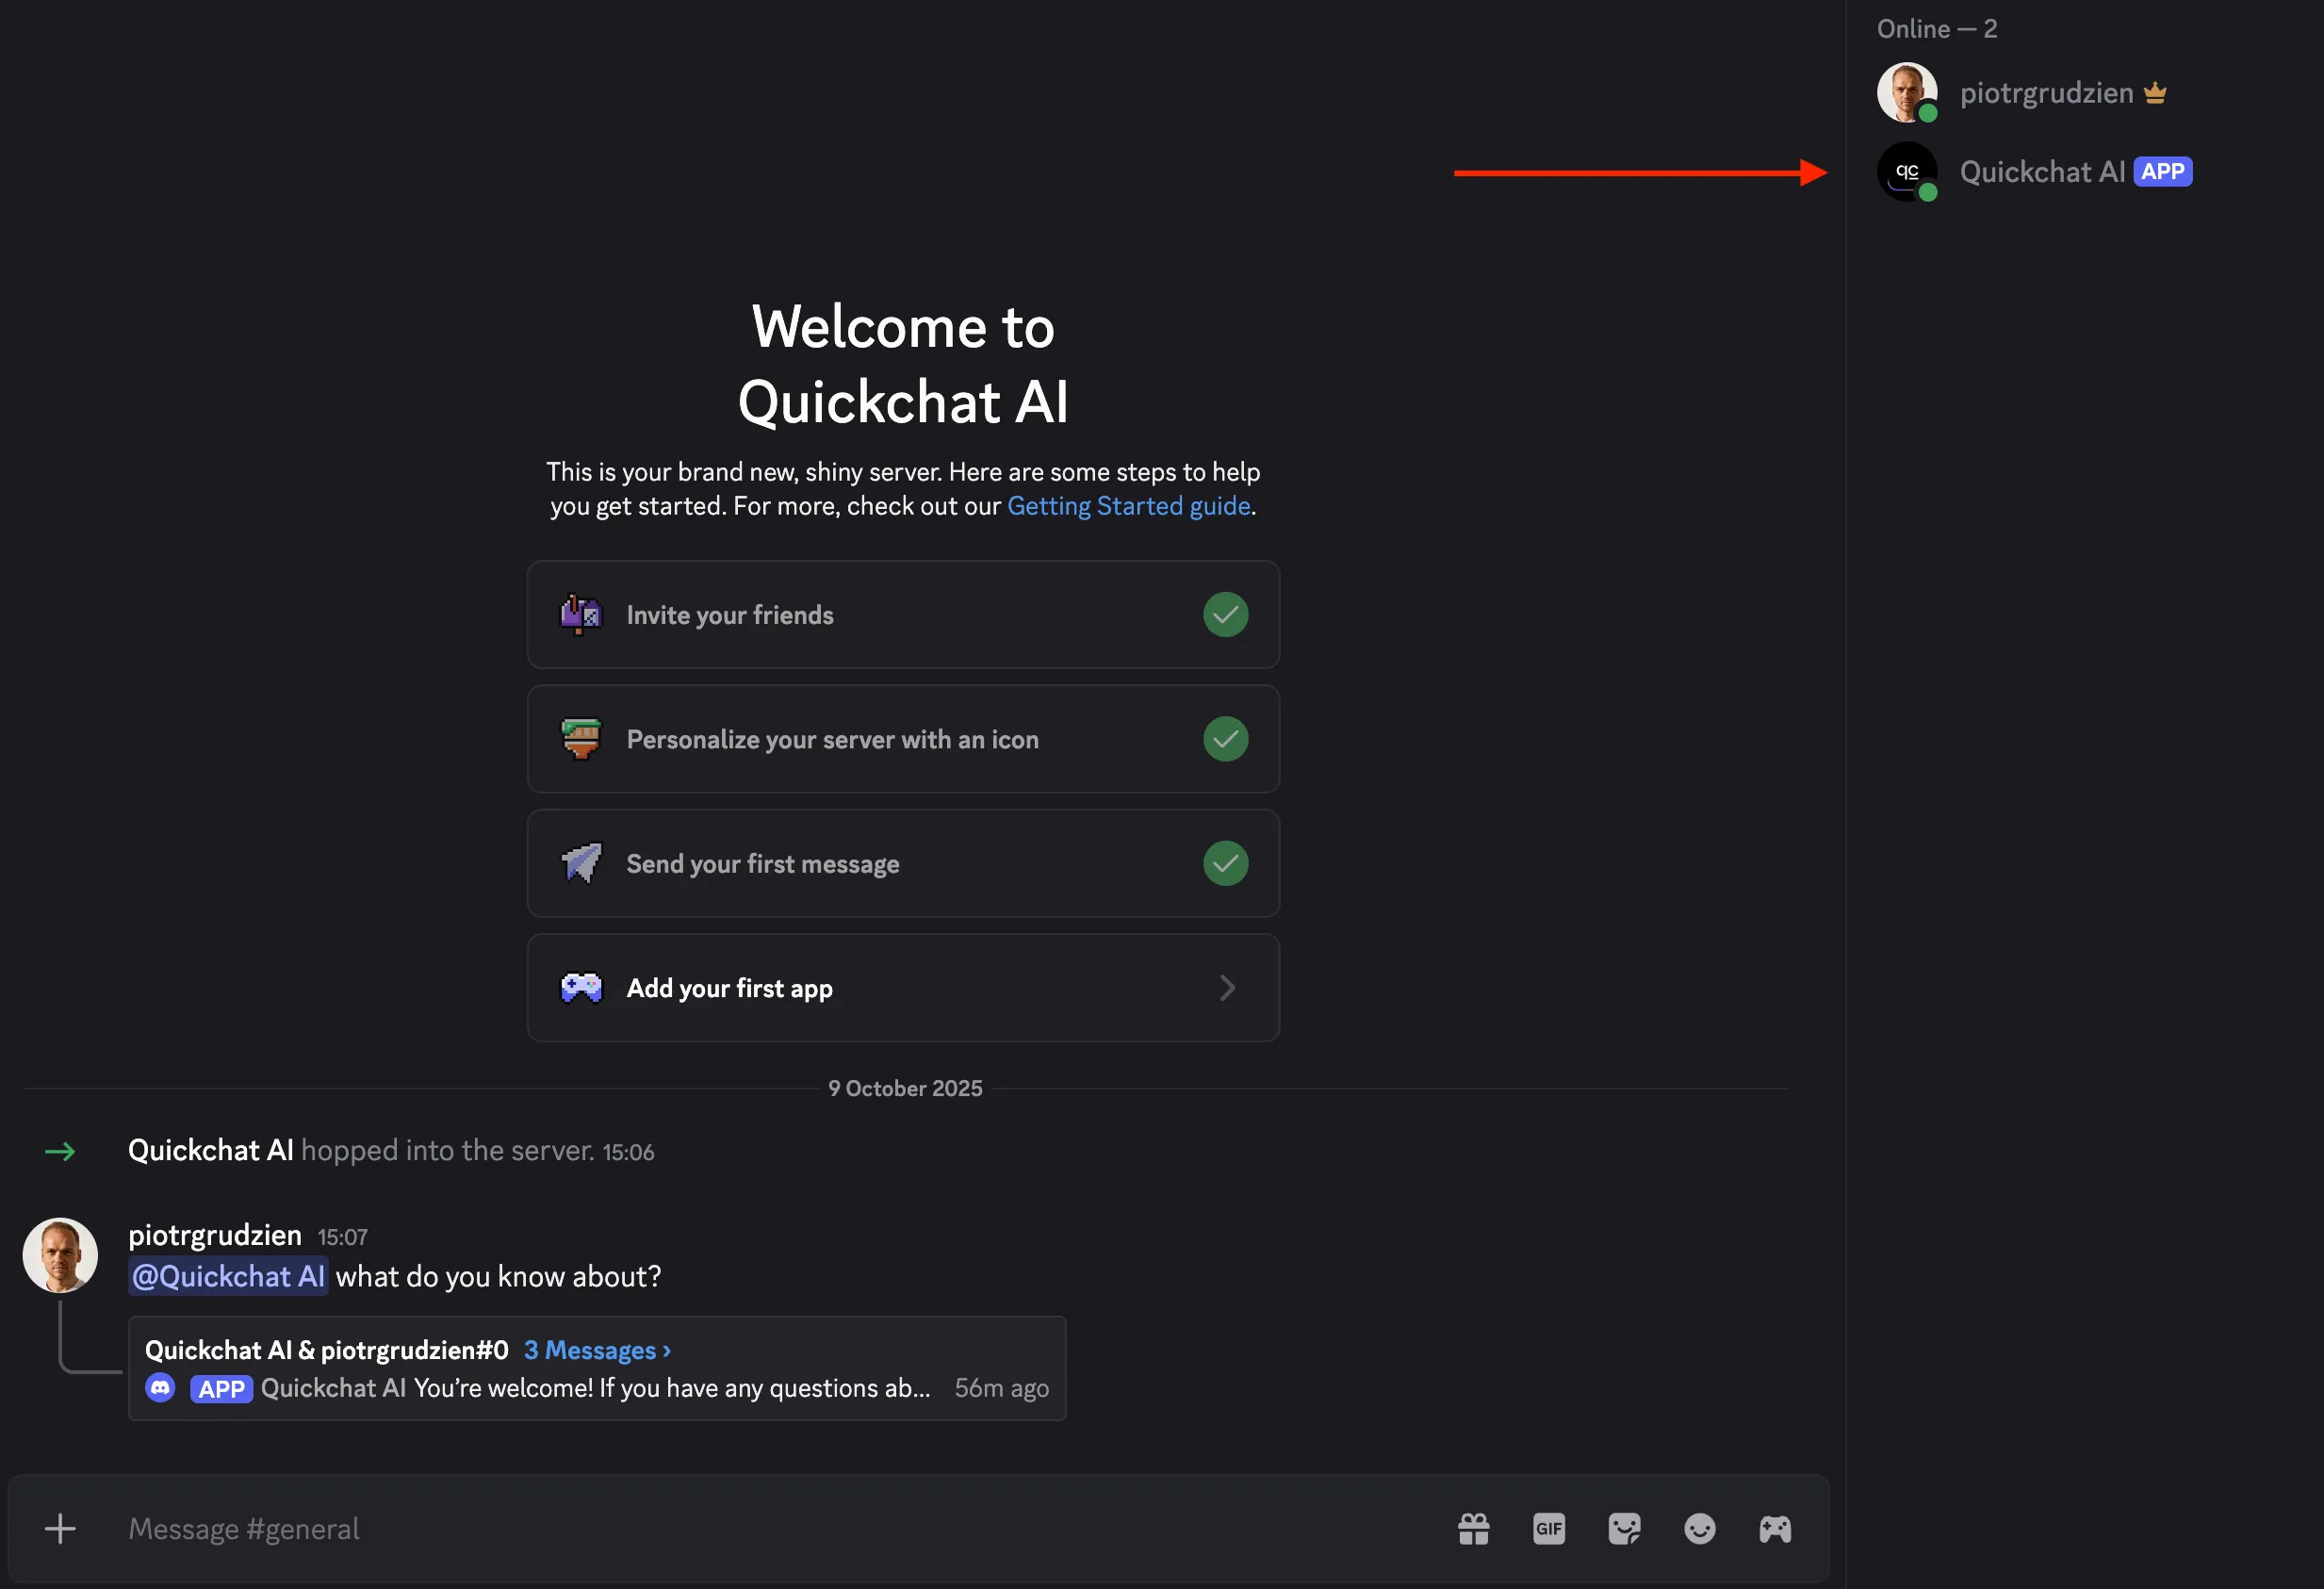
When @mentioned, the bot will reply to users in a thread. Users can continue the conversation inside the thread without mentioning the bot.
How the Bot Responds
The bot can be triggered in several ways, each with different behavior around conversation history:
| Scenario | How to trigger | Conversation history |
|---|---|---|
| @mention in a channel | @mention the bot in any text channel | Depends on the Reply in setting (see below) |
| Message in a bot thread | Send a message in a thread the bot created | Full thread history is maintained |
| Reply to a bot message | Use Discord’s Reply feature on a bot message | Starts a new conversation each time |
/ask slash command | Type /ask and your question (one-click bot only) | Starts a new conversation each time |
| Direct message | Send the bot a DM (own application only) | Maintained across the entire DM session |
A plain message in a channel triggers nothing. That is deliberate, so the bot stays quiet in a busy server, and it is the most common reason a freshly added bot looks broken. /ask exists partly as the more discoverable alternative: typing / in any channel lists it, and it works where message content is restricted. It is registered on the shared one-click bot, so if you connect your own application, @mentions are the way in.
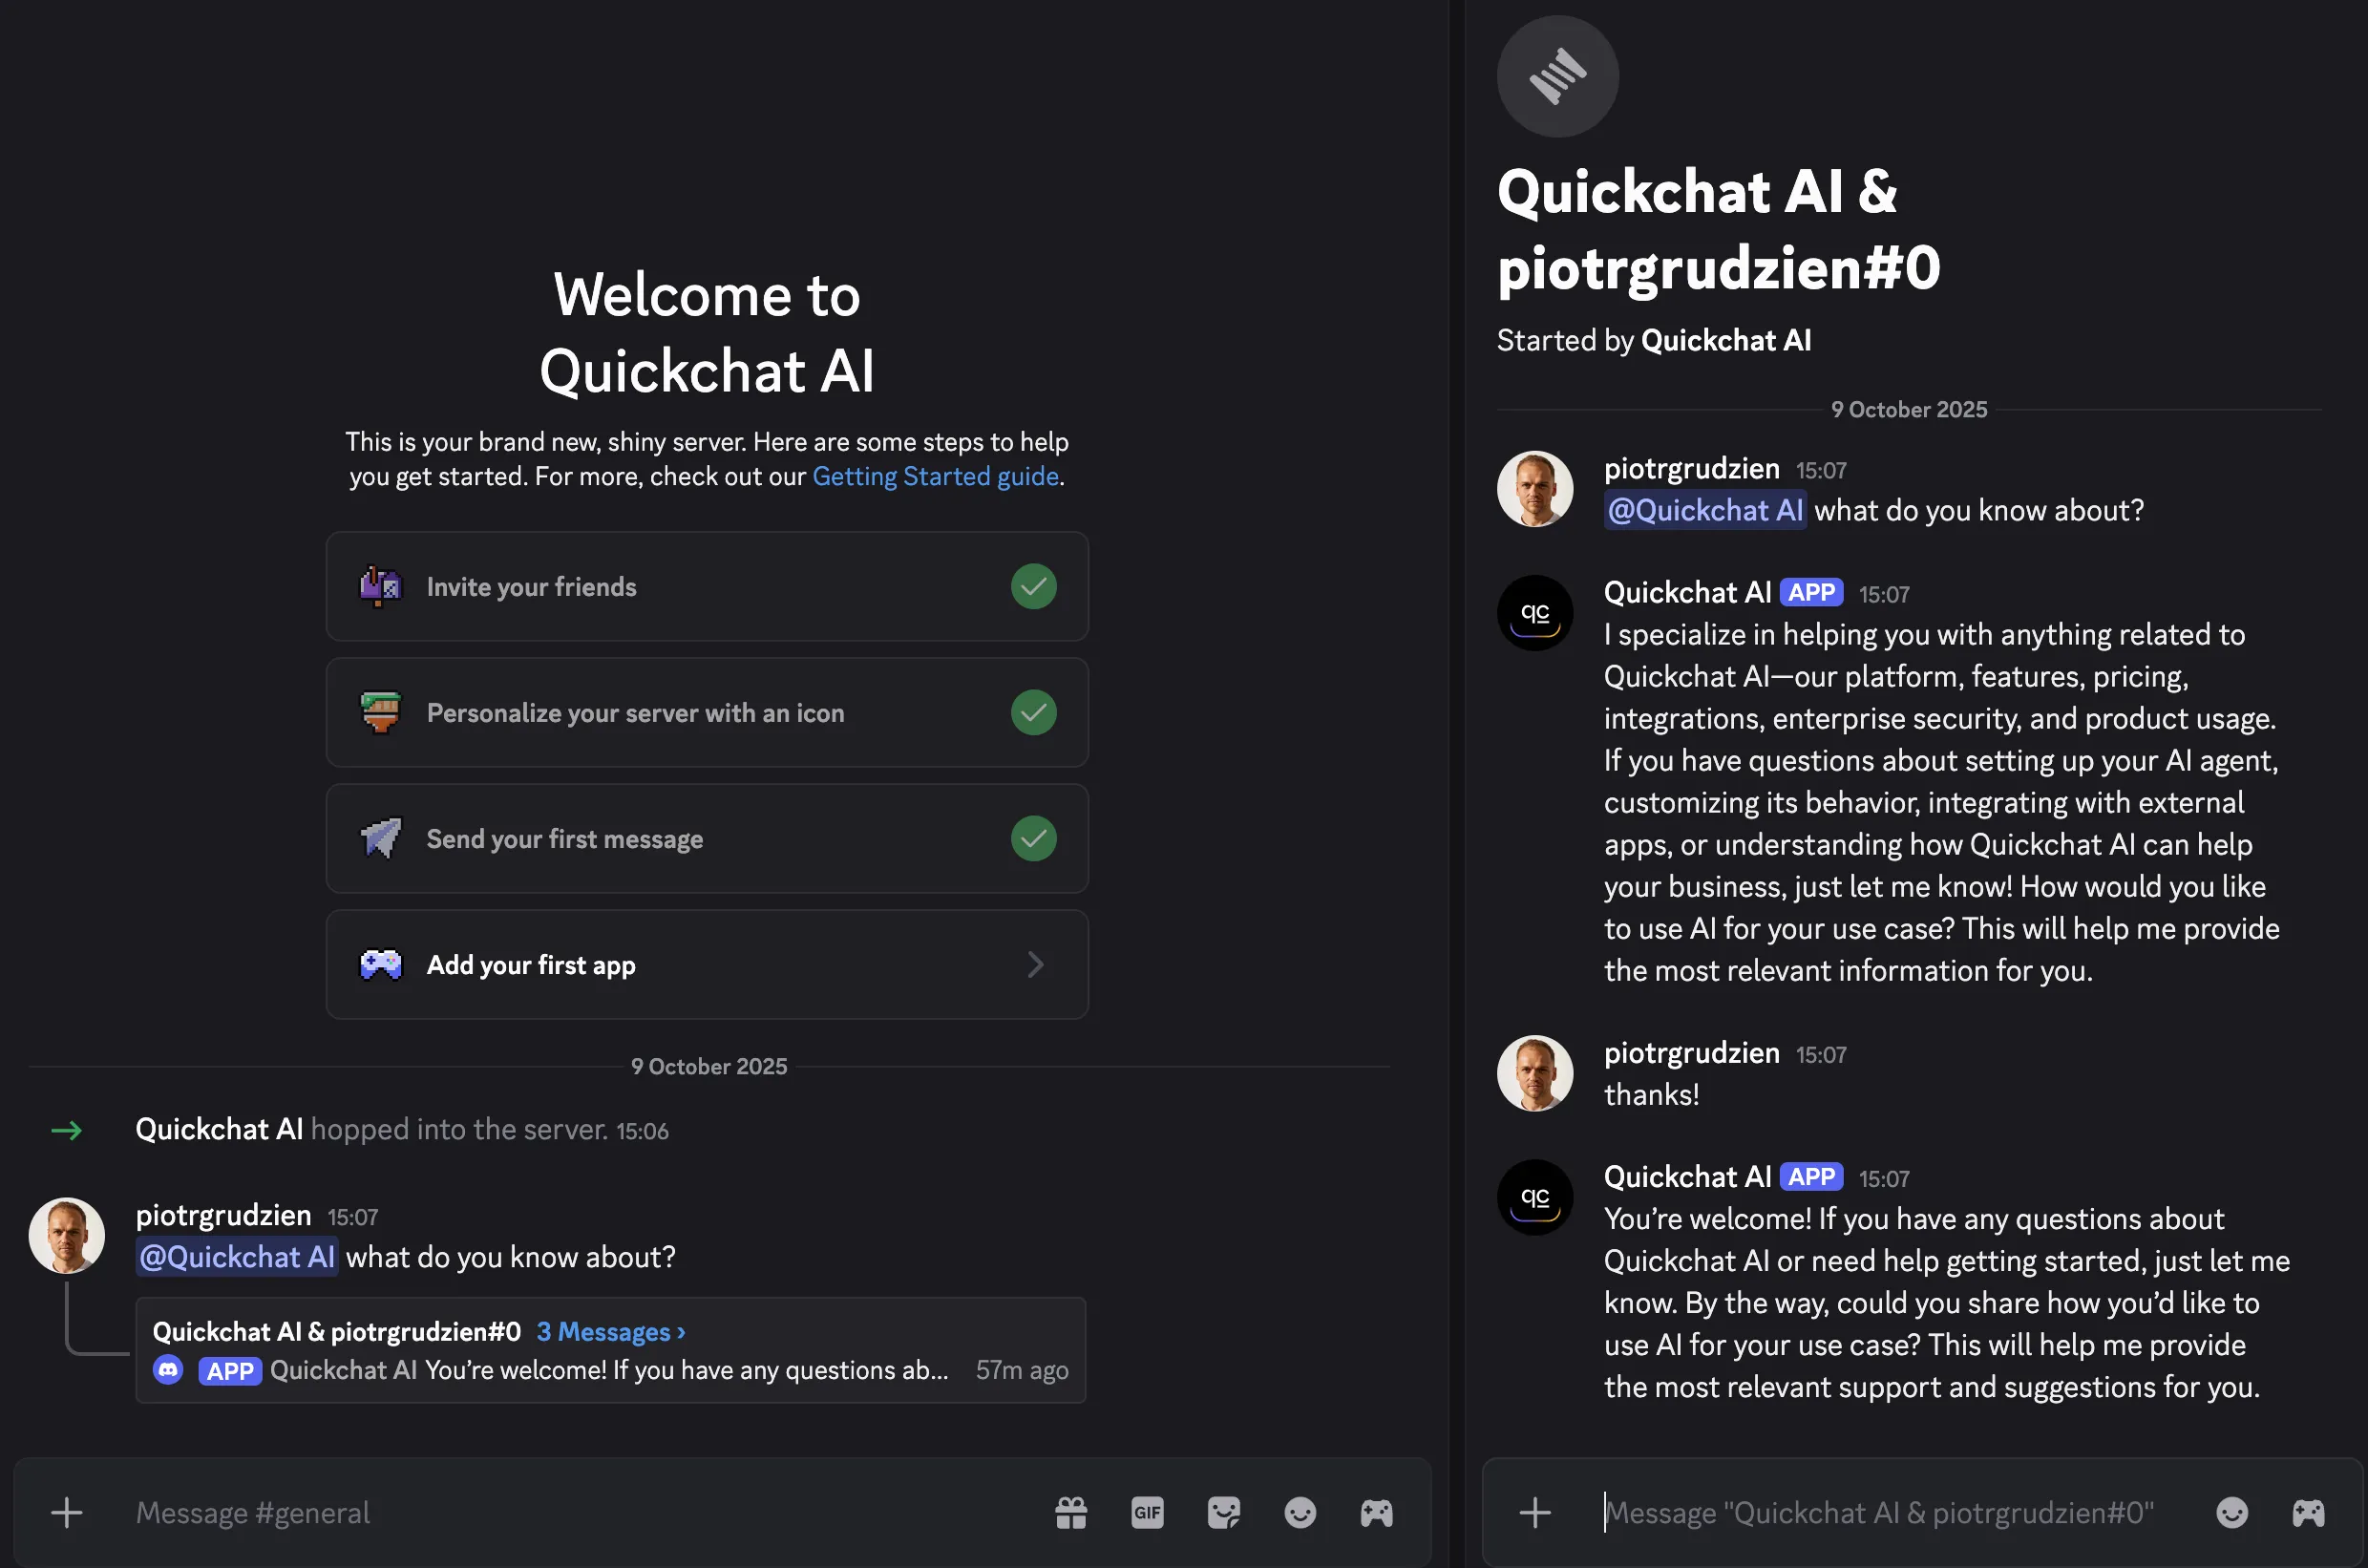
The “Reply in” Setting
In the Quickchat dashboard under Channels > External Apps > Discord, there is a “Reply in:” dropdown with two options:
- Channel (default): The bot replies directly in the channel where it was mentioned. Each @mention starts a fresh conversation with no memory of prior interactions.
- Thread: The bot creates a new thread for each @mention. The thread is named after the bot and the user (e.g., “Aria & john_doe”). Inside the thread, the bot responds to every message without requiring an @mention, and the full conversation history is preserved.
Direct Messages
DMs require your own Discord application. The shared one-click bot answers in servers only, since replying to unsolicited DMs on one shared identity would affect every server it serves.
On your own application, no @mention is needed in a DM. The bot responds to every message, and conversation history persists across the session. The bot does not have access to server channel history when responding in DMs.
Note: The bot only responds in threads it created itself. If someone creates a thread manually and writes in it, the bot will not respond.
How the Bot Understands Channel Context
When someone @mentions the bot in a channel, the bot does not just see the single message it was mentioned in. It automatically fetches recent messages from the channel and includes them in the AI’s prompt as a timestamped transcript. This means the bot understands the ongoing conversation and can reference what people said earlier.
Here is an example of what that context looks like from the AI’s perspective:
Most recent messages on the #general channel:
[2026-02-19 14:01] alice: Has anyone tried the new API endpoint?
[2026-02-19 14:03] bob: Yeah, I got a 429 back after about 50 requests
[2026-02-19 14:05] alice: @QuickchatBot what's the rate limit for the v2 API?
The bot also reads messages from active threads and archived threads in the channel, so thread discussions are included in the context.
When someone uses Discord’s Reply feature to respond to a specific message, the bot narrows its context to just the messages immediately surrounding the replied-to message, instead of fetching the full recent history. This gives targeted context for the specific conversation the user is referencing.
Special content in messages (stickers, GIFs, images, embeds, reactions) is represented with annotations so the bot is aware of them even though it cannot see them visually in the context transcript. @mention tokens are replaced with readable display names.
No configuration is needed. Channel context is on by default for all Quickchat AI bots on Discord.
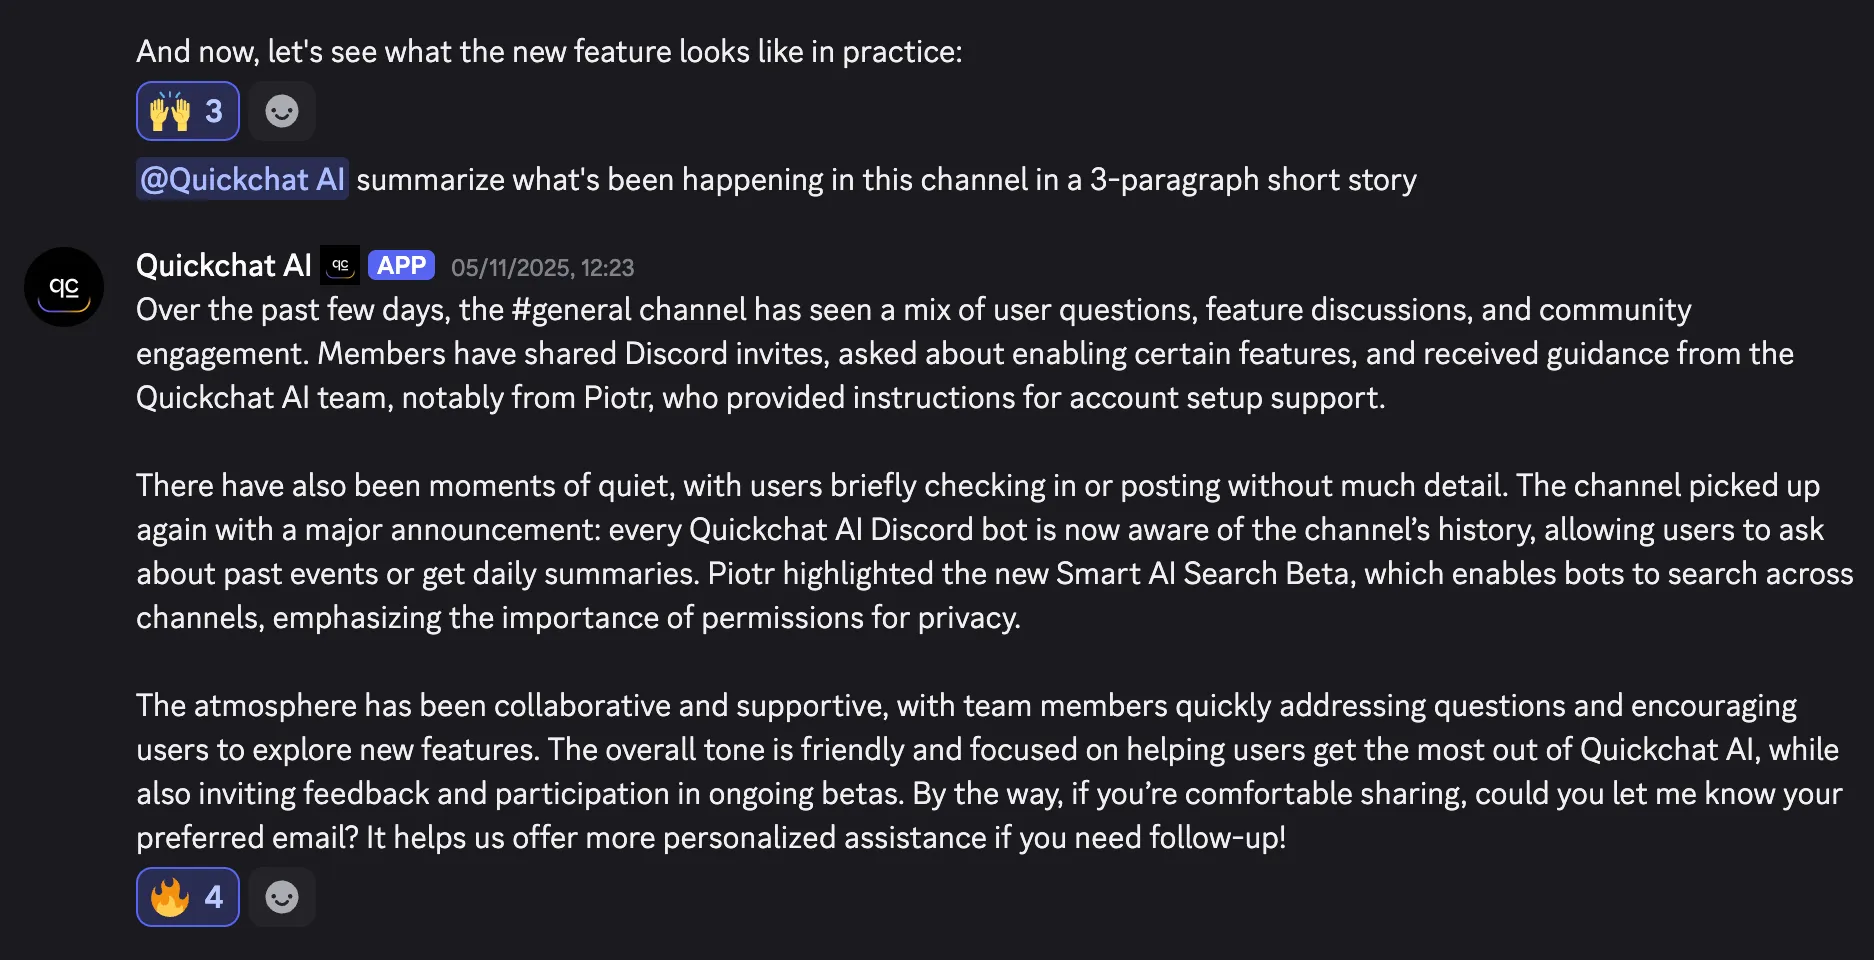
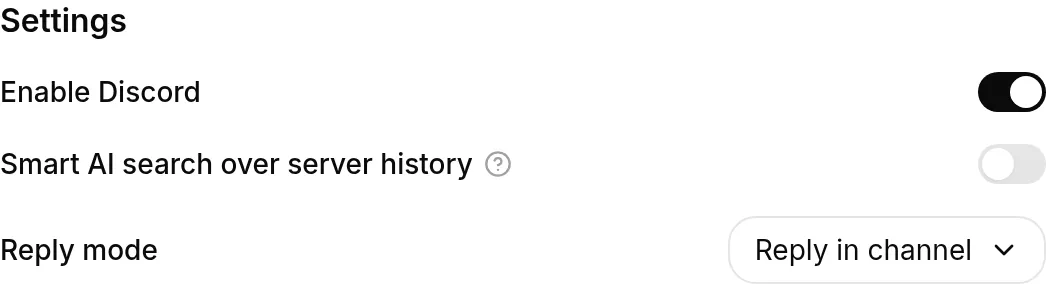
Smart AI Search Over Server History
By default, the bot only reads messages from the channel where it was mentioned. With Smart AI search over server history enabled, the AI can query messages from any text channel in the server. The AI decides which channel to look at based on the user’s question.
For example, if someone asks in #general “what was the conclusion in #engineering about the migration?”, the bot can read the recent history of #engineering and answer based on what it finds there.
The feature also supports time-window filtering and pagination, so the AI can look further back in history when needed.
| Mode | Scope | Best for |
|---|---|---|
| Default | Current channel only | General-purpose community bot |
| Smart AI search over server history | Any channel in the server | Support bots, knowledge retrieval across channels |
Note: Smart AI search over server history is currently in beta. If you’re interested, reach out via email or on the Quickchat Discord server.
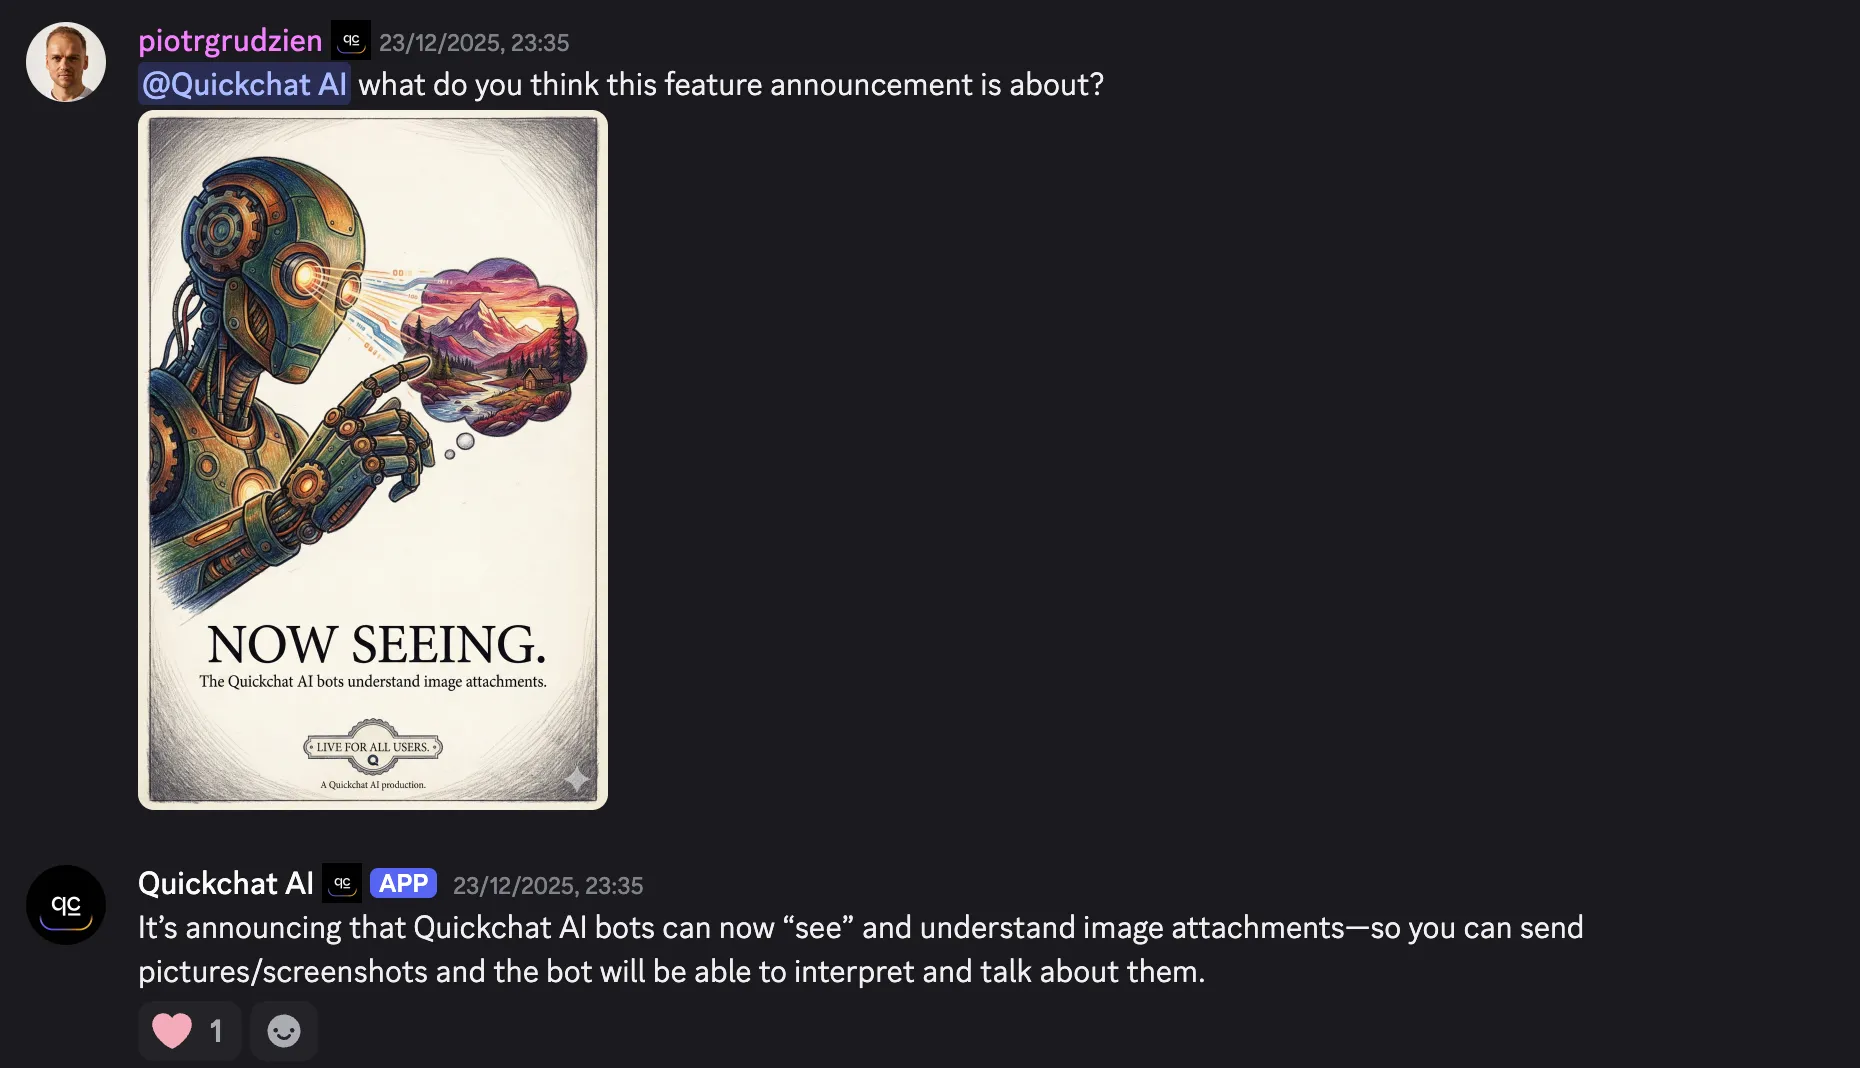
Sending Images to the Bot
Users can attach an image when @mentioning the bot, and the AI will process it using its vision capabilities. Supported formats are PNG, JPG, JPEG, GIF, and WebP. If multiple images are attached, the bot processes the first one.
The image URL from Discord’s CDN is passed alongside the message text to the AI model as a multimodal input, so the AI sees both the text and the image in the same turn. No configuration is needed. Image understanding is enabled by default.
Some practical examples for Discord communities:
- Developer community: a user screenshots a stack trace or error message and asks the bot to explain it
- Design community: a user shares a UI mockup and asks the bot for feedback
- Gaming community: a user shares a screenshot of game settings and asks the bot for optimization tips
- E-commerce support: a customer sends a photo of a defective product to the support bot
Connecting AI Actions to Discord
AI Actions let the bot call external APIs and tools during a Discord conversation. They are configured once in the Quickchat dashboard under AI Agent > Actions & MCPs and work across all channels (Discord, website widget, WhatsApp, Telegram, etc.).
Two types of actions are available:
| Action type | What it does |
|---|---|
| API Action | Makes HTTP requests (GET, POST, PUT, DELETE) to external endpoints with configurable parameters, headers, and body |
| Remote MCP | Connects to a Model Context Protocol server for access to external tools and data sources |
Here are some examples of what you could build with AI Actions on Discord:
- Order tracking bot: Connect an API Action to your e-commerce backend so community members can ask “where’s my order #12345?” and get real-time status.
- GitHub issue bot: Hook up a Remote MCP to your GitHub repo so developers can ask the bot “are there any open bugs tagged
critical?” directly in Discord. - Moderation helper: Connect to a content moderation API so the bot can analyze reported messages when asked.
- Meeting scheduler: Connect a Remote MCP to Cal.com or Google Calendar so users can book meetings with your team through Discord.
- CRM integration: Connect to HubSpot so the bot can log leads or create support tickets from Discord conversations.
- Lead and feedback logging: Connect Google Sheets so the bot logs leads, unanswered questions, and demo requests from Discord conversations straight into a spreadsheet your team already uses.
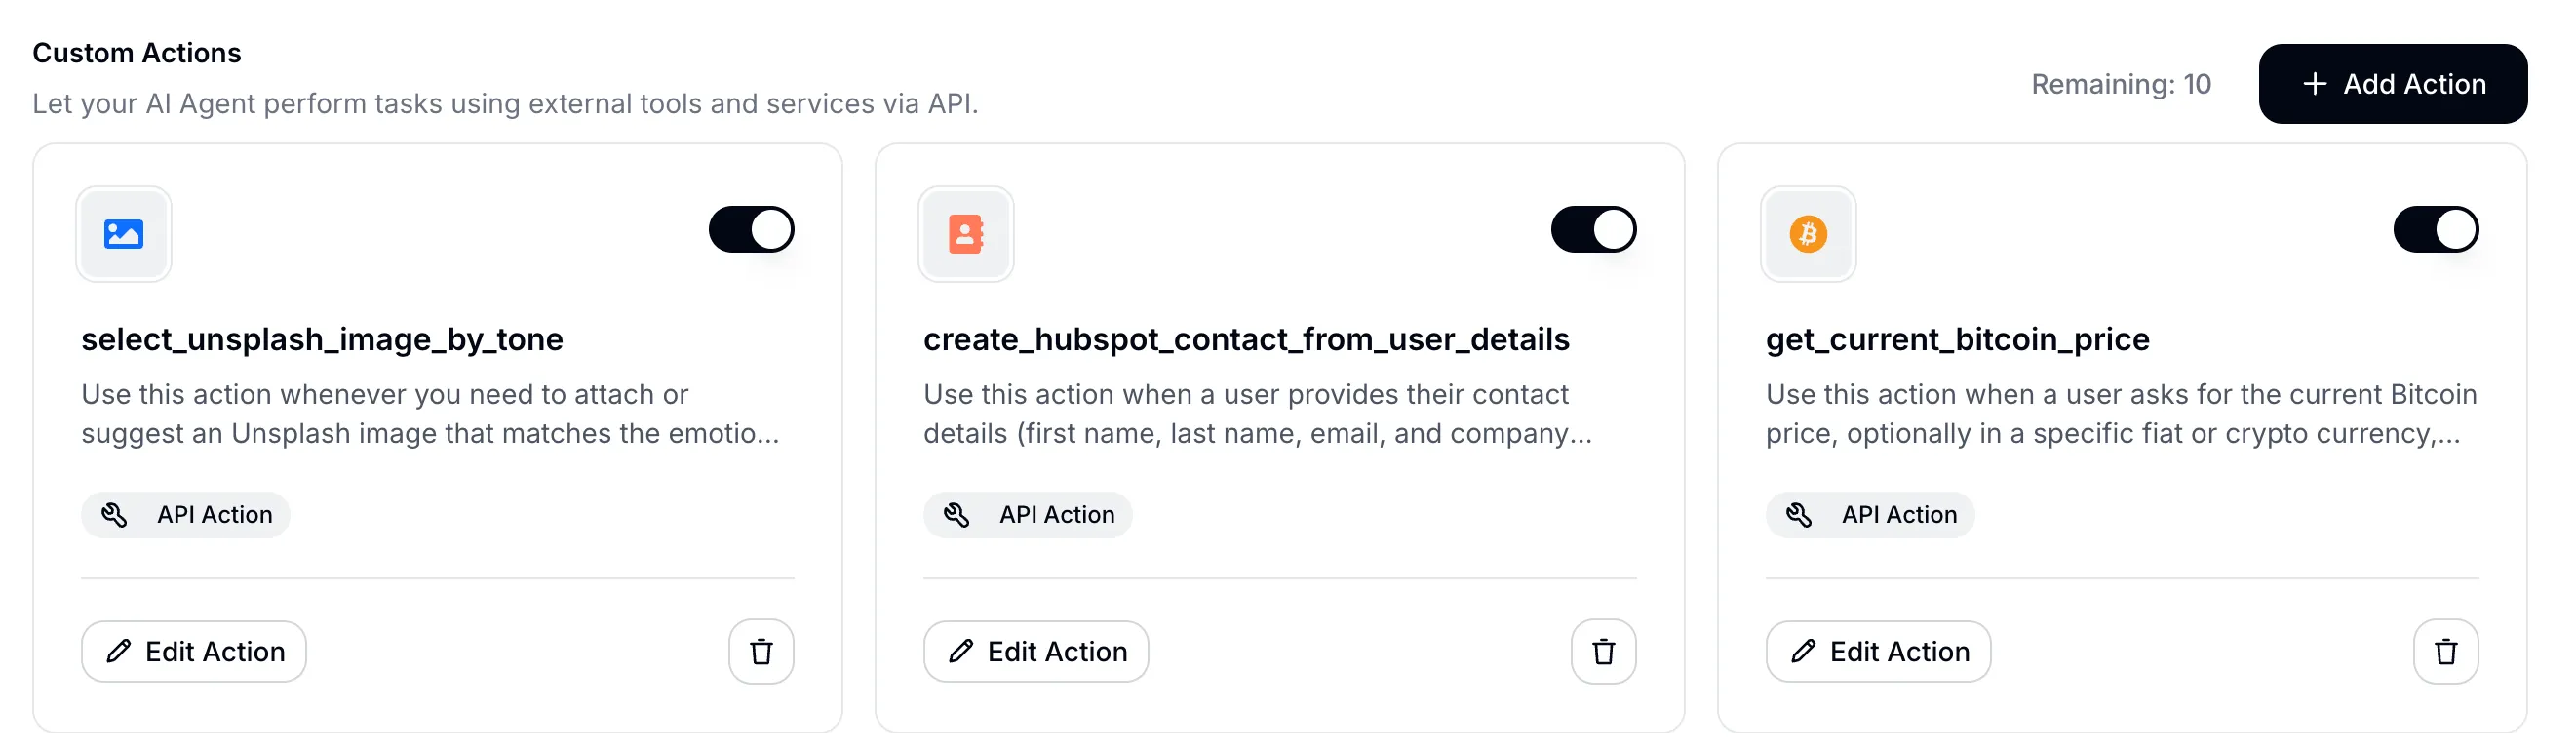
Setting Up an API Action
- In the Quickchat dashboard, go to AI Agent > Actions & MCPs.
- Under Custom Actions, click Add Action and select API Action.
- Give the action a name (e.g., “Check Order Status”) and a description that tells the AI when to use it (e.g., “Use this when a user asks about their order status. Ask for the order number first.”).
- Set the HTTP method (e.g., GET), the endpoint URL, and any parameters.
- Save.
The action is now available to the bot in all channels, including Discord. For a more detailed walkthrough, see the HubSpot AI Actions tutorial, the Discord moderation bot guide (timeout, kick, ban, roles, and slowmode as AI Actions), or the Actions documentation.
Further Reading
These guides cover related topics in more detail:
- How to Create an AI Chatbot for Telegram — deploy the same AI Agent on Telegram
- Create an AI Bot for WhatsApp — WhatsApp integration guide
- HubSpot AI Actions — step-by-step tutorial on setting up API Actions
- Connect an AI Agent to Jira Tickets — Remote MCP example with Jira
- MCP Explained — what Model Context Protocol is and how it works
- Actions documentation — full reference
Sign up for Quickchat AI to start building your AI Agent, or join the community on Discord: discord.gg/KqkHwvPRNH