

Introduction
In this blog post, I will show you how to connect your AI Agent to Jira. We will be using:
- a Jira account (free)
- a Quickchat’s AI Agent (sign up here and use for free)
Looking for the canonical, continuously-updated reference? The same walkthrough lives in our docs at docs.quickchat.ai/channels/jira. This post is the long-form, narrated version.
It will enable your Quickchat AI Agent to:
- be able to search through your Jira tickets, and
- be smart about answering questions based on them
We will use Quickchat’s AI Actions (custom HTTP actions) to let your Agent call the Enhanced search for issues endpoint of the Jira (Atlassian) API.
 Craft an AI Agent creative about interpreting user inputs
Watch the Video
How it works
Here is how your AI Agent will operate during conversations:
- User asks a question like “what’s up with issues to do with mercury?”
- AI Agent fetches relevant information from the Jira API using a query like “mercury”
- AI Agent replies to the user based on the information fetched from the API
Please follow the steps below. The whole setup shouldn’t take longer than 10 minutes!
Step 0 - create a Jira account and project
- Go to id.atlassian.com/signup, create and verify your account.
- Add Jira to your Atlassian apps (the free plan will be enough to start).
- Set up your first project and create tickets like in the example below.
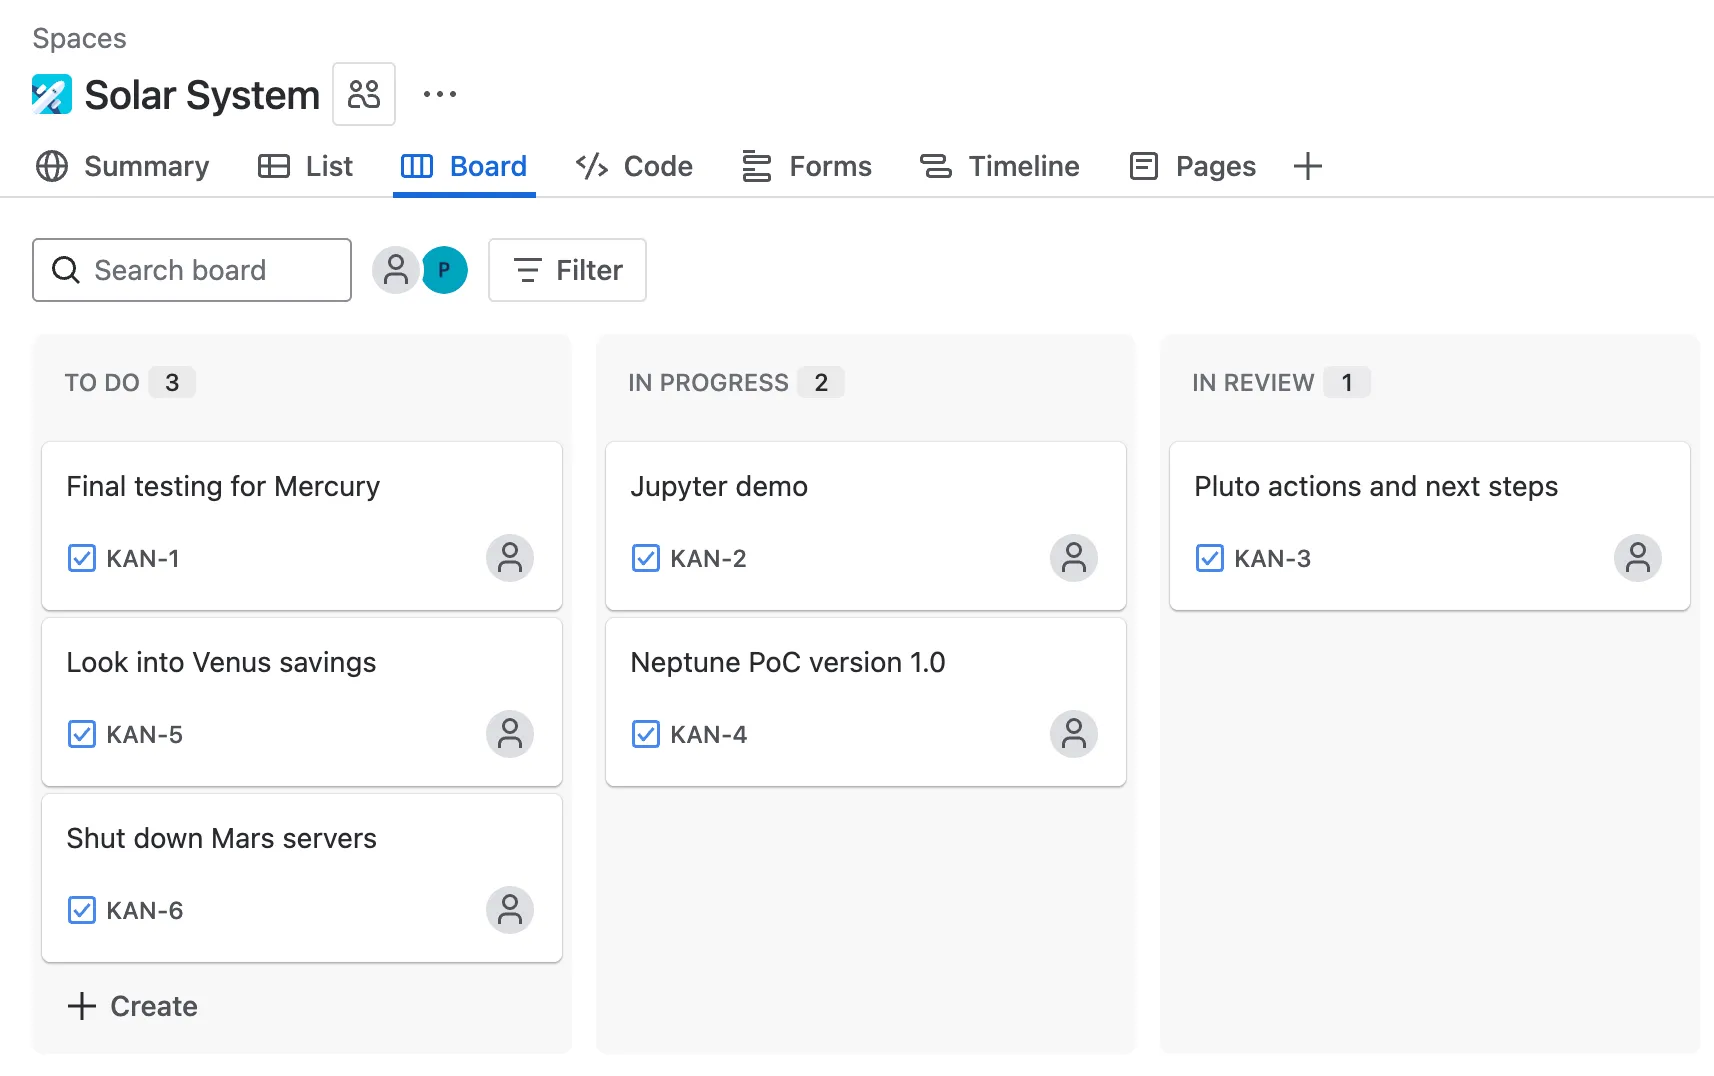 Example board with Jira issues
Step 1 - Jira API authentication token
Go to id.atlassian.com/manage-profile/security/api-tokens and create your API token which will look something like this:
ATATT3xFfGF01sKUl0HEW2-_-u9umfLSz7jeblmeLzEHZ1DLcdLbKeVF137iTHGkKhPuNMSKX8mkbwLpHXT4-qXEn-xNEnfiK8_XDVW6XXvGd_SBV3HD4kJInGNjfg2_yEoJFN6uwy4NRqeuhV2tjmyzxozLBRn35OhXkDA6QGfLFvf2_PKuNtA=8DA704E4In order to be able to use your Atlassian API token in Quickchat AI Actions, you need to base64-encode it along with your email address:
your_email@example.com:ATATT3xFfGF01sKUl0HEW2-_-u9umfLSz7jeblmeLzEHZ1DLcdLbKeVF137iTHGkKhPuNMSKX8mkbwLpHXT4-qXEn-xNEnfiK8_XDVW6XXvGd_SBV3HD4kJInGNjfg2_yEoJFN6uwy4NRqeuhV2tjmyzxozLBRn35OhXkDA6QGfLFvf2_PKuNtA=8DA704E4Make sure to include the exact email address you used to set up your Atlassian account
You can use a simple online tool like base64encode.org.
Make sure to use the Live mode which guarantees the encoding happens entirely in your browser.
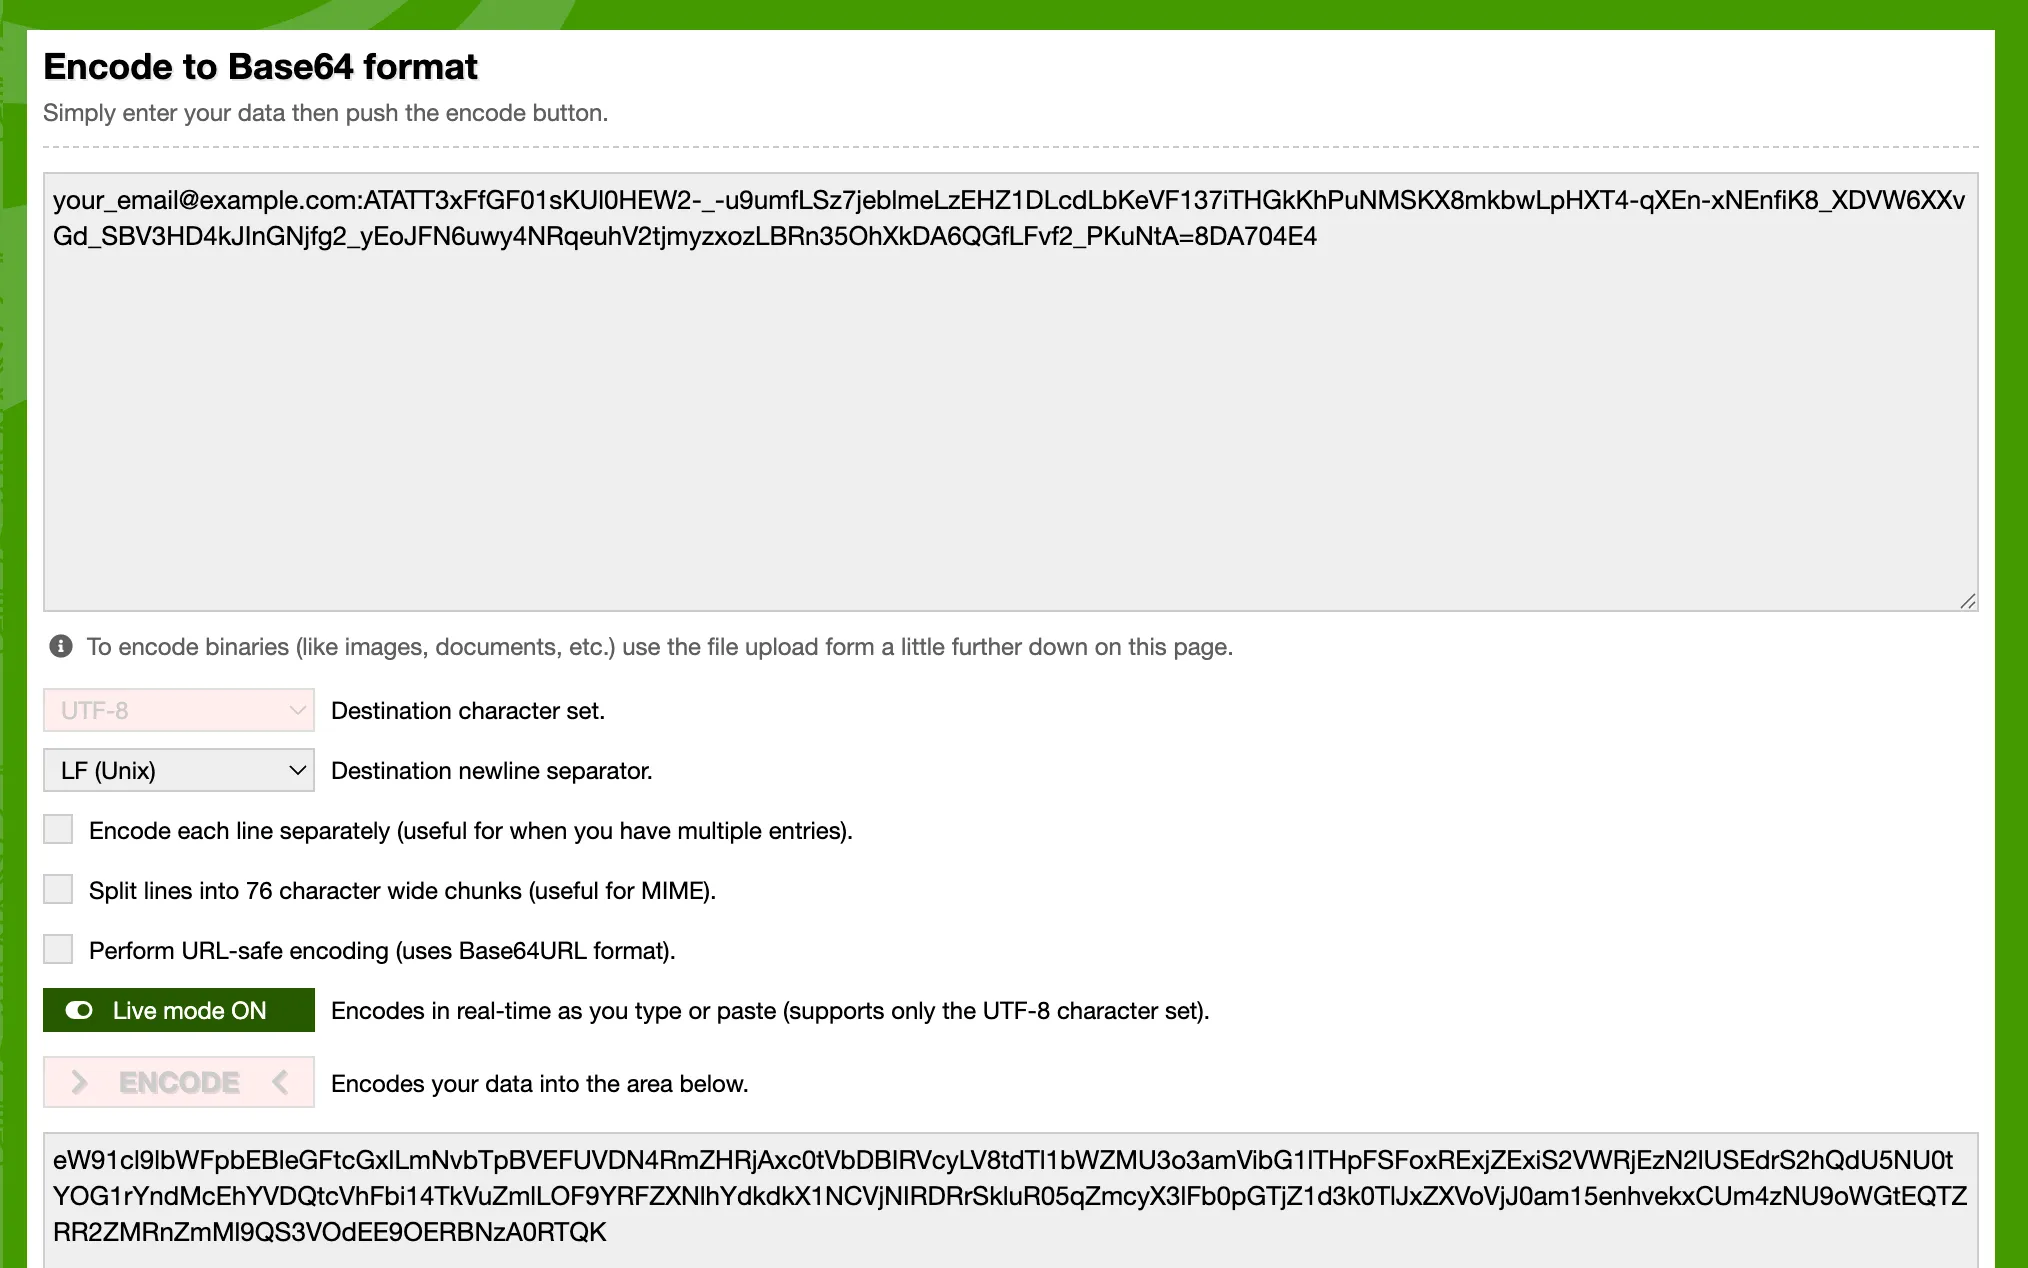 You can use a free online tool to encode your API token
Alternatively, here is how to do it on your machine in a simple python script:
import base64

email = "your_email@example.com"
api_token = "ATATT3xFfGF01sKUl0HEW2-_-u9umfLSz7jeblmeLzEHZ1DLcdLbKeVF137iTHGkKhPuNMSKX8mkbwLpHXT4-qXEn-xNEnfiK8_XDVW6XXvGd_SBV3HD4kJInGNjfg2_yEoJFN6uwy4NRqeuhV2tjmyzxozLBRn35OhXkDA6QGfLFvf2_PKuNtA=8DA704E4"

credentials = f"{email}:{api_token}"
b64_credentials = base64.b64encode(credentials.encode("utf-8")).decode("utf-8")

print(f"Basic {b64_credentials}")
The above script will give you a ready-to-use header with the encoded token which looks something like this:
Basic eW91cl9lbWFpbEBleGFtcGxlLmNvbTpBVEFUVDN4RmZHRjAxc0tVbDBIRVcyLV8tdTl1bWZMU3o3amVibG1lTHpFSFoxRExjZExiS2VWRjEzN2lUSEdrS2hQdU5NU0tYOG1rYndMcEhYVDQtcVhFbi14TkVuZmlLOF9YRFZXNlhYdkdkX1NCVjNIRDRrSkluR05qZmcyX3lFb0pGTjZ1d3k0TlJxZXVoVjJ0am15enhvekxCUm4zNU9oWGtEQTZRR2ZMRnZmMl9QS3VOdEE9OERBNzA0RTQ=Step 2 - create a Quickchat AI Action
In the Quickchat AI app, go to Actions & MCPs and add an action:
 AI Action page
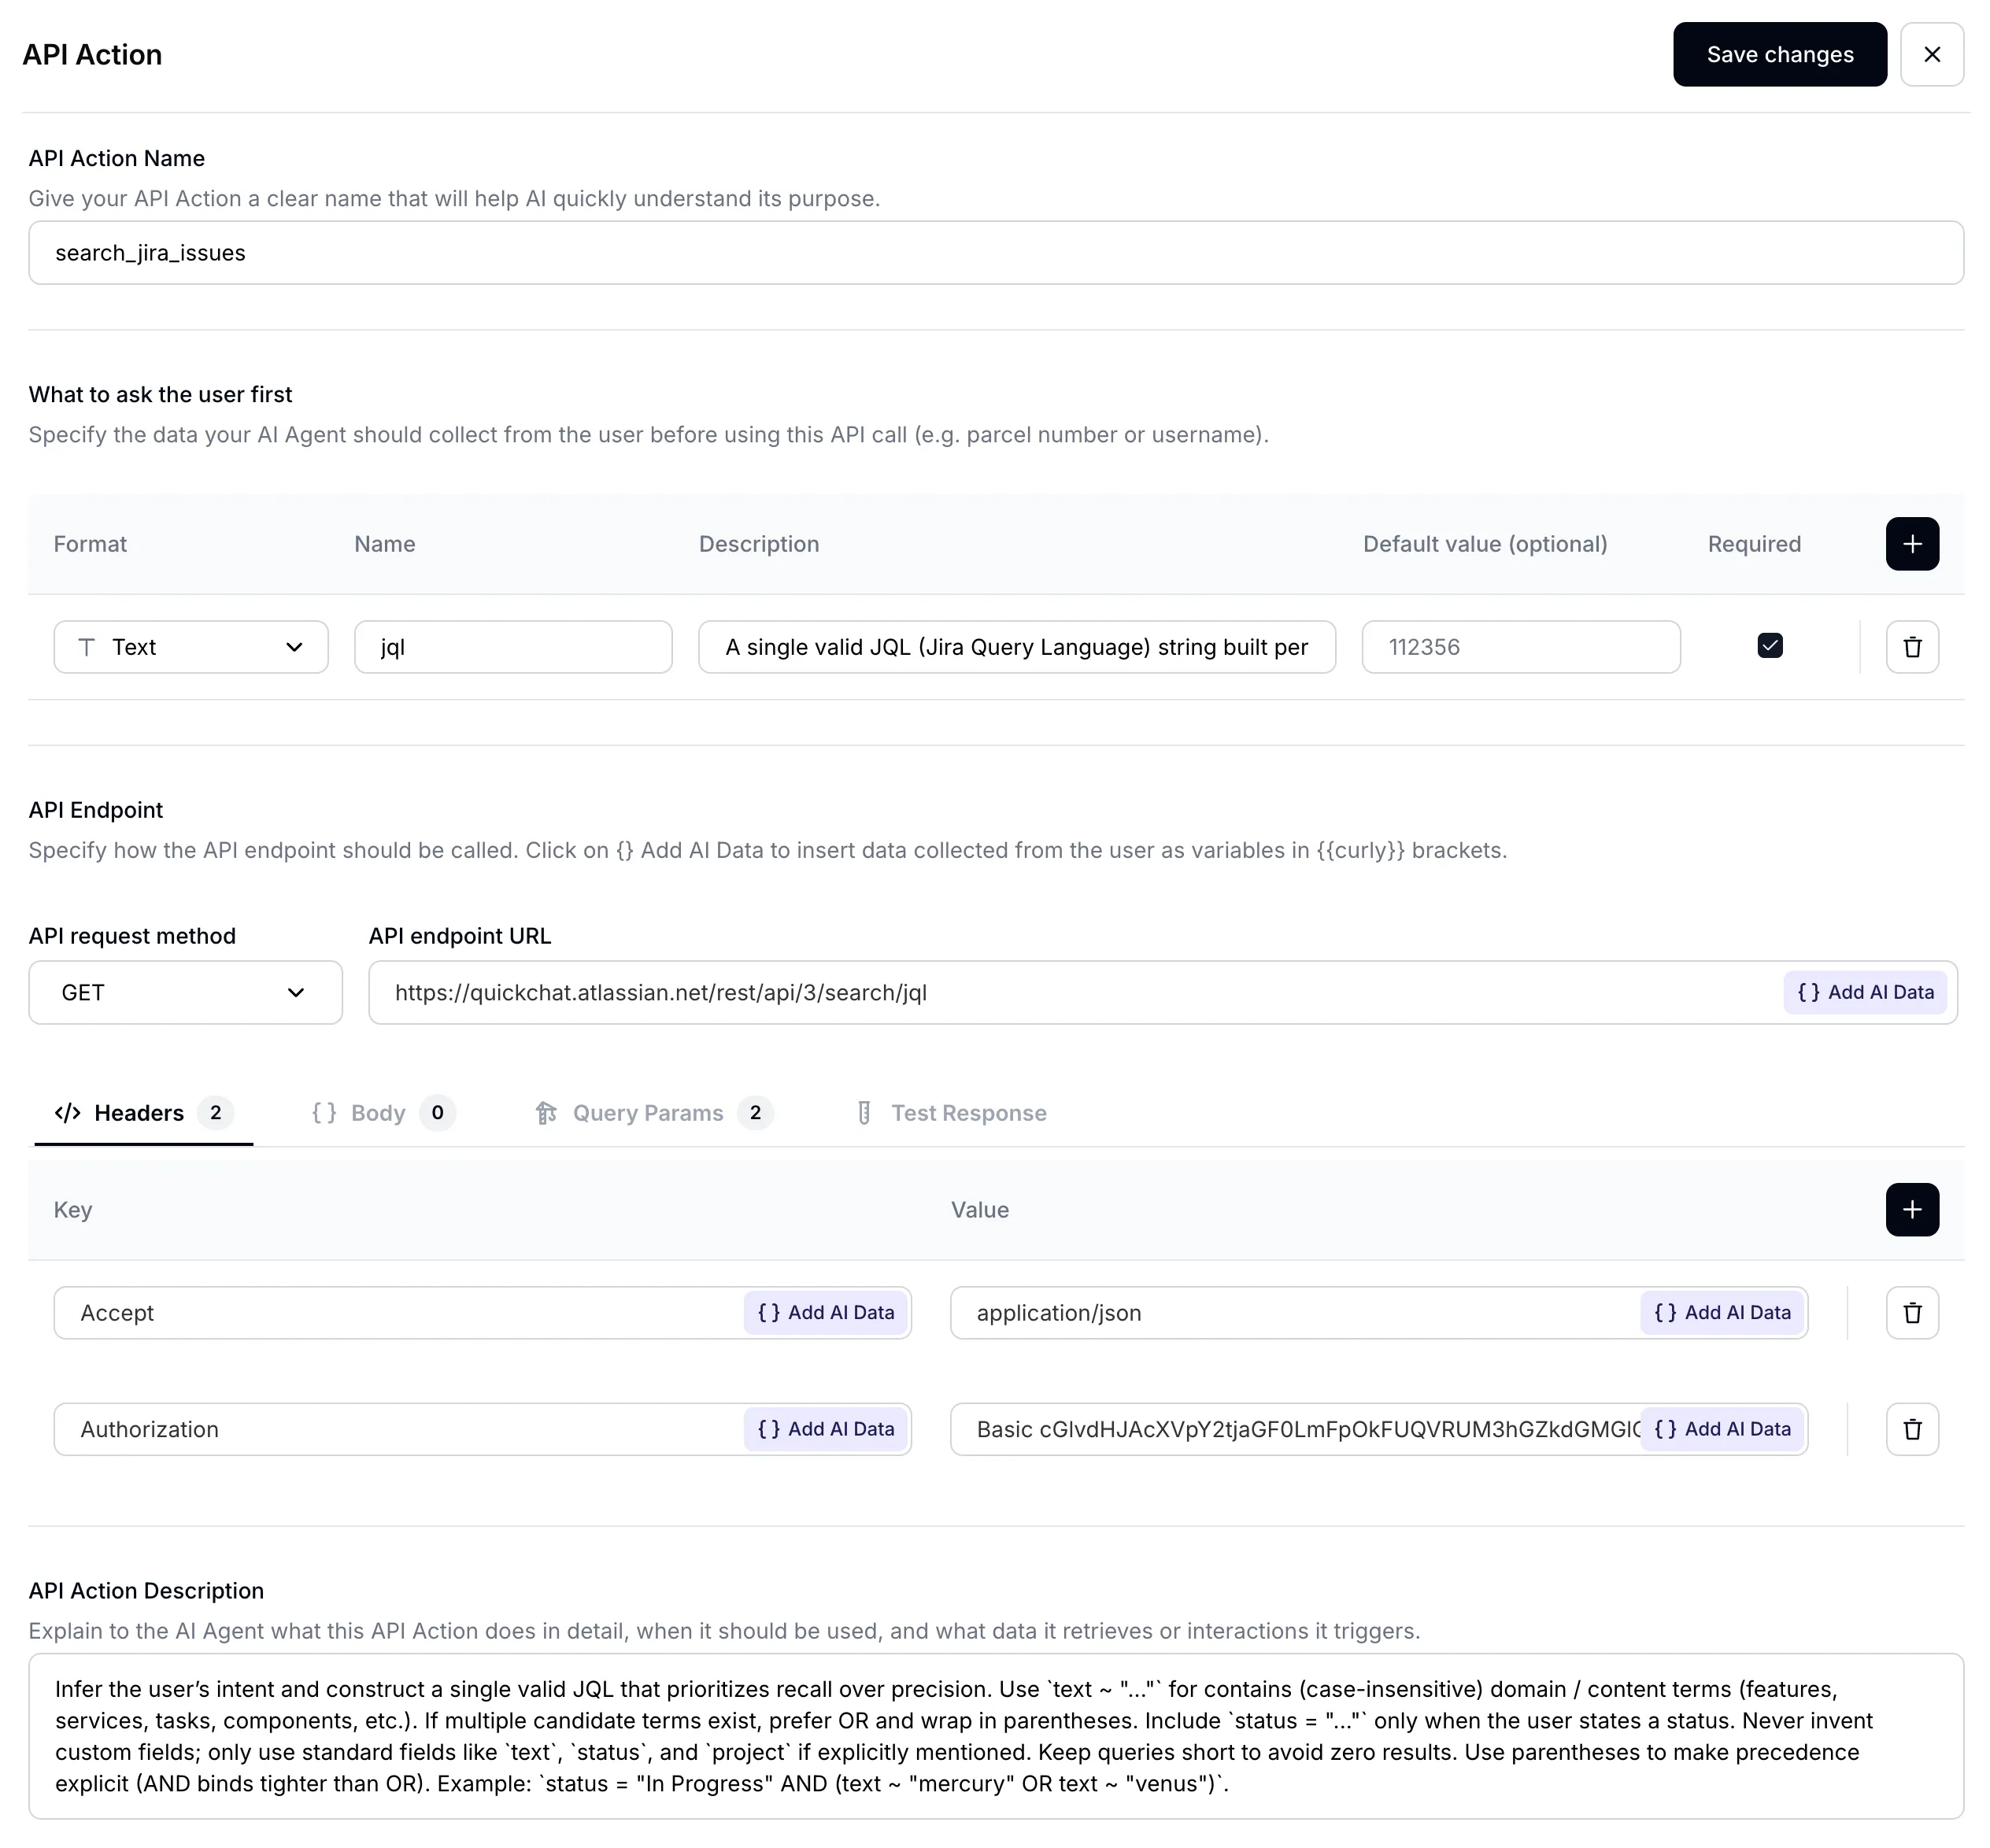
Give your AI Action an appropriate name:
Name: Search Jira issues
 Insert AI Action name
Step 3 - set input parameters
Your AI Agent’s main task will be to translate what the user is asking about into an exact query to use to search through Jira issues. When it comes to searching for issues Jira recently fully migrated to JQL (Jira Query Language) to allow for performing more complicated search. This allows your AI Agent to be much more powerful. Set up your input parameters as follows:
| Format | Name | Description | Default value | Required |
|---|---|---|---|---|
Text | jql | (see below) | - | ✅ |
In order to achieve great performance with your AI Agent, a well-crafted description is hugely important:
Description:
A single valid JQL (Jira Query Language) string built per the description. Favor recall: prefer `(text ~ "term1" OR text ~ "term2")` over chaining with AND, and use parentheses for grouping. For "not started / in progress / done" questions, filter on `statusCategory` ("To Do", "In Progress", "Done"), which is stable across projects; use `status = "..."` only when the user names a specific status that exists on the board. Avoid custom fields. Examples: `statusCategory = "In Progress" AND (text ~ "mercury" OR text ~ "venus")`, `(text ~ "planet*" OR text ~ "integration")`, `project = "Solar System" AND statusCategory = "To Do"`.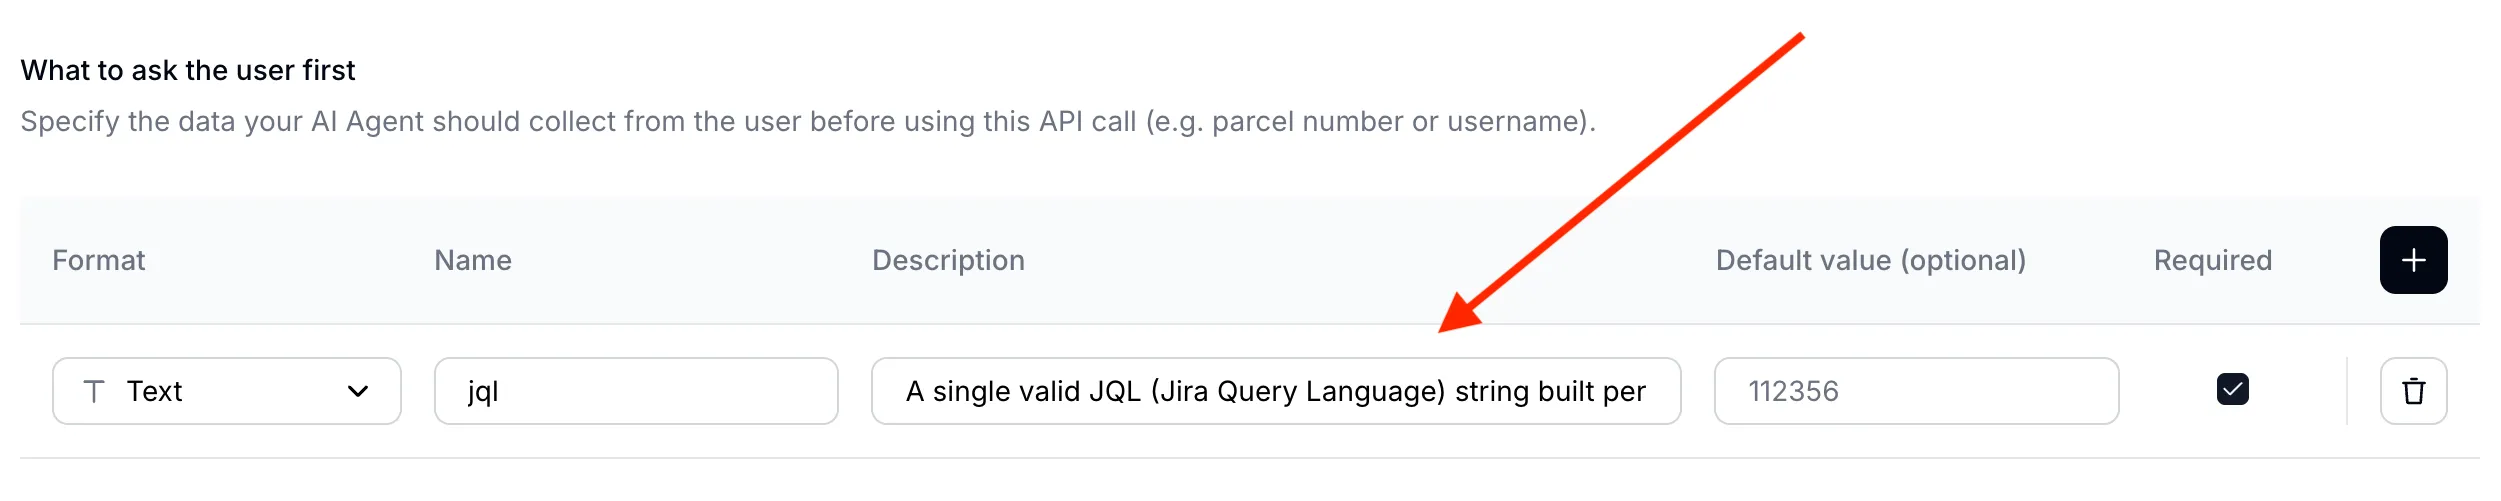 A well-crafted parameter description is key for AI Agent performance
A note on Jira statuses
Jira separates a status name from its category, and JQL treats them differently:
- The status name is whatever the board shows. One project uses
To Do/In Progress/Done, another usesOpen/In Review/Closed. - The status category is one of three fixed buckets every status maps to:
To Do,In Progress,Done.
status = "To Do" filters by name, so it returns nothing on a board whose first column is named Open. This is a common reason an agent confidently reports “no tickets to do” while the board is full of them. For “what has not started”, “what is in progress” and “what is done” questions, filter on the category instead:
statusCategory = "To Do"
statusCategory = "In Progress"
statusCategory = "Done"
Keep status = "..." for when the user names a specific status you know exists on the board. You can also list your board’s real status names in the Action description (Step 7) so the agent maps a request like “ready for QA” to the right one.
Step 4 - set API endpoint URL
- Select GET as the Action Type
- Set the endpoint URL to the Jira /rest/api/3/search/jql endpoint
 Set your API endpoint URL
Make sure to use your Atlassian domain name. You will find it in your Jira board URL.
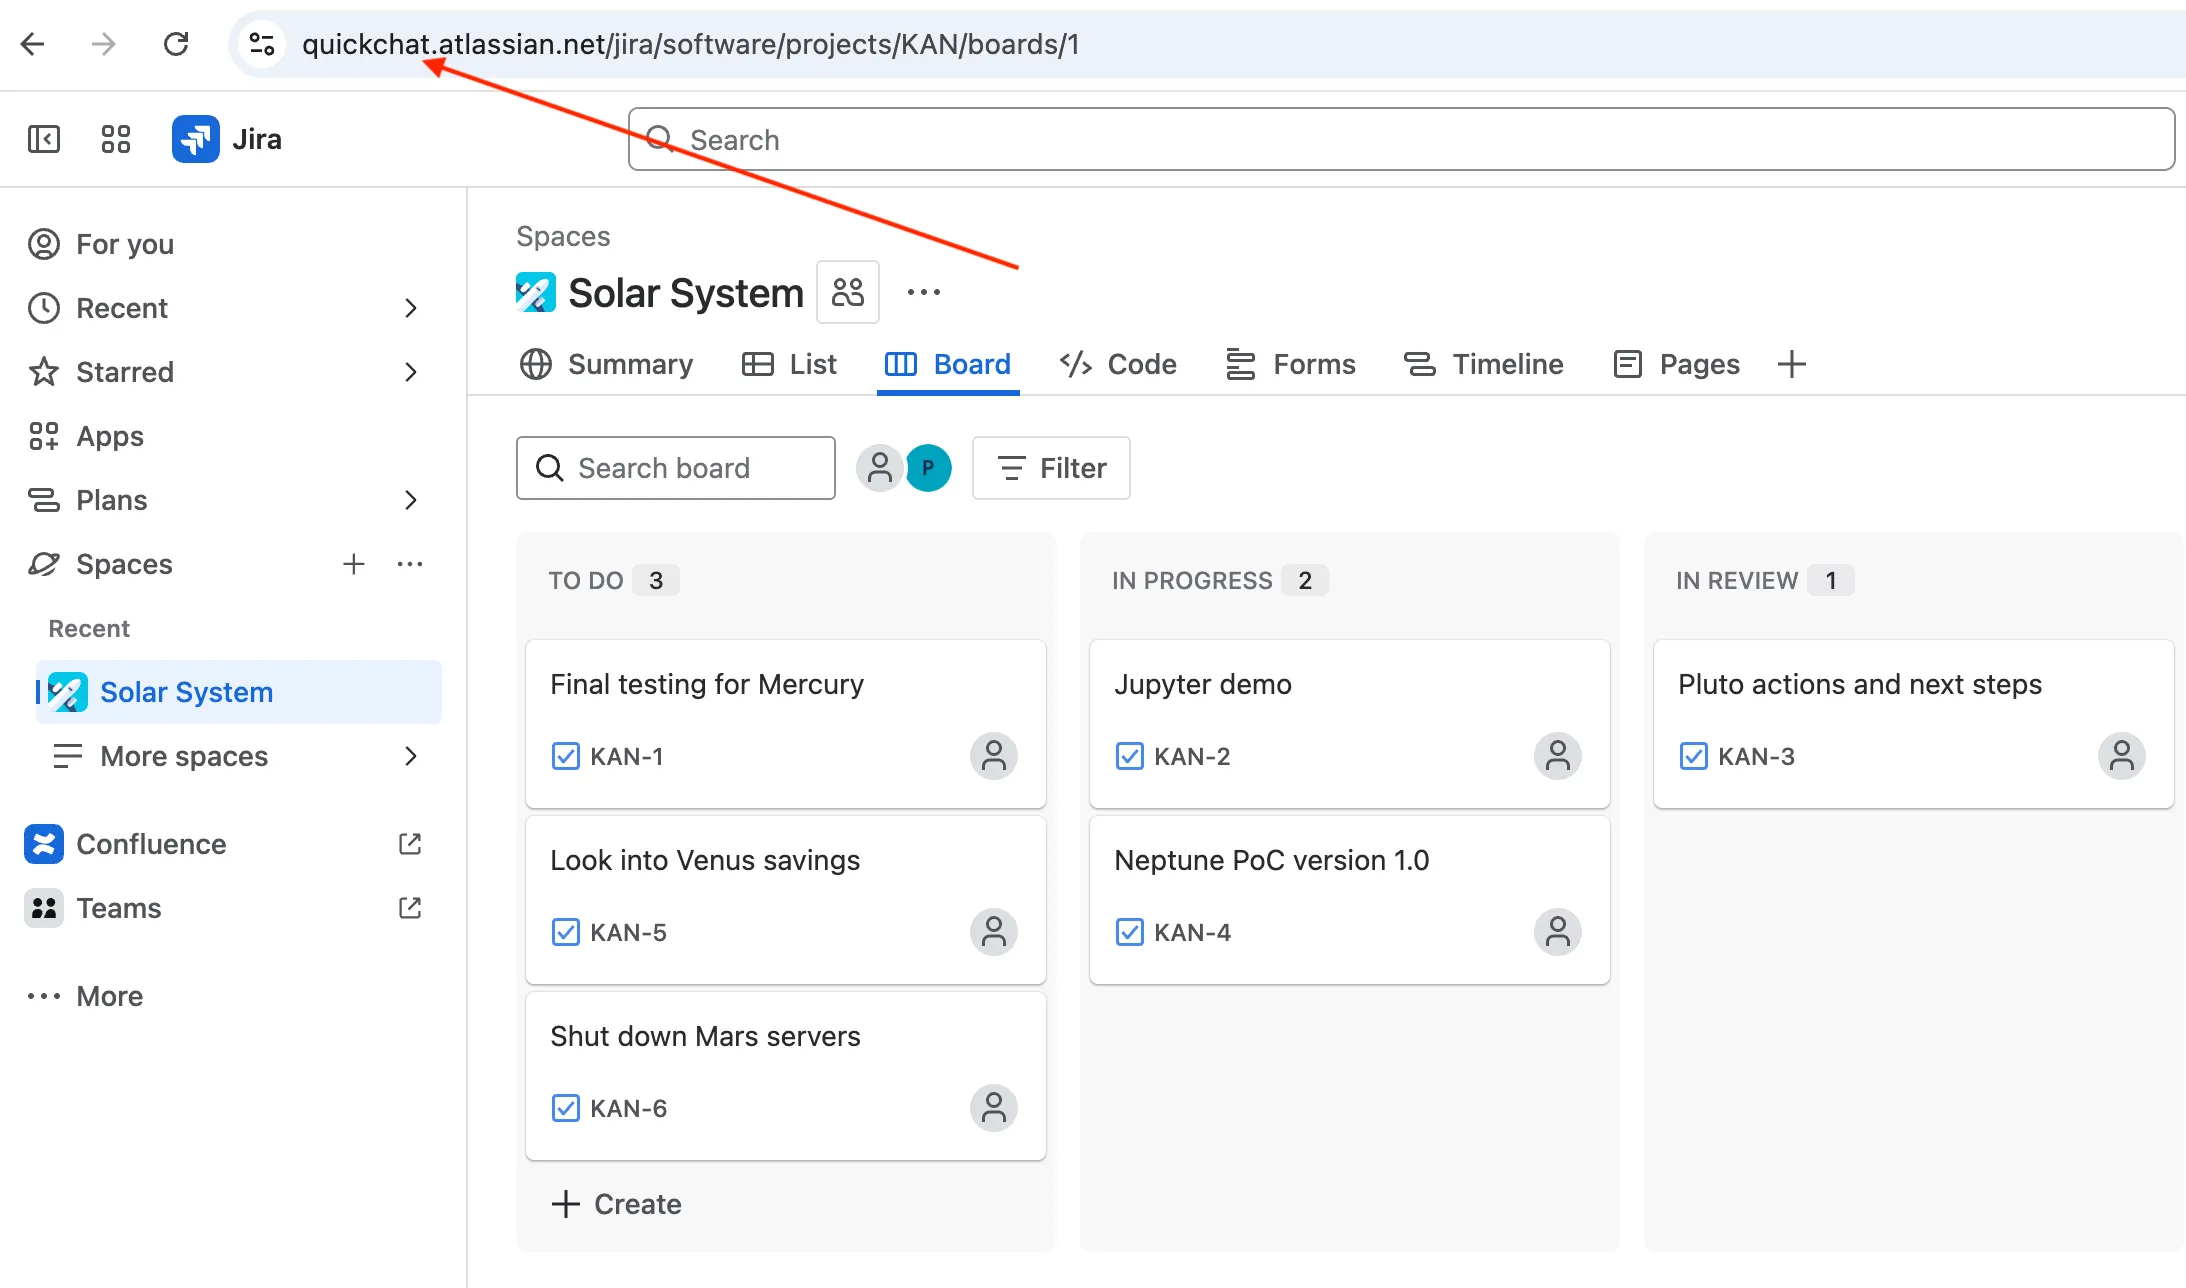 Your Atlassian domain name
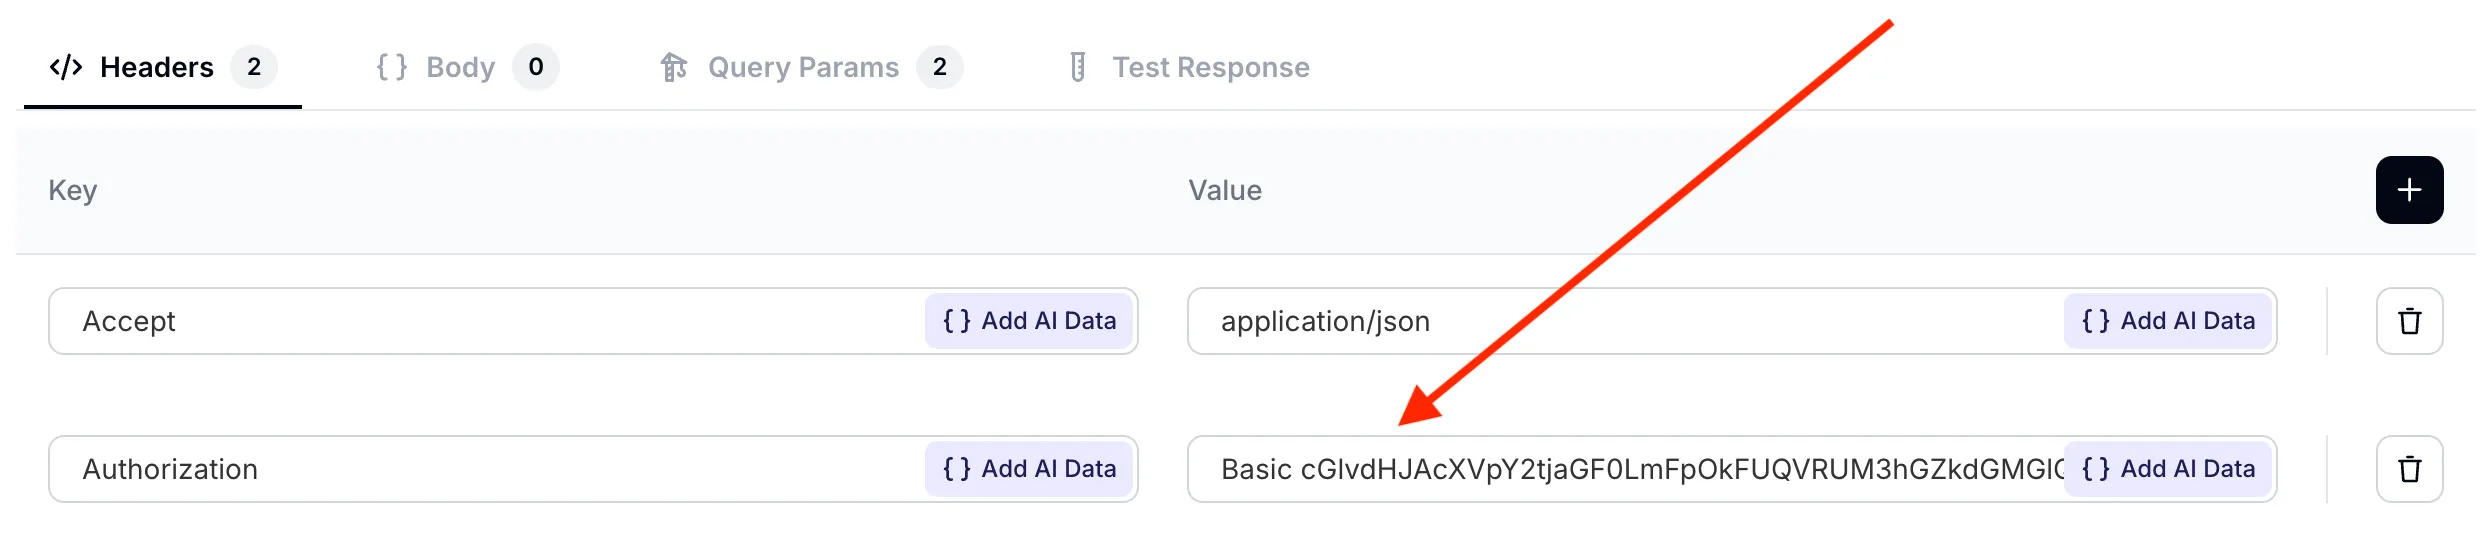
Step 5 - set API request headers
Define your API request headers as follows:
| Accept | Autorization |
|---|---|
application/json | Basic cGlvdHJAcXVpY2tjaGF0LmFpOkFUQVRUM3hGZkdGMGlQOVNacEhVZ1o5YUJfWGhmQjZJWjJId3MyaHlsMzEtTlNpYW90Z2tZVzRxQXEwQ3R4UVY1OXFTZkpWWVZNcXlxem42MWRkR0VobmJWNzdzaWtrb19ZWkhtLUgwazFOZGh4WlpQMnltYmZ1SzhBRmlFMnJEUmdqd182N1hkSFFUelFQY2I2U1lrNUFPRlRuVnZvaGxkZUd3djVpM2VrcEFyMVJ4QnJWRncyYz04MEZGQTcyMA== |
Pay special attention to correctly formatting your Authorization header: Basic
<base64-encoded email:api token>
 Set your API request headers
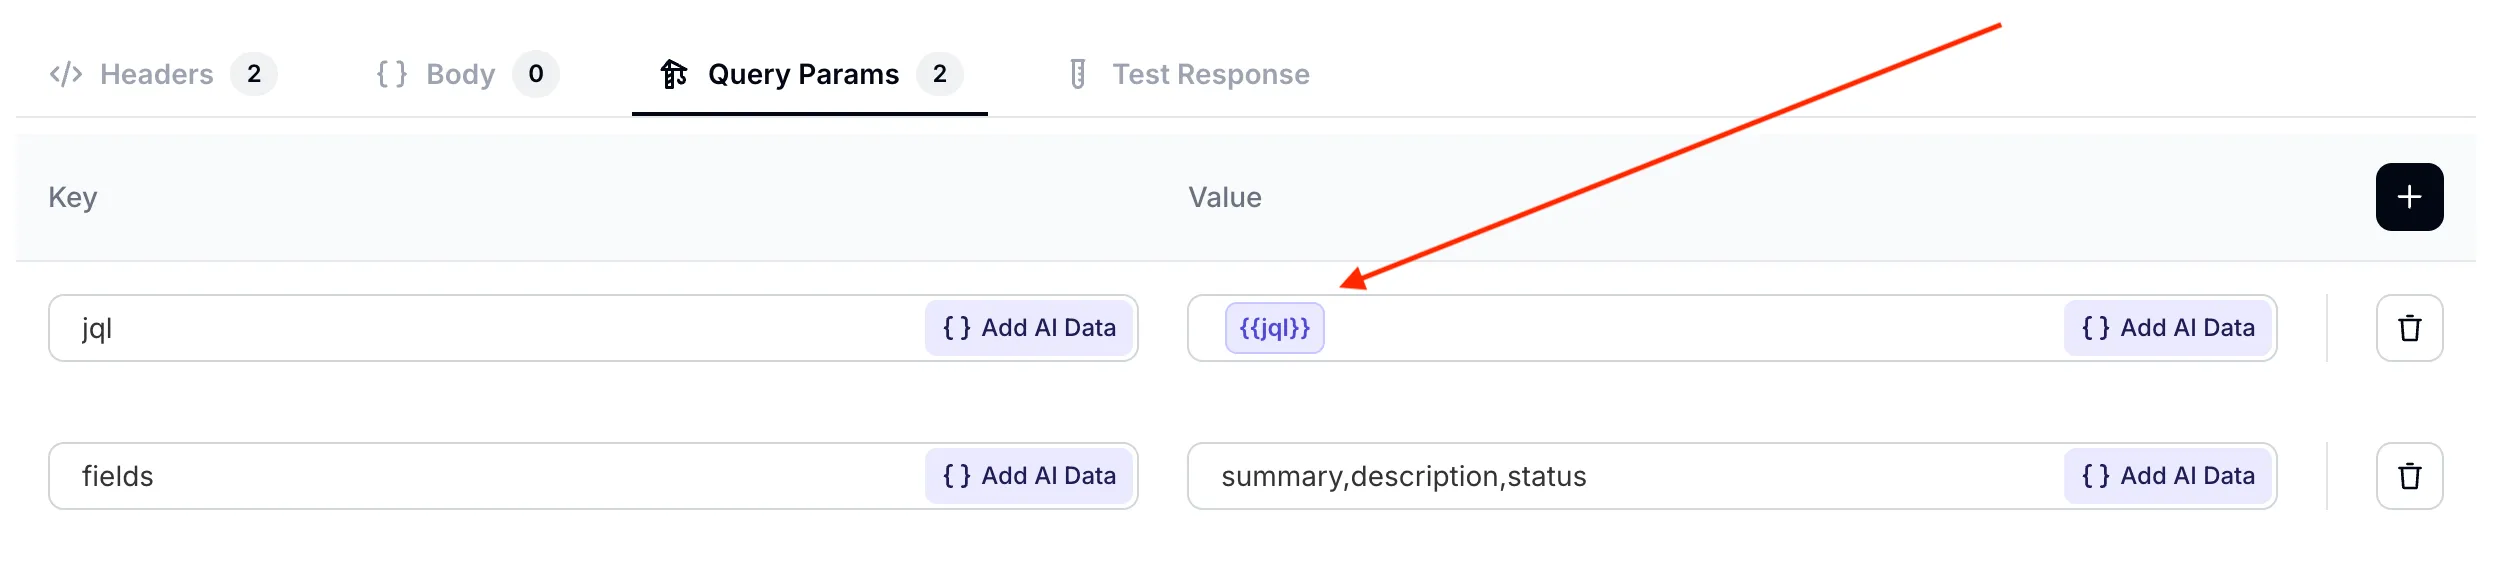
Step 6 - set API request query parameters
Set two query parameters for your AI request:
jqlis taking a dynamic value defined earlier in the What to ask the user first section. It is the AI Agent’s job to fill out the value of this parameter based on what the user has said in the conversation.fieldsis taking a fixed value. For each Jira issues, we are only interested in its summary, description and status.
| jql | fields |
|---|---|
{{jql}} | summary,description,status |
 Set your API request query parameters
Make sure the
jqlparameter correctly points to the value defined earlier. You can select it from the Add AI Data dropdown menu.
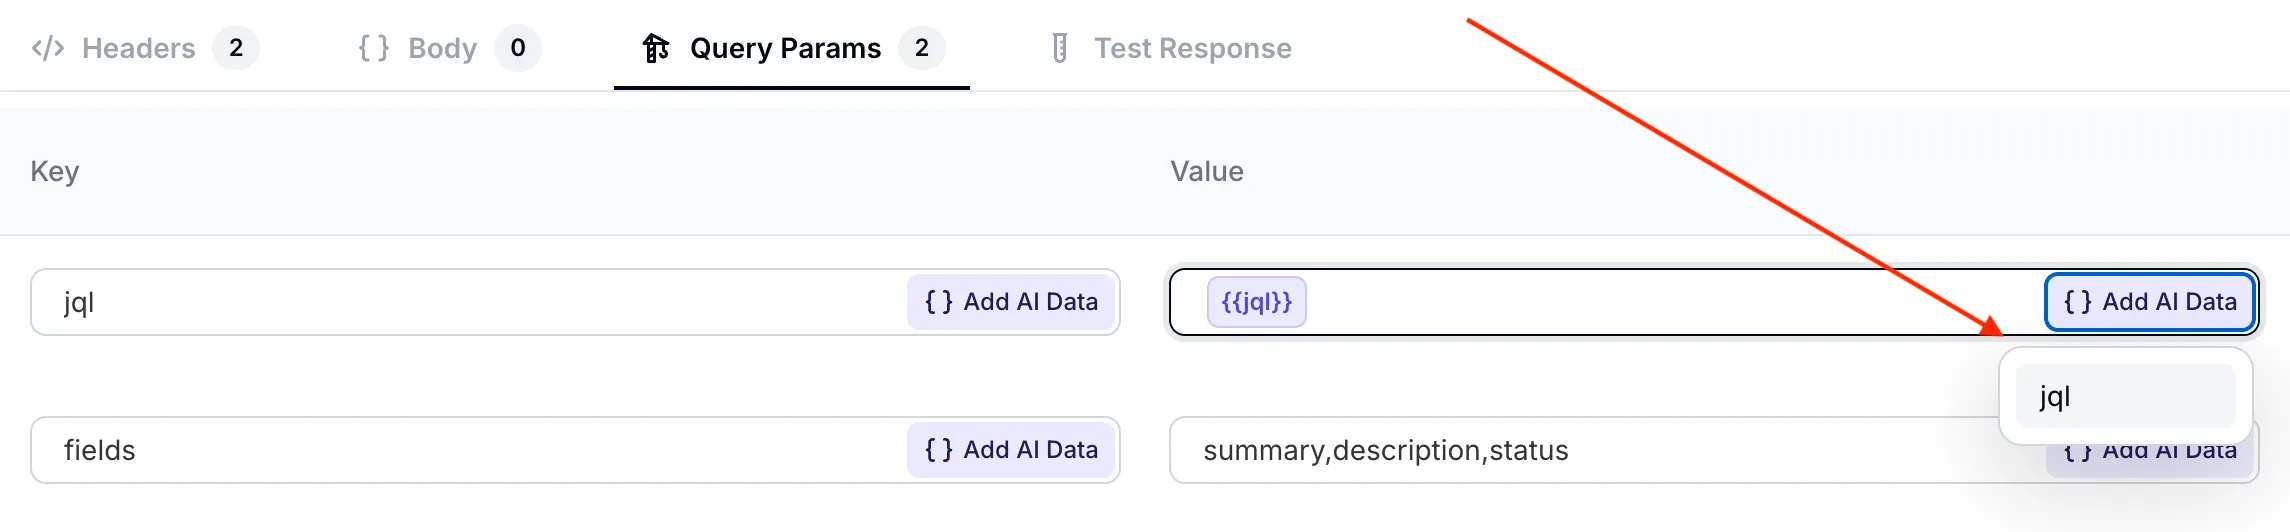 Select the dynamic
 jql parameter from the dropdown menu
Step 7 - set API Action description
The final crucial ingredient of a well set-up AI Action is its description. While the AI Agent has a good understanding of your API endpoint just from its URL and parameters, it is key to optimize its behaviour for your use case.
The three most important aspects included in the prompt are:
- when to invoke the action — listing every phrasing the user might pick (find / search / look for, as well as explain / tell me about / describe / what is / how is the status of) so the agent does not skip the call when the user does not say “search”
- suggestions on how to use the advanced JQL syntax when searching for Jira issues
- how to handle empty results — the agent must say so explicitly rather than refuse access
Here is the resultant API Action Description:
Use this action whenever the user asks anything that could be answered by data in their Jira — projects, issues, statuses, sprints, test cycles, descriptions, owners, comments — regardless of how they phrase the request (find / search / look for / explain / tell me about / describe / what is / how is the status of, etc.). Do not refuse access; query Jira first.

Construct a JQL that prioritises recall over precision: prefer `(text ~ "term1" OR text ~ "term2")` over chaining with AND, and use parentheses for grouping. For lifecycle questions (not started, in progress, done) filter on `statusCategory` ("To Do" / "In Progress" / "Done") rather than `status`, because status names vary by board; use `status = "..."` only when the user names a specific status. Avoid custom fields.

If Jira returns no matches, say so explicitly to the user and suggest a refined query.
Step 8 - test the API Action
Before we test the AI Action in conversation, we can test how the API itself is being called in the Test Response tab. Let’s do a first test with the following query which should return all issues in the project: project = "Solar System"
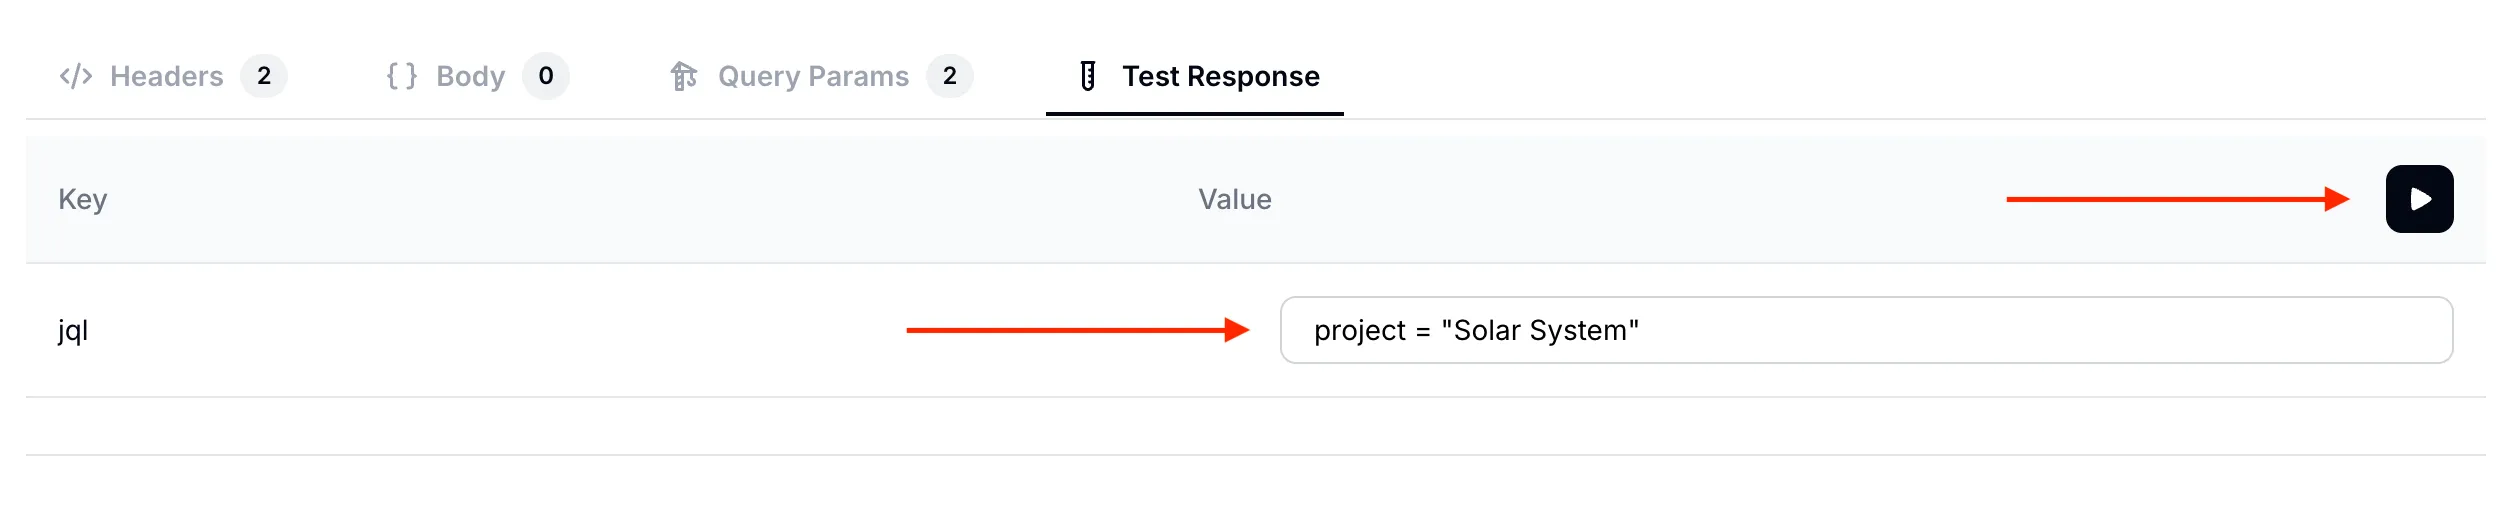 Searching for all issues in the
 Solar System project
Below is the test response we get. As expected, it lists the summary, description and status fields for all the 6 issues on our Jira board.
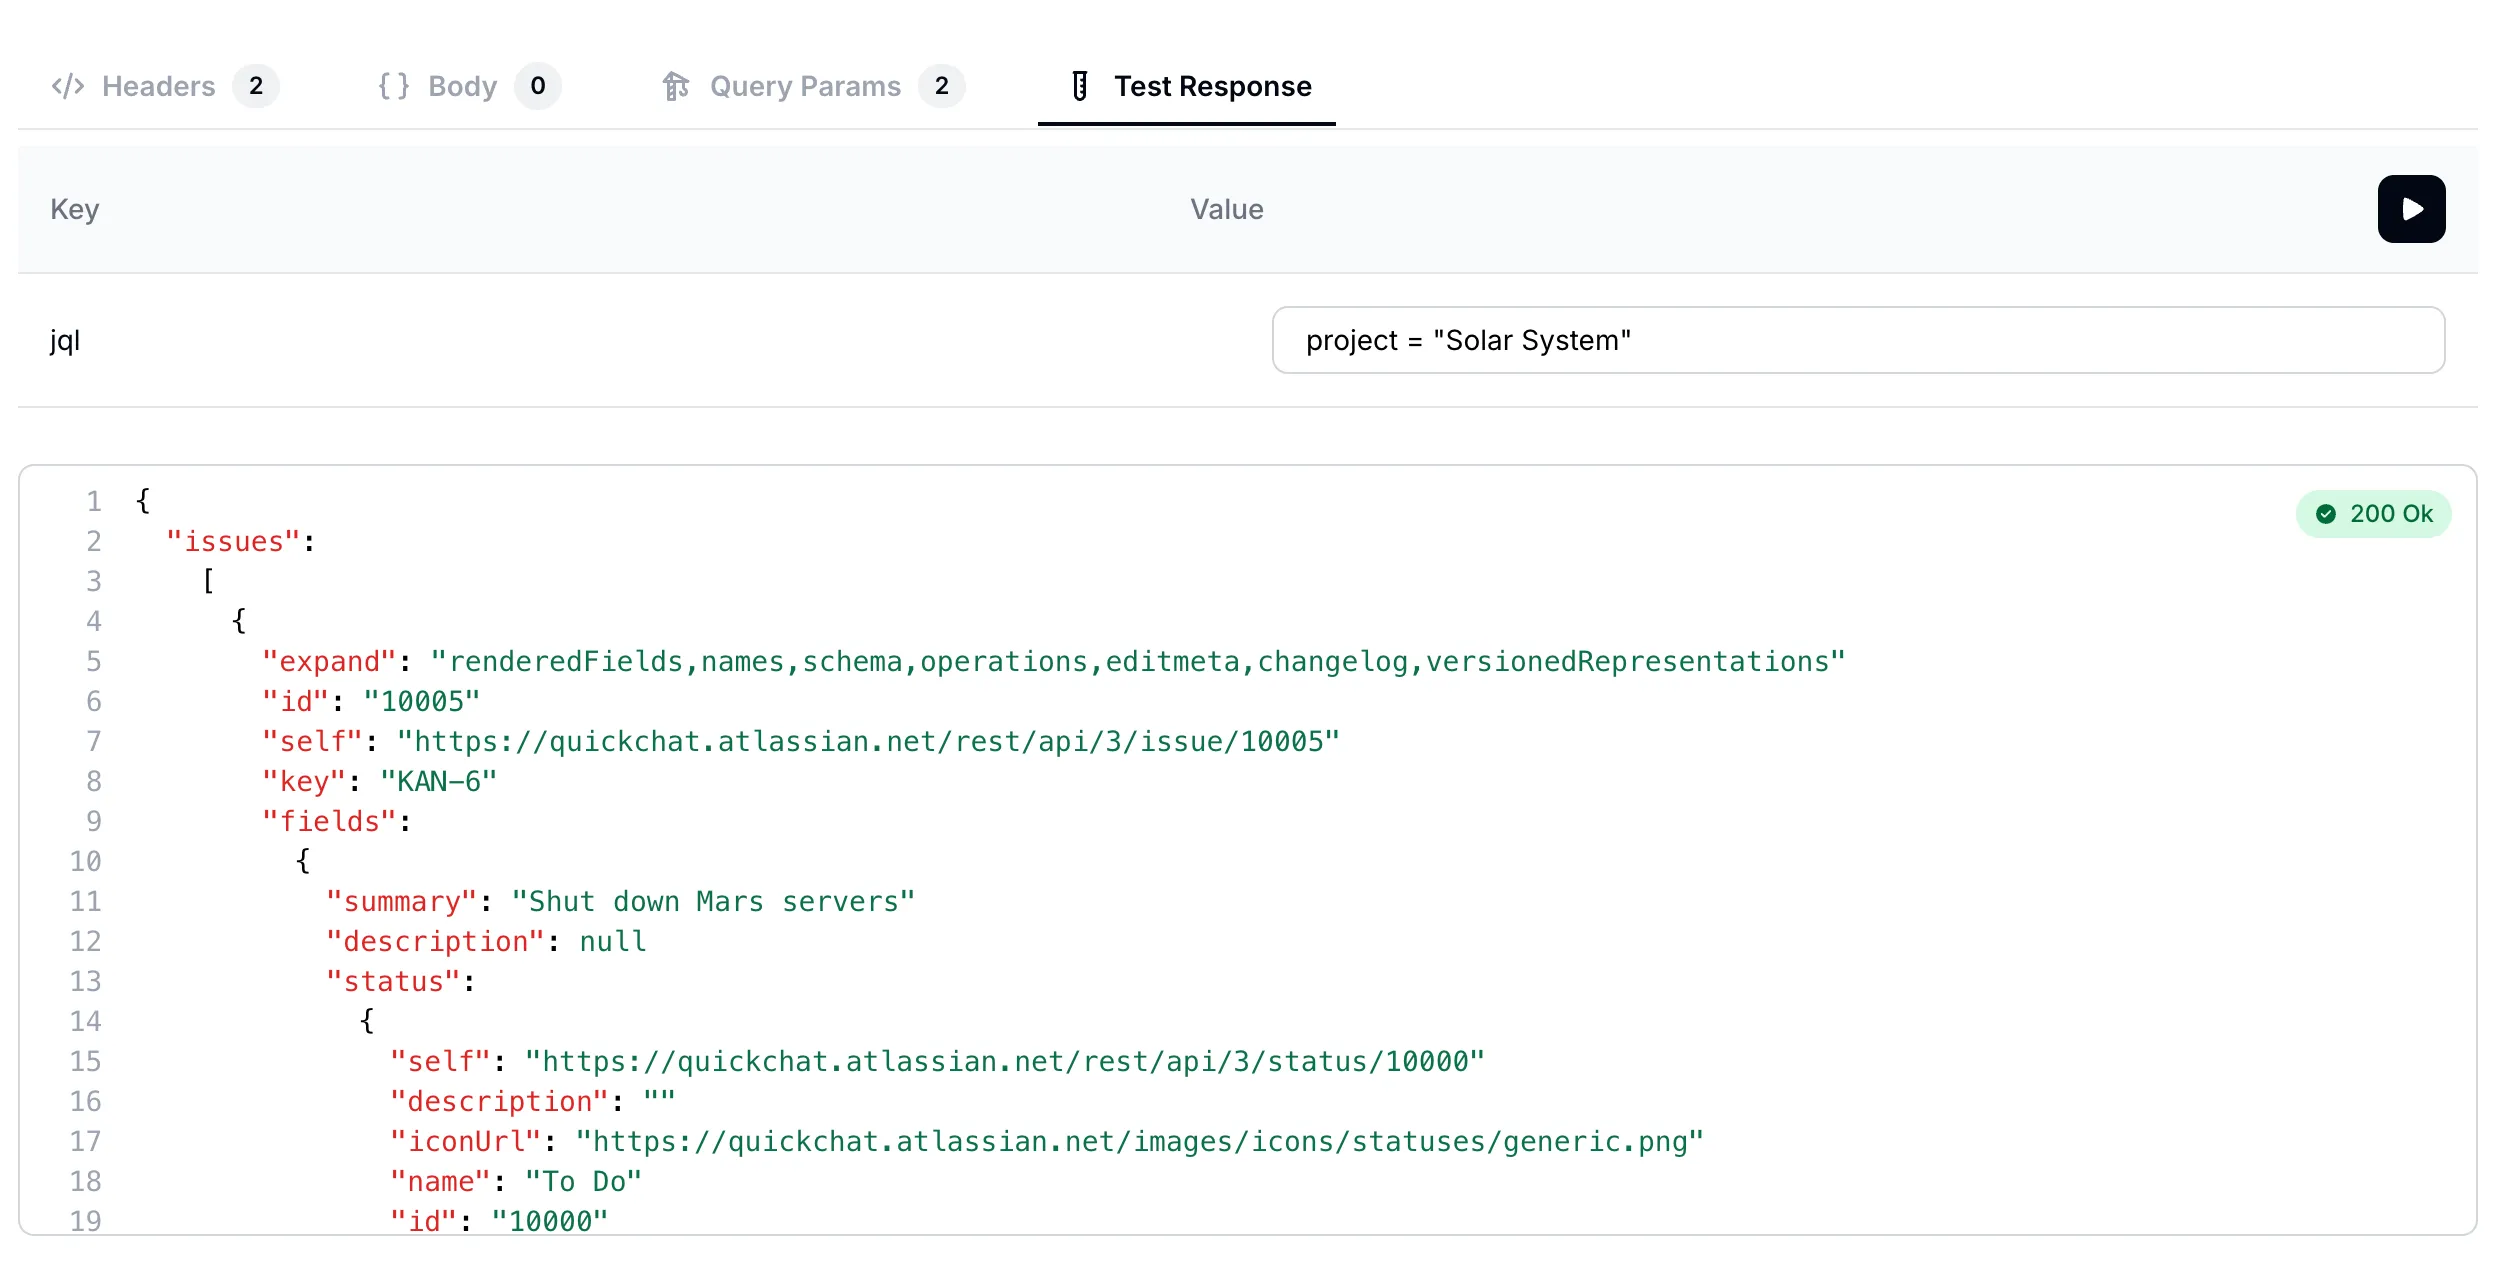 Response lists all issues in the
 Solar System project
Let’s try one more query. This time let’s search for all the issues which mention “mercury”: text ~ "mercury"
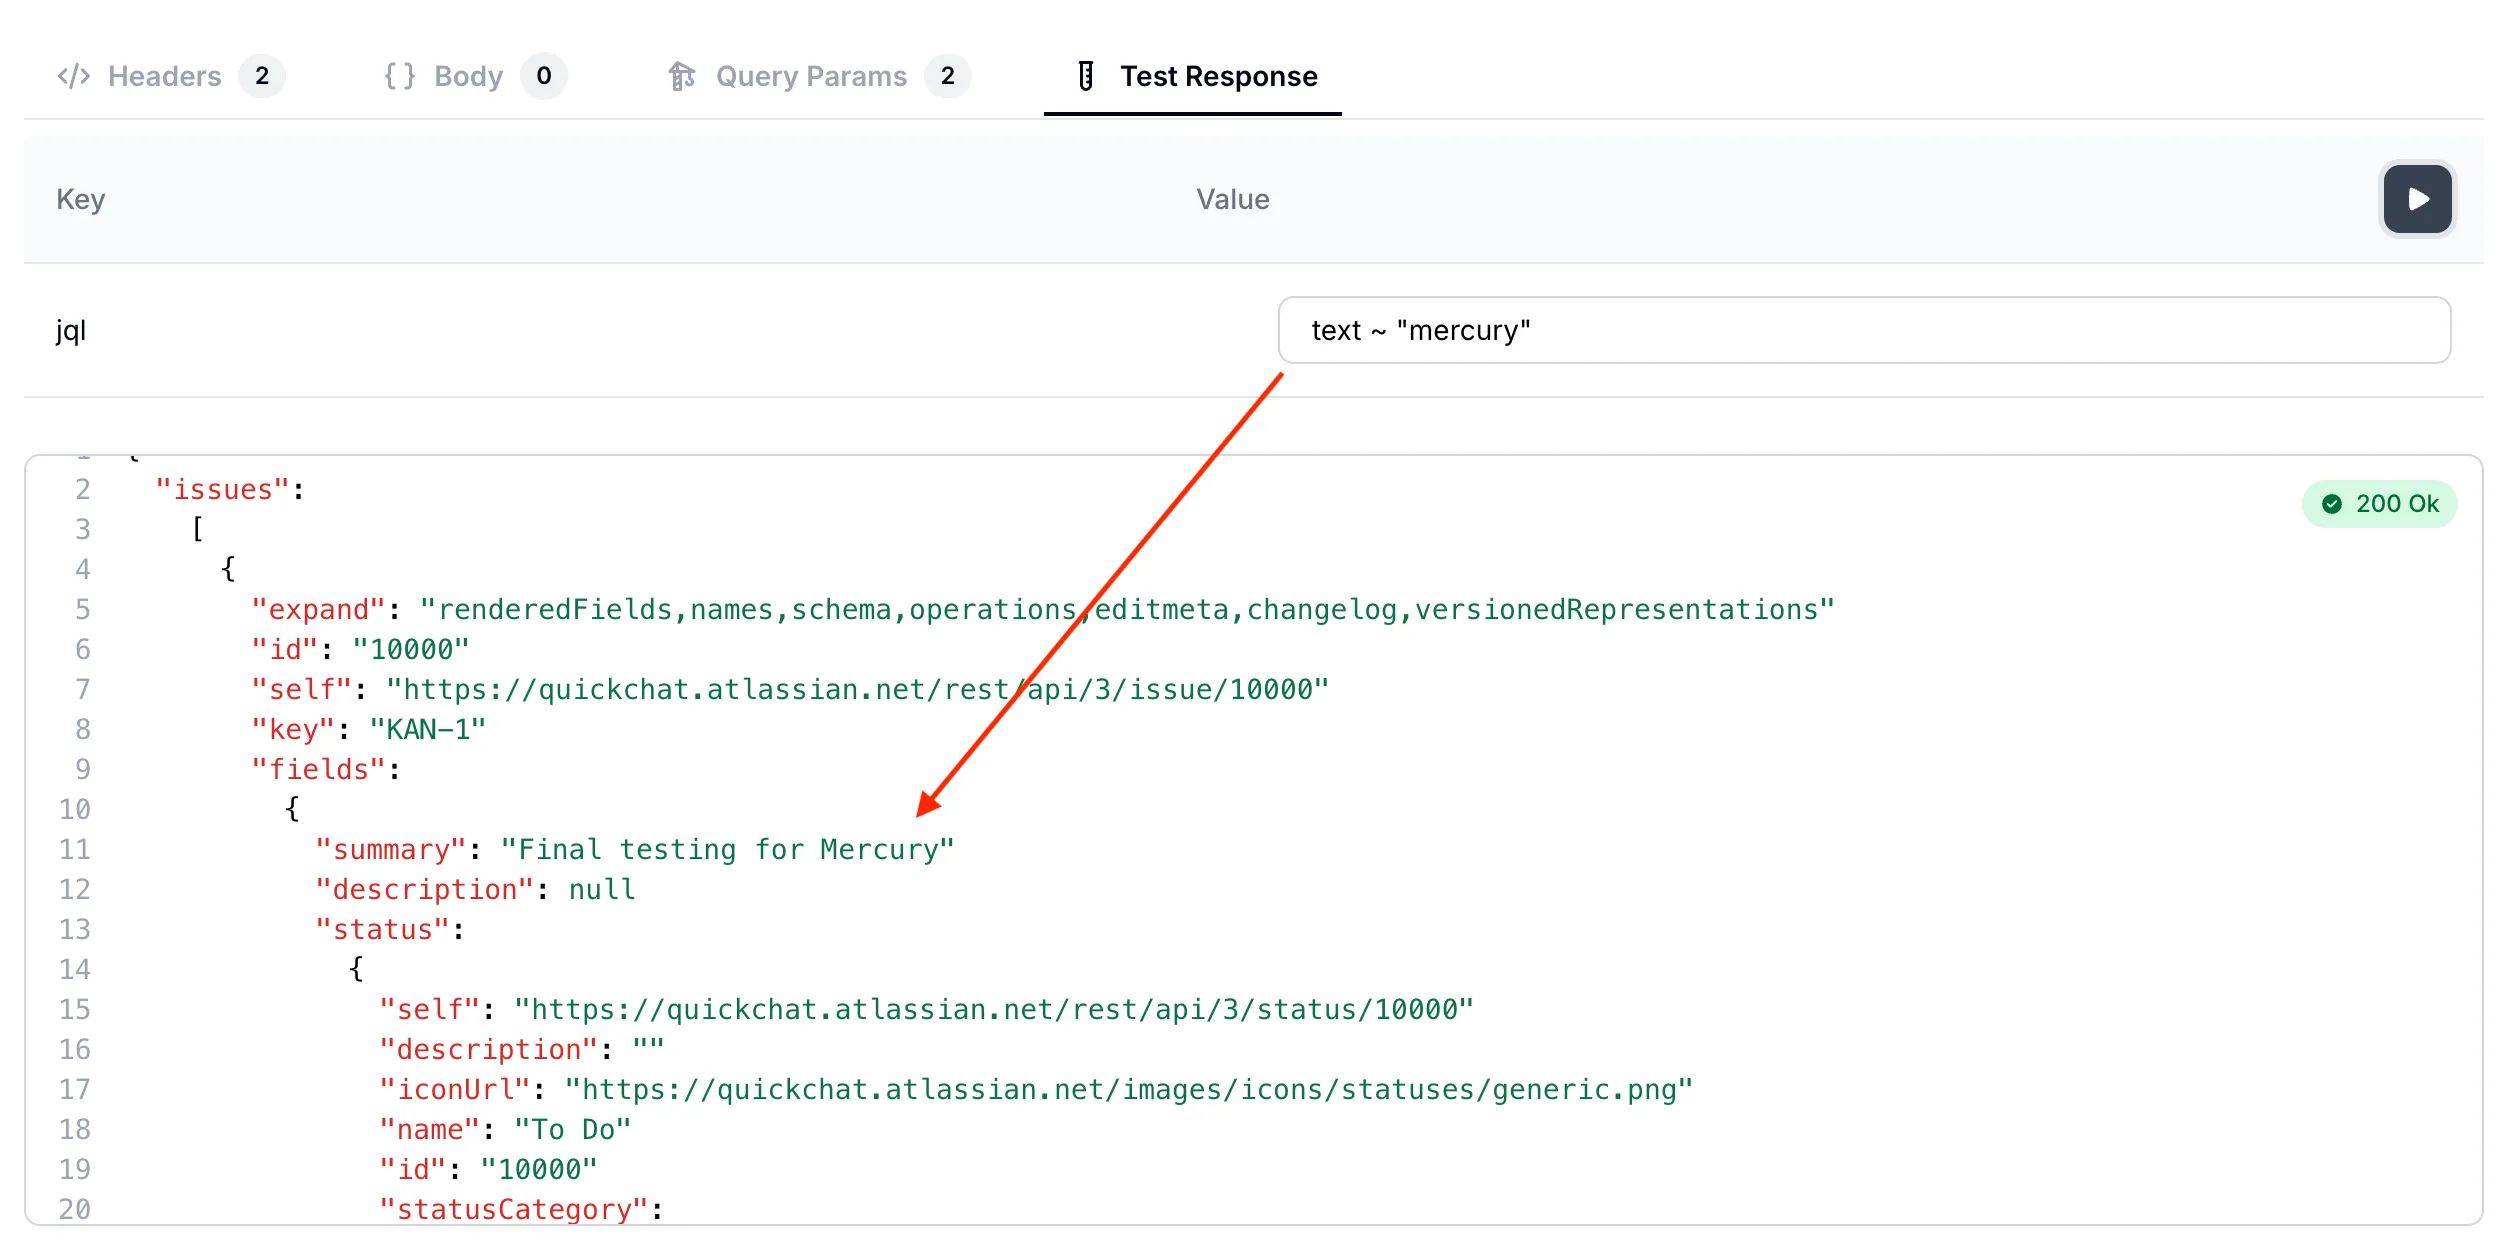 Searching for issues which mention
 mercury
We have now validated that the AI Action correctly calls our API endpoint. We can now move on to testing full conversations with the AI Agent!
Step 9 - test the AI Agent in conversations
Head back to the Quickchat AI app and test your AI Agent in conversation preview.
Conversation #1
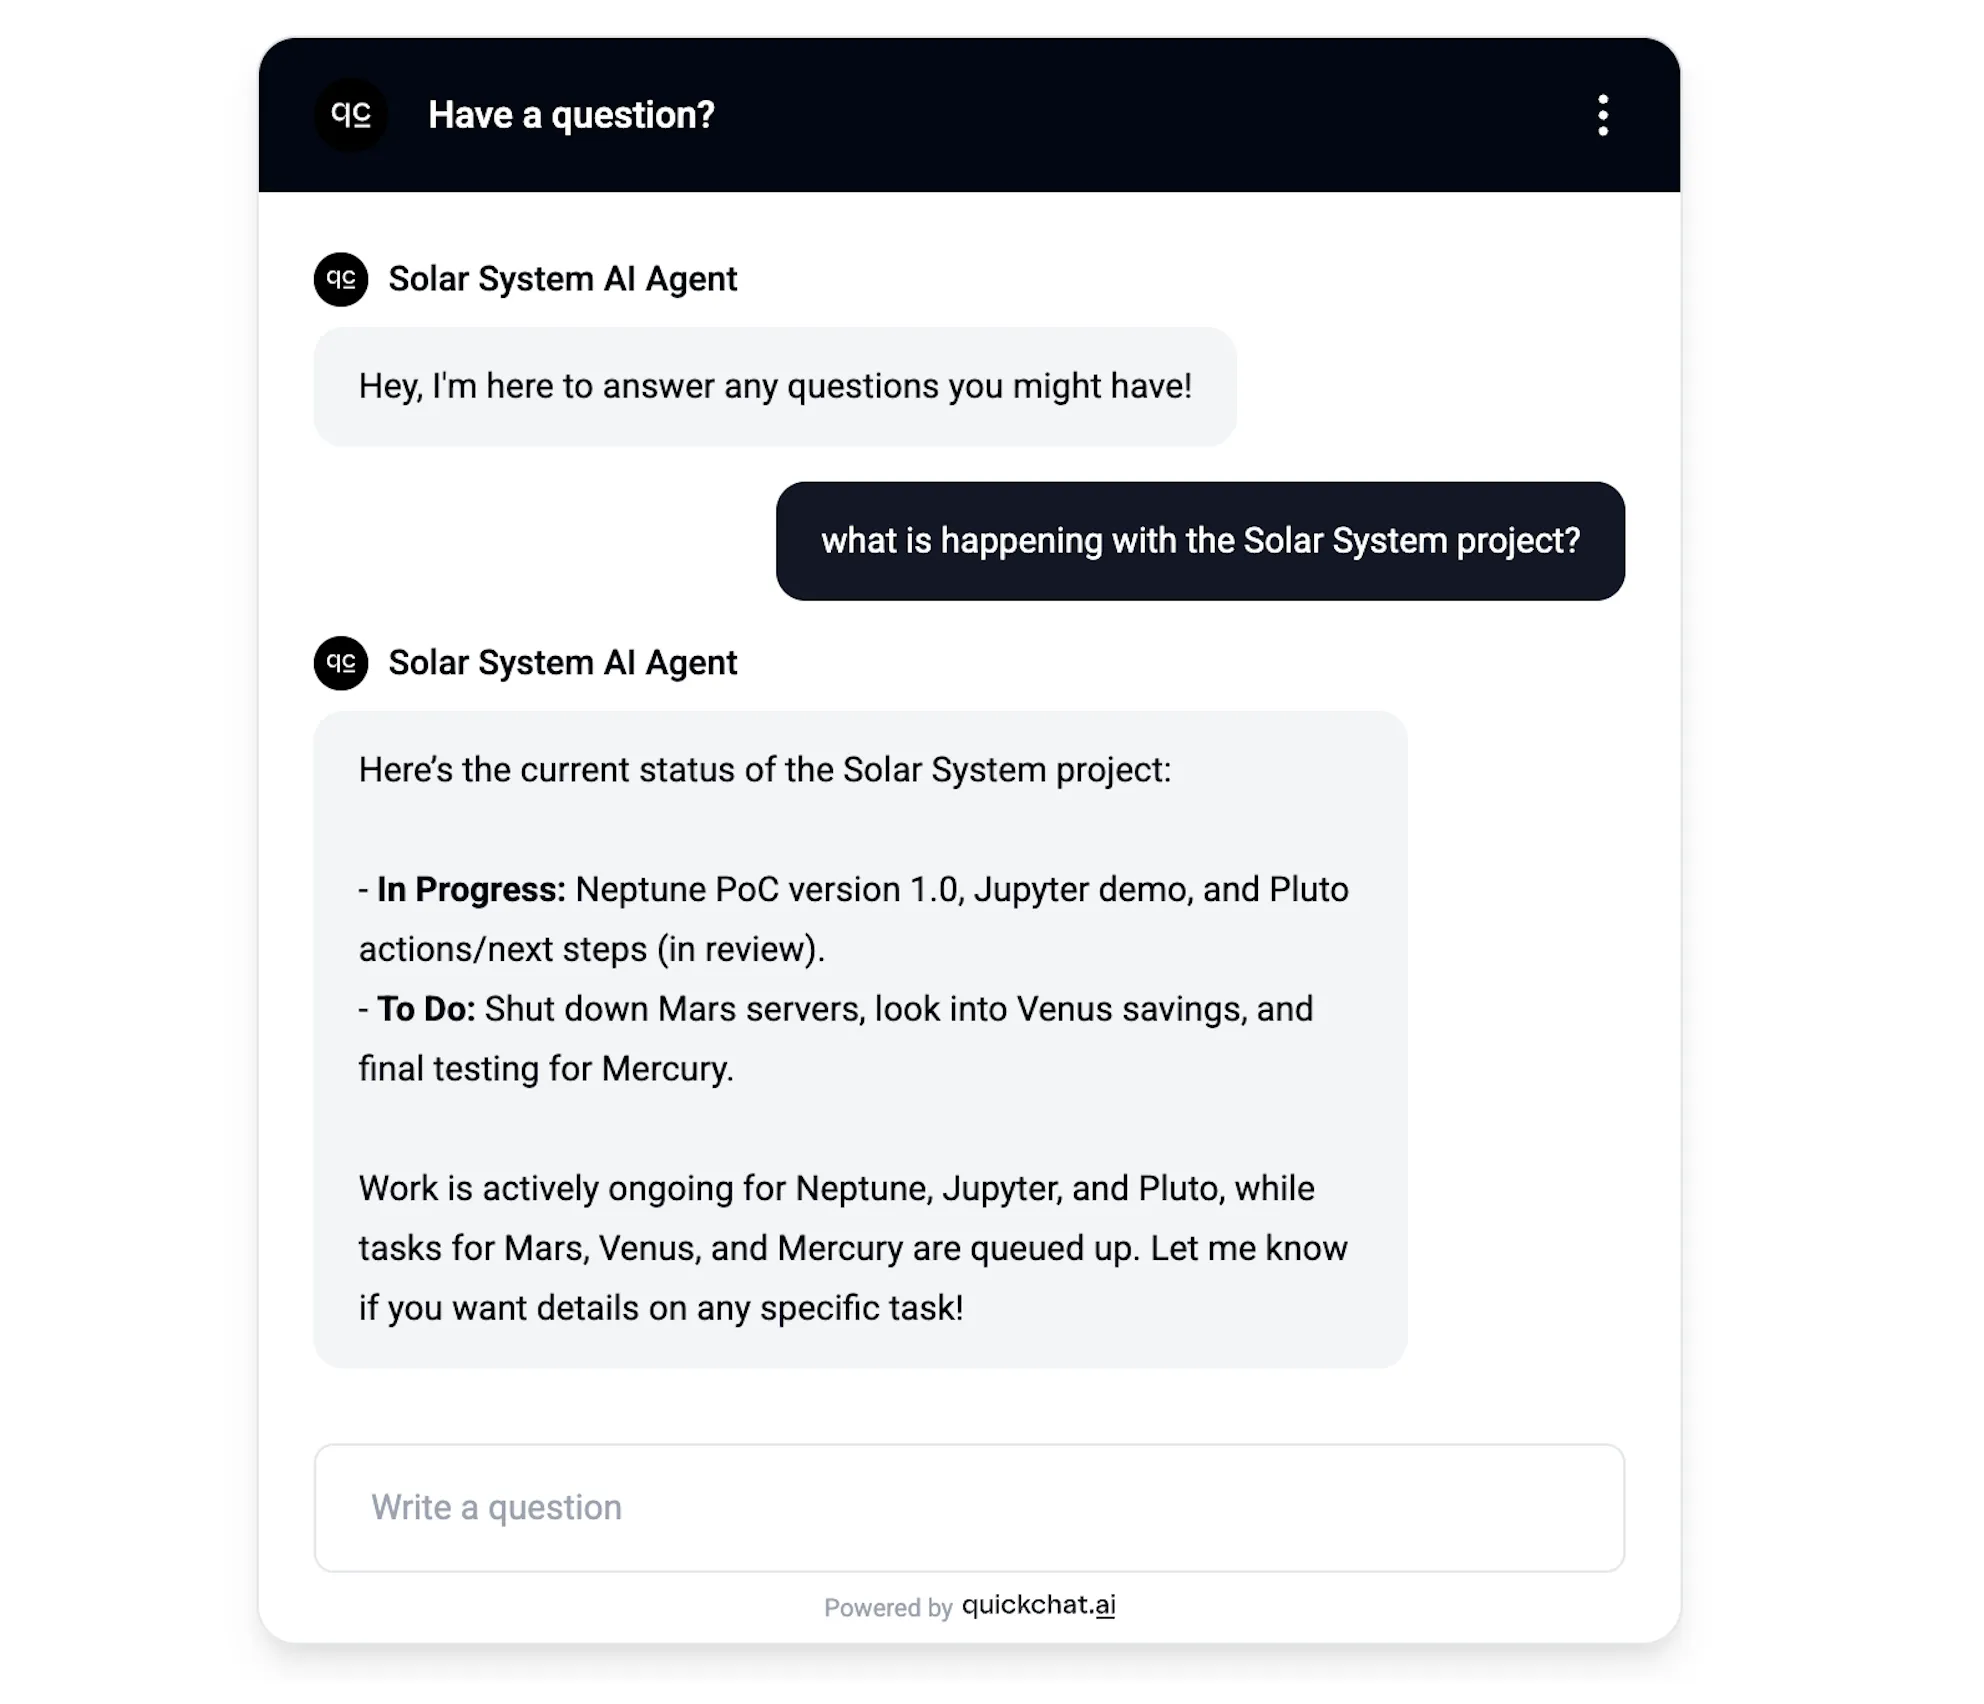 AI Agent gives a summary of all issues within the project
In this simple conversation the AI Agent gives an overview of all the issues within the project. A look behind the scenes tell us that the exact query it ran against the API endpoint was: project = "Solar System"
Conversation #2
 AI Agent responds to questions about specific issues and statuses
In this case, the AI Agent was asked about two separate aspects: a specific issue and issues ongoing in general. A look behind the scenes tells us that it decided to use the Jira API in a two-step process:
- Check if
plutois ongoing:
status = "In Progress" AND (text ~ "pluto" OR text ~ "ongoing" OR text ~ "current" OR text ~ "active" OR text ~ "progress")- Check what else is ongoing:
status = "In Progress"Conversation #3
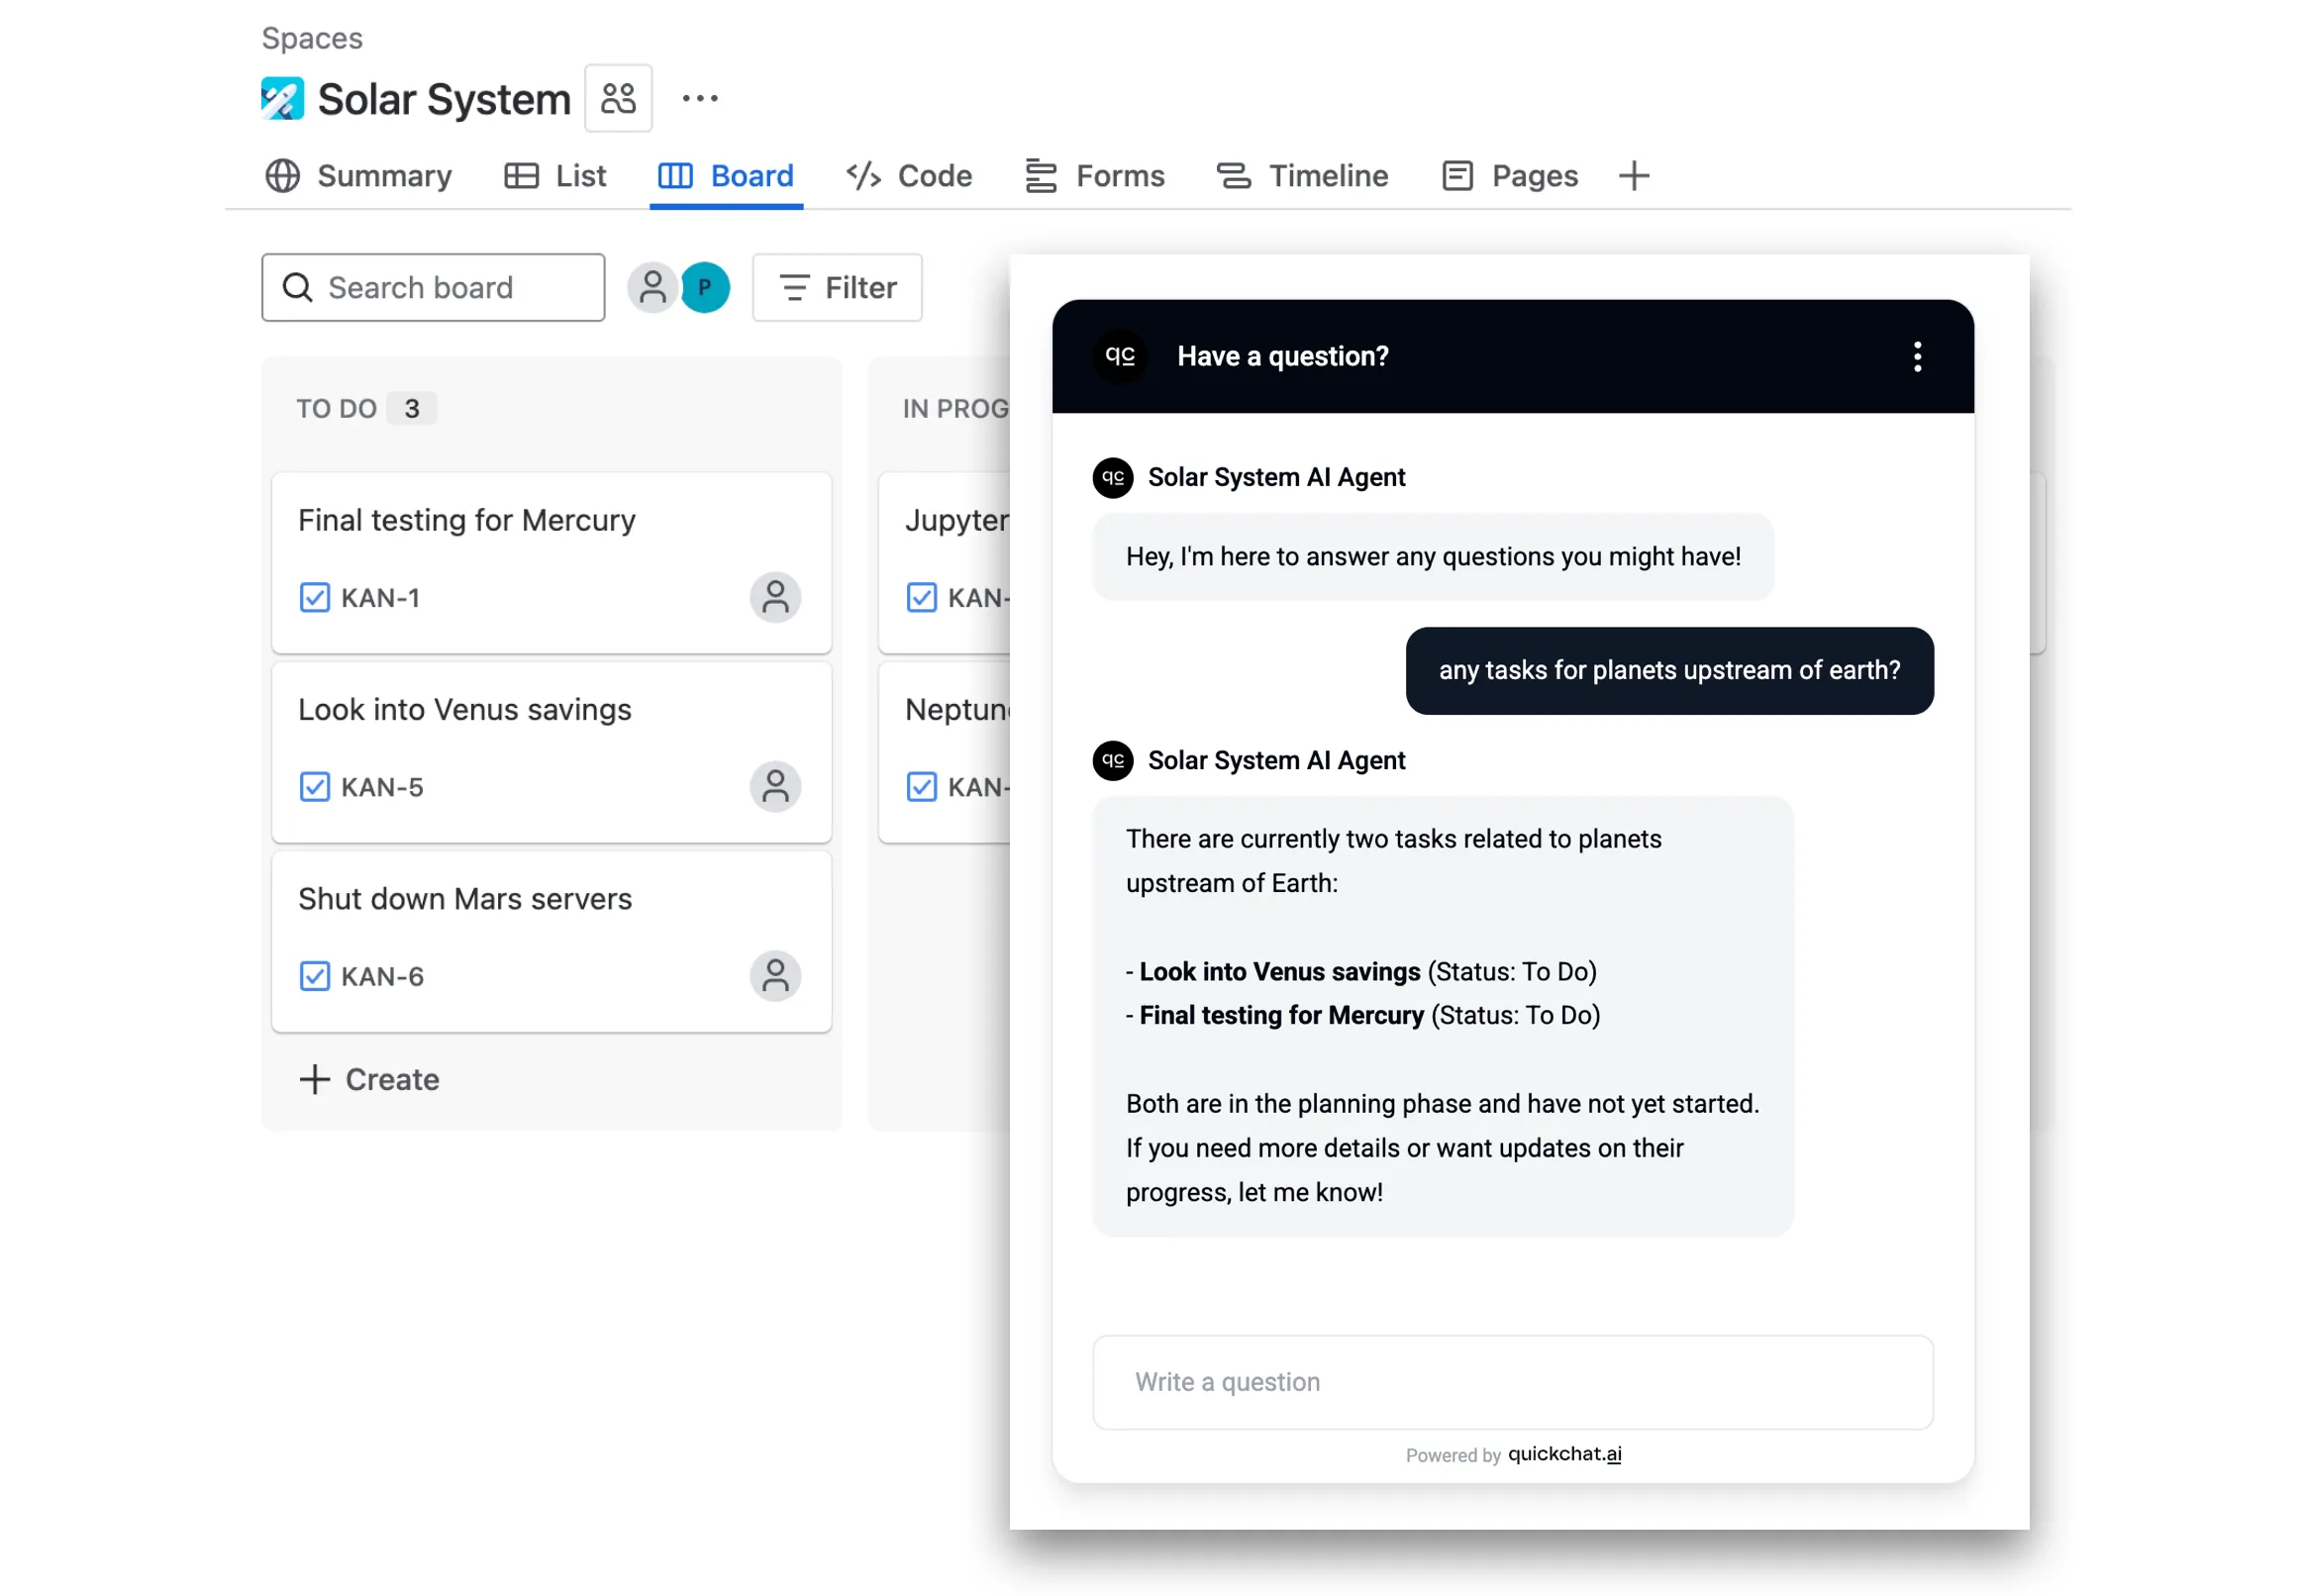
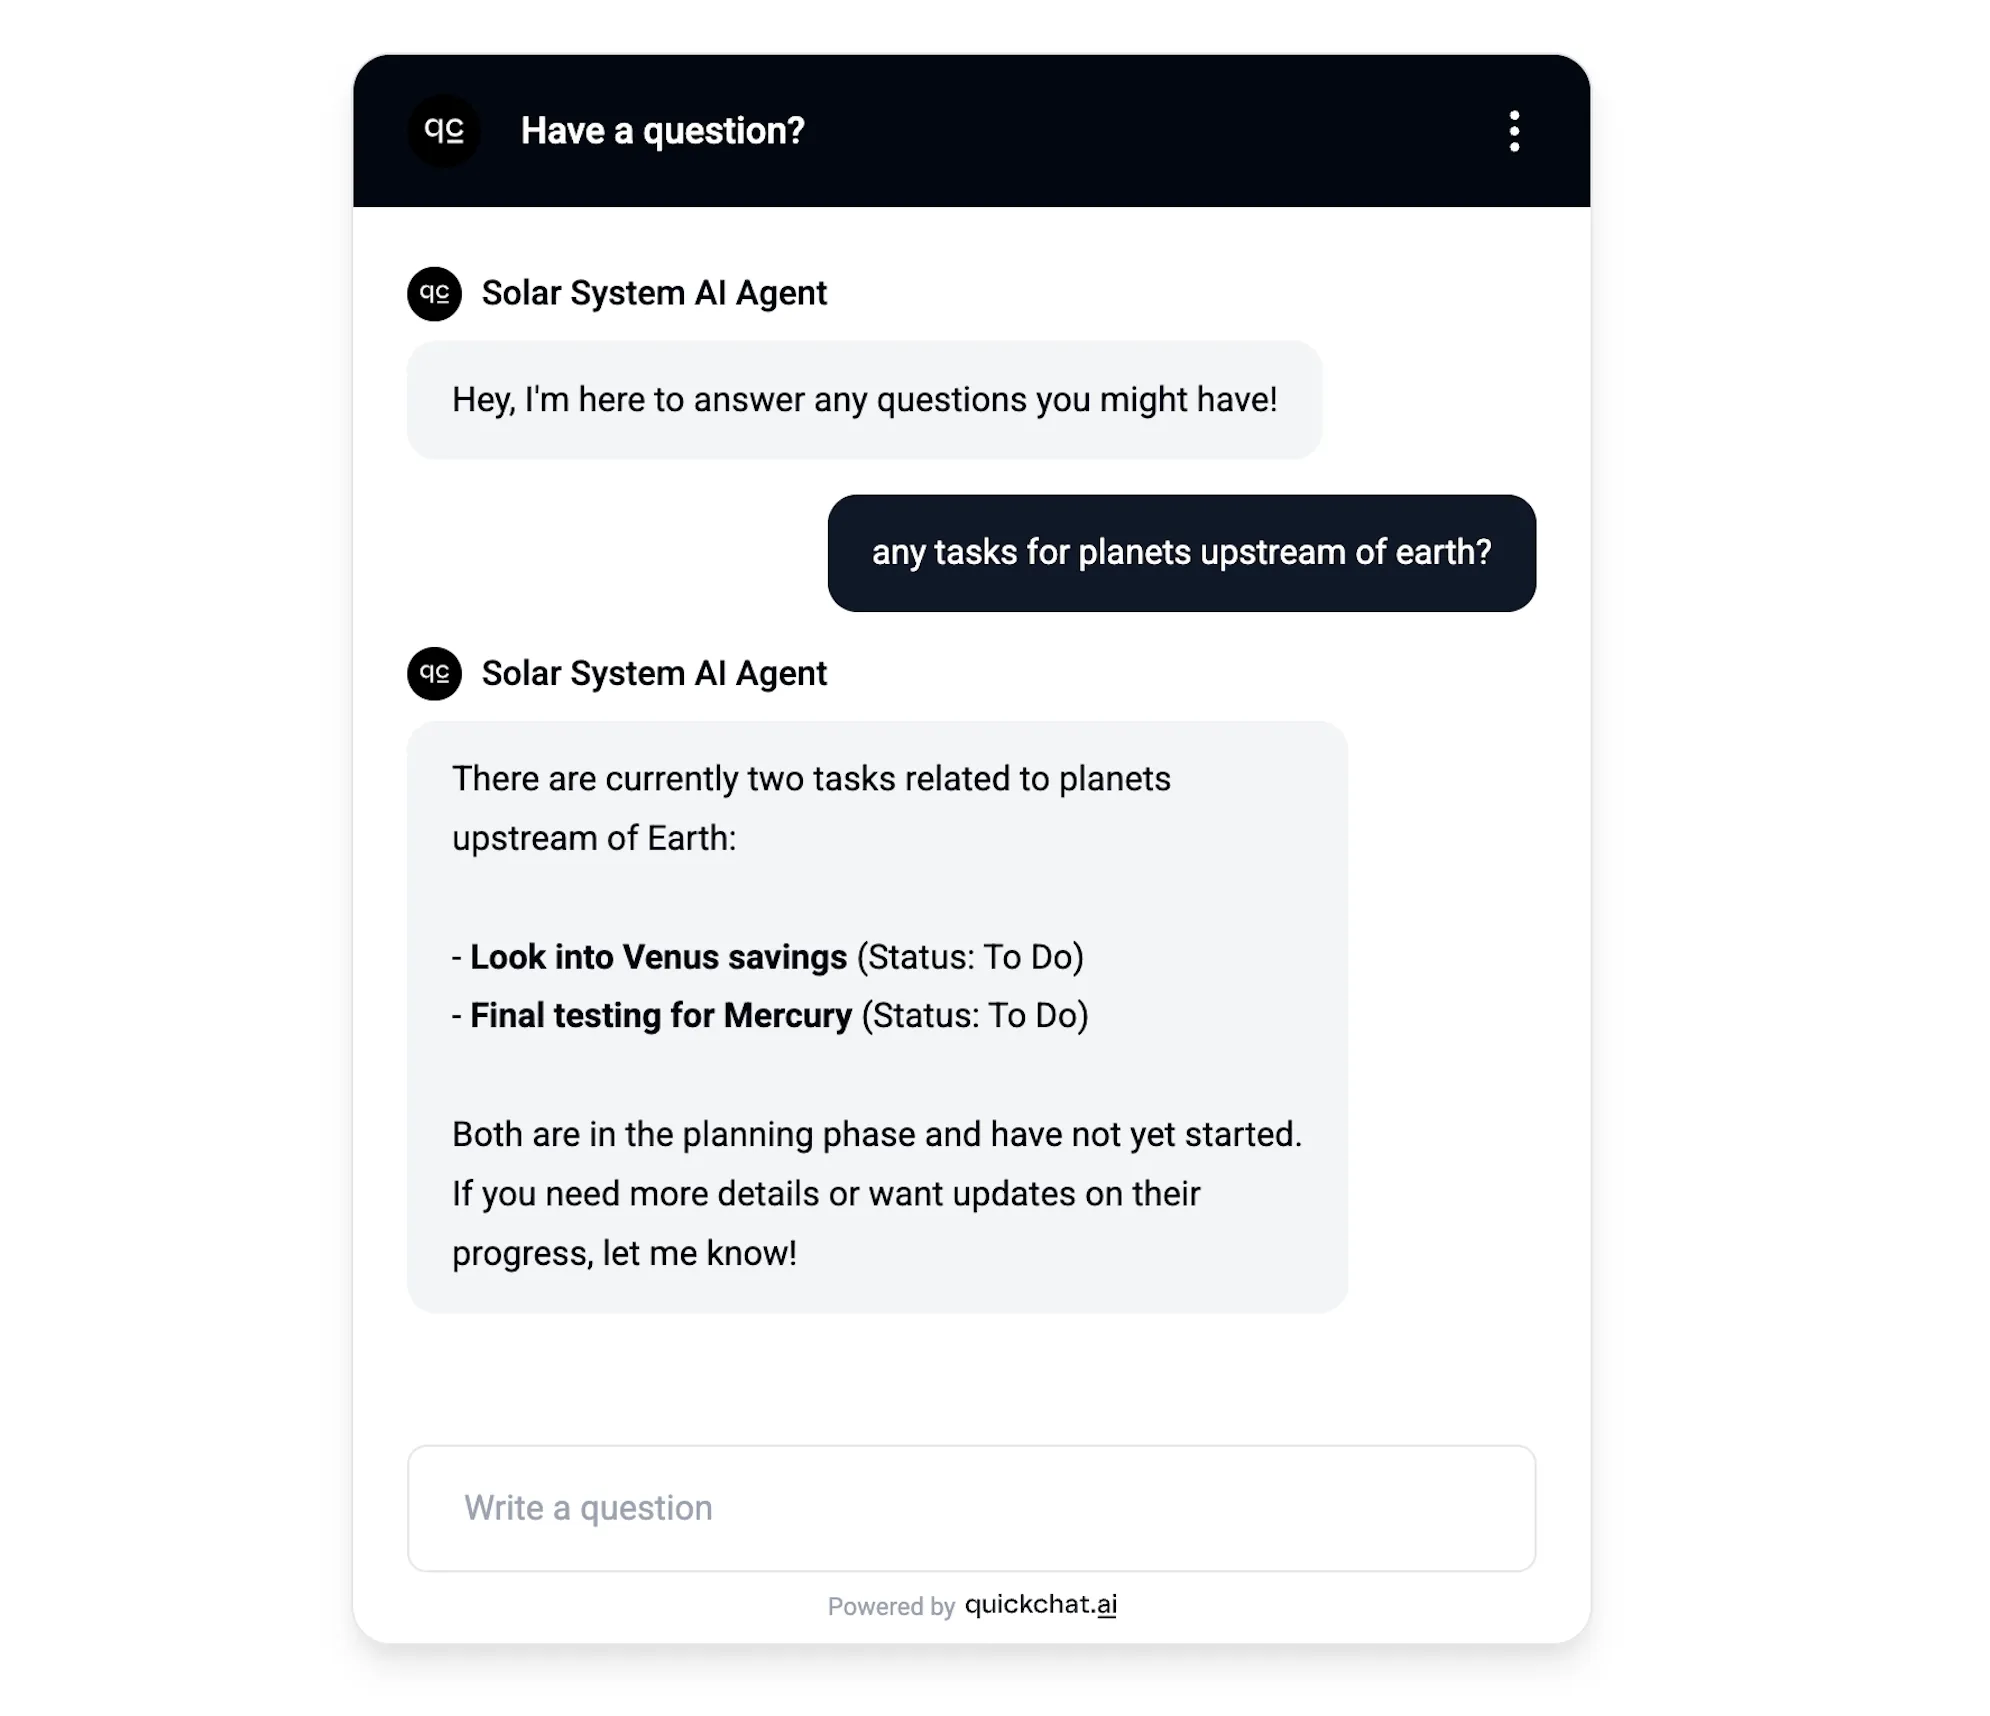 AI Agent responds to a creative query 😉
In this case I wanted to throw a curveball at the AI Agent and asked it a question that takes some creativity to interpret correctly. Here is how it got translated into a JQL query:
(text ~ "planet" OR text ~ "upstream" OR text ~ "mercury" OR text ~ "venus")Try these phrasings
To be confident the AI Action fires no matter how your end users phrase their request, run each of the prompts below against your test scenario. The agent should query Jira on every one of them, not just the search-style ones:
- “find all open issues about live scores”
- “search for issues with
mercury” - “explain the Solar System project”
- “tell me about the open issues in this sprint”
- “describe what’s currently in progress”
- “what is the status of pluto?”
If any of these phrasings does not invoke the AI Action, double-check that your API Action description (Step 7) lists those verbs explicitly.
What to expect when Jira has no matching issues. When Jira returns zero results, your AI Agent should say so explicitly — for example, “I checked Jira and found no matching issues for your query — try a broader phrasing or remove the status filter.” If instead you see the agent reply with “I don’t have direct access to your Jira”, the AI Action did not fire at all. Re-check the description from Step 7 and confirm that it explicitly lists non-search verbs (
explain,tell me about,describe,what is).
Summary
In this blog post, we showed how an AI Agent can be set up to use a specific API endpoint in a creative way in conversations. The correct setup doesn’t come out of the box - it requires providing detailed extra information of the specific use case we have in mind. Please feel free to reuse the prompts and descriptions shown in this blog post for creating your own similar AI Agents! For another fully worked example in the same step-by-step style, see how to connect your AI Agent to Google Sheets and log leads, unanswered questions, and demo requests to a spreadsheet.
Want to keep this guide bookmarked? The canonical, continuously-updated version of this walkthrough lives in our docs at docs.quickchat.ai/channels/jira — head there to copy-paste the latest API Action description and to follow updates to the recipe.
Going further
A Jira action does not have to be a single fixed request. You can inject built-in conversation variables and saved metadata (such as the visitor’s language or values captured earlier in the conversation) into any field, and you can add several actions so the agent picks the right one per question. The AI Actions reference covers the full set of options.
Related guides
The same AI Action mechanism connects an agent to any HTTP API. Other walkthroughs that use it:
- Build an AI Discord moderation bot with custom AI Actions
- Connect your AI Agent to the Telegram Bot API
- Connect your AI Agent to Google Sheets
- Connect your AI Agent to HubSpot to log contacts, deals, and tickets
- Send Slack notifications with AI Actions
- Connect Cal.com to Your AI Agent in 5 Minutes
- How to create an AI Support Agent from your documentation
- AI Agent for SaaS Customer Support
BONUS
The above blog post was written by a human (yours truly) but could have just as well been written by AI. For example, by pasting a prompt like this one into ChatGPT:
I need an API endpoint that allows me to search through my Jira tickets.

Guide me through the process step by step so that it is accessible to a moderately technical person:
- Provide links to documentation describing the endpoint
- Any necessary account creation and initial setup
- If any paid account is needed, indicate that clearly
- If any authentication such as API tokens is needed, guide me through the process of creating them and show me exactly every step needed to be able to use them as an HTTP request header. For example, if base64 encoding is needed, show a script or another way of achieving that.
- Show to me exactly what header keys and values I need for the HTTP request (show me header keys and values in a table)
- Show to me exactly what payload parameters I need for the HTTP request (show me payload parameter name and example values in a table)
In the future, perhaps rather than search through Jira tickets you would like to:
- send messages to a Slack channel?
- fetch information from a Notion page?
- perform an action via Zapier?
Say that in the first sentence and run the prompt again! You will obtain perfectly good instructions to add the exact AI Action you need!