

Picture this: a potential customer is on your website, excited about your product. They want to book a demo. The old way involves them sending an email, you replying with a calendar link, and going back and forth to find a time. It’s slow, and you risk losing their interest.
Now, imagine a better way. The visitor simply asks your AI agent, “Can I book a meeting?” The agent instantly checks your calendar, offers available slots, and books the appointment right there in the chat.
That’s the power of connecting Cal.com with your Quickchat AI Agent. In this guide, we’ll walk you through this simple integration. In just a few minutes, you can empower your AI to handle scheduling, so new leads can get on your calendar without ever leaving the conversation.
Why Connect Cal.com to Your AI Agent?
Cal.com is a powerhouse for flexible scheduling, and its API is the key to unlocking automation. By pairing it with Quickchat’s AI Actions, you can transform your website’s chat into a smart scheduling assistant.
Here’s why it’s a game-changer:
- Create a Seamless User Experience: Visitors can book a call directly in the chat window. No more juggling tabs, links, or emails. It’s fast, modern, and impressive.
- Capture More Leads: By removing friction from the booking process, you reduce the chances of a lead dropping off. Instant confirmation means instant commitment.
- Eliminate Manual Work: Your AI handles the entire scheduling flow, from checking availability to sending invites. Your calendar fills up automatically, freeing you to focus on more important tasks.
How Does It Work?
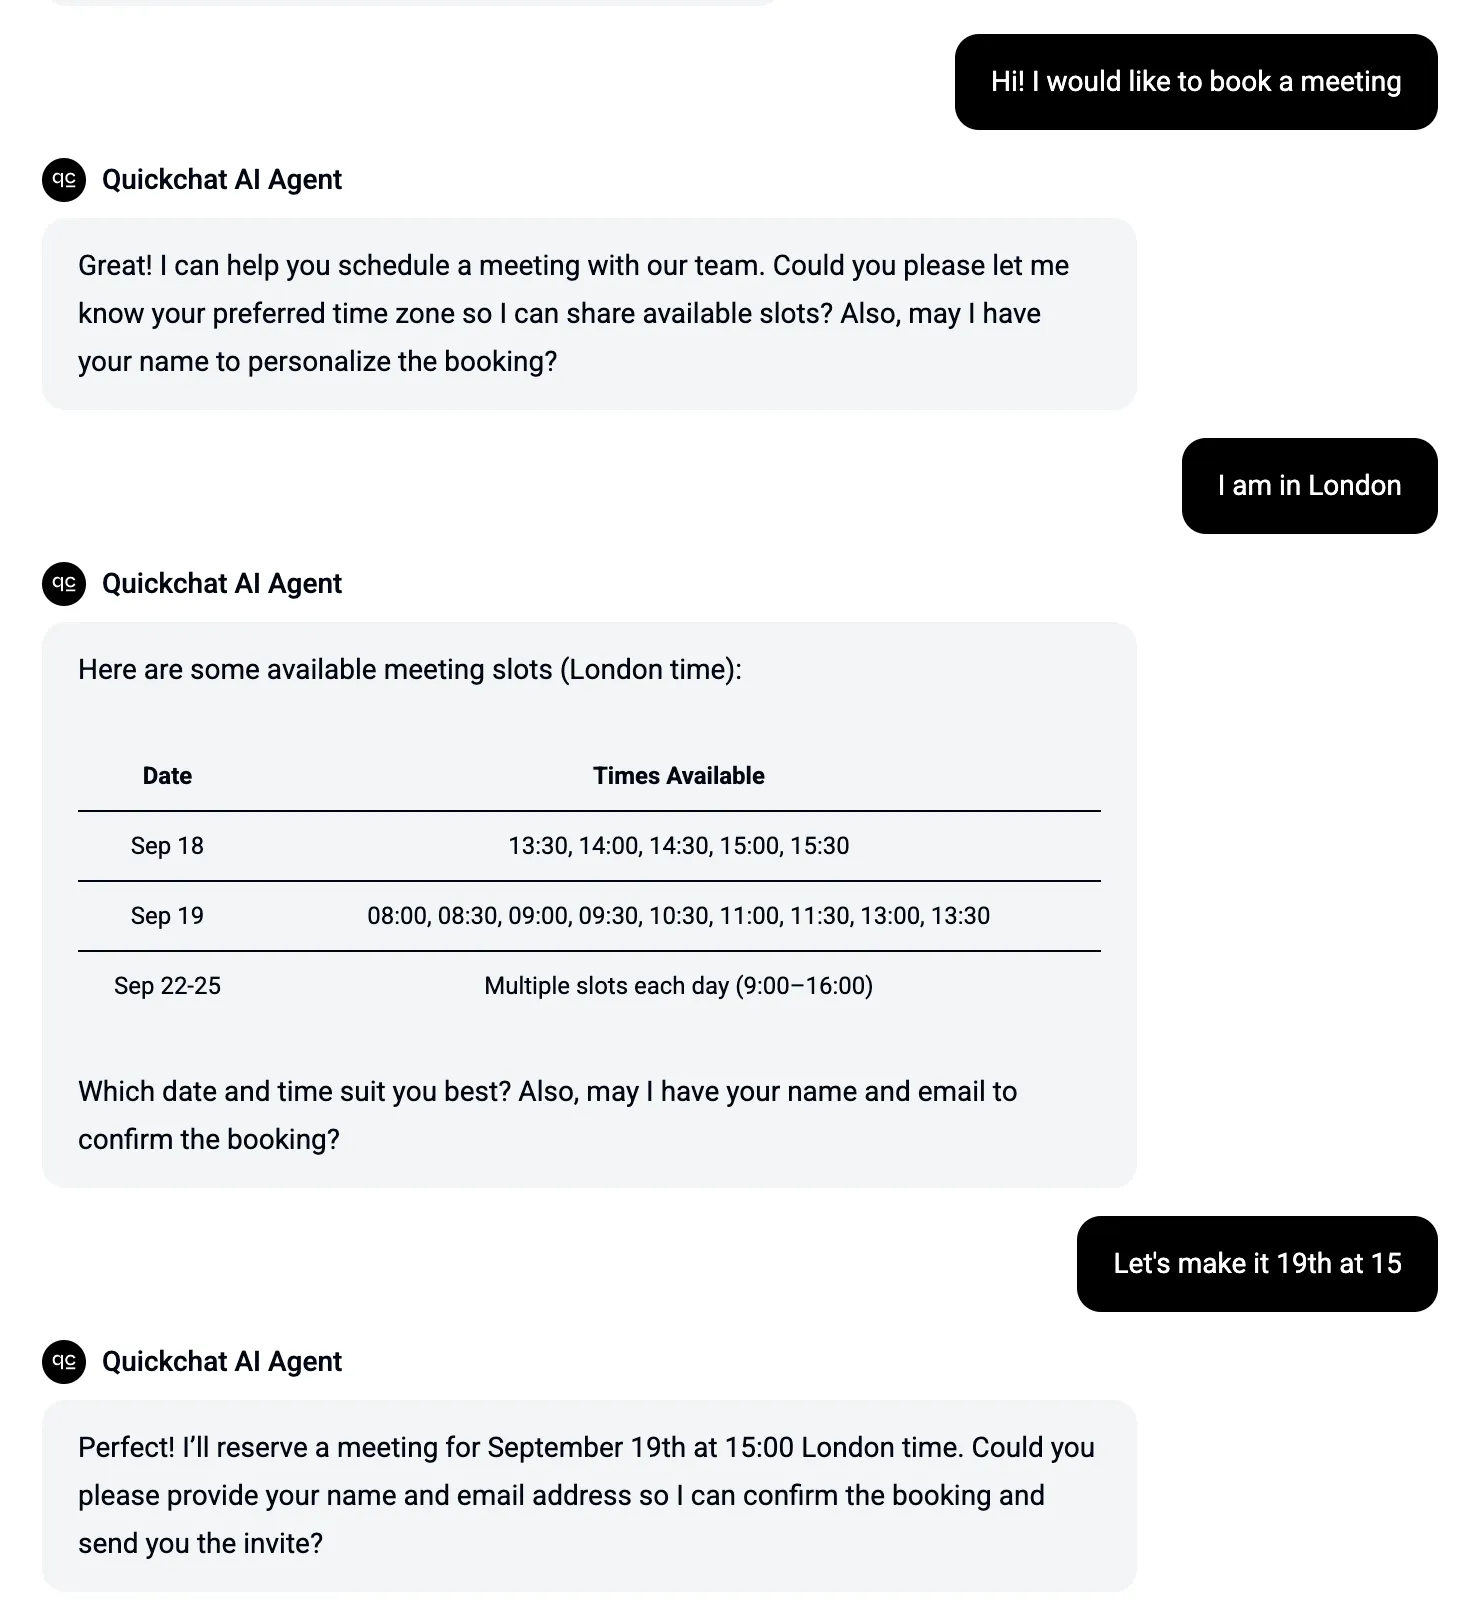
The magic happens through two API calls that your AI agent makes to Cal.com. Here’s a quick overview of the conversational flow:
- The Ask: A visitor asks to book a meeting. Your AI agent intelligently asks for their preferred dates and timezone.
- Check Availability: The agent calls Cal.com’s to find open time slots based on your pre-configured event types.
- The Offer: The AI presents the available times to the user. Once they pick one, it asks for their name and email.
- Book the Meeting: The agent then calls the Cal.com API to book the meeting, sending the chosen slot and the user’s details to finalize the appointment.
- Confirmation: Cal.com takes over, automatically sending calendar invites to both you and your new lead.
Here’s a glimpse of what that conversation looks like:
What You’ll Need (Prerequisites)
Before we start, make sure you have the following ready:
- A Cal.com Account: The free plan will be perfect if you’re just getting started. You’ll need at least one event type set up (e.g., a 30-minute demo call). You can sign up for a Cal.com account here.
- A Quickchat AI Agent: You’ll need access to create custom AI Actions. If you don’t have an account, you can sign up here.
- Your Cal.com API Key: In your Cal.com dashboard, navigate to Settings → API keys. Click Add, give your key a name, set an expiry date, and copy the token. You’ll need this for authentication.
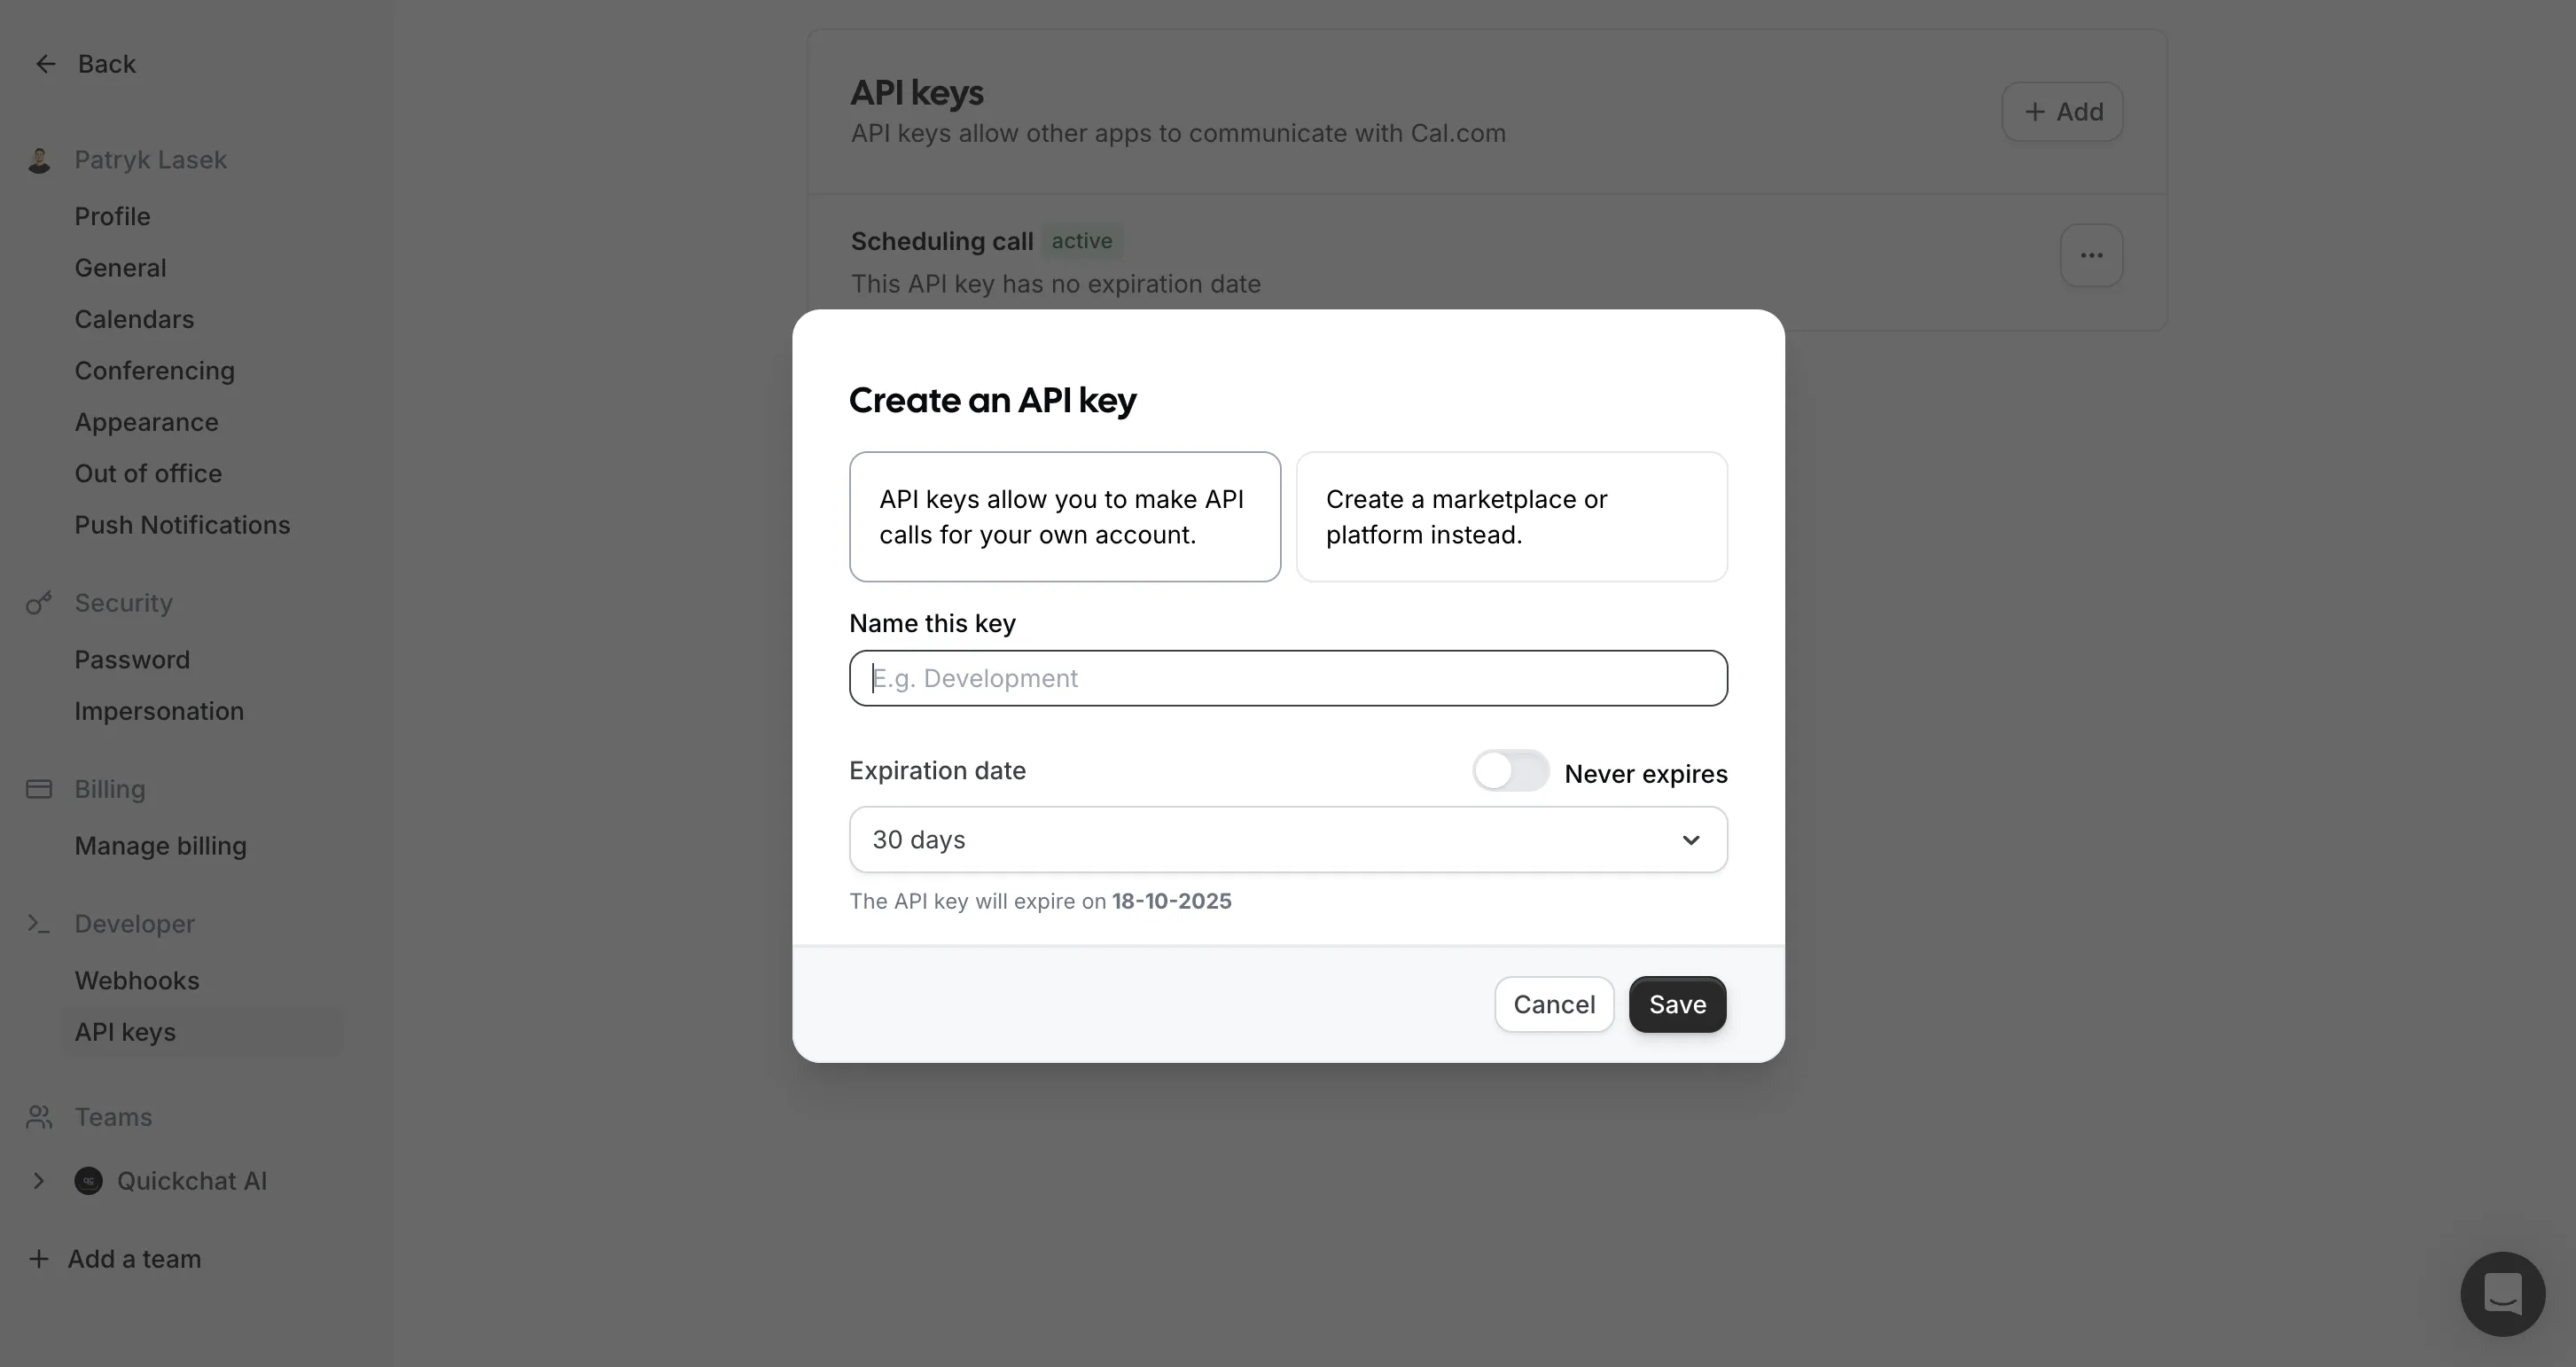
Pro Tip: While public event types on Cal.com can be accessed without an API key, using one is highly recommended. It prevents you from being rate-limited and ensures your integration is ready for any future API changes.
Step 1: Create an AI Action to Check Availability
First, let’s teach your AI agent how to find your free time slots.
In your Quickchat dashboard, go to Actions & MCPs → Custom Actions and click Add Action.
1.1 Define User Inputs
We need to ask the user for a few key details before we can check the calendar. Define these fields for the agent to collect:
| Field | Description | Example |
|---|---|---|
start | The beginning of the date range to search (ISO 8601) | 2025-09-18T00:00Z |
end | The end of the date range to search (ISO 8601) | 2025-09-25T23:59Z |
timeZone | The user’s timezone in IANA format | Europe/Warsaw |

1.2 Configure the API Call
Now, set up the request to Cal.com:
-
Method:
GET -
API endpoint URL:
https://api.cal.com/v2/slots?eventTypeSlug=call&username=patryk-lasek&start={{start}}&end={{end}}&timeZone={{timeZone}}Important: Replace
callwith the URL slug of your event type andpatryk-lasekwith your Cal.com username. -
Headers:
| Header | Value | Required |
|---|---|---|
cal-api-version | 2024-09-04 | ✔︎ |
Authorization | Bearer <your_api_key> | Recommended |
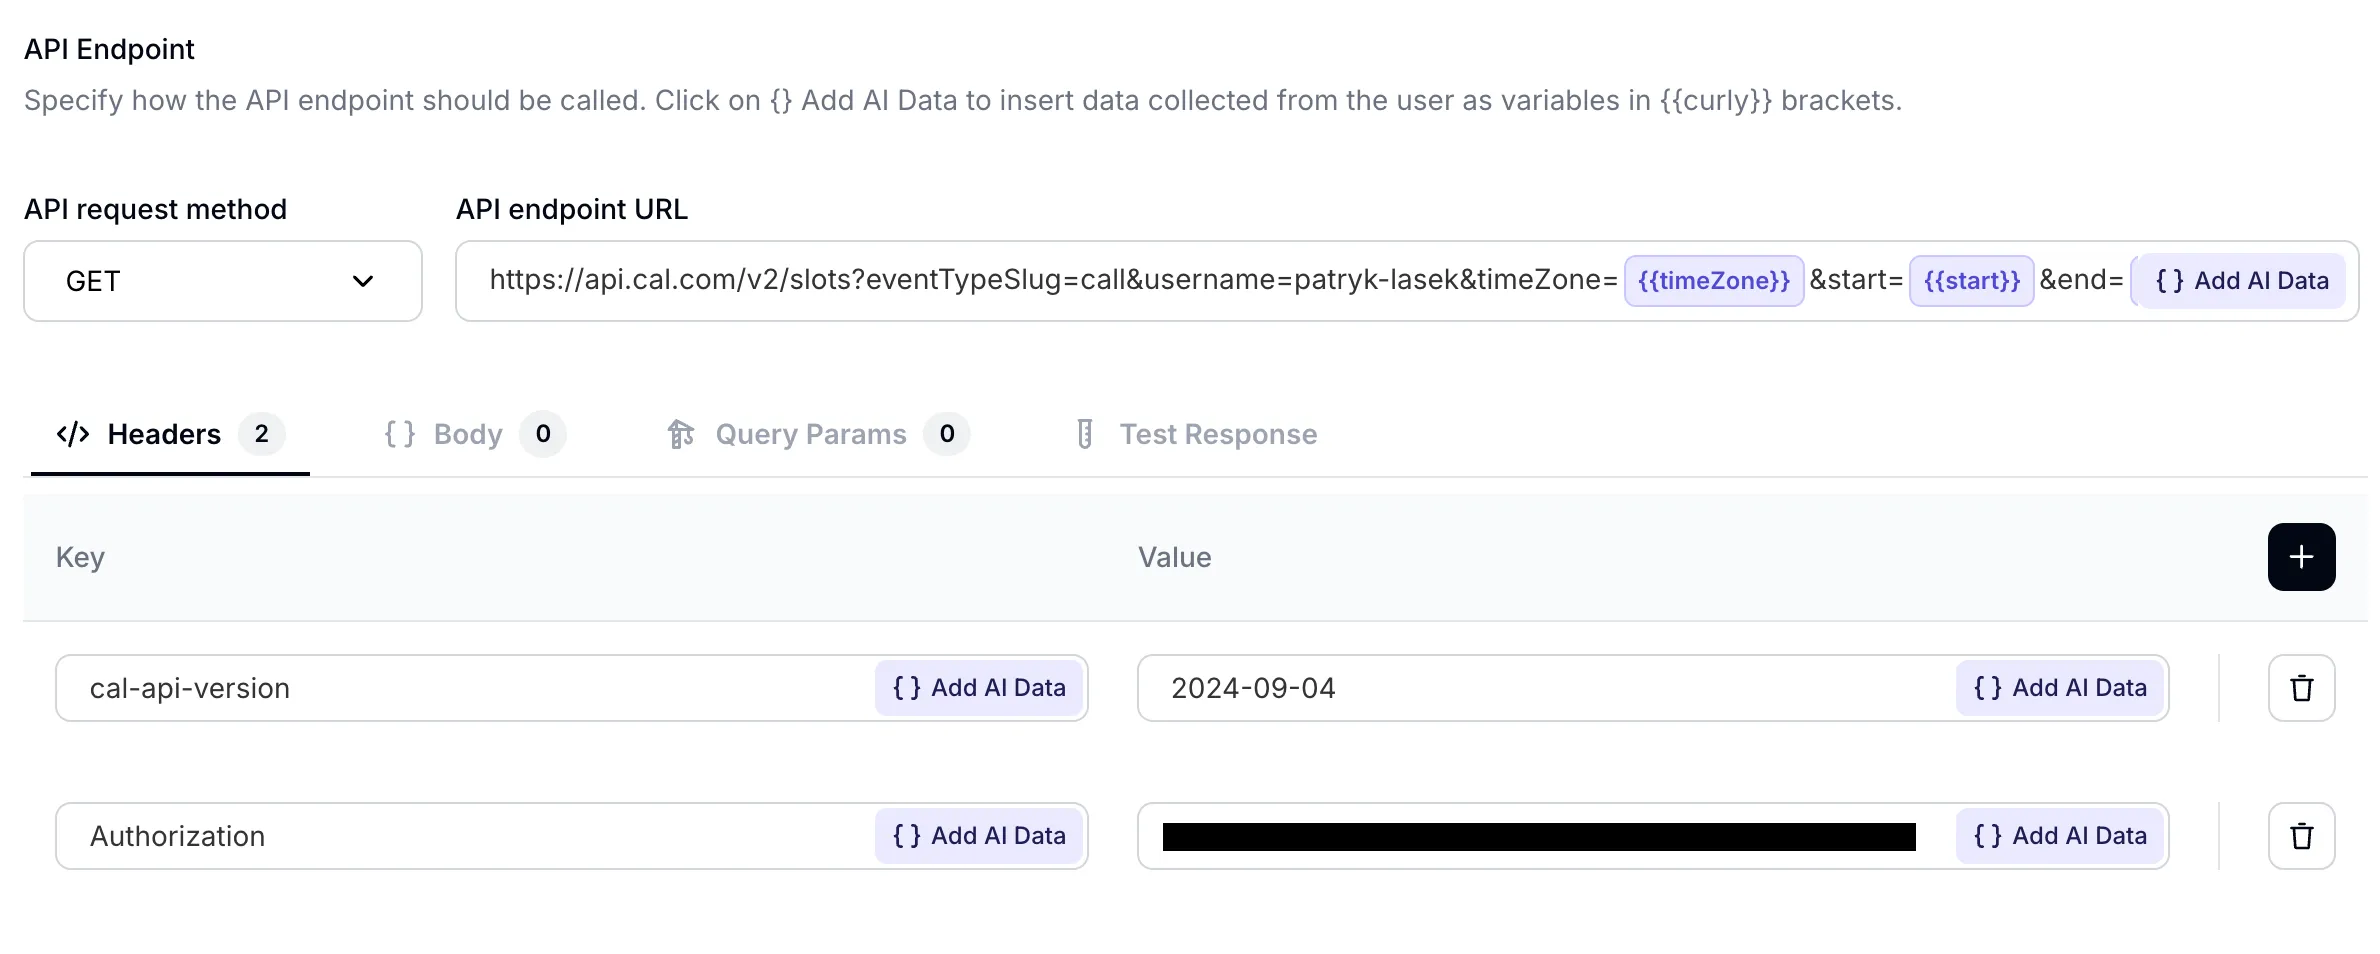
The cal-api-version header is mandatory; without it, your request will fail.
In the Quickchat interface, the placeholders ({{start}}, {{end}}, {{timeZone}}) in the URL will be automatically replaced with the information your agent collects from the user.
Once saved, your agent can now successfully fetch and display available time slots!
Step 2: Create an AI Action to Book the Meeting
With availability checked, it’s time for the final step: creating the booking. Let’s build a second action.
2.1 Define User Inputs
For this action, the agent needs to collect the following:
| Field | Description | Default Value | Required |
|---|---|---|---|
start | The chosen time slot in UTC format: 2025-09-21T07:00:00Z | - | ✔︎ |
name | The attendee’s full name | - | Optional |
email | The attendee’s email address | - | ✔︎ |
timeZone | The user’s timezone in IANA format: Europe/Warsaw | - | ✔︎ |
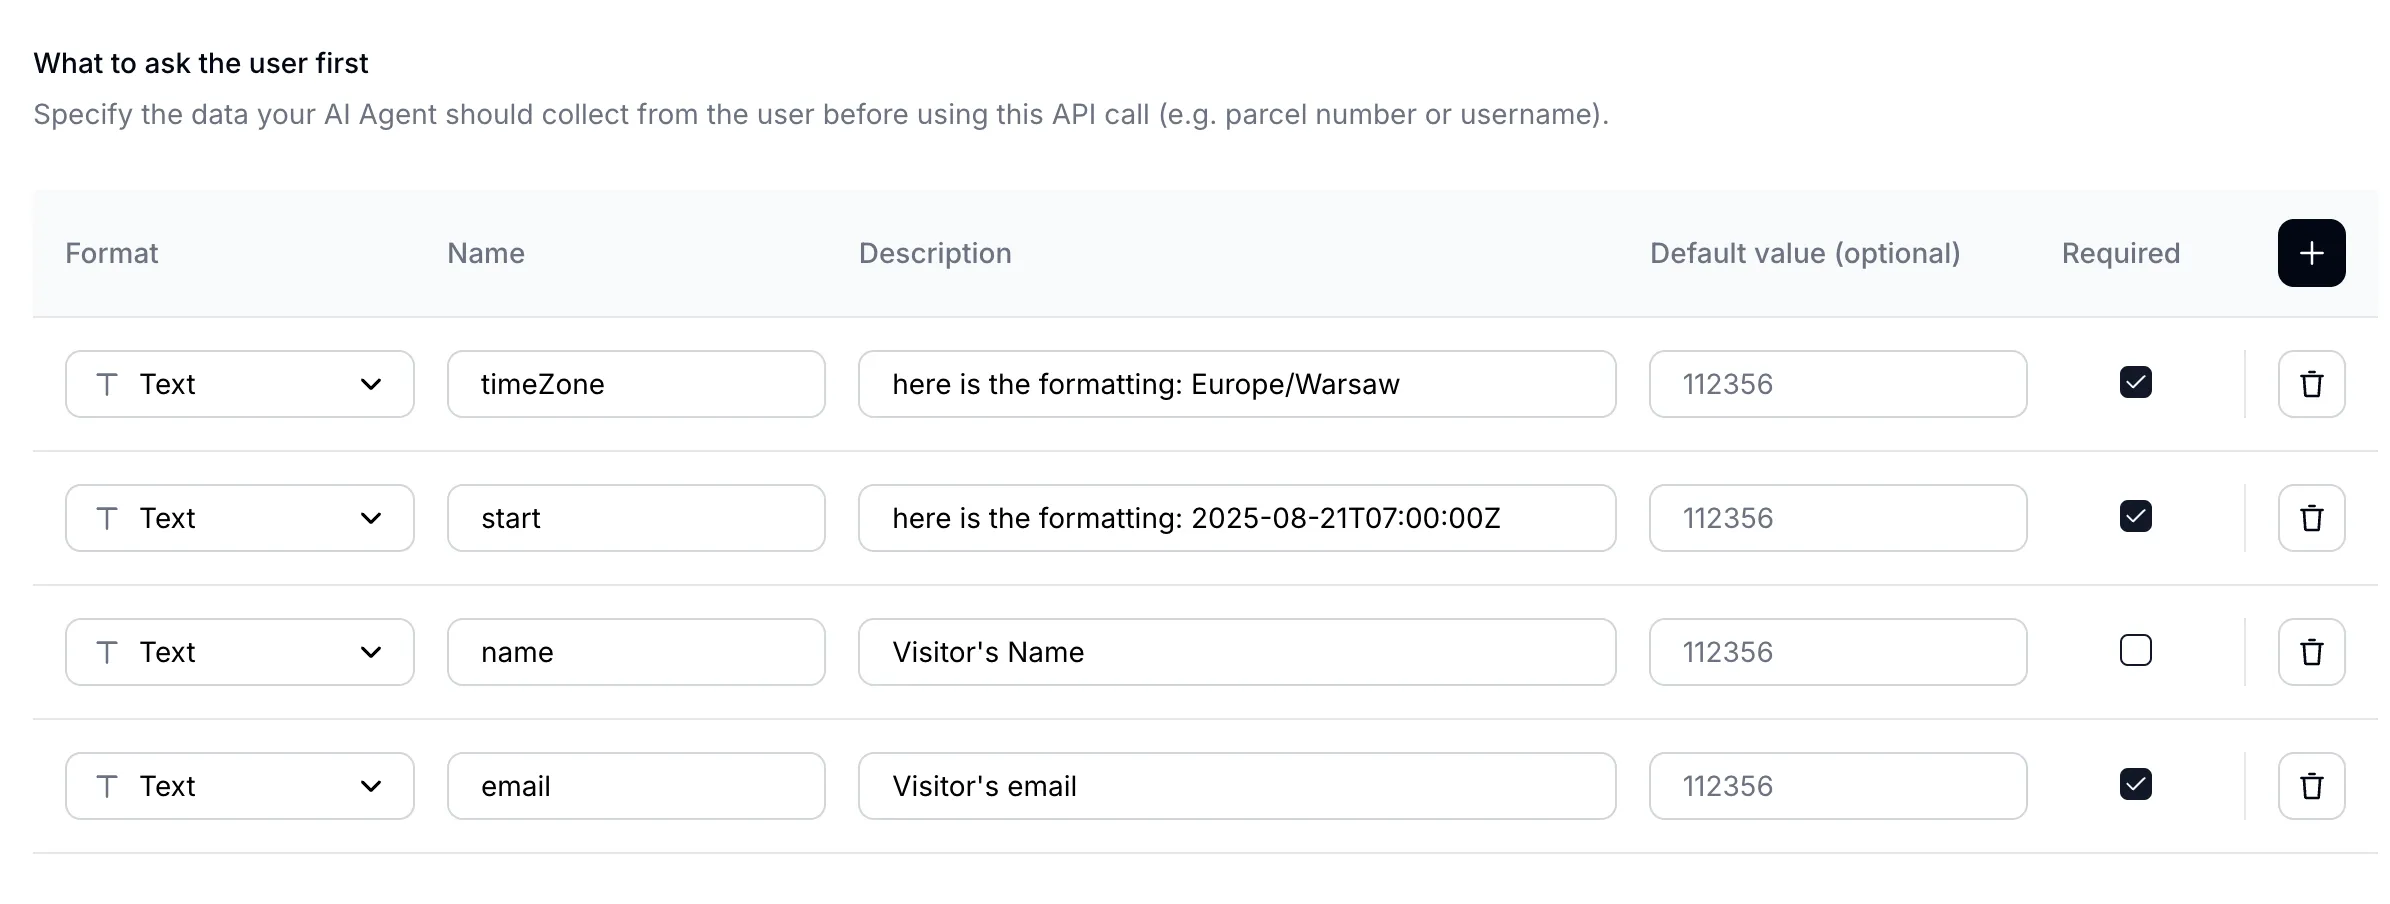
A Note on Timezones: Cal.com’s booking endpoint requires the start time to be in UTC. Your AI agent should handle this conversion. For example, if a user in Warsaw (UTC+2) picks 11:00 AM, the value sent to the API should be 09:00:00Z.
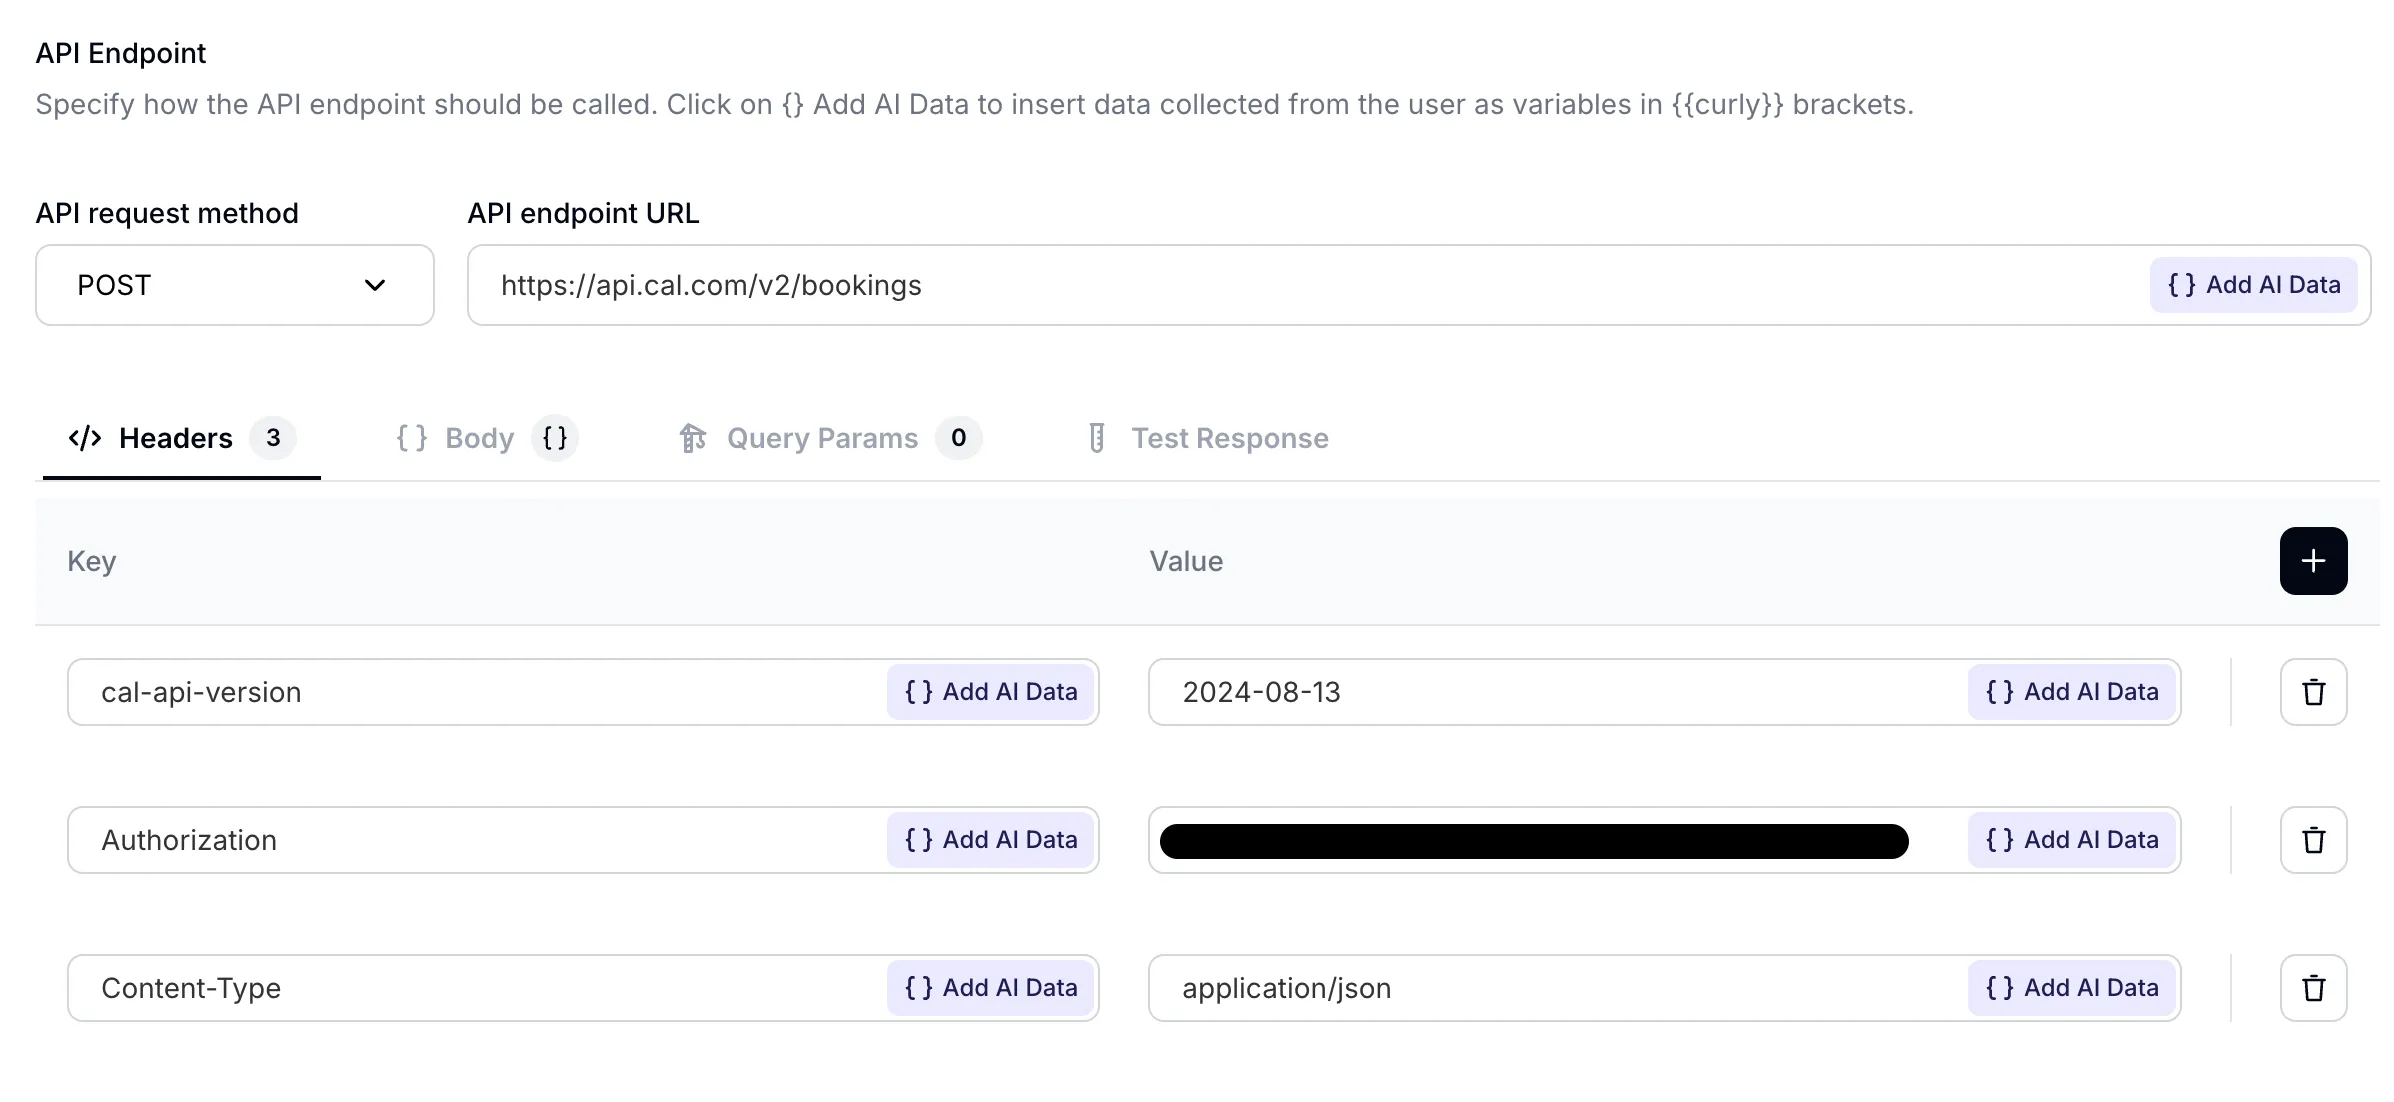
2.2 Configure the API Call
- Method:
POST - API endpoint URL:
https://api.cal.com/v2/bookings - Headers:
| Header | Value | Required |
|---|---|---|
Content-Type | application/json | ✔︎ |
cal-api-version | 2024-08-13 | ✔︎ |
Authorization | Bearer <your_api_key> | Recommended |
Notice the cal-api-version is different for this endpoint. Always check the Cal.com documentation for the correct version string.
-
Body: In the Quickchat action editor, select
JSONfor the body and paste the following structure:{ "start": "{{start}}", "eventTypeSlug": "call", "username": "patryk-lasek", "attendee": { "name": "{{name}}", "email": "{{email}}", "timeZone": "{{timeZone}}" } }Remember to replace the
eventTypeSlugandusernamewith your own details. Theattendeeinformation must be a nested JSON object as shown above.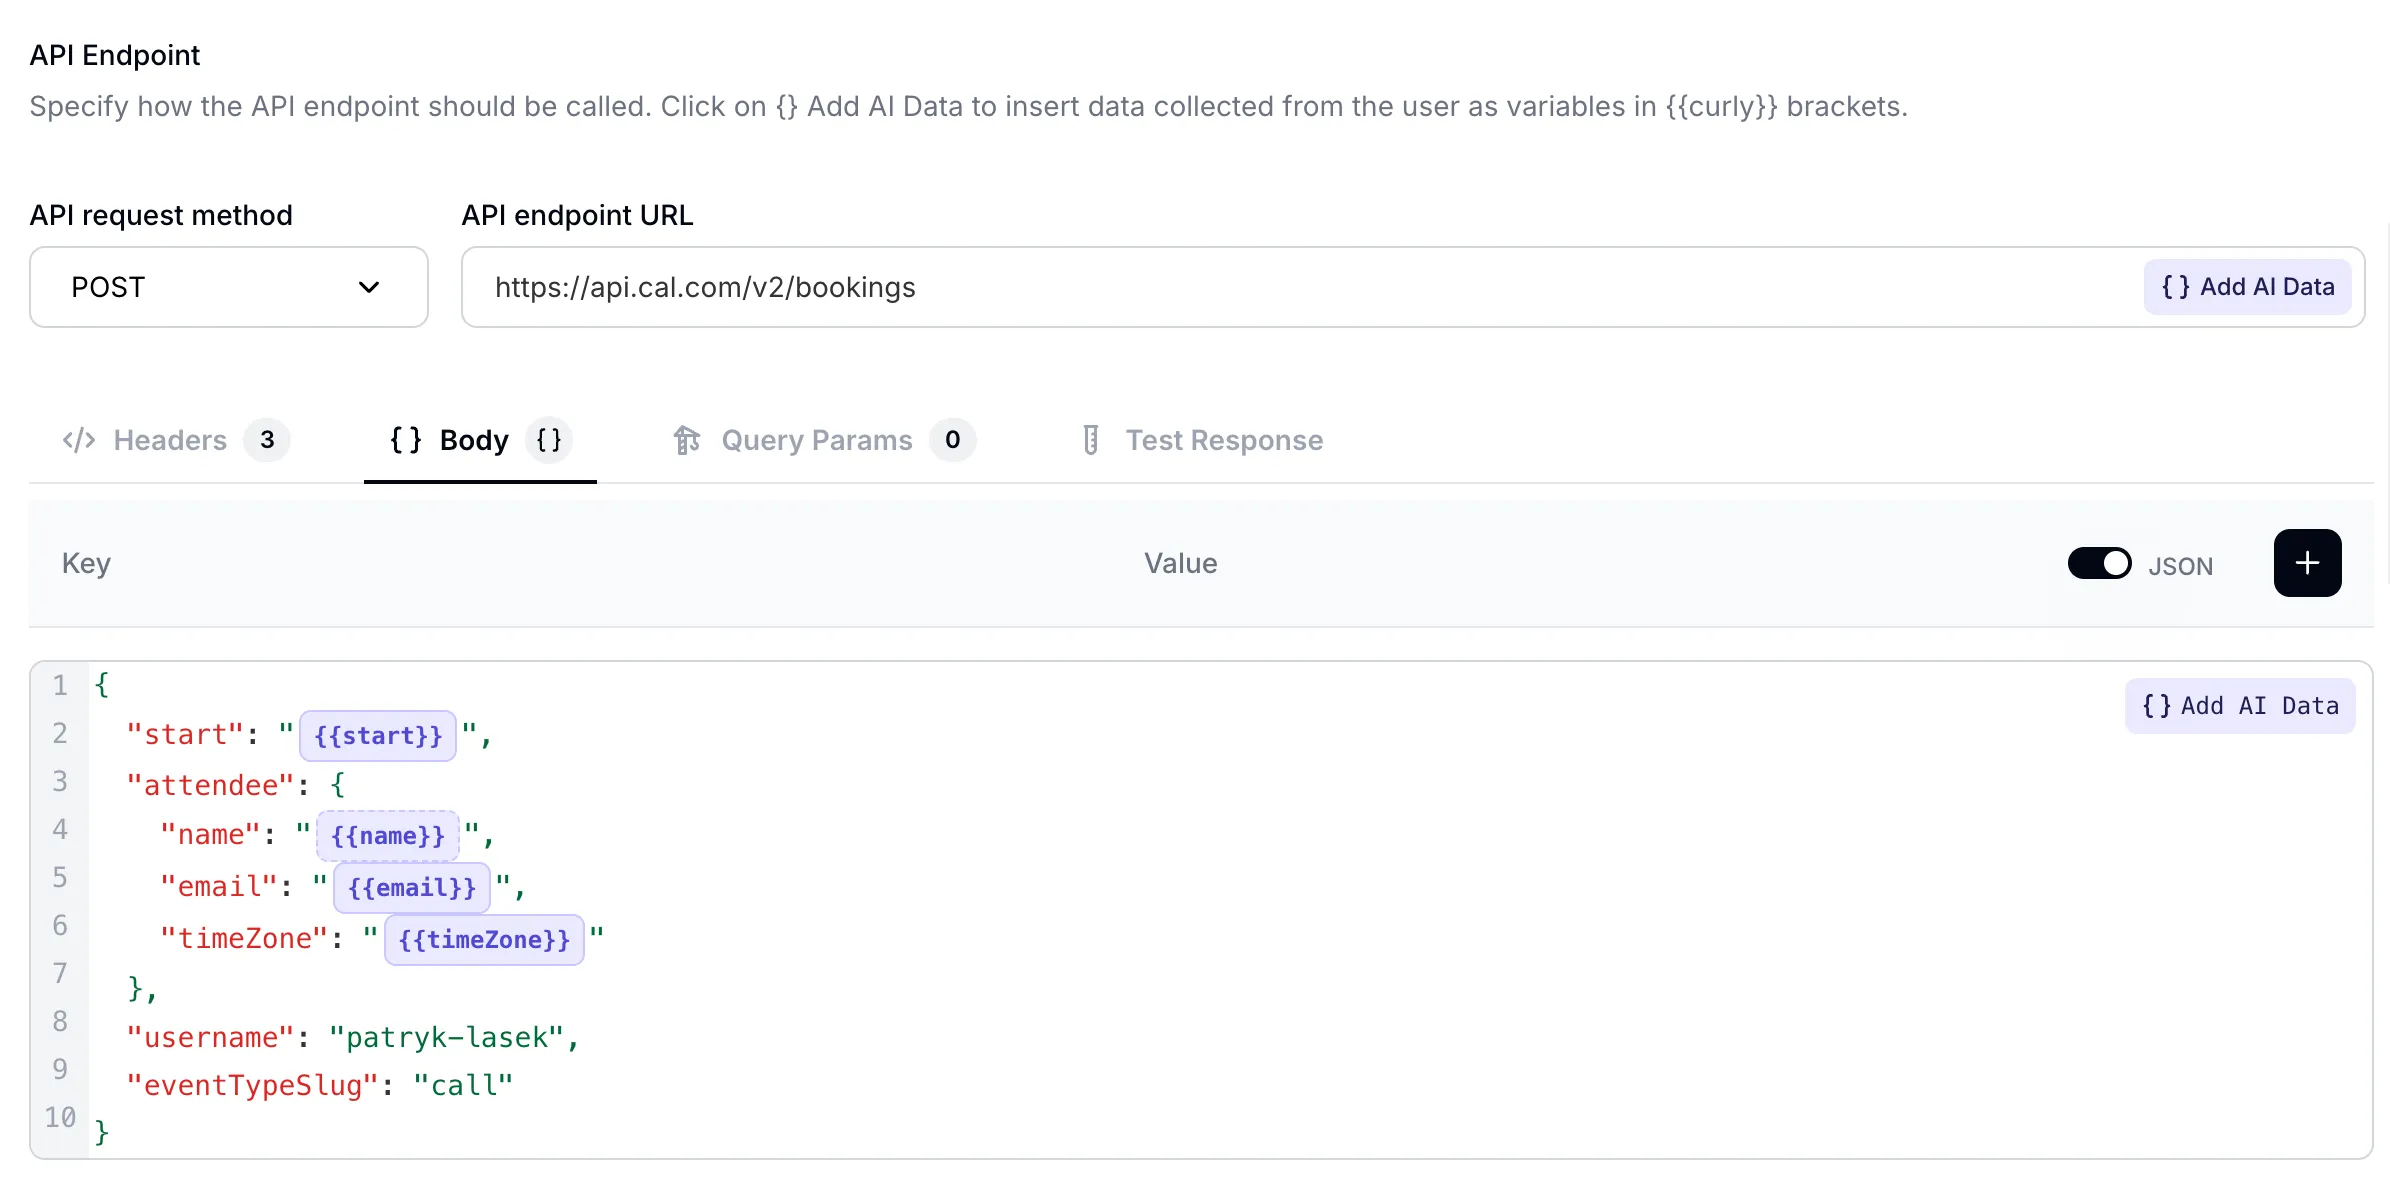
Perfect! With this action configured and saved, your AI agent now has everything it needs to seamlessly book meetings on your behalf.
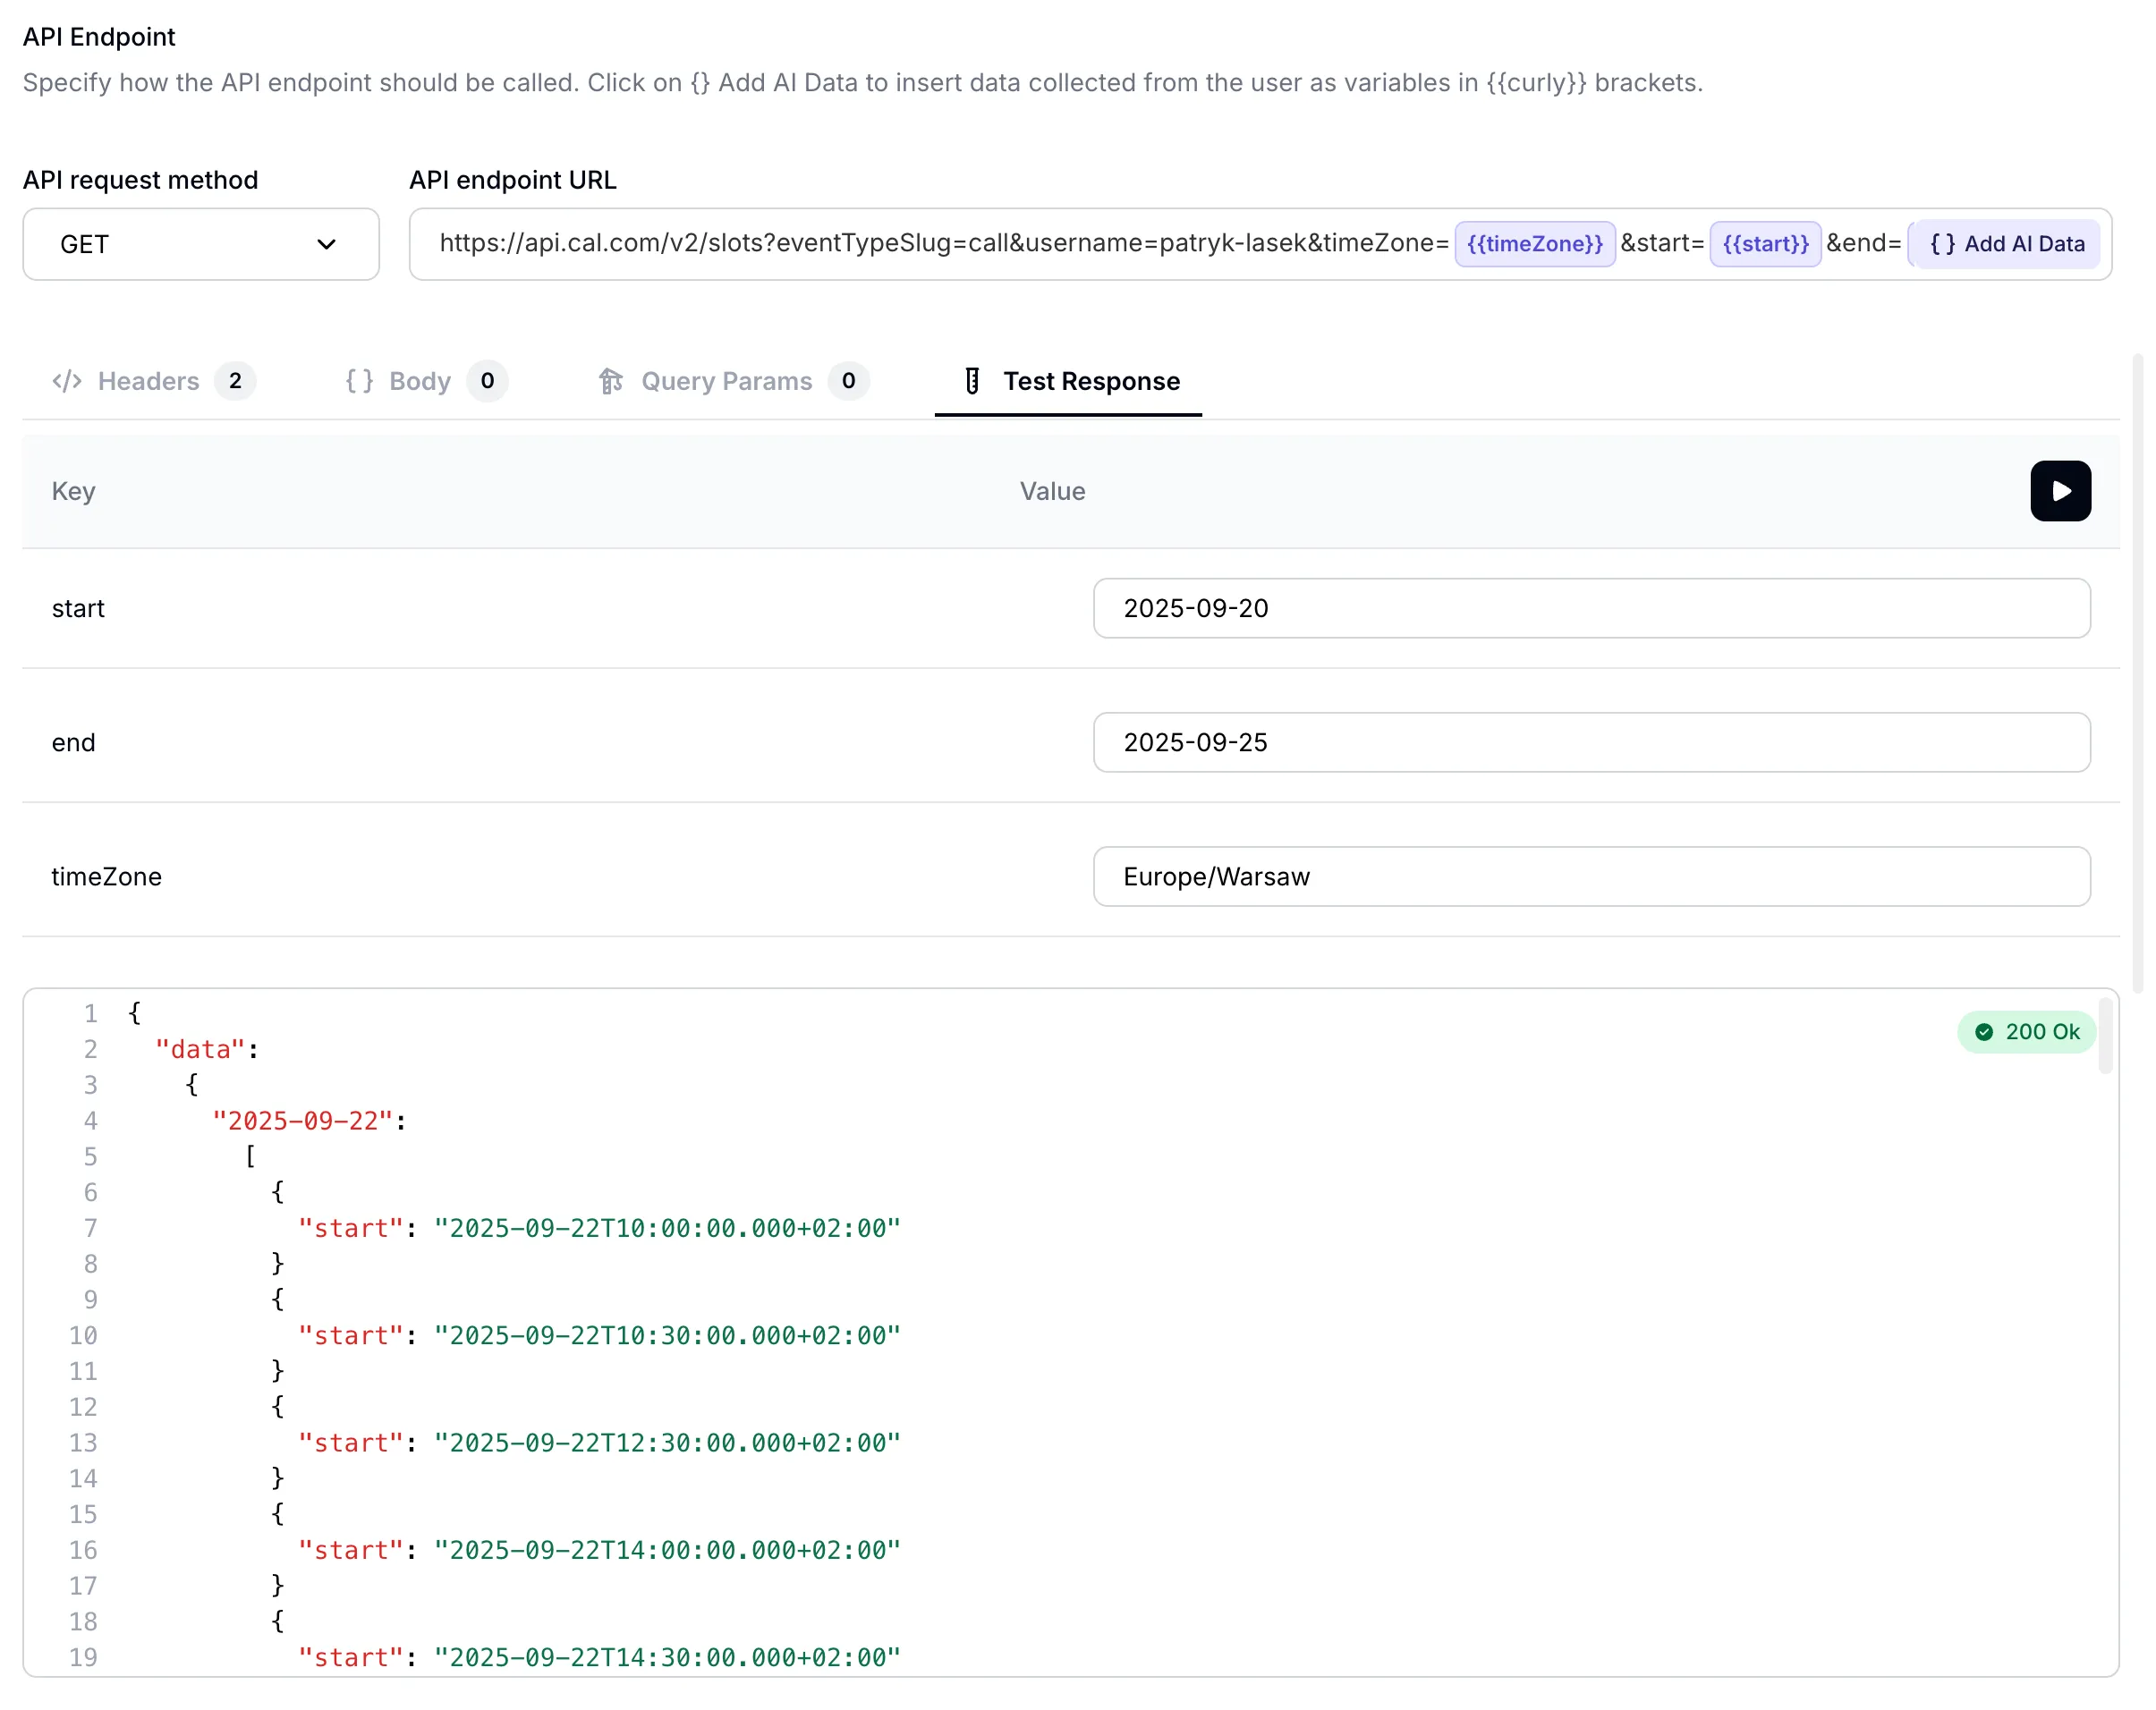
Test your Endpoint
To verify everything is working correctly, you can test both AI Actions by opening them, scrolling down to the API Endpoint section, and clicking “Test Response”:
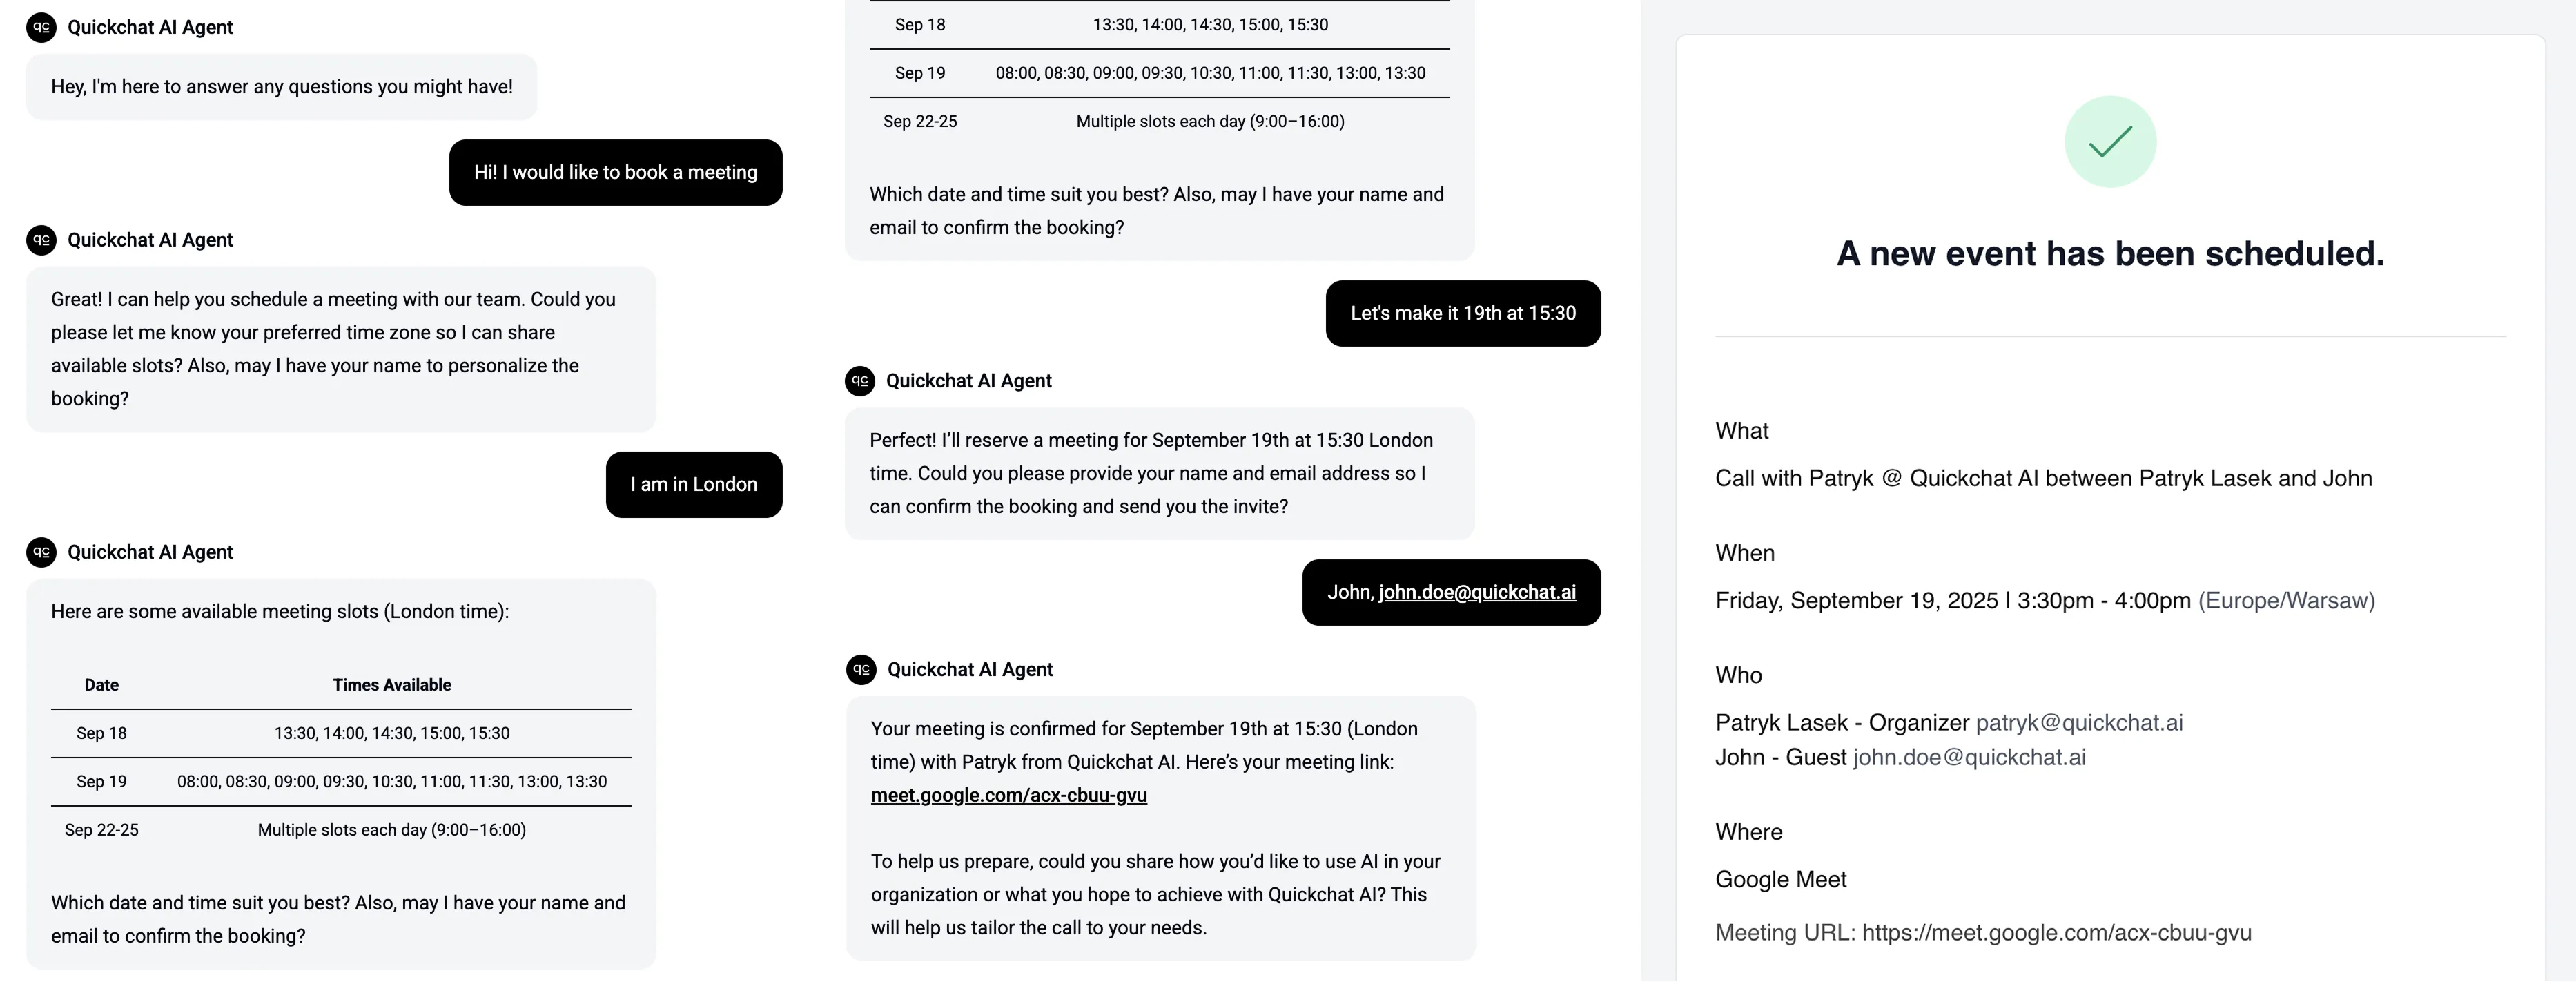
Step 3: Test Your New Scheduling Assistant
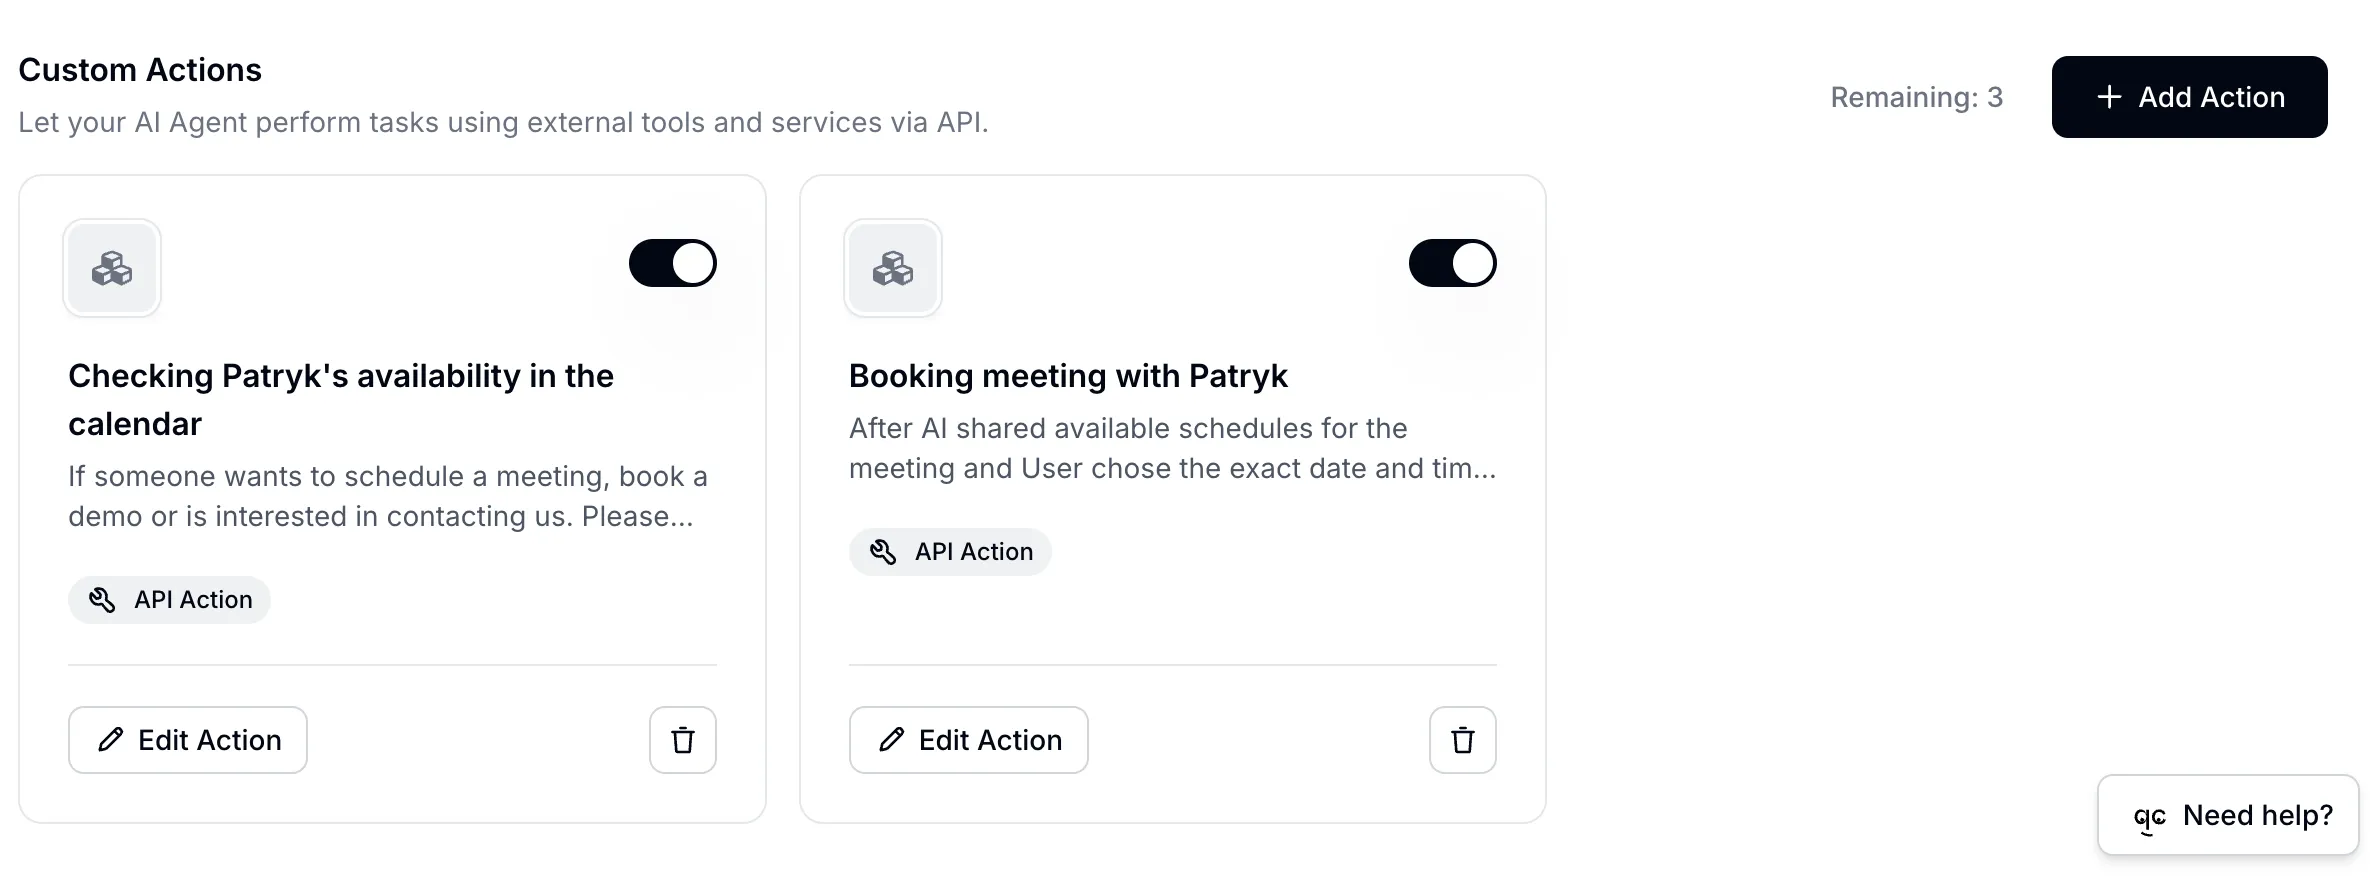
Before testing, make sure your AI Actions page matches the setup shown below:
It’s time for the fun part! Go to the AI Preview in your Quickchat dashboard and start a new conversation. Try asking something like:
“I’d like to book a demo for next week.”
Watch as your agent:
- Asks for your preferred dates and timezone.
- Fetches and displays available slots from your Cal.com calendar.
- Prompts for your name and email after you select a time.
- Confirms the booking is complete!
Troubleshooting Common Issues
Running into errors? Here are a few common pitfalls and how to fix them:
- Getting a
403 Forbiddenor404 Not Founderror? Double-check that you are using thePOSTmethod for the booking action. Cal.com will rejectGETrequests sent to the/bookingsendpoint. - Seeing a
400 Bad Requesterror about attendee fields? This almost always means the JSON body is formatted incorrectly. Ensurename,email, andtimeZoneare nested inside anattendeeobject, not at the top level. - Request failing due to a missing header?
Every Cal.com v2 endpoint requires the
cal-api-versionheader. Use2024-09-04for/slotsand2024-08-13for/bookings. - Meetings are booked at the wrong time?
Confirm that the
starttime in your booking request is being sent in UTC.
Conclusion
Congratulations! With just two AI Actions, you’ve transformed your Quickchat agent into a scheduling powerhouse. It can now handle the entire booking process, providing a frictionless experience for your website visitors and freeing you from the tedious back-and-forth of manual scheduling.
This is just the beginning. With the flexibility of Cal.com’s API and Quickchat’s AI Actions, you could add SMS reminders, follow-up emails, and other custom automations like logging each booking to HubSpot as a contact and deal. The possibilities are endless!