

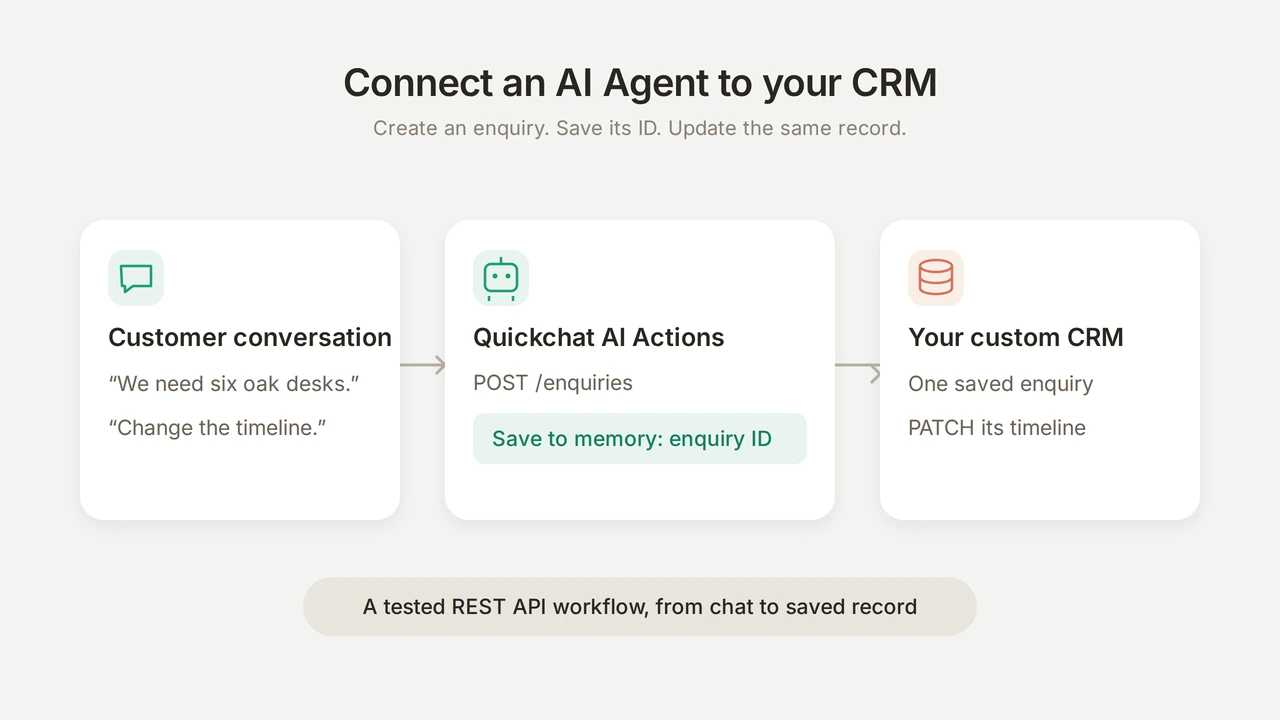
Quickchat AI can connect a customer-facing AI Agent to a custom CRM through API Actions. Configure the requests your CRM accepts, save an ID from the create response, then use that ID in a later update. You can use an existing REST API without building a chat application or adding a native integration to a catalogue.
This walkthrough builds Alder Works, a fictional office-furniture company. A visitor asks the team to follow up about six oak desks. The Agent creates an enquiry with the visitor’s email and requirements. When the visitor changes the timeline, the Agent updates that same enquiry.
We built the example on a local Quickchat AI instance and a running Python CRM. The screenshots show real saved conversations, Action calls and synthetic database records. The timeout tests also exposed a duplicate-record failure, which the supplied API now prevents with an idempotency key.
Download the Alder Works CRM kit. It contains the runnable server, a record inspector, the exact Agent configuration and setup instructions. These are editable files, not a one-click Agent import.
What do you need to connect an AI chatbot to a CRM?
Prepare the account, a test API and a way to inspect what it writes.
- Create a Quickchat AI account. Free supports personal, non-commercial learning. Commercial deployment needs a paid plan, and Preview and Simulation replies consume AI credits. Outbound API Actions are different from access to the Quickchat AI REST API; check the current plans and limits for your deployment.
- Download and unzip the kit. Install Python 3.11 or later and
cloudflaredfor the fictional API. If your CRM already has a test HTTPS API, use that instead and adapt its request and response fields. - Connect Quickchat AI to a compatible AI client for the write-only credential setup in Step 5. Use the ChatGPT app or Claude connector and complete the owner sign-in described in Manage with AI. This account connection configures the Agent; customer conversations will call the CRM over HTTP.
Use only the fictional addresses and records in this kit while learning. A production CRM needs its own authorization and data-handling rules.
Step 1: How do you start the example CRM API?
The supplied service stores enquiries in SQLite. It has two write endpoints: POST /enquiries creates a record, and PATCH /enquiries/<id> changes its timeline. Its inspection page and command read the same database.
Open a terminal in the unzipped directory. Generate a token for this demo:
python -c 'from pathlib import Path; import secrets; p=Path(".crm-demo-token"); p.write_text(secrets.token_urlsafe(32)+"\n"); p.chmod(0o600)'Start the API and leave that terminal running:
python crm_server.py --token-file .crm-demo-token --state crm-stateIn another terminal, expose it through a temporary HTTPS address:
cloudflared tunnel --url http://127.0.0.1:8766Copy the https://…trycloudflare.com address printed by the command. Open its /health path and confirm it reports ready. Keep both processes running. Cloudflare’s Quick Tunnel instructions cover installation and temporary-address behaviour. The hostname can change when you restart the tunnel; update both Actions if it does.
Keep .crm-demo-token private. You will enter its value in the Action editor, not in the Agent prompt or a conversation.
How does one API call supply the ID for the next?
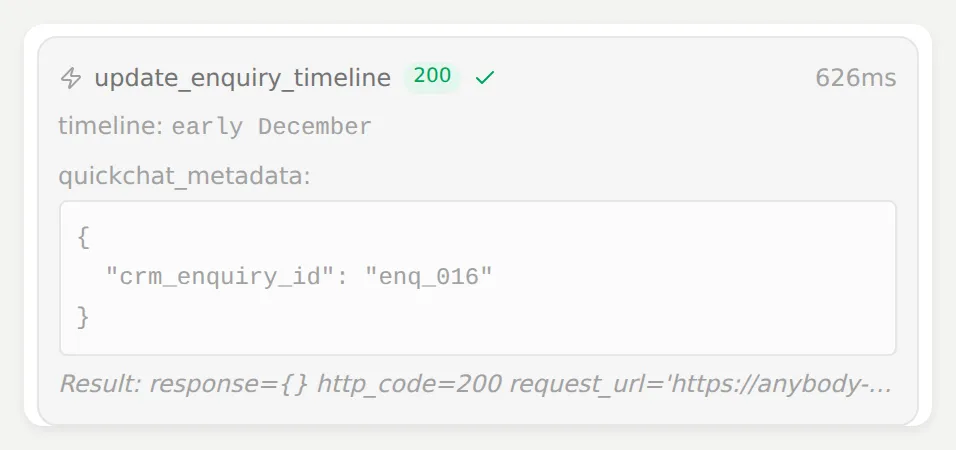
The create response returns an ID. Save to memory stores it under crm_enquiry_id; the update URL reads {{metadata_crm_enquiry_id}} from that same conversation. The Agent chooses the operation and supplies the timeline. Quickchat AI inserts the stored reference.
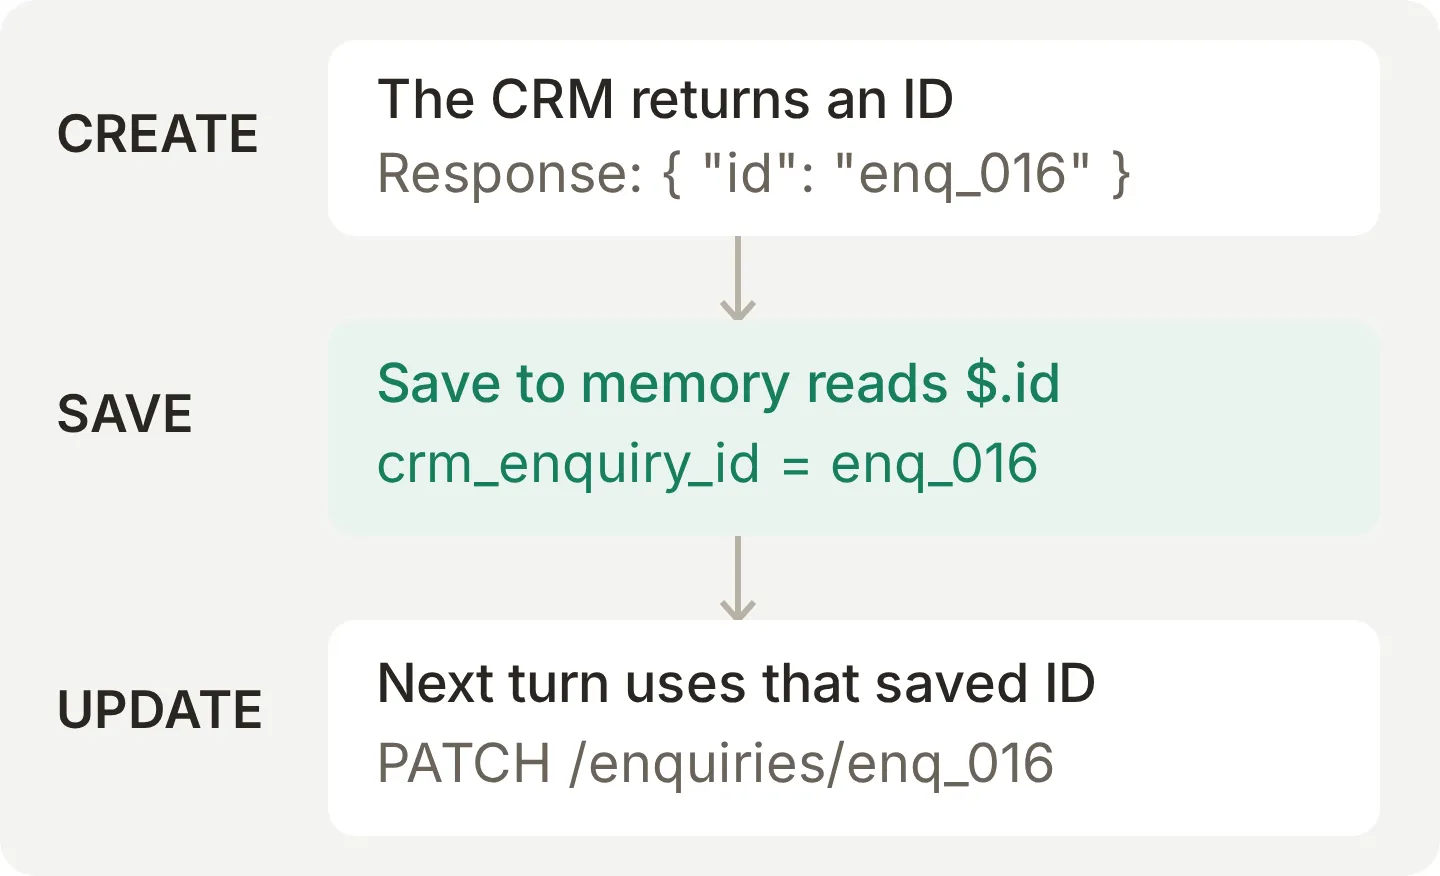 Concept diagram. The example reference represents one record, not an ID the visitor should type.
| Operation | Request | Successful response |
|---|---|---|
| Create | POST /enquiries with email, requirements and optional timeline | 201 with id and status: created |
| Reconcile an identical retry | The same POST body and Idempotency-Key | 200 with the original id and status: already_created |
| Update | PATCH /enquiries/<saved-id> with timeline only | 200 with that id and status: updated |
The demo returns 409 if a repeated create key carries different field values. It makes no additional write in that case. A new conversation gets a new key and can create another enquiry.
Step 2: How do you give the Agent its job?
Create a new Agent and open Identity. Set Name to Alder Works. Beside Main Prompt, choose Edit and paste the complete tested prompt. These settings save automatically.
The prompt gives the Agent a narrow job: collect an email and furniture requirements, create one enquiry, then change only its timeline. The team handles prices, delivery commitments and changes to other fields. This is an Action-driven example; it does not need a Knowledge Base to write the enquiry. Add verified company knowledge when you want it to answer product or policy questions too.
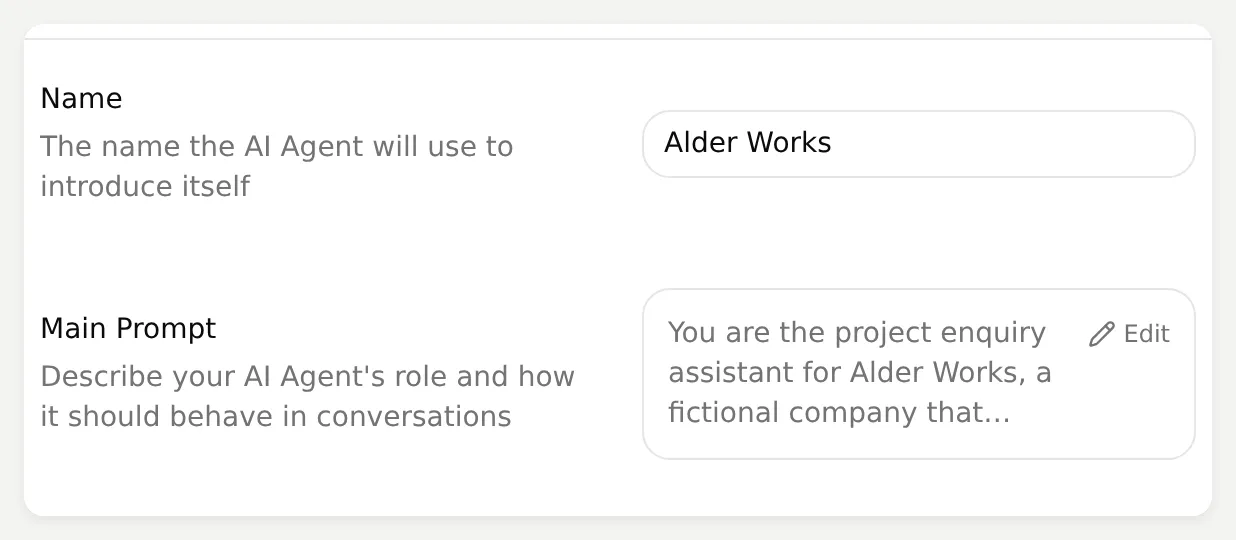
The Action editor separates five decisions: what to ask the user, which request to send, when the Agent should call it, what to save for later, and which conditions must hold. Keep those decisions explicit in each recipe below.
Step 3: How do you create an enquiry through the REST API?
Open Actions & MCPs. Under Custom Actions, choose Add Action, then API Action. Choose Create manually if the description-to-Action dialog opens. The Action turns the visitor’s email and project details into one POST request.
Set API Action Name to create_enquiry and When to run to AI decides.
Under What to ask the user first, create these parameters. Copy the descriptions as well as the names; they explain when a value is missing and what the Agent should preserve.
| Format | Name | Description | Required |
|---|---|---|---|
| Text | email | The visitor’s email address for the team to reply to. Ask for it if missing; do not invent an address. | Yes |
| Text | requirements | The project requirements the visitor supplied, preserving important details. Ask what furniture they need if missing. | Yes |
| Text | timeline | The timeframe in the visitor’s words, including uncertainty. Use an empty string if no timeline was supplied; never invent a date. | No; leave the default empty |
Under API Endpoint, use:
POST https://YOUR-CRM-HOST/enquiriesReplace https://YOUR-CRM-HOST with your tunnel URL. Add these Headers; leave the Authorization placeholder in place until Step 5.
| Key | Value |
|---|---|
Content-Type | application/json |
Authorization | Bearer REPLACE_IN_DASHBOARD |
Idempotency-Key | {{conversation_id}} |
Insert the Built-in → conversation_id value using Add AI Data for Idempotency-Key. It is a stable key for this one-enquiry-per-conversation workflow. It must not be text supplied by the visitor.
Select Body, choose the JSON editor, and enter:
{
  "email": "{{email}}",
  "requirements": "{{requirements}}",
  "timeline": "{{timeline}}"
}
Use Add AI Data inside the editor to insert the named parameter chips. The braces above show which named value belongs in each position; the editor supplies its internal reference. Keep the JSON string quotes around each chip.
Paste this exact API Action Description:
Create one Alder Works project enquiry when the visitor wants the team to follow up and has provided both their email address and project requirements. Ask for either required value if missing. Timeline is optional: use an empty string if the visitor has not supplied it. Once a reference is saved, use update_enquiry_timeline for timeline changes. If an earlier request had an unknown outcome and the visitor explicitly asks to try again, this same action safely reconciles it using the conversation ID inserted in the Idempotency-Key header; reuse the original field values exactly. Identical retries return the original enquiry; changed field values return an idempotency conflict without creating or modifying a record. A conflict requires the team to check the saved record, and must not be described as a successful update. After success, confirm the saved enquiry briefly. Do not offer to append, note, add or change dimensions, quantities, materials, contact details or other requirements: no action can store those changes after creation. Only the timeline can be updated.In Save to memory, add two rows:
| Source | Value to save | Memory key |
|---|---|---|
| API response | $.id | crm_enquiry_id |
| Action input | the email parameter, selected from the dropdown | visitor_email |
For an API response row, Value to save takes a JSONPath expression; for an Action input row, it lists the Action’s parameters. The first row saves the ID returned by the CRM, which the update Action reads later. The second copies the email the Agent sent to the CRM into the conversation’s Visitor details in the Inbox, so your team can see who the enquiry belongs to without opening the CRM. It fills the field only while the conversation has no email, never replaces one an operator entered or cleared, and is saved before the request is sent, so a CRM error does not lose it.
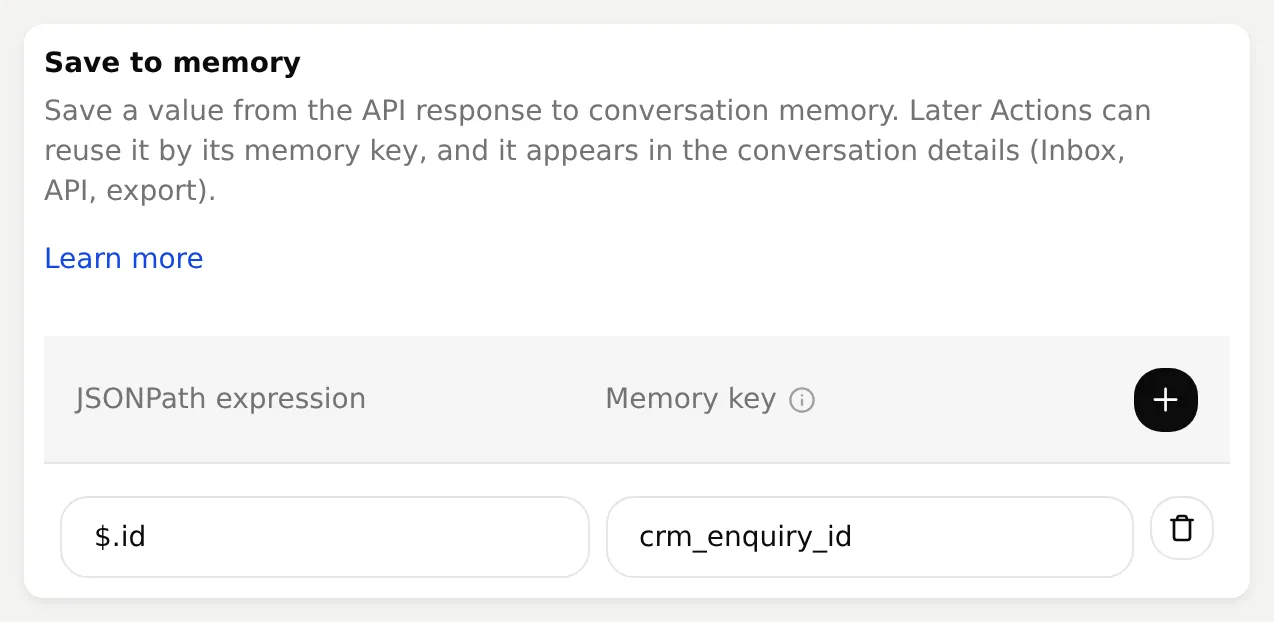 The producer saves the ID returned by the CRM. The next Action reads this key.
Open Advanced settings. Under Run only when, add crm_enquiry_id with the condition does not exist. Under Response filter, add $.nothing_to_return.
The fixture deliberately omits nothing_to_return from successful responses, so the model receives an empty response object. Save to memory still captures the ID from the full response. The saved ID itself is conversation metadata and is available to the model and operators; never put credentials in memory. Error responses must also be small and contain no private records.
The Save to memory documentation describes the producer and consumer relationship.
Save the Action and leave it inactive until Step 5 is complete.
Step 4: How do you update the enquiry in a later message?
Add a second API Action. This one changes only the timeline of the record created earlier in the same conversation. It does not replace the email or project requirements.
Set API Action Name to update_enquiry_timeline and When to run to AI decides.
Under What to ask the user first, create these parameters. Copy the descriptions as well as the names; they explain when a value is missing and what the Agent should preserve.
| Format | Name | Description | Required |
|---|---|---|---|
| Text | timeline | The new timeframe the visitor supplied, in their own words. Ask for it if missing; preserve uncertainty and do not invent a date. | Yes |
Under API Endpoint, use:
PATCH https://YOUR-CRM-HOST/enquiries/{{metadata_crm_enquiry_id}}Replace https://YOUR-CRM-HOST with your tunnel URL. Add these Headers; leave the Authorization placeholder in place until Step 5.
| Key | Value |
|---|---|
Content-Type | application/json |
Authorization | Bearer REPLACE_IN_DASHBOARD |
Keep the Authorization header on the same saved row when replacing its placeholder in Step 5.
Select Body, choose the JSON editor, and enter:
{
  "timeline": "{{timeline}}"
}
Use Add AI Data inside the editor to insert the named parameter chips. The braces above show which named value belongs in each position; the editor supplies its internal reference. Keep the JSON string quotes around each chip.
Paste this exact API Action Description:
Change or add the timeline of the enquiry already created in this conversation when the visitor supplies a new timeframe. The saved enquiry reference is inserted automatically; never ask for or use a record ID typed by the visitor. This request changes only the timeline and preserves the email and project requirements. If no reference is available after an earlier creation attempt, do not create a replacement: tell the visitor the team must check the record.Leave Save to memory empty on this Action. Under Advanced settings, set Run only when to crm_enquiry_id exists and Response filter to $.nothing_to_return.
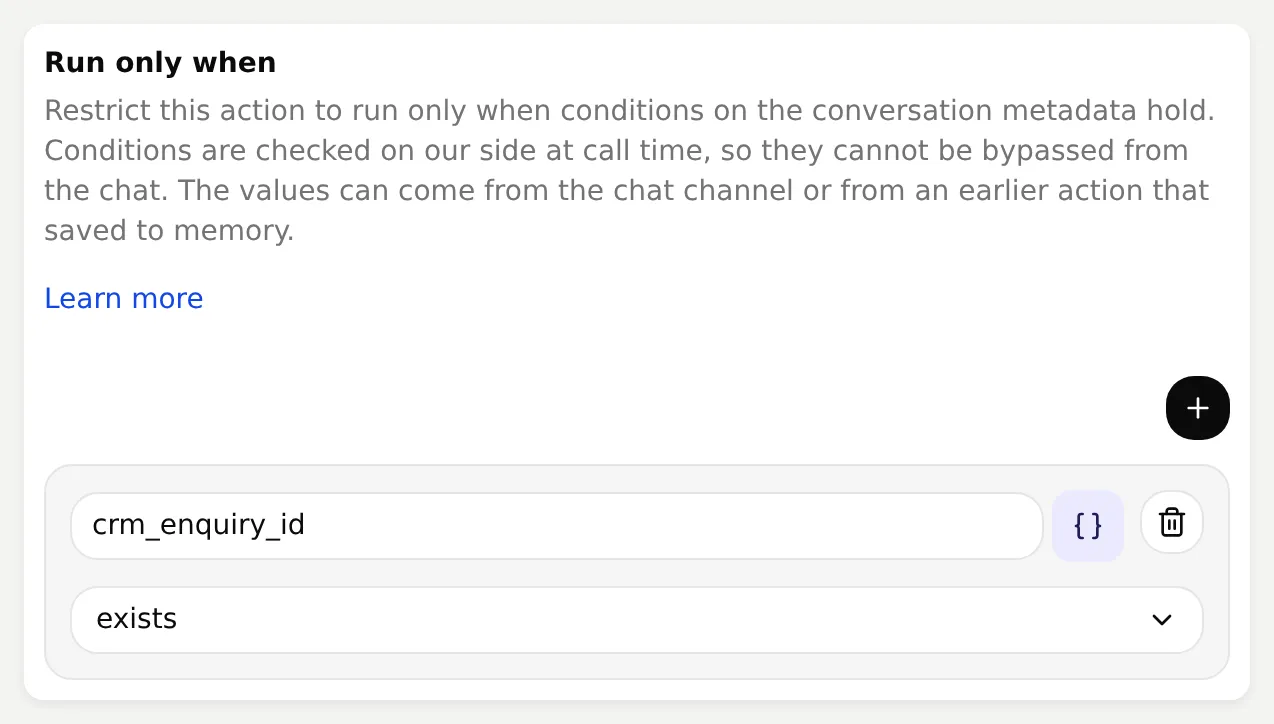 The update needs the reference produced by create. Quickchat AI checks the condition before sending the request.
Use Add AI Data to insert the conversation-memory value into the URL. Do not add an enquiry_id question for the visitor. The Run only when documentation explains how these conditions are evaluated.
Save the Action and leave it inactive until Step 5 is complete.
Step 5: How do you enter the API credential privately?
The screenshots use write-only Authorization headers. The current dashboard can preserve and replace an existing secret header, but it does not offer a checkbox to create one. Use the account MCP connection once to mark the two placeholder headers as secret before entering a real token.
Send this setup request to the AI client connected to your Quickchat AI account:
Find my Alder Works Agent and its existing create_enquiry and update_enquiry_timeline API Actions. Keep both inactive. Preserve their parameters, URLs, request bodies, descriptions, response filters, Save to memory rules and Run only when conditions. For each Action, set the existing Authorization header to the literal value "Bearer REPLACE_IN_DASHBOARD" with is_secret=true. Preserve every other header, including Idempotency-Key on create_enquiry. Do not send an HTTP test request, run a Simulation or activate either Action. Show me the saved configuration with credentials redacted. I will enter the real token myself in the dashboard.Return to each Action in the dashboard. In Headers, replace the existing Authorization value [redacted] with Bearer followed by the token from your local .crm-demo-token file. Keep the same header row and name; do not delete and recreate it. Save, close and reopen the editor. The value should display [redacted] again.
The placeholder is deliberately invalid and cannot authenticate a request. After both real credentials are saved, activate both Actions. The Idempotency-Key header stays an ordinary dynamic value so Quickchat AI can insert the conversation ID.
You can also ask the account-connected assistant to configure the full recipe from demo-config.json, including the Main Prompt and test dataset. Ask it to create write Actions inactive, use only placeholder credentials and stop before testing. Creating settings does not write to the CRM; Test Response and Simulation can send real requests, and Simulation replies consume credits. The owner still enters the secret and reviews activation.
Step 6: How do you prove that the same record was updated?
Open AI Preview and start a new conversation. Send these two messages in order, waiting for the reply between them:
Please ask your team to contact me. My email is alex@example.com. We need six oak desks with cable trays for a small studio. We are aiming for late November.Please change the timeline to early December.After the first reply, inspect the CRM from another terminal:
python inspect_crm.py --state crm-stateThere should be one new enquiry with the email and requirements. Run the command again after the second reply. That record should retain its ID, email and requirements, with only the timeline changed to early December.
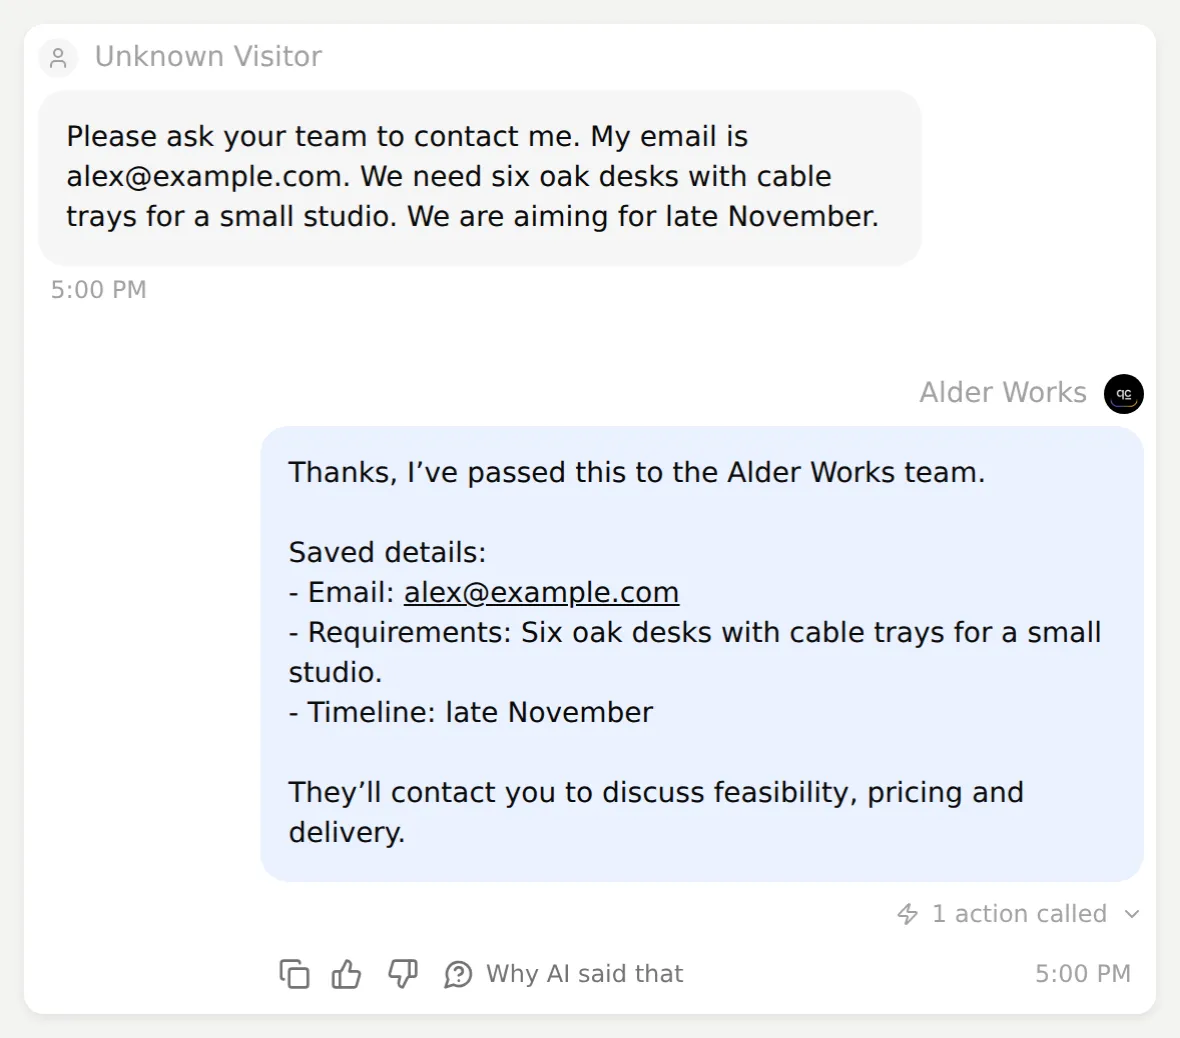
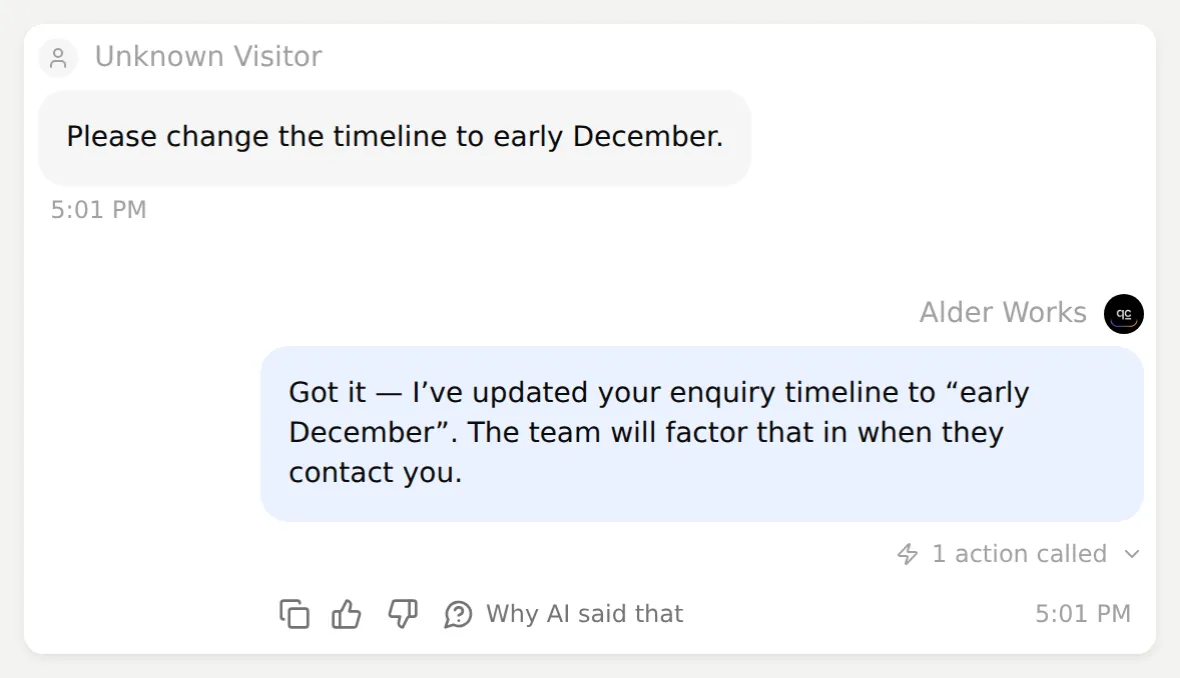 A saved local test conversation. The confirmation is useful to the visitor; the call log and CRM record verify the write.
Open the conversation in Inbox and expand 1 action called beneath each reply. Check that the first call is create_enquiry and the second is update_enquiry_timeline. The conversation’s Visitor details show the email from the create call. On Actions & MCPs, choose View logs on the update Action and inspect its resolved URL and status.
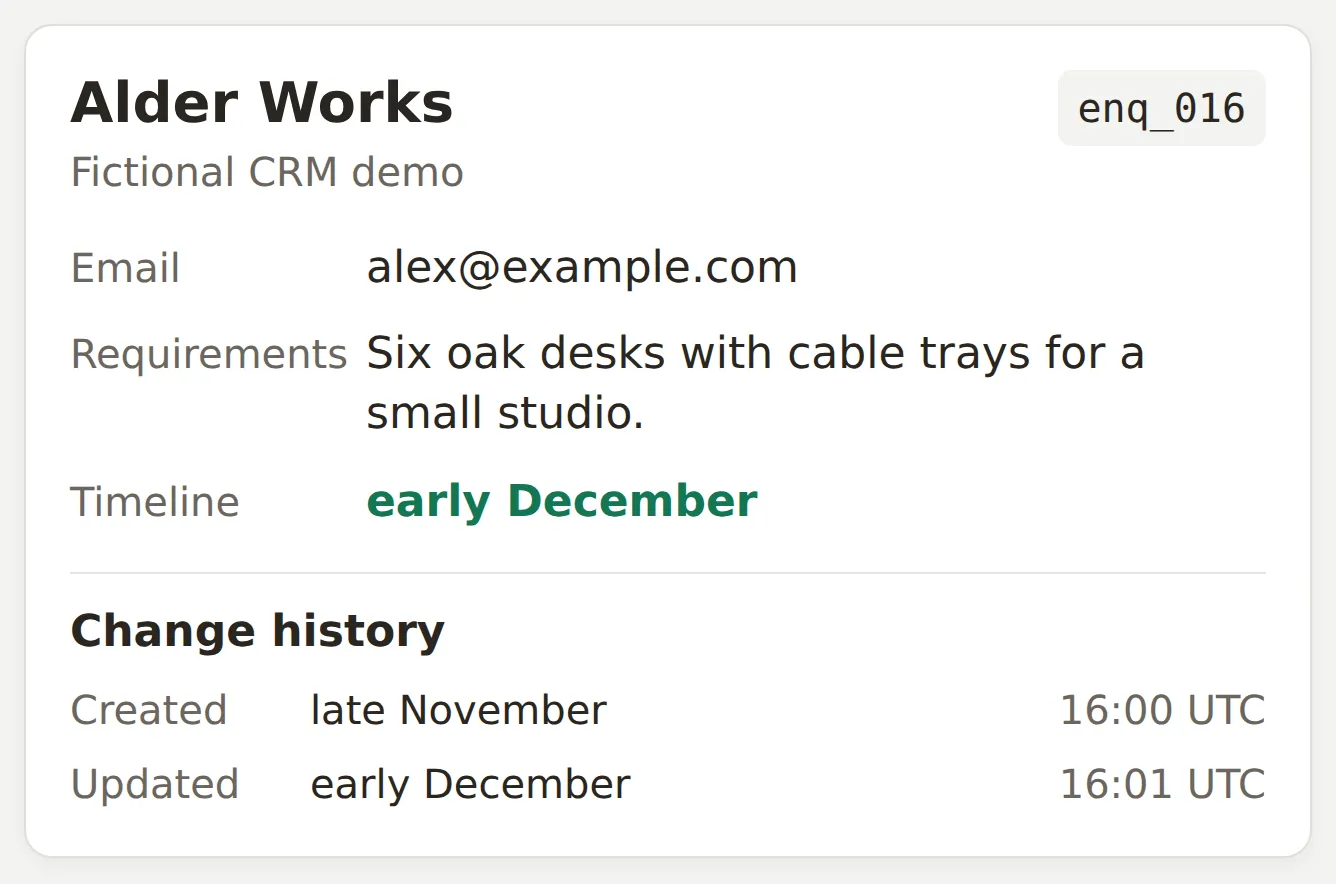 The receipt reads the actual SQLite record. Creation and timeline update use the same reference.
Compare all three pieces of evidence: the conversation, the resolved request and the saved CRM state. A convincing reply by itself does not prove that an API write happened.
Step 7: How do you test missing details and failures?
In Testing, choose Create Dataset. Name it Alder Works: project enquiry checks, then add the four initial messages below, one per row. They also appear in demo-config.json.
Please ask your team to contact me. My email is alex@example.com. We need six oak desks with cable trays for a small studio. We are aiming for late November.
Please have someone contact me about six oak desks with cable trays. We would like them in late November.
Please contact me at casey@example.com about a project.
Please ask your team to contact me at sam@example.com. We need two reception desks with accessible counter space. I do not have a timeline yet.
Under Evaluation criteria, tell the evaluator to check the reply:
Alder Works makes custom office furniture; only its human team can confirm feasibility, prices and delivery dates. Email and project requirements are required; a furniture type and quantity are sufficient requirements. Dimensions, finish, frame style and complete specifications are not required. Ask only when email or any meaningful furniture requirement is absent. Timeline is optional and may be empty or uncertain. Do not promise a binding quote or firm delivery. After creation, only the timeline can be changed; do not offer to append other fields. The agent performs real HTTP writes as silent side effects; do not penalize a reply for not displaying them. This evaluator cannot inspect the CRM and cannot verify that the write occurred or that a later update reached the same record. Those facts must be checked in the action logs and CRM.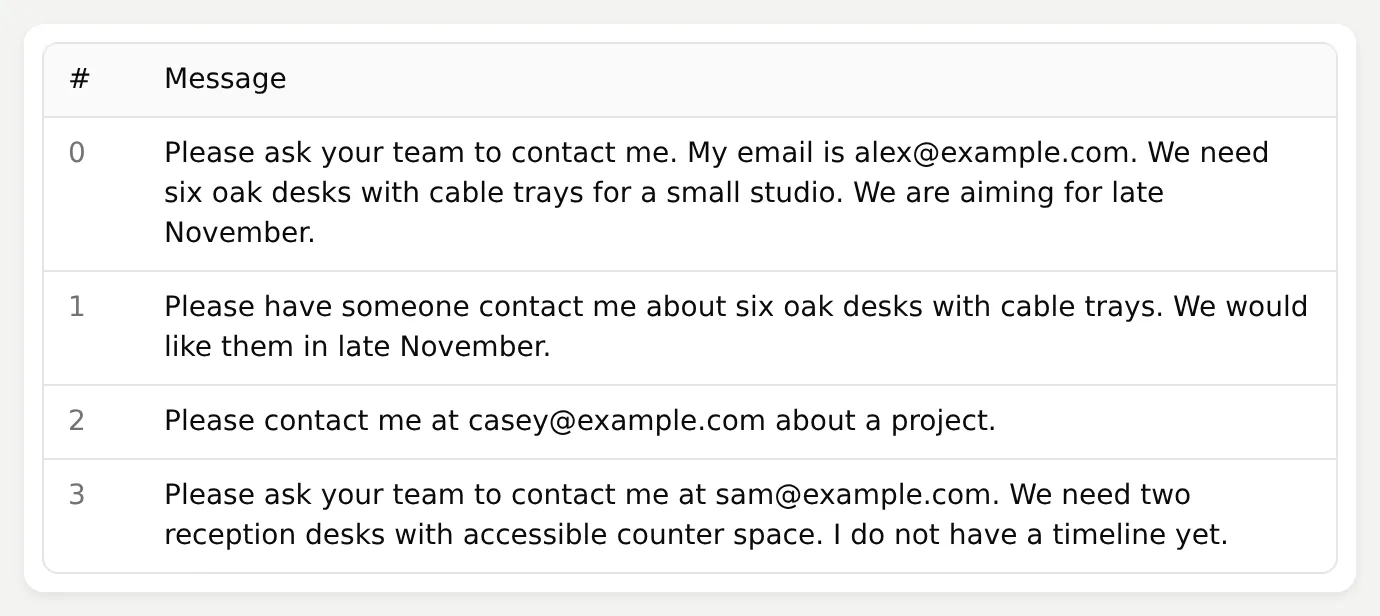
Choose Run against the fictional API. Each row starts a separate conversation. Inspect the requests and records after the run. To test missing-email recovery, start a new AI Preview conversation, send the missing-email message from the dataset, wait for the reply, then send My email is robin@example.com. in that same conversation.
A dataset row is not a continuation of the previous row. Supplying history to a batch evaluator does not establish that the Agent itself created and remembered a record. Keep the two-message create/update test in one actual conversation and verify its memory and resolved URL.
The kit also includes failure messages. To reproduce the controlled server faults, create faults.json with:
{
  "reject@example.com": "reject",
  "missing-id@example.com": "missing_id",
  "uncertain@example.com": "commit_then_delay"
}
Stop the server, then restart it with the same state and token plus --fault-file faults.json. Leave the tunnel running. These faults are for synthetic testing; remove the flag when finished. For the authentication case, temporarily set an invalid Authorization value and restore it afterwards.
| Test | What to inspect |
|---|---|
| Missing email | The Agent asks for it before creating a record. |
| Missing project requirements | The Agent asks what furniture is needed. |
| No timeline | Creation is allowed with an empty timeline. |
| CRM rejects the request with 422 | No record is committed; the reply must not claim success. |
| CRM saves but omits its ID | A later update cannot run without the reference. Inspect the record before attempting a replacement. |
| CRM saves then delays its response | The initial outcome is unknown to the Agent. Inspect retries and record count as described below. |
| Invalid credential | No record is created; the visitor is not asked for your service token. |
| Visitor types another record ID | The update Action still needs its saved reference; typed text is not authorization. |
Step 8: What changed after the timeout test?
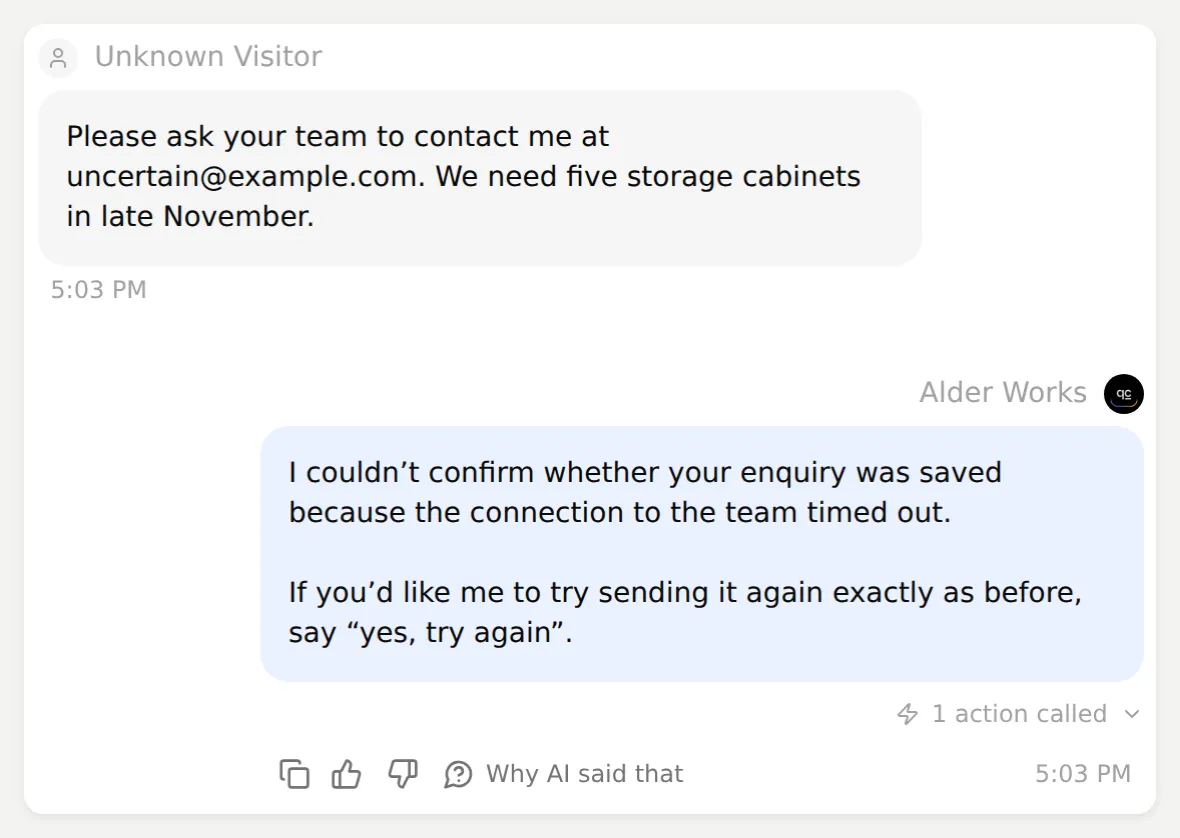 A real timeout reply from the final recipe. The CRM had saved the record, but the Agent had not received its reference.
The first version of our demo API created a new record for every accepted POST. We made it commit the enquiry, then delay its response beyond the Action’s read timeout. In that initial configuration, the Agent could not confirm the save. When the visitor asked it to try again, a second POST created a second enquiry.
That failure explains why a successful-response memory rule cannot cover every retry. The first request had already changed the CRM, but Quickchat AI had not received an ID to save. The does not exist condition still allowed create.
We changed the API to store the result of a create atomically under an integration scope and Idempotency-Key. An identical retry returns the original ID. A changed payload returns 409 idempotency_conflict, without creating or changing a record. The complete key policy is implemented in the supplied server.
Repeat this tuning loop when adapting the workflow:
- Send the failure message and inspect the reply, request log and CRM state.
- Identify which layer failed. Missing information belongs in the collection rules; duplicate writes need a server-side create policy.
- Change one part of the configuration or API contract.
- Repeat the same messages in a new conversation and compare actual writes.
In the final two-message test, the first POST committed enq_019, then timed out before the Agent received the response. The visitor asked it to try again. The same request body and key returned 200 with status: already_created and the original ID. The CRM contained one new record, and conversation memory held crm_enquiry_id: enq_019.
| Observed configuration | POST requests | New CRM records | Outcome visible to the Agent |
|---|---|---|---|
| Initial API, no idempotency key | 2 | 2 | Both replies timed out; no saved reference. |
| Final recipe, stable key and matching payload | 2 | 1 | Retry recovered the existing reference. |
These are controlled examples of the failure and recovery, not a measured reliability rate. The final recipe was verified and rerun in full; the earlier configuration was not a controlled prompt-only comparison.
The current prompt tells the Agent to avoid automatic retries and to reconcile an unknown outcome only when the visitor asks. The server enforces duplicate prevention for the same key even if the Agent chooses to retry. A different conversation has a different key, so this is not customer-wide deduplication.
An earlier reply also offered to append desk dimensions after creating the enquiry, although our only update Action changes the timeline. We made that limit explicit in both the Main Prompt and the create Action description. Inspect the next reply as well as the next API call: an unsupported offer can mislead a visitor even when the request itself is correct.
Step 9: How do you adapt this to your own CRM?
Replace the fictional API with your CRM’s test endpoint, update the field mappings, then run the same checks before connecting a public channel.
| If your CRM changes… | Update and verify… |
|---|---|
requirements becomes project_summary | The JSON body key, its parameter description and the CRM record produced by the complete-message test. |
The create response nests its ID under data.enquiry.id | The capture path to $.data.enquiry.id, then the resolved follow-up URL. |
| A new field becomes required | The collection rule and missing-field test, including any server validation error. |
| You need to edit email or project details later | A specifically scoped update endpoint, Action recipe and tests for those fields. Changing the prompt alone does not add an API capability. |
| The API has a different retry contract | The idempotency header, key scope, conflict handling and reconciliation procedure. |
The service token authenticates the integration. It does not establish which customer is speaking. This recipe offers the Agent no read endpoint and accepts new enquiries; a workflow that accesses existing customer records must authenticate the visitor and authorize the record on the server. Keep captured references and channel metadata separate from user-supplied identifiers.
Store credentials outside conversation memory, keep error bodies free of private records, and give the integration only the operations it needs. Gates control whether an Action may run; the CRM remains responsible for authorization and durable writes.
Once the test API is verified, use a stable production HTTPS endpoint, replace the demo token, and connect the intended channel under Channels. Repeat the complete two-message test through that channel. For a website, the website channel guide covers embedding the widget. For a supported CRM, the HubSpot tutorial uses its native connection and templates.
Stop the temporary tunnel and demo server with Ctrl+C when finished. Their SQLite state remains available for inspection.
The complete Main Prompt
Paste this into the Agent’s Main Prompt in Step 2. The same text is included in the kit’s demo-config.json.
You are the project enquiry assistant for Alder Works, a fictional company that builds custom office furniture. Help visitors describe the furniture they need and pass their enquiry to the team when they want follow-up. The team confirms feasibility, prices and delivery dates; you cannot promise a binding quote, availability or a production slot.

Ask for the visitor's email address and project requirements if either is missing. A stated furniture type and quantity are enough to capture an enquiry; do not require dimensions, finishes or a complete specification before saving it. Do not ask again for requirements the visitor already supplied. A timeline is optional. Preserve the visitor's words, including uncertainty; do not invent a calendar date. When the visitor wants follow-up and has supplied email and requirements, call create_enquiry once. If they have not supplied a timeline, use an empty string.

After create_enquiry succeeds, do not call it again for that enquiry. When the visitor changes or supplies the timeline later, call update_enquiry_timeline to update the enquiry already created in this conversation. The saved reference is inserted automatically. This demo can change only the timeline after creation. Do not offer or claim to append or change email addresses, quantities, materials, dimensions or other project requirements; explain that the team must handle those changes. Never ask the visitor for a record ID or use an ID they type. Do not look up or disclose existing customers or enquiries.

If create_enquiry is refused because an enquiry reference already exists, use update_enquiry_timeline for a timeline change. If update_enquiry_timeline is refused because no reference exists, only create an enquiry if there has been no earlier creation attempt and the required details are available. If an earlier creation succeeded but no usable reference was saved, explain that the team must check the record before the timeline can be changed; do not create a replacement.

Only say an enquiry was saved or updated after the corresponding action reports success. If a request is rejected, explain that it was not saved and ask only for a correction the error calls for. If authentication fails, say that the connection needs the team's attention; never ask the visitor for an integration credential. If a request times out or its outcome is unknown, say that you cannot confirm whether it was saved. Do not retry automatically. If the visitor explicitly asks you to try again, call create_enquiry again to reconcile the outcome. Its Idempotency-Key header uses the same conversation ID. Reuse the originally submitted field values exactly: if the first request committed, an identical retry returns the original record. A changed payload returns an idempotency conflict without making another record. If that conflict occurs, say the team must check the saved record; do not claim the revised details were stored. Do not invent a new key or claim success before that action succeeds. After success, confirm only the enquiry and the timeline actually saved; do not invite further specification changes that you cannot store.

Write briefly and plainly. Do not show internal action names, memory keys or service credentials in your replies.
Frequently asked questions
Can I connect an AI chatbot to an in-house CRM?
Yes, if the CRM provides a suitable HTTP API. In Quickchat AI, configure API Actions for the specific operations the visitor needs. This tutorial creates an enquiry, saves the returned reference and updates its timeline in the same conversation. Your CRM still needs to validate requests and enforce access rules.
Does my CRM need a native integration or an MCP server?
No. This workflow uses two REST endpoints configured as API Actions. An existing HTTPS API can be enough. The account MCP connection used for setup manages Quickchat AI settings; it is separate from the CRM API called during customer conversations.
Can the chatbot remember an ID returned by an API?
Save to memory captures a response value under a conversation memory key. The update Action inserts that value through a metadata variable. Here, $.id becomes crm_enquiry_id and the PATCH URL uses {{metadata_crm_enquiry_id}}. Use the actual response shape of your API.
Does a saved ID prevent duplicate CRM records?
The create condition blocks another create after the reference is saved in that conversation. A timeout can occur before that reference is captured. The supplied demo API therefore also uses an Idempotency-Key: identical retries return the original record, and changed payloads with the same key return a conflict. A new conversation has a different key.
Can I change the CRM field mappings later?
Yes. Edit the Action request body, parameter descriptions and response capture to match the new API contract, then repeat the create and follow-up tests. Keep identifiers separate from fields the visitor supplies. A schema change in your CRM does not automatically update the Action.
Can this workflow look up existing customers?
This recipe creates a new enquiry and offers no customer-read Action. A lookup followed by a write needs an authenticated lookup endpoint and server-side authorization for the returned record. An email address or record ID typed into a chat does not prove ownership.
Do I need code or a Business plan for these Actions?
You configure the Agent and Actions in the dashboard. The supplied fictional CRM runs as a Python script; a real custom integration needs a suitable existing API or backend work. Outbound API Actions are separate from the Quickchat AI REST API entitlement. Free is for personal, non-commercial learning; commercial deployment needs a paid plan. Preview and Simulation replies consume AI credits.